ConohaVPSでAlmaLinux9.3を構築する。part2です。
目次
1. パッケージのアップデート(おまじない)
2. ユーザの作成
3. 鍵作成
4. Conohaセキュリティグループの設定
5. SSHセキュリティの設定
6. SSH接続
0. 事前作業
Conohaのコンソールを立ち上げること。
rootでログインできること。
1. パッケージのアップデート(おまじない)
インストール済みのパッケージをすべて最新のバージョンにアップデートするコマンド
$ sudo dnf upgrade
2. ユーザの作成
今回は例として、greenというユーザを用いて説明します。
なので、greenという部分には自分が作成したい「任意のユーザ名」を入力してください。
新規ユーザを作成。
$ useradd green
新規ユーザのパスワードを設定する。
※入力中のパスワードは、ターミナルには表示されません。
2回問題なく入力できれば「passwd: all authentication tokens updated successfully.」が表示され、正しくパスワードが設定されます。
$ passwd green
Changing password for testuser.
New password:
Retype new password:
passwd: all authentication tokens updated successfully.
ユーザが正しく作成できているか確認する。
#ユーザ切り替え
$ su - green

#現在のユーザがgreenであることを確認する
$ whoami

#greenからログアウトする
$ exit

#現在のユーザがrootであることを確認する
$ whoami
3. 鍵作成
前知識として鍵を作成するパターンは2つある。
・サーバ側の秘密鍵をクライアント側に配布するパターン(この記事内では採用しません。)
クライアント側の作業者が多く、一人ずつ公開鍵を回収することが困難になる場合
・クライアント側で作成した公開鍵をサーバ側に転送するパターン(採用)
セキュリティ上、秘密鍵を配布していないのでこちらが安全。
ということで、鍵の準備を行う。
【サーバ側作業:AlmaLinux】
#新規ユーザに切り替える。su - <新規ユーザ>
$ su - green

#現在のディレクトリが「/home/green」であることを確認する。
$ pwd

#.sshディレクトを作成
$ mkdir .ssh

#.sshディレクトリに移動する
$ cd .ssh

#現在いるディレクトリが「/home/green/.ssh」であることを確認する。
$ pwd

#authorized_keys(公開鍵を登録する)ファイルを作成
$ touch authorized_keys

#.sshディレクトの権限を変更
$ chmod 700 /home/green/.ssh

#authorized_keysの権限を変更
$ chmod 600 /.ssh/authorized_keys

#ファイルの所有者とグループを同時に変更する
# -R はディレクトリ内のファイルも変更する
$ chown -R green:green /home/green/.ssh
【クライアント側作業:Windows】
今回クライアント側はwindows想定で鍵を作成していきます。
windows + R を押下後、「cmd」と入力してEnter
そうするとコマンドプロンプトが立ち上がるので、以下のコマンドを実行
$ ssh-keygen -t ed25519
Generating public/private ed25519 key pair.
Enter file in which to save the key (C:\Users\hoge/.ssh/id_ed25519):(入力せずにEnter)
Enter passphrase (empty for no passphrase):(入力せずにEnter)
Enter same passphrase again:(入力せずにEnter)
Your identification has been saved in C:\Users\hoge/.ssh/id_ed25519.(秘密鍵)
Your public key has been saved in C:\Users\hoge/.ssh/id_ed25519.pub.(公開鍵)
The key fingerprint is:
SHA256:xxxxxx/xxxxxx/xxxxxxxxxxxxxxxxxxxxxxxxxxxx hoge@DESKTOP
The key's randomart image is:
+--[ED25519 256]--+
|  ...+o=.        |
|   +oo+oo        |
| o .+xo o    o   |
| oooo oo.        |
| ..+.o. S .      |
| o*o.o.. o       |
|.++.*S+   oo     |
|.o=E.So      o   |
|SoSSSSS          |
+----[SHA256]-----+
コマンドを実行後、以下の部分に公開鍵が作成されるのでファイルを開く。
Your public key has been saved in C:\Users\hoge/.ssh/id_ed25519.pub.
「C:\Users\hoge/.ssh/id_ed25519.pub.」
ファイルを開くと、
ssh-ed25519 xxxxxxxxxxxxxxxxxxxxxxxxxxxxxxxxxxxxxxxxxxxxxxxx hoge@DESKTOP
と記載しているのでコピーする。
【サーバ側作業:AlmaLinux】
#ユーザ切り替え
$ su - green

#viエディタを開く
$ vi .ssh/authorized_keys

#[Shift+i]を押してINSERTモードに変更する。

#Conohaコンソールの「テキスト送信」を押下後、
#クライアント側(windows)で作成した公開鍵を貼り付けて送信する。

ssh-ed25519 xxxxxxxxxxxxxxxxxxxxxxxxxxxxxxxxxxxxxxxxxxxxxxxx hoge@DESKTOP

#[ESC]を押す。
#[:wq]←を入力。

#正しく入力できているか確認
$ cat .ssh/authorized_keys
ssh-ed25519 xxxxxxxxxxxxxxxxxxxxxxxxxxxxxxxxxxxxxxxxxxxxxxxx hoge@DESKTOP
ここまで終了したら一度、サーバを停止する。
#サーバ停止
shutdown
4. Conohaセキュリティグループの設定
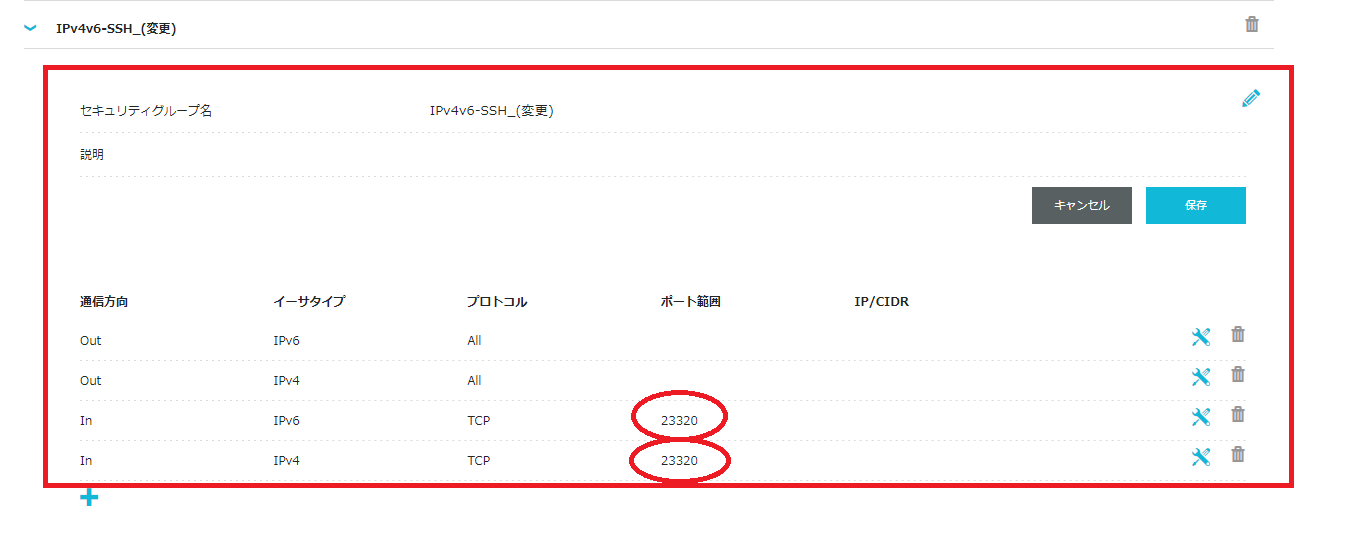
SSHのポート番号に設定できる範囲は[1~65535]まで可能だが、ウェルノウンポートは避けるため、1~1023以外のポート番号を設定する。
※ウェルノウンポートとは、特定のサービスやプロトコルで既に予約されているポートのこと。
この記事では、SSHのポート番号は「23320」を設定する。
実際、この時点でセキュリティグループの標準に「IPv4v6-SSH」が追加されていれば接続は可能だが、
標準ポートは攻撃される恐れがあるため、基本避けるべき。
SSHの標準ポートは22番です。
サイドバーから「セキュリティ」→「セキュリティグループ」を押す。
「+セキュリティグループ」を押す。

以下のように設定する。
説明には、自分がわかるように内容を記載しておけばOK

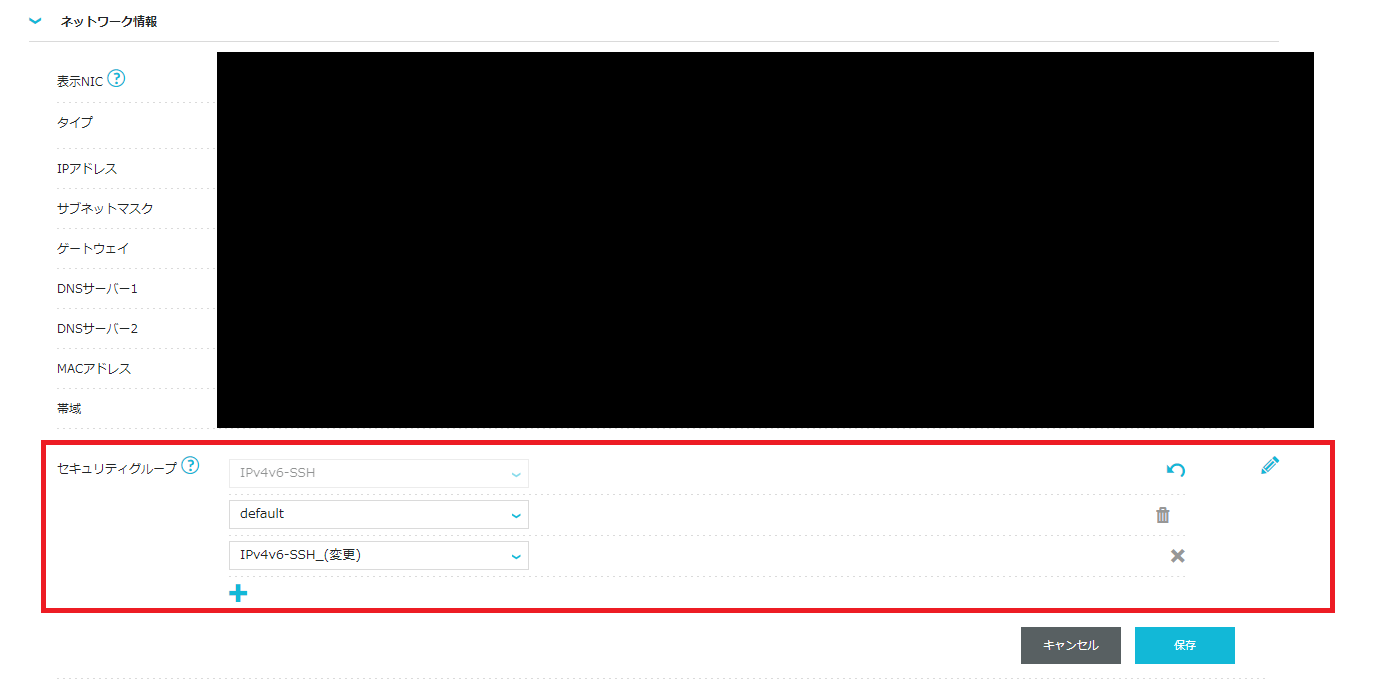
サイドバーから「サーバ」→「(自分のサーバネームタグ)」を押す。
「ネットワーク情報」を押す。
先ほど追加したセキュリティグループ(IPv4v6-SSH_(変更))を追加する。
同時に、標準の「IPv4v6-SSH」を削除する。
保存を押す。
5. SSHセキュリティの設定
サーバを起動し、Conohaコンソールを開く。
rootでログインする。
【sshd_configの設定】
sshの設定は「/etc/ssh/sshd_config」で行っているため、修正していく。
#rootに変更
$ su -
Password:(任意のパスワードです。入力中の文字は表示されません)

#rootであることを確認
$ whoami
/root

#ルートディレクトリに移動
$ cd ..

#現在のディレクトリがルートディレクトリであることを確認する。
$ pwd
/

#sshディレクトリに移動する。
$ cd /etc/ssh

#sshd_config設定ファイルのバックアップを取る。
$ cp sshd_config sshd_config.bak

#sshd_configを修正する。
$ vi sshd_config

#コメントアウトを外す。
#ポート番号の変更
#Port 22
Port 23320

#コメントアウトを外す。
#rootログインを拒否
#PermitRootLogin prohibit-password
PermitRootLogin no

#コメントアウトを外す。
#公開鍵認証を許可する。
#PubkeyAuthentication no
PubkeyAuthentication yes

#コメントアウトを外す。
#パスワード認証を拒否する。
#PasswordAuthentication yes
PasswordAuthentication no

#[ESC]を押す。
#[:wq]を入力後、Enter
sshサービスを再起動する。
#sshサービスの再起動
$ systemctl restart sshd
【SELinuxの設定】
#SELinuxの動作モードを確認
$ getenforce
Disabledの場合、SELinuxが無効状態となっているため起動する。
#SELinuxを有効にする。

#現在のディレクトリがrootホームディレクトリであることを確認する。
$ cd
/root

#現在のディレクトリがルートディレクトリであることを確認する。
$ cd ..
/

#ルートディレクトリからselinuxの設定ファイルがあるディレクトリへ移動する。
$ /etc/selinux/

#config設定ファイルのバックアップを取る。
$ cp config config.bak

#viモードで修正する。
$ vi config

SELINUX=disabled(変更前)
SELINUX=enforcing(変更後)

#[ESC]を押す。
#[:wq]を入力後、Enter
semanageコマンドでポートを許可する。
#SELinuxで許可するSSHポートを確認
$ semanage port -l | grep ssh
ssh_port_t                     tcp      22

#23320を許可する
$ semanage port -a -t ssh_port_t -p tcp 23320

#23320が追加されていればOK
$ semanage port -l | grep ssh
ssh_port_t                     tcp      23320,22
【Firewallの設定】
#Firewallの起動状態を確認
$ systemctl status firewalld
Active: active (running)

#Firewallが無効化(stop)の場合
$ systemctl start firewalld

#Firewallの設定を確認
$ firewall-cmd --list-all
  target: default
  icmp-block-inversion: no
  interfaces: eth0
  sources:
  services: cockpit dhcpv6-client ssh
  ports:
  protocols:
  forward: yes
  masquerade: no
  forward-ports:
  source-ports:
  icmp-blocks:
  rich rules:

#Firewallの設定を確認
$ firewall-cmd --add-port=23320/tcp --permanent --zone=public
success

#Firewallの設定をリロード
$ firewall-cmd --reload

#Firewallの設定をもう一度確認し、portに23320が追加されていることを確認する。
$ firewall-cmd --list-all
  target: default
  icmp-block-inversion: no
  interfaces: eth0
  sources:
  services: cockpit dhcpv6-client ssh
  ports: 23320/tcp
  protocols:
  forward: yes
  masquerade: no
  forward-ports:
  source-ports:
  icmp-blocks:
  rich rules:
ここまでの設定が完了すれば、サーバ側の設定は終了。
6. SSH接続
最後にSSH接続をする。
【クライアント側作業:Windows】
【秘密鍵の場所】
以下のコマンドを入力時に記載されていたディレクト場所
ssh-keygen -t ed25519
Your identification has been saved in C:\Users\hoge/.ssh/id_ed25519.(秘密鍵)
→C:\Users\hoge/.ssh/id_ed25519(秘密鍵があるパス)
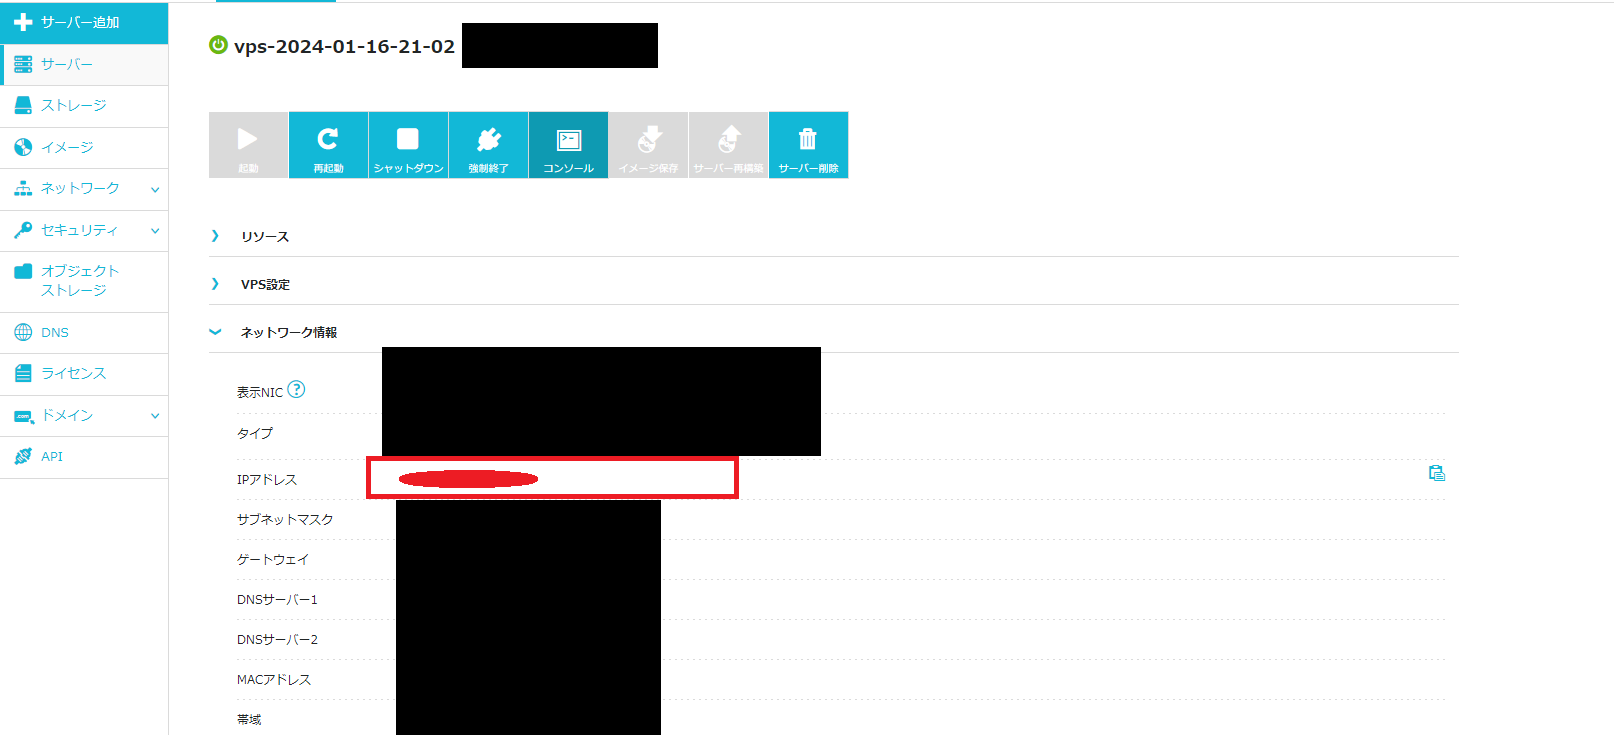
【ConohaIPアドレス】
以下参照
赤枠で塗り潰している部分がサーバのIPアドレスです。

コマンドプロンプトを立ち上げて以下のコマンドを実行する。
#ssh [作成したユーザ名]@[サーバのIPアドレス] -p [ポート番号]
$ ssh green@XXX.XXX.XXXX.XXX -p 23320
The authenticity of host '[XXX.XXX.XXXX.XXX]:23320 ([XXX.XXX.XXXX.XXX]:23320)' can't be established.
ECDSA key fingerprint is SHA256:XXXXXXXXXXXXXXXXXXXXXXXXXXXXXXXXXXXXXXXXX.
Are you sure you want to continue connecting (yes/no/[fingerprint])? yes(←yesを入力)
Warning: Permanently added '[XXX.XXX.XXXX.XXX]:23320' (ECDSA) to the list of known hosts.
Last login: Sun Mar 31 04:08:47 2024 from XXX.XXX.XXXX.XXX
[green@xxxxx ~]$
ssh接続できれば完了です。
正直、コマンドプロンプトでSSH接続をして使用する人はあまりいないような気がする。
TeraTermとか使用できればいいかも。
(気が向いたら修正してのせる)
