はじめに
Azure Functionsを使ったアプリの開発時にAzureのストレージテーブルを用いることになりました。その際に参考にする記事が少なくやや苦戦したので、基本的なCRUD処理を扱うまでの手順を示す記事を作成しました。
本記事ではAzure Functions内で利用するTable Storageに対するCRUD処理方法をTable Storage作成から順を追って示します。
本記事に記述したAzure Functionsのソースコードは以下のリンクにあります。
また、本記事ではAzureのTable StorageへのCRUDを示しますが、Table Storageの仕様自体には言及しません。仕様自体は以下のリンクの公式ドキュメント等を確認してください。
【Microsoft公式ドキュメント】Azure ストレージ テーブルの設計ガイド: スケーラブルな設計とハイパフォーマンスなテーブル
対象者
- これからAzure Functionsを利用したサービスを作成したい人
- Azure FunctionsでのTable Storageの使い方がよくわかっていない人
前提条件
- 本記事で記載の実装はC#です。Azure内の設定はその他の言語でも共通です
- Azureのアカウントを所持
- Azure Functionsアプリケーションは生成済み
事前準備
Azure FunctionsにてStorageテーブルを利用するには下記の内容を行う必要があります。
- Azure StorageにてTable Storageを作成する
- Microsoft Azure Storage Exploreを利用してテーブル内へアクセスする
Azure StorageにてTable Storageを作成する
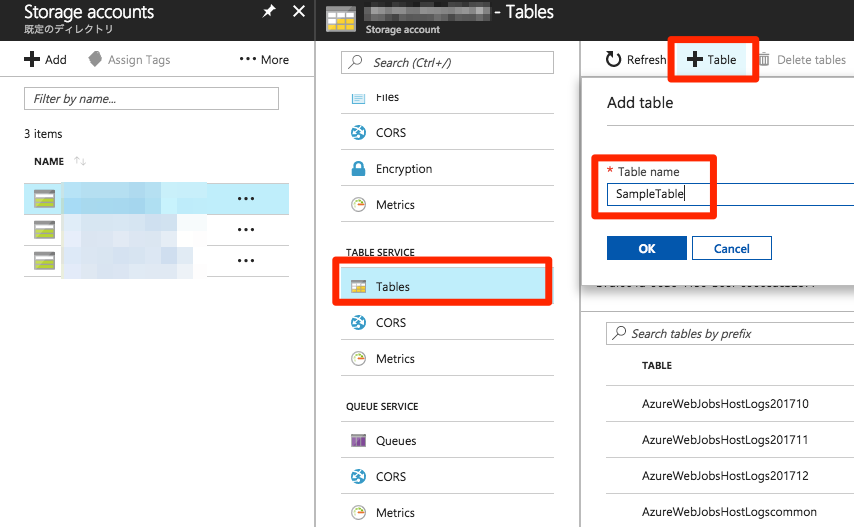
① Azure Portal画面から"Storage Accounts"を選択
② 生成済みのAzure Functionsのアプリと紐付いているStorage Accountを選択する
③ "Tables"を選択し、"+Table"ボタンから作成したい名前のテーブルを作成する
Microsoft Azure Storage Exploreを利用してテーブル内へアクセスする
現状(2017年11月時点)では、Azure Portal上から上記で作成したようなAzure Storage上のコンテンツを参照・変更することはできないようです。
作成したテーブルのコンテンツへアクセスするには、Microsoft Azure Storage Explore(無料)というMicrosoftが提供する、専用のクライアントアプリを利用する必要があります。(Windows, Mac, Linux3つともアプリ有り)
① アプリをダウンロードする
② Azureのアカウントでログインする
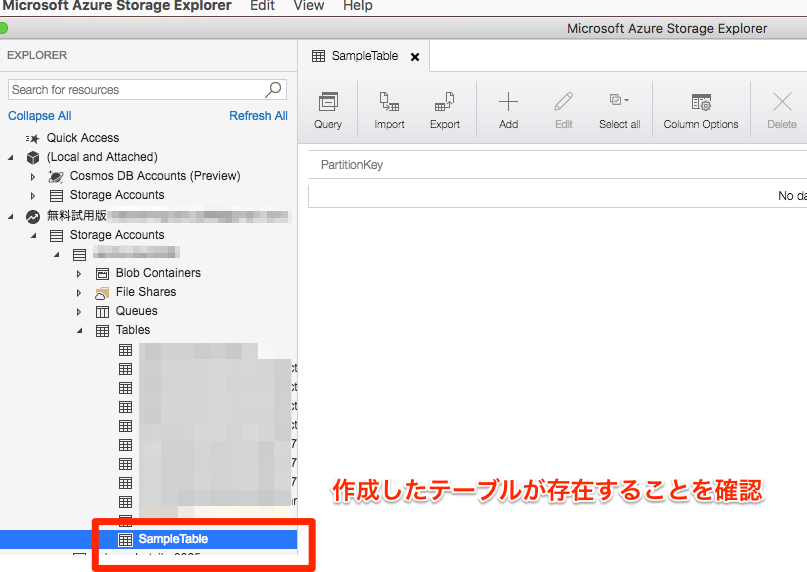
③ テーブルを作成したStorage Accountにて作成したテーブルが存在することを確認する
Azure FcuntionsでTable StorageへのCRUD処理
事前準備が完了したらAzure Functionsにて作成したテーブルへのCRUD処理(テーブルへの登録(C)・参照(R)・更新(U)・削除(D))の方法を1つずつ以下に示します。
本記事ではAzure Functionsにおけるテーブルバインディング処理方法に着目するため、実装では"TimerTrigger"形式のFunctionを扱います。
登録 (Create/INSERT)
Azure Functionsのテーブルはコードファーストでテーブル設計・実装を行うことができます。
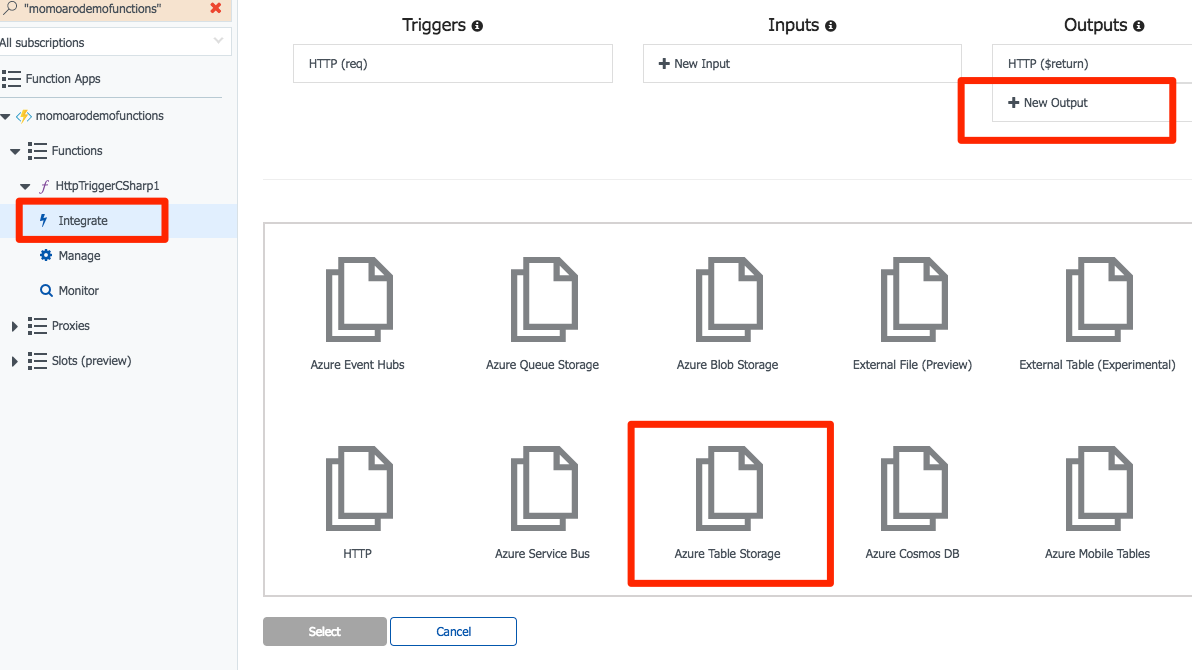
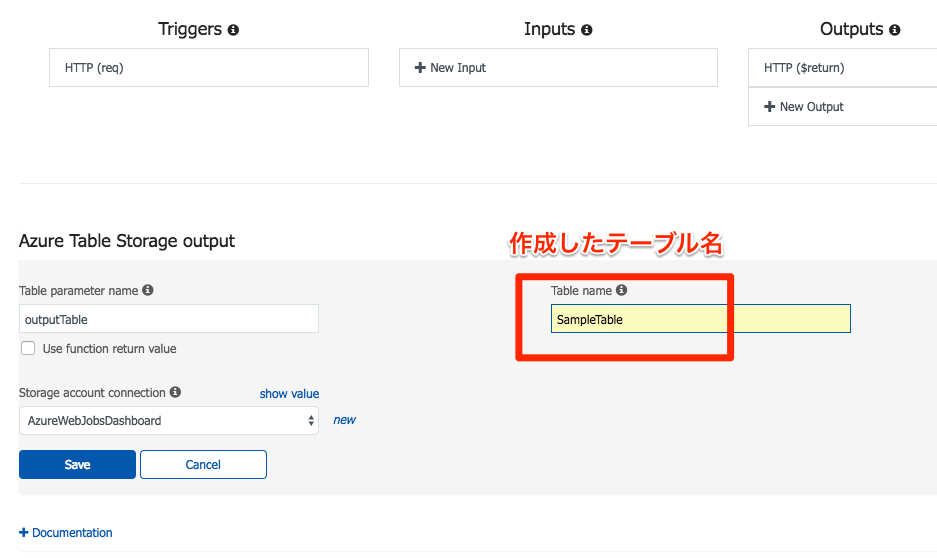
FunctionsのIntegrate画面でOutputテーブル設定
Azure PortalのGUIから設定する場合は下記図のように、対象FunctionのIntegrate設定の"Outputs"にて、作成したテーブル名を指定しバインディング設定をします。
上記設定を行うと、対象Functionのfunction.jsonファイルにて以下のような設定に更新されます。また、逆にfunction.jsonファイルから先に修正することでバインディング設定をすることもできます。
{
  "bindings": [
    {
      "name": "myTimer",
      "type": "timerTrigger",
      "direction": "in",
      "schedule": "0 */5 * * * *"
    },
    {
      "type": "table",
      "name": "outputTable",
      "tableName": "SampleTable",
      "connection": "AzureWebJobsDashboard",
      "direction": "out"
    }
  ],
  "disabled": false
}
実装
using System.Net;

public static void Run(TimerInfo myTimer, ICollector<SampleTable> outputTable, TraceWriter log)
{
    log.Info($"C# Timer trigger function executed at: {DateTime.Now}");

    // RowKeyの重複回避のためランダムな文字列を生成する
    Random random = new Random();
    string chars = "ABCDEFGHIJKLMNOPQRSTUVWXYZ0123456789";
    string randomStr = new string(Enumerable.Repeat(chars, 32)
        .Select(s => s[random.Next(s.Length)]).ToArray());

    // SampleTableへEntity(レコード)登録
    outputTable.Add(
        new SampleTable() {
            PartitionKey = "PremiumUser",
            RowKey = randomStr,
            UserId = "user1",
            UserName = "momotaro" }
        );
}

public class SampleTable
{
    public string PartitionKey { get; set; }
    public string RowKey { get; set; }
    public string UserId { get; set; }
    public string UserName { get; set; }
}
登録時にはICollector型インターフェースをFunctionの引数に指定しAddメソッドでテーブル登録します。
Functionを実行しテーブル状態を確認
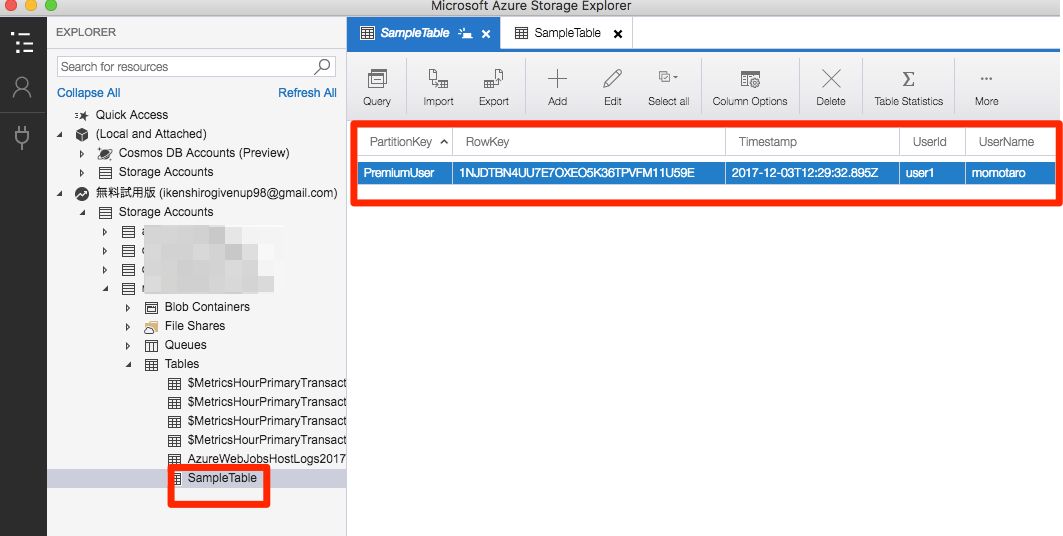
"Run"でFunctionを実行し、Microsoft Azure Storage Exploreでテーブルの状態を確認します。
上図のように、コード内のSampleTableの設計にもとづいてテーブルにEntityが追加されていることが確認できました。コードファーストです。
参照 (Read/SELECT)
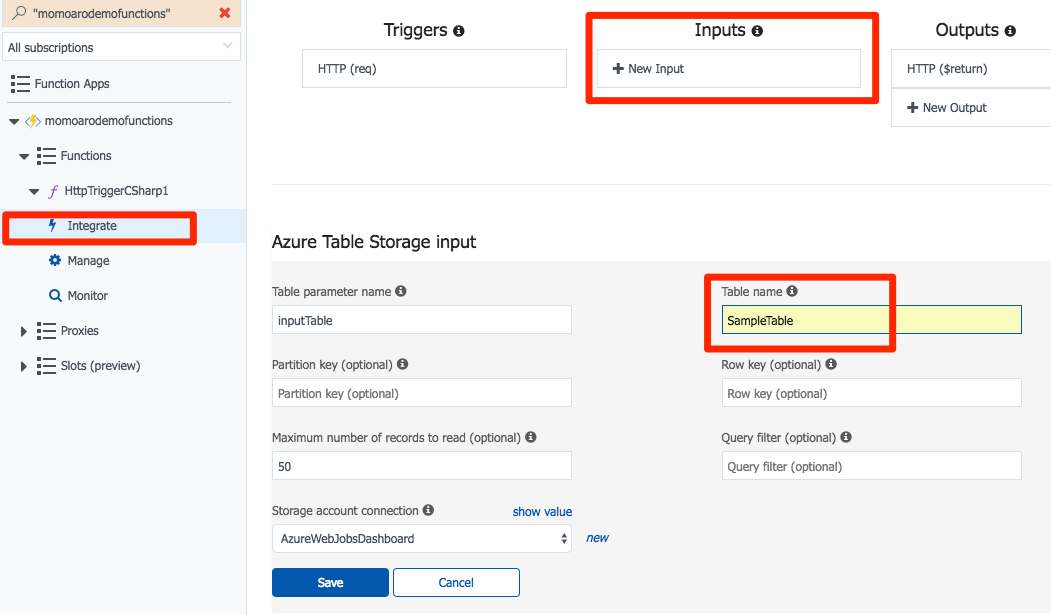
FunctionのIntegrate画面でInputテーブルを設定
下記図のように、対象FunctionのIntegrate設定の"Inputs"にて、作成したテーブル名とパラメータ名(任意の文字)とその他項目を指定し設定します。(※)
※ Partition Key、Row KeyはAzureのStorage Tableにおける必須の複合キーであり、設定することで、フィルターがかかったクエリが実行される。Query Filterはより詳細なフィルター設定であり、この設定画面上の"Document"にその詳細が記載されている。
function.jsonは以下のような設定となります。
{
  "bindings": [
    {
      "name": "myTimer",
      "type": "timerTrigger",
      "direction": "in",
      "schedule": "0 */5 * * * *"
    },
    {
      "type": "table",
      "name": "inputTable",
      "tableName": "SampleTable",
      "take": 50,
      "connection": "AzureWebJobsDashboard",
      "direction": "in"
    }
  ],
  "disabled": false
}
実装
# r "Microsoft.WindowsAzure.Storage"

using Microsoft.WindowsAzure.Storage.Table;
using System;

public static void Run(TimerInfo myTimer,IQueryable<SampleTable> inputTable, TraceWriter log)
{
    // Query from the Table
    SampleTable user = inputTable.Where(u => u.UserId == "user1").ToList().FirstOrDefault();
    log.Info($"User Name: {user.UserName}");
}

public class SampleTable : TableEntity
{
    public string UserId { get; set; }
    public string UserName { get; set; }
}
実行後ログ
2017-12-03T14:40:09.440 Function started (Id=c95e3e7d-cbfd-4213-b630-6d55cea04f23)
2017-12-03T14:40:09.487 User Name: momotaro
2017-12-03T14:40:09.487 Function completed (Success, Id=c95e3e7d-cbfd-4213-b630-6d55cea04f23, Duration=39ms)
前述の登録処理はコードファーストとしてコード内のクラスを登録しましたが、参照・更新・削除では既に存在するEntityを引っ張る必要があるため、Microsoft.WindowsAzure.Storage.Table名前空間内のTableEntityクラスを継承したクラスでテーブル定義する必要があります。
上述のコードのように #r "Microsoft.WindowsAzure.Storage" とロードすることで参照することができます。
参照のときはIQueryableインターフェース型をFunctionの引数に取りそれに対してクエリを発行します。
更新 (Update/UPDATE)・削除 (Delete/DELETE)
更新処理と削除処理は共に、参照処理によって得られたEntityに対して処理を実行するかたちです。
参照処理での"Inputs"設定に加えて、登録処理と同様に"Outputs"の設定をFunctionのIntegrateに対して行います。
{
  "bindings": [
    {
      "name": "myTimer",
      "type": "timerTrigger",
      "direction": "in",
      "schedule": "0 */5 * * * *"
    },
    {
      "type": "table",
      "name": "inputTable",
      "tableName": "SampleTable",
      "take": 50,
      "connection": "AzureWebJobsDashboard",
      "direction": "in"
    },
    {
      "type": "table",
      "name": "outputTable",
      "tableName": "SampleTable",
      "connection": "AzureWebJobsDashboard",
      "direction": "out"
    }
  ],
  "disabled": false
}
実装
# r "Microsoft.WindowsAzure.Storage"

using Microsoft.WindowsAzure.Storage.Table;
using System;

public static void Run(TimerInfo myTimer,IQueryable<SampleTable> inputTable, CloudTable outputTable, TraceWriter log)
{
    // Query from the Table
    SampleTable user = inputTable.Where(u => u.UserId == "user1").ToList().FirstOrDefault();

    // Update the Entity
    user.UserName = "urashimataro"; // Change UserName column
    var updateOperation = TableOperation.Replace(user);
    outputTable.Execute(updateOperation);

    // Delete the Entity
    var deleteOperation = TableOperation.Delete(user);
    outputTable.Execute(deleteOperation);
}

public class SampleTable : TableEntity
{
    public string UserId { get; set; }
    public string UserName { get; set; }
}
更新・削除処理の際には、TableEntityクラスと同じくMicrosoft.WindowsAzure.Storage.Table名前空間内にあるCloudTableクラス、TableOperationクラスを利用します。
上記のコードでは、同一Entityに対して更新後に削除をしているので、結果として対象Entityは削除されていますが、Update処理だけならばUserNameカラムの値が更新される結果となります。
おわりに
Azure FunctionsでのTable StorageのテーブルバインディングによるCRUD処理の実装方法を示しました。
"C"・"R"・"UD"の3つの処理でそれぞれ利用するクラスが異なるので留意が必要です。
本記事ではこの3処理を分けたFunctionで実装しましたが、組み合わせることももちろん可能です。
