next.jsチュートリアルの学習記録
Chapter1 Creating a new project
npx create-next-app@latest nextjs-dashboard --example "https://github.com/vercel/next-learn/tree/main/dashboard/starter-example"
--example以降はなくても良い。--exampleで、これレポジトリを元に作るよって意味。
Placeholder data
DBとかAPIがまだできていない時ように、place holder dataを作る。
mockAPIっていうのもあるみたい。
const invoices = [
  {
    customer_id: customers[0].id,
    amount: 15795,
    status: 'pending',
    date: '2022-12-06',
  },
  {
    customer_id: customers[1].id,
    amount: 20348,
    status: 'pending',
    date: '2022-11-14',
  },
  // ...
];
Chapter2 Tailwind
WIP
Chapter4 Creating Layouts and Pages
Nested routing
Next.js uses file-system routing where folders are used to create nested routes.
app/dashboard/invoicesにあるpage.tsxのurlは、~.com/dashboard.invoicesになる。
- page.tsx: special Next.js file that exports a React component, ans it is required for the route to be accessible.

For example, in page.tsx:
export default function Page(){
    return <p>Dashboard page</p>
}
Only the content inside the page file will be publicly accessible.
- layout.tsx: to create UI that is shared between multiple pages.
import SideNav from '@/app/ui/dashboard/sidenav';

export default function Layout({ children }: { children: React.ReactNode }) {
  return (
    <div className="flex h-screen flex-col md:flex-row md:overflow-hidden">
      <div className="w-full flex-none md:w-64">
        <SideNav />
      </div>
      <div className="flex-grow p-6 md:overflow-y-auto md:p-12">{children}</div>
    </div>
  );
}
The component receives a children prop. This child can either be a page or another layout.
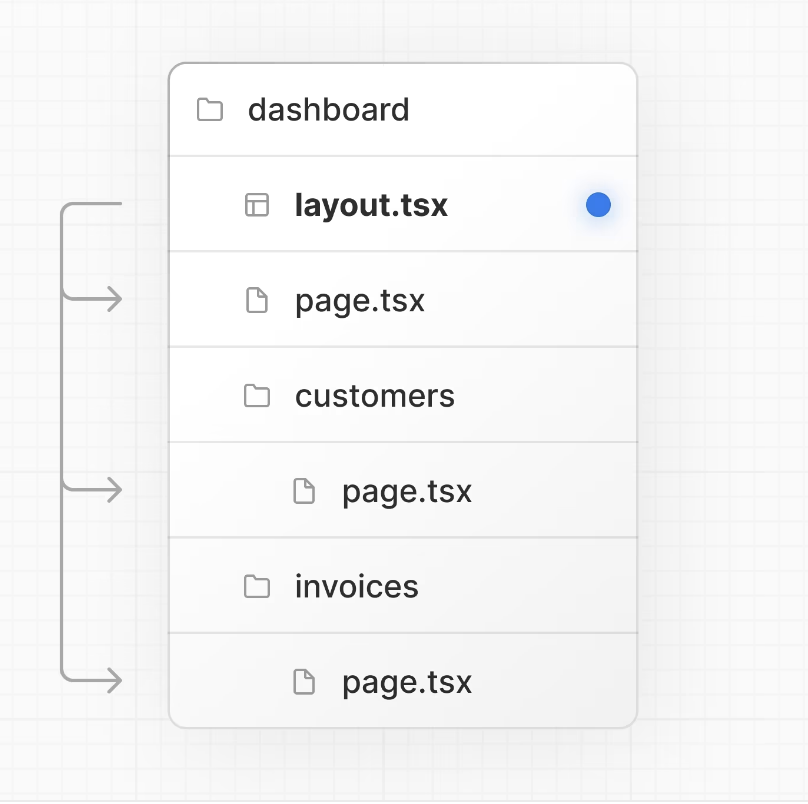
上の例だったら、layout.tsxのchildrenとなりうるのは、nそのフォルダの内側のpage.tsx全部。だからdashboard/page.tsxだけじゃなくてcustomers/page.tsxとinvoives/page.tsxも.
ナビゲーションで中身が変わっても、layoutは再レンダリングされない。
Chapter5 Navigating Between Pages
Why optimize navigation?
If we use <a> HTML element, there's a full page refresh on each page navigation.
The <Link> component
allows you to do `client-side` navigation.
[internal source code](https://github.com/vercel/next.js/blob/68a71289b3a7eca1fa9865bf49a92590faa9c6c0/packages/next/src/client/link.tsx#L283)
ここから処理を追っていくと、実際にレンダリングされている処理は以下のようになってた。つまり、reactのrenderが呼び出されている。
  const elem: JSX.Element = (
    <>
      <Head callback={onHeadCommit} />
      <AppContainer>
        {renderApp(App, appProps)}
        <Portal type="next-route-announcer">
          <RouteAnnouncer />
        </Portal>
      </AppContainer>
    </>
  )

  // We catch runtime errors using componentDidCatch which will trigger renderError
  renderReactElement(appElement!, (callback) => (
    <Root callbacks={[callback, onRootCommit]}>
      {process.env.__NEXT_STRICT_MODE ? (
        <React.StrictMode>{elem}</React.StrictMode>
      ) : (
        elem
      )}
    </Root>
  ))

function renderReactElement(
  domEl: HTMLElement,
  fn: (cb: () => void) => JSX.Element
): void {
  // mark start of hydrate/render
  if (ST) {
    performance.mark(performanceMarks.beforeRender)
  }

  const reactEl = fn(shouldHydrate ? markHydrateComplete : markRenderComplete)
  if (!reactRoot) {
    // Unlike with createRoot, you don't need a separate root.render() call here
    reactRoot = ReactDOM.hydrateRoot(domEl, reactEl, {
      onRecoverableError,
    })
    // TODO: Remove shouldHydrate variable when React 18 is stable as it can depend on `reactRoot` existing
    shouldHydrate = false
  } else {
    const startTransition = (React as any).startTransition
    startTransition(() => {
      reactRoot.render(reactEl)
    })
  }
}
import {
  UserGroupIcon,
  HomeIcon,
  DocumentDuplicateIcon,
} from '@heroicons/react/24/outline';
import Link from 'next/link';

// Map of links to display in the side navigation.
// Depending on the size of the application, this would be stored in a database.
const links = [
  { name: 'Home', href: '/dashboard', icon: HomeIcon },
  {
    name: 'Invoices',
    href: '/dashboard/invoices',
    icon: DocumentDuplicateIcon,
  },
  { name: 'Customers', href: '/dashboard/customers', icon: UserGroupIcon },
];

export default function NavLinks() {
  return (
    <>
      {links.map((link) => {
        const LinkIcon = link.icon;
        return (
          <Link
            key={link.name}
            href={link.href}
            className="flex h-[48px] grow items-center justify-center gap-2 rounded-md bg-gray-50 p-3 text-sm font-medium hover:bg-sky-100 hover:text-blue-600 md:flex-none md:justify-start md:p-2 md:px-3"
          >
            <LinkIcon className="w-6" />
            <p className="hidden md:block">{link.name}</p>
          </Link>
        );
      })}
    </>
  );
}
To improve the navigation experience, there are two points.
-
code splitting
Next.js automatically code splits your application by route segments. This is different from a traditional React SPA, where the browser loads all your application code on initial load. -
prefetch
whenever components appear in the browser's viewport, Next.js automatically prefetches the code for the linked route in the background. By the time the user clicks the link, the code for the destination page will already be loaded in the background, and this is what makes the page transition near-instant!
