はじめに
こんにちは、駆け出しエンジニアのmokotaです。
今回はAI-chatbotアプリの作成をしてみました。
「pythonを学習してるけど、何も実績がない...。」「AIを活用したアプリを作りたい!」そんな方にアプリを作るきっかけになればとても嬉しいです!コードの詳しい説明はあまり記載していないので、ご自分で調べていただけると幸いです。参考文献は、可能な限り載せています。とりあえず動くものを作るという目的で読んでもらえたらいいと思います。
環境
・macbook-pro(Intel)
・VScode
・Python 3.11.5
※今回はmacユーザー向けの記事となります。
完成イメージ
まずは、どんなものを作るかゴールを決めないと始まりません。
世の中にAIチャットサービスはたくさんありますが、その中でも
市役所などに導入されているチャット問い合わせサービスを今回の目標としたいと思います。
↓こんな感じのイメージ
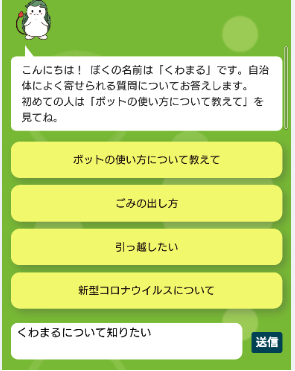
メインの機能としては、
ユーザーが質問を入力・送信すると、その質問内容を
準備したデータセットから検索し、LLM(大規模言語モデル)が最もらしい文章を生成・回答するという流れです。
追加機能としては、質問・回答内容を日付ごとにデータベースに保存しておくことができます。
ここで使われる技術をRAG(検索拡張生成)と呼びます。
わかりやすく説明されていた記事があったので、こちらを参照ください。
事前準備
今回の実装ではOpenAIのAPIを使用するため、
事前にOpenAIアカウントを作成し、API-Keyを取得する必要があります。OpenAI-APIを使用して回答を生成すると1回答あたり0.08ドル(約10円)かかる感覚です。
アカウントを持っていない方は、作成のタイミングで無料トライアル用のクレジットが提供されるのでそちらを使用するといいです。
僕はアカウント作成から時間が経っており無料トライアル期間が終了していたので、5ドルだけ課金しました😭
何も考えずに生成しまくるとすぐに消費してしまうので、慎重に使いましょう!
こちらからアカウント作成できます↓
開発手順
1.プロジェクトフォルダの作成
2.データセットの準備
3.仮想環境の設定
4.インタフェースの準備
5.メインの実装
6.ログ機能とデザインの調整
1. プロジェクトフォルダの作成
最終的なローカルPCのフォルダの構成を先に載せておきます。
AI_chatbot/
    ├── env
    ├── data/
    │   └── it-life-hack
    ├── main.py
    ├── templates/
    │   ├── index.html
    │   └── logs.html
    ├── static/
    │   ├── stylesheet.css
    │   └── main.js
    ├── requirements.txt
    └── .env
まずは"AI_chatbot"フォルダを作成します。
(好きな場所に、名前は何でも良いです)
2. データセットの準備
今回はロンウィット社が公開している、
"ライブドアニュースコーパス"から"ITライフハック"カテゴリの記事を使用したいと思います。(データは2012年9月とかなり前のものですが、870もの記事があります)
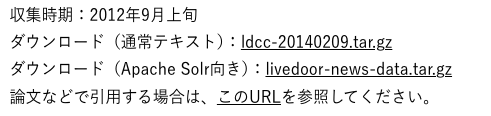
下線が引いてある箇所をクリックでダウンロードできます。
通常テキストの方でOKです。
※使用する際はライセンスをよく確認しましょう
データのダウンロードが完了したら、
"data"フォルダを作成し、その中に"it-life-hack"フォルダを入れます。
AI_chatbot/
    └── data/
        └── it-life-hack  # 追加
これでデータの準備は完了です!
3. 仮想環境の設定
基本的にプロジェクトごとに仮想環境を作成しておくと、
思わぬエラーが起きにくく安心だと思います。
Pythonの仮想環境を作るソフトウェアはいくつかありますが、
今回は"venv"を使用します。
基本操作はこちらの記事を参照するとわかりやすいかと思います。
まずはVSCodeで"AI_chatbot"フォルダを開きます。
ターミナルで以下のコマンドを順番に実行していきます。
python3 -m venv env
実行すると、"env"フォルダが追加され仮想環境が作成されます。
AI_chatbot/
    ├── data/
    │   └── it-life-hack
    └── env  # 追加
続いて、作成した仮想環境に入るためのコマンドです。
これを実行すると、ターミナルの先頭に(env)がつくと思います。
この表記が、仮想環境に入っている目印となります。
source env/bin/activate
ここで試しに、以下のコマンドを実行してみます。
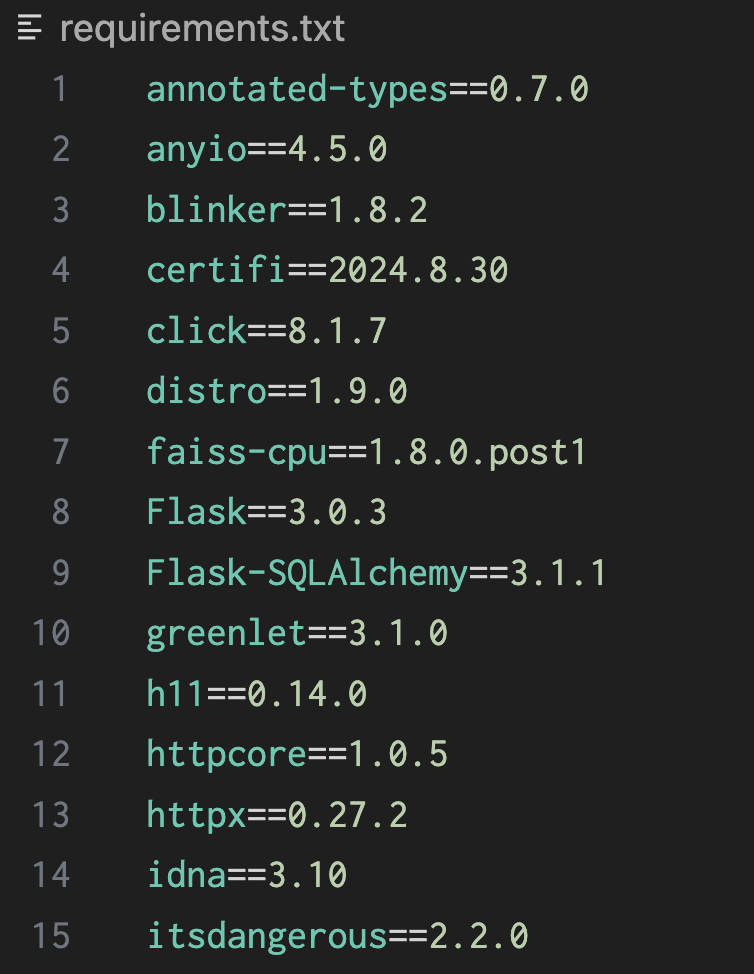
pip freeze > requirements.txt
すると、"requirements.txt"というファイルが作成されると思います。
AI_chatbot/
    ├── data/
    │   └── it-life-hack
    ├── env
    └── requirements.txt  # 追加
これは仮想環境内のパッケージ一覧を表示するファイルとなります。
現在は何もインストールしていないので、中身は空のはずです。
ここから自分の好きなようにライブラリなどをインストールして
カスタマイズできるわけですね!
それでは今回必要となるパッケージを見てみましょう。
・flask
・flask-sqlalchemy
・openai
・faiss-cpu
・numpy
・pandas
・python-dotenv
例えば一番上のflaskをインストールする場合、ターミナルで以下のようにコマンドを実行します。
pip install flask
次のように複数パッケージを一度にインストールすることも可能です。
pip install flask flask-sqlalchemy openai
全てインストールし終えたら、"requirements.txt"を作成してみると、先ほどは空でしたが、いろいろとインストールされたことが視覚的にわかります。
"requirements.txt"については下のサイトが詳しく解説されていてわかりやすいです。
これで環境設定は完了です!
もりもりコードを実装していきましょう!
4. インタフェースの準備
いよいよFlaskの登場です。
メインの処理を"main.py"に、表示内容を"index.html"に、レイアウトを"stylesheet.css"に書いていきます。
 AI_chatbot/
    ├── data/
    │   └── it-life-hack
    ├── env
    ├── static/
    │   └── stylesheet.css  # 追加
    ├── templates/
    │   └── index.html  # 追加
    ├── main.py  # 追加
    └── requirements.txt
まずは簡単な実装から始めます。
portは指定しない場合は5000番となり基本的にはこれで問題ないのですが、時々繋がらなくなったことがあるので僕は8888番に設定しています。
from flask import Flask, render_template


# Flaskアプリケーションのインスタンス作成
app = Flask(__name__)


# ルートページの表示
@app.route("/", methods=["GET"])
def home():
    return render_template("index.html")


# Flaskアプリケーションの実行
if __name__ == "__main__":
    app.run(port=8888)
表示画面も実装します。
"!"と入力すると、予測変換でHTMLフォーマットが出てくるので
そこから少し修正します。
<!DOCTYPE html>
<html lang='ja'>
<head>
    <meta charset='UTF-8'>
    <meta name='viewport' content="width=device-width, initial-scale=1.0">
    <meta http-equiv='X-UA-Compatible' content="ie=edge">
    <title>チャットシステム</title>
    <link rel='stylesheet' href="{{ url_for('static', filename='stylesheet.css') }}">
</head>
<body>
    <header>
        <a class='header-logo' href="#">チャットサポート</a>
    </header>

    <div class='main'>
        <h2> AIが入力されたテキストに基づいて検索し、回答を生成します</h2>
        <p>検索したいテキストを入力してください</p>
        <form method='POST'>
            <input class='file_choose' type="text" name="file" placeholder="検索したいテキストを入力">
            <input class='btn' value="検索" type="submit">
        </form>
        <div class='answer'>{{ answer }}</div>
    </div>
</body>
</html>
レイアウトも調整します。一字一句覚える必要はなく、こんな感じで書くんだな〜くらいでいいかと。
header {
    background-color: #76B55B;
    text-align: center;
}

.header-logo {
    color: #fff;
    font-size: 25px;
}

.main {
    height: auto; /* 高さを自動調整 */
    padding: 20px; /* パディングを追加して余白を持たせる */
}

h2 {
    color: #444444;
    margin: 40px 0px;
    text-align: center;
}

p {
    color: #444444;
    margin: 20px 0px 20px 0px; /* 上下の余白を少し調整 */
    text-align: center;
}

.answer {
    color: #444444;
    margin: 40px 0px;
    text-align: center;
    font-size: 18px; /* フォントサイズを大きくして見やすく */
    border: 1px solid #ccc; /* 境界線を追加 */
    padding: 10px;
    width: 80%;
    margin-left: auto;
    margin-right: auto;
}

form {
    text-align: center;
    margin-bottom: 30px;
}

input[type="text"] {
    width: 60%;
    padding: 10px;
    font-size: 16px;
    margin: 10px 0;
    border: 1px solid #ccc;
    border-radius: 5px;
}

input[type="submit"] {
    padding: 10px 20px;
    font-size: 16px;
    color: #fff;
    background-color: #76B55B;
    border: none;
    border-radius: 5px;
    cursor: pointer;
}

input[type="submit"]:hover {
    background-color: #6a9c4f;
}
ターミナルで次のコマンドを実行します。
python main.py
すると、以下のような画面になるので
ブラウザでURL(http://127.0.0.1:8888 )を入力するとWebページが開きます。

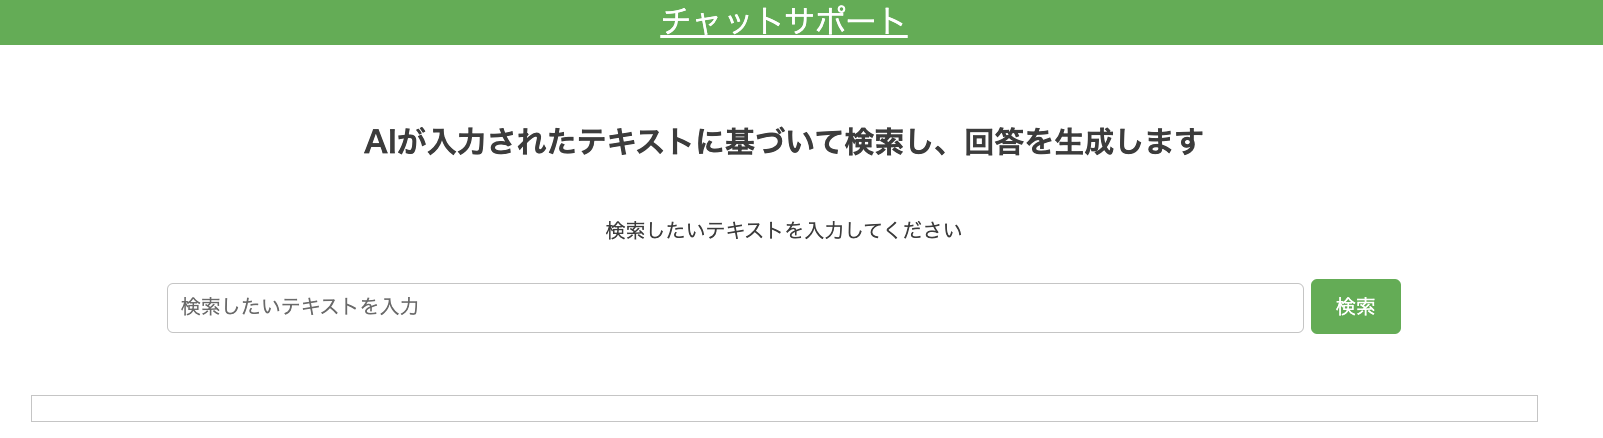
こんな簡単にwebアプリが作れちゃうんですね...。
ちなみにサーバーを切断するにはターミナル上でcontrol+Cコマンドを使います。
これでテキスト入力欄、検索ボタン、出力欄だけの簡単なインタフェースができました!お疲れ様です!!
5. メインの実装
ここからはOpenAIのAPI-Keyを取得した前提で話を進めます。
取得したKeyを"main.py"に直接入力してしまうと、セキュリティの観点でよろしくありません。そのため、機密情報であるKeyを".env"という隠しファイルで管理します。
AI_chatbot/
    ├── data/
    │   └── it-life-hack
    ├── env
    ├── static/
    │   └── stylesheet.css
    ├── templates/
    │   └── index.html
    ├── .env  # 追加
    ├── main.py
    └── requirements.txt
".env"ファイルを作成し、自分のAPI-Keyを"your_openai_api_key"の箇所に上書きします。
OPENAI_API_KEY = "your_openai_api_key"
ここから文章の生成ができるまで"main.py"を
一気に実装していきます。難しい部分もありますが、
少しずつ慣れていきましょう!特にインポートしたものがどこで使われているかを理解するのは大切です。
"main.py"コード詳細
from flask import Flask, render_template, request
import openai
import faiss
import numpy as np
import pandas as pd
import glob
import os
from dotenv import load_dotenv

# Flaskアプリケーションのインスタンス作成
app = Flask(__name__)

# .envファイルの内容を読み込む
load_dotenv()

# OpenAI APIキーの設定(環境変数から取得)
openai.api_key = os.environ.get('OPENAI_API_KEY', '')


# データの読み込み(今回は1カテゴリのみ)
def load_livedoor_news_corpus():
    category = {
        # 'dokujo-tsushin': 1,
        'it-life-hack': 2,
        # 'kaden-channel': 3,
        # 'livedoor-homme': 4,
        # 'movie-enter': 5,
        # 'peachy': 6,
        # 'smax': 7,
        # 'sports-watch': 8,
        # 'topic-news': 9
    }
    docs = []
    subjects = []

    for c_name, c_id in category.items():
        # カテゴリのテキストファイルのパスを取得
        files = glob.glob(f"./data/{c_name}/{c_name}*.txt")

        for file in files[:30]:  # 読み込むファイル数を制限
            with open(file, 'r', errors='ignore') as f:
                lines = f.read().splitlines()

                # 1,2行目に書かれているURLと日時を除去し、本文を取得
                subject = lines[2]
                body = "".join(lines[3:])
                text = body

            # テキストとタイトルをリストに追加
            docs.append(text)
            subjects.append(subject)

    return docs, subjects


# データを読み込み
docs, subjects = load_livedoor_news_corpus()

# docs と subjects を DataFrame に変換
df = pd.DataFrame({
    'title': subjects,
    'content': docs
})


# Embedding APIを使用してテキストをベクトル化する関数
def embed_text(text):
    response = openai.embeddings.create(
        input=text,
        model="text-embedding-ada-002"
    )
    return response.data[0].embedding


# DataFrameの内容をベクトル化
df['embedding'] = df['content'].apply(lambda x: embed_text(x))

# Faissのインデックスを作成し、ベクトルを追加
dimension = len(df['embedding'][0])
faiss_index = faiss.IndexFlatL2(dimension)  # index を faiss_index に変更
faiss_index.add(np.array(df['embedding'].tolist()).astype(np.float32))


# クエリに基づいてベクトル検索を実行する関数
def search(query, top_k=1):
    query_vector = np.array(embed_text(query)).astype(np.float32).reshape(1, -1)
    distances, indices = faiss_index.search(query_vector, top_k)  # faiss_index を使用
    return df.iloc[indices[0]]


# 検索結果を元に、OpenAI APIを使って回答を生成する関数
def generate_response(search_result):
    context = "\n\n".join(search_result['content'].tolist())
    response = openai.chat.completions.create(
        model="gpt-4",
        messages=[
            {"role": "system", "content": "You are a helpful assistant."},
            {"role": "user", "content": f"次の記事の情報を使って回答を生成してください: {context}"}
        ]
    )
    return response.choices[0].message.content


# ルートページを表示
@app.route("/", methods=["GET", "POST"])
def home():
    if request.method == "POST":
        user_query = request.form.get("file")  # ユーザーのクエリ
        if user_query:
            search_results = search(user_query, top_k=1)
            if not search_results.empty:
                generated_text = generate_response(search_results)
                return render_template("index.html", answer=generated_text)
            else:
                return render_template("index.html", answer="関連する検索結果が見つかりませんでした。")
    return render_template("index.html", answer="")


# Flaskアプリケーションの実行
if __name__ == "__main__":
    app.run(port=8888)
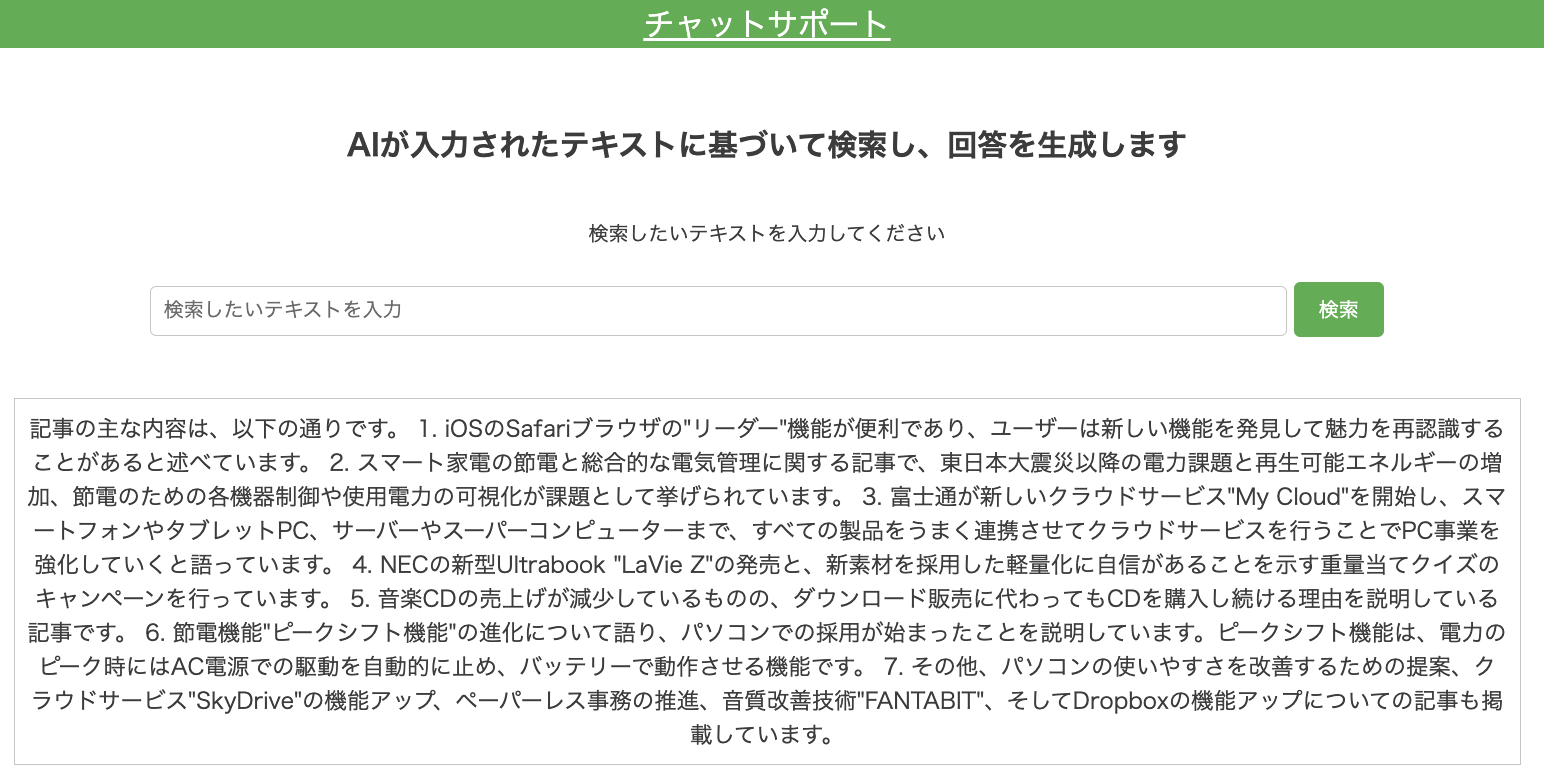
アプリを実行し、質問を入力して検索ボタンを押すと...
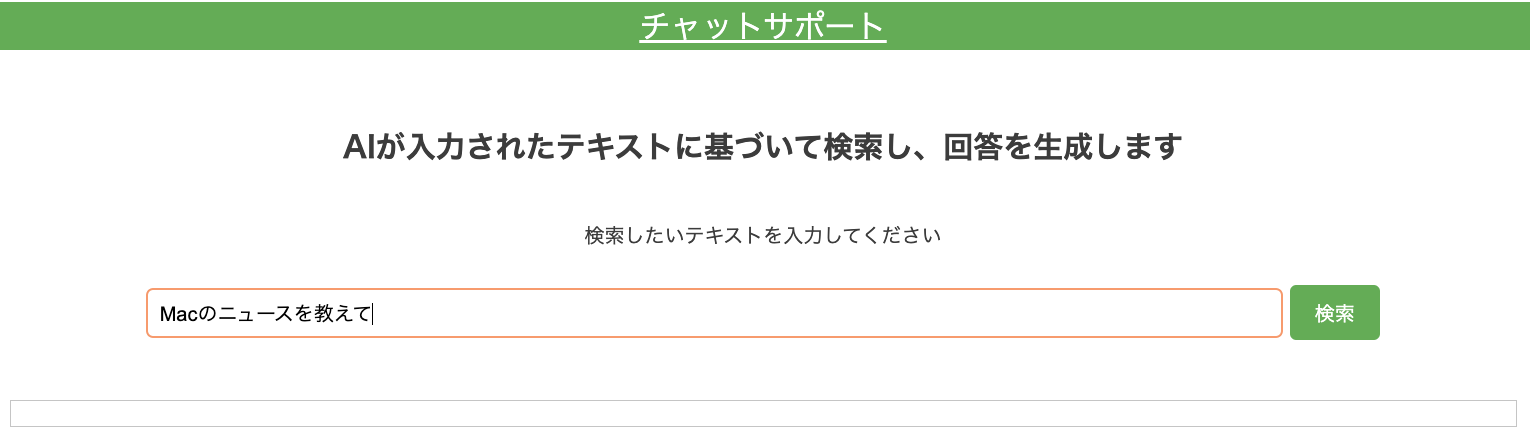
精度は低いですが、記事の中からキーワードを検索して
回答が返ってくるようになりました!
6. ログ機能とデザインの調整
最後に、ログ機能の追加とデザインの調整を一気に
実装してしまいます!
"main.py"コード詳細
from flask import Flask, render_template, request, session, jsonify
from flask_sqlalchemy import SQLAlchemy
import openai
import faiss
import numpy as np
import pandas as pd
import glob
from dotenv import load_dotenv
import os
from datetime import datetime


# Flaskアプリケーションのインスタンス作成
app = Flask(__name__)

# .envファイルの内容を読み込む
load_dotenv()

# セッションキーの設定(環境変数から取得)
app.secret_key = os.environ.get('SECRET_KEY', 'defaultsecretkey')

# OpenAI APIキーの設定(環境変数から取得)
openai.api_key = os.environ.get('OPENAI_API_KEY', '')

# データベースの設定(SQLite使用)
app.config['SQLALCHEMY_DATABASE_URI'] = 'sqlite:///chat_logs.db'
app.config['SQLALCHEMY_TRACK_MODIFICATIONS'] = False
db = SQLAlchemy(app)


# チャットログ用のテーブル定義
class ChatLog(db.Model):
    id = db.Column(db.Integer, primary_key=True)
    user_message = db.Column(db.String, nullable=False)
    ai_response = db.Column(db.String, nullable=False)
    timestamp = db.Column(db.DateTime, default=datetime.now)


# データベースの初期化
with app.app_context():
    db.create_all()


# データの読み込み関数
def load_livedoor_news_corpus():
    category = {
        # 'dokujo-tsushin': 1,
        'it-life-hack': 2,
        # 'kaden-channel': 3,
        # 'livedoor-homme': 4,
        # 'movie-enter': 5,
        # 'peachy': 6,
        # 'smax': 7,
        # 'sports-watch': 8,
        # 'topic-news': 9
    }
    docs = []
    subjects = []

    for c_name, c_id in category.items():
        files = glob.glob(f"./data/{c_name}/{c_name}*.txt")
        for file in files[:30]:
            with open(file, 'r', errors='ignore') as f:
                lines = f.read().splitlines()
                subject = lines[2]
                body = "".join(lines[3:])
                docs.append(body)
                subjects.append(subject)

    return docs, subjects


# テキストをベクトルに変換する関数
def embed_text(text):
    response = openai.embeddings.create(input=text, model="text-embedding-ada-002")
    return response.data[0].embedding


# データの読み込みとベクトル化
docs, subjects = load_livedoor_news_corpus()
df = pd.DataFrame({'title': subjects, 'content': docs})
df['embedding'] = df['content'].apply(lambda x: embed_text(x))

# ベクトルの正規化(コサイン類似度用)
embedding_vectors = np.array(df['embedding'].tolist()).astype(np.float32)
faiss.normalize_L2(embedding_vectors)

# FAISSインデックスの作成(内積類似度を使用)
dimension = embedding_vectors.shape[1]
faiss_index = faiss.IndexFlatIP(dimension)
faiss_index.add(embedding_vectors)


# 検索関数
def search(query, top_k=1):
    query_vector = np.array(embed_text(query)).astype(np.float32).reshape(1, -1)
    faiss.normalize_L2(query_vector)
    distances, indices = faiss_index.search(query_vector, top_k)
    return df.iloc[indices[0]]


# OpenAI APIからの応答生成関数
def generate_response(search_result, user_query):
    context = "\n\n".join(search_result['content'].tolist())
    response = openai.chat.completions.create(
        model="gpt-4",
        messages=[
            {"role": "system", "content": "あなたは有能な市役所職員です。市民の質問に丁寧に回答してください。"},
            {"role": "user", "content": f"ユーザーからの質問: {user_query}\n\n以下の情報を参考に回答してください:\n{context}"}
        ]
    )
    return response.choices[0].message.content


# ルートページの表示
@app.route("/", methods=["GET"])
def home():
    chat_history = session.get('chat_history', [])
    return render_template("index.html", chat_history=chat_history)


# チャットエンドポイントの作成
@app.route("/chat", methods=["POST"])
def chat():
    session['chat_history'] = []
    user_query = request.json.get("message")
    if user_query:
        search_results = search(user_query, top_k=1)
        if not search_results.empty:
            generated_text = generate_response(search_results, user_query)

            # チャット履歴に追加(セッション用)
            session['chat_history'].append({"user": user_query, "ai": generated_text})

            # データベースにチャットログを保存
            new_log = ChatLog(user_message=user_query, ai_response=generated_text)
            db.session.add(new_log)
            db.session.commit()

            return jsonify({"response": generated_text})
        else:
            error_message = "関連する情報が見つかりませんでした。"
            session['chat_history'].append({"user": user_query, "ai": error_message})
            return jsonify({"response": error_message})
    else:
        error_message = "入力が空です。"
        return jsonify({"response": error_message})


@app.route("/logs", methods=["GET"])
def logs():
    logs = ChatLog.query.order_by(ChatLog.timestamp.desc()).all()
    return render_template("logs.html", logs=logs)


# Flaskアプリケーションの実行
if __name__ == "__main__":
    app.run(port=8888)
"index.html"コード詳細
<!DOCTYPE html>
<html lang="ja">
<head>
<meta charset="UTF-8">
<meta name="viewport" content="width=device-width, initial-scale=1.0">
<title>チャットシステム</title>
<link rel="stylesheet" href="{{ url_for('static', filename='stylesheet.css') }}">
</head>
<body>
<header>
<div class="header-container">
<h1>チャットサポート</h1>
<nav>
<a href="/logs" class="log-button">ログを見る</a>
</nav>
</div>
</header>
<main class="chat-container">
<div class="chat-window" id="chat-window">
<!-- チャット履歴をループで表示 -->
{% for message in chat_history %}
<div class="message user">{{ message.user }}</div>
<div class="message ai">{{ message.ai }}</div>
{% endfor %}
</div>
<form class="chat-form">
<label for="chat-input" class="visually-hidden">メッセージを入力してください</label>
<input type="text" id="chat-input" class="chat-input" name="message" placeholder="メッセージを入力してください" required>
<button type="submit" class="chat-send-btn">送信</button>
</form>
</main>
<footer>
<small>© 2024 mokota</small>
</footer>
<script src="{{ url_for('static', filename='main.js') }}"></script>
</body>
</html>
"stylesheet.css"コード詳細
/* Reset */
html {
    box-sizing: border-box;
}

*, *::before, *::after {
    box-sizing: inherit;
}

body {
    margin: 0;
    padding: 0;
    font-family: 'Arial', sans-serif;
    color: #333;
    background-color: #F0F4F8;
}

/* カスタムプロパティ(変数) */
:root {
    --primary-color: #283044;
    --secondary-color: #F0F4F8;
    --accent-color: #5E9FF2;
    --accent-hover-color: #4A86D4;
    --font-color: #333;
    --background-color: #ffffff;
}

/* Header */
header {
    background-color: var(--primary-color);
    color: white;
    padding: 20px;
    text-align: center;
    box-shadow: 0 4px 6px rgba(0, 0, 0, 0.1);
    border-radius: 10px;
}

.header-container h1 {
    font-size: 1.5rem;
    letter-spacing: 1.5px;
    font-weight: bold;
}

/* Main chat container */
.chat-container {
    max-width: 1200px;
    margin: 60px auto;
    background-color: var(--background-color);
    padding: 20px;
    border-radius: 20px;
    box-shadow: 0 4px 12px rgba(0, 0, 0, 0.1);
}

/* Chat window */
.chat-window {
    display: flex;
    flex-direction: column;
    height: 300px;
    padding: 20px;
    background-color: var(--background-color);
    border-radius: 20px;
    overflow-y: auto;
    border: 1px solid #e0e0e0;
    box-shadow: inset 0 1px 3px rgba(0, 0, 0, 0.1);
    margin-bottom: 20px;
}

/* Message styles */
.message {
    padding: 15px 20px;
    margin: 10px 0;
    border-radius: 25px;
    max-width: 75%;
    font-size: 1rem;
    line-height: 1.5;
    position: relative;
    color: var(--font-color);
}

.user {
    background-color: #DFF7E0;
    align-self: flex-start;
    margin-left: 10px;
    box-shadow: 0 3px 6px rgba(0, 0, 0, 0.1);
}

.ai {
    background-color: #E0F2FF;
    align-self: flex-end;
    margin-right: 10px;
    box-shadow: 0 3px 6px rgba(0, 0, 0, 0.1);
}

/* Chat form */
.chat-form {
    display: flex;
    justify-content: space-between;
    align-items: center;
    padding-top: 10px;
}

.chat-input {
    width: 80%;
    padding: 15px;
    border: none;
    border-radius: 20px;
    outline: none;
    background-color: var(--secondary-color);
    font-size: 1rem;
    box-shadow: inset 0 1px 3px rgba(0, 0, 0, 0.1);
}

.chat-send-btn {
    width: 15%;
    padding: 15px 0;
    background-color: var(--accent-color);
    color: white;
    border: none;
    border-radius: 20px;
    font-size: 1rem;
    cursor: pointer;
    transition: background-color 0.3s ease;
}

.chat-send-btn:hover {
    background-color: var(--accent-hover-color);
}

/* Footer */
footer {
    text-align: center;
    padding: 15px;
    background-color: var(--primary-color);
    color: white;
    border-radius: 10px;
    margin-top: 40px;
}

/* アクセシビリティ向上のためのクラス */
.visually-hidden {
    position: absolute;
    width: 1px;
    height: 1px;
    padding: 0;
    margin: -1px;
    overflow: hidden;
    clip: rect(0,0,0,0);
    white-space: nowrap;
    border: 0;
}

/* レスポンシブデザイン */
@media (max-width: 600px) {
    .chat-container {
        margin: 20px;
        padding: 10px;
    }

    .chat-input, .chat-send-btn {
        width: 100%;
        margin-bottom: 10px;
    }

    .chat-form {
        flex-direction: column;
        align-items: stretch;
    }
}

/* ログページ用のスタイル */
.log-container {
    max-width: 800px;
    margin: 0 auto;
    padding: 20px;
    background-color: var(--background-color);
    border-radius: 10px;
    box-shadow: 0 4px 12px rgba(0, 0, 0, 0.1);
}

.log-item {
    margin-bottom: 20px;
}

.log-btn {
    width: 100%;
    padding: 10px;
    background-color: var(--primary-color);
    color: white;
    border: none;
    border-radius: 5px;
    cursor: pointer;
    text-align: left;
}

.log-btn:hover {
    background-color: var(--accent-color);
}

.log-details {
    background-color: var(--secondary-color);
    padding: 15px;
    border-radius: 5px;
    margin-top: 10px;
}

.log-button {
    background-color: #5E9FF2; /* 明るい青色 */
    color: white; /* テキストは白色 */
    padding: 10px 20px;
    border: none;
    border-radius: 5px;
    font-size: 1rem;
    cursor: pointer;
    text-decoration: none;
    transition: background-color 0.3s ease;
}

.log-button:hover {
    background-color: #4A86D4; /* ホバー時に濃い青色 */
}

.back-button {
    background-color: #5E9FF2;
    color: white;
    padding: 10px 20px;
    border: none;
    border-radius: 5px;
    font-size: 1rem;
    text-decoration: none;
    display: inline-block;
    margin-top: 20px;
}

.back-button:hover {
    background-color: #4A86D4;
}
ログを表示する画面である"logs.html"と
静的なサイトに動きをつけるための"main.js"を追加します。
AI_chatbot/
    ├── data/
    │   └── it-life-hack
    ├── env
    ├── static/
    │   ├── main.js  # 追加
    │   └── stylesheet.css
    ├── templates/
    │   ├── index.html
    │   └── logs.html  # 追加
    ├── .env
    ├── main.py
    └── requirements.txt
"logs.html"コード詳細
<!DOCTYPE html>
<html lang="ja">
<head>
    <meta charset="UTF-8">
    <meta name="viewport" content="width=device-width, initial-scale=1.0">
    <title>チャットログ</title>
    <link rel="stylesheet" href="{{ url_for('static', filename='stylesheet.css') }}">
</head>
<body>
    <header>
        <div class="header-container">
            <h1>チャットログ一覧</h1>
        </div>
    </header>

    <main class="log-container">
        <ul>
            {% for log in logs %}
                <li>
                    <button class="log-item" onclick="toggleLogDetails('{{ log.id }}')">
                        {{ log.timestamp.strftime('%Y-%m-%d %H:%M:%S') }}
                    </button>
                    <div id="log-details-{{ log.id }}" class="log-details" style="display: none;">
                        <p><strong>ユーザー:</strong> {{ log.user_message }}</p>
                        <p><strong>AIの応答:</strong> {{ log.ai_response }}</p>
                    </div>
                </li>
            {% endfor %}
        </ul>
        <button onclick="window.location.href='/'">戻る</button>
    </main>

    <script>
        function toggleLogDetails(id) {
            const details = document.getElementById('log-details-' + id);
            if (details.style.display === 'none') {
                details.style.display = 'block';
            } else {
                details.style.display = 'none';
            }
        }
    </script>
</body>
</html>
"main.js"コード詳細
document.addEventListener("DOMContentLoaded", function() {
    const form = document.querySelector('.chat-form');
    form.addEventListener('submit', function(event) {
        event.preventDefault(); // デフォルトのフォーム送信を防ぐ
        const userInput = document.querySelector('.chat-input').value;

        if (userInput.trim() !== "") {
            const chatWindow = document.getElementById('chat-window');

            // ユーザーのメッセージを表示
            const userMessage = document.createElement('div');
            userMessage.className = 'message user';
            userMessage.innerText = userInput;
            chatWindow.appendChild(userMessage);

            // 入力フィールドをクリア
            document.querySelector('.chat-input').value = "";

            // サーバーにデータを送信
            fetch('/chat', {
                method: 'POST',
                headers: {
                    'Content-Type': 'application/json'
                },
                body: JSON.stringify({ message: userInput })
            })
            .then(response => response.json())
            .then(data => {
                // サーバーからのAIメッセージを表示
                const aiMessage = document.createElement('div');
                aiMessage.className = 'message ai';
                aiMessage.innerText = data.response;
                chatWindow.appendChild(aiMessage);

                // チャットウィンドウを最下部にスクロール
                chatWindow.scrollTop = chatWindow.scrollHeight;
            })
            .catch(error => console.error('Error:', error));
        }
    });
});
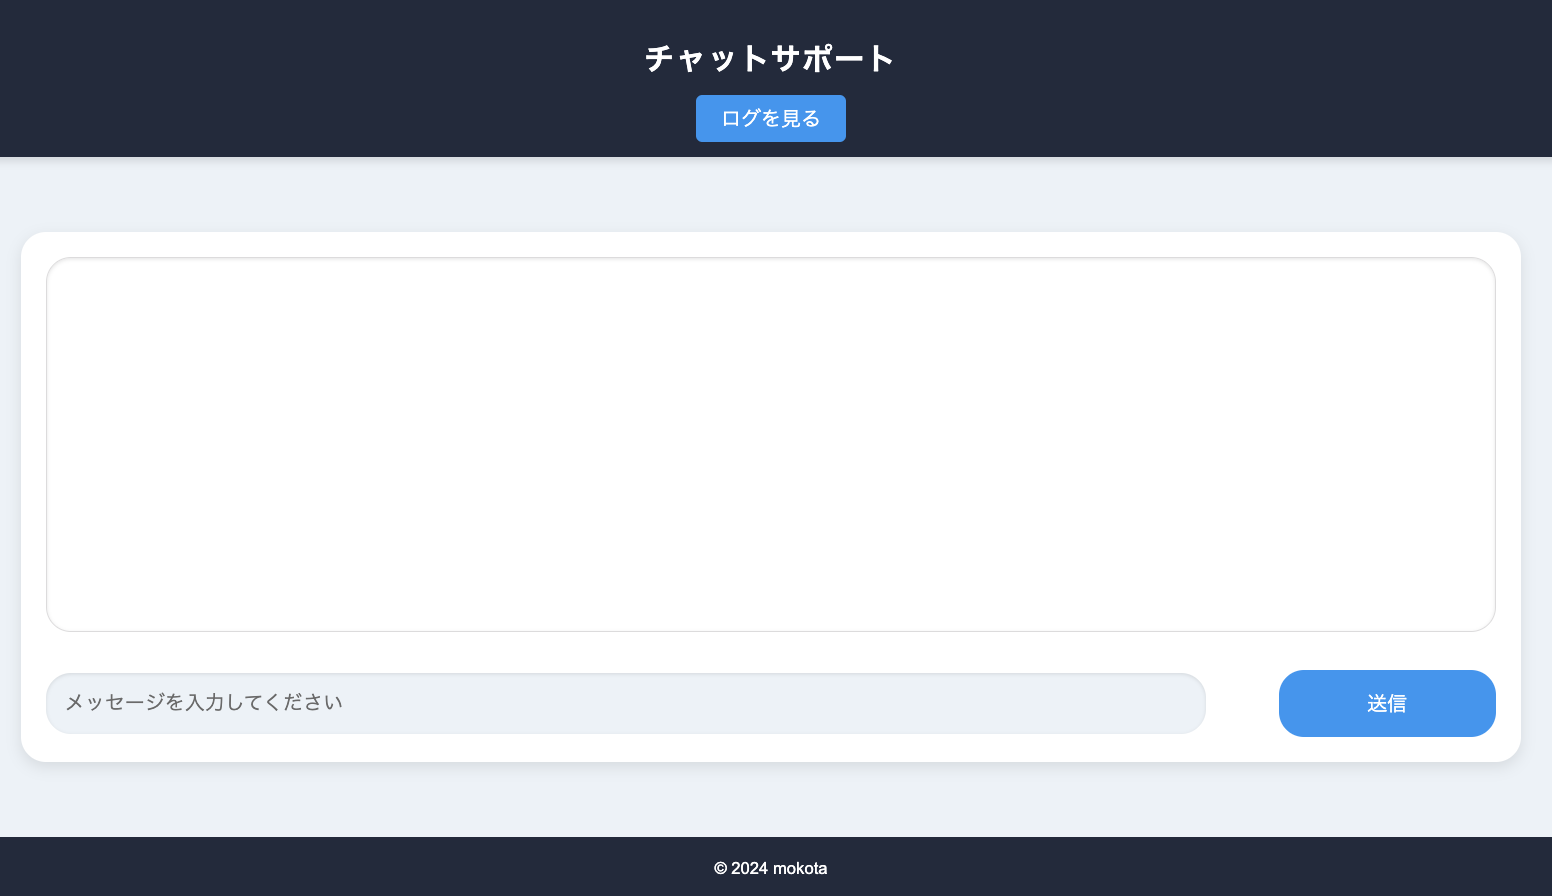
ここまで実装すると、見た目もガラッと変わります。
チャット画面みたいな雰囲気になりましたね。
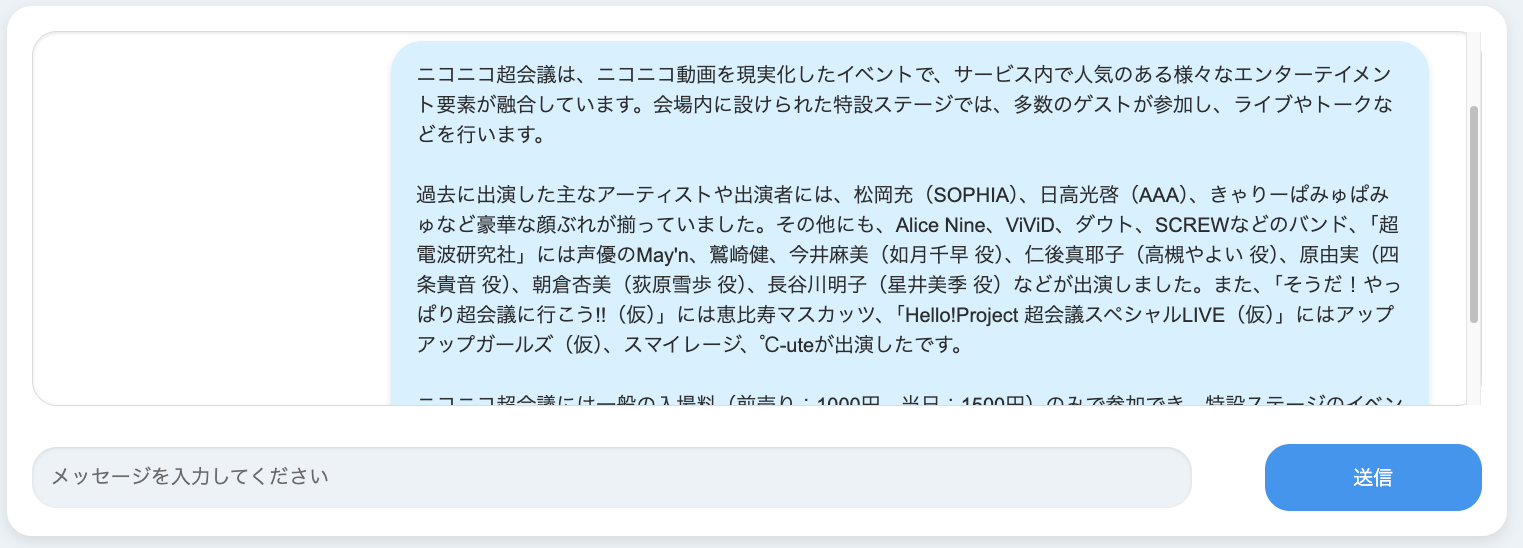
それではメッセージを入力して、送信ボタンを押してみます。
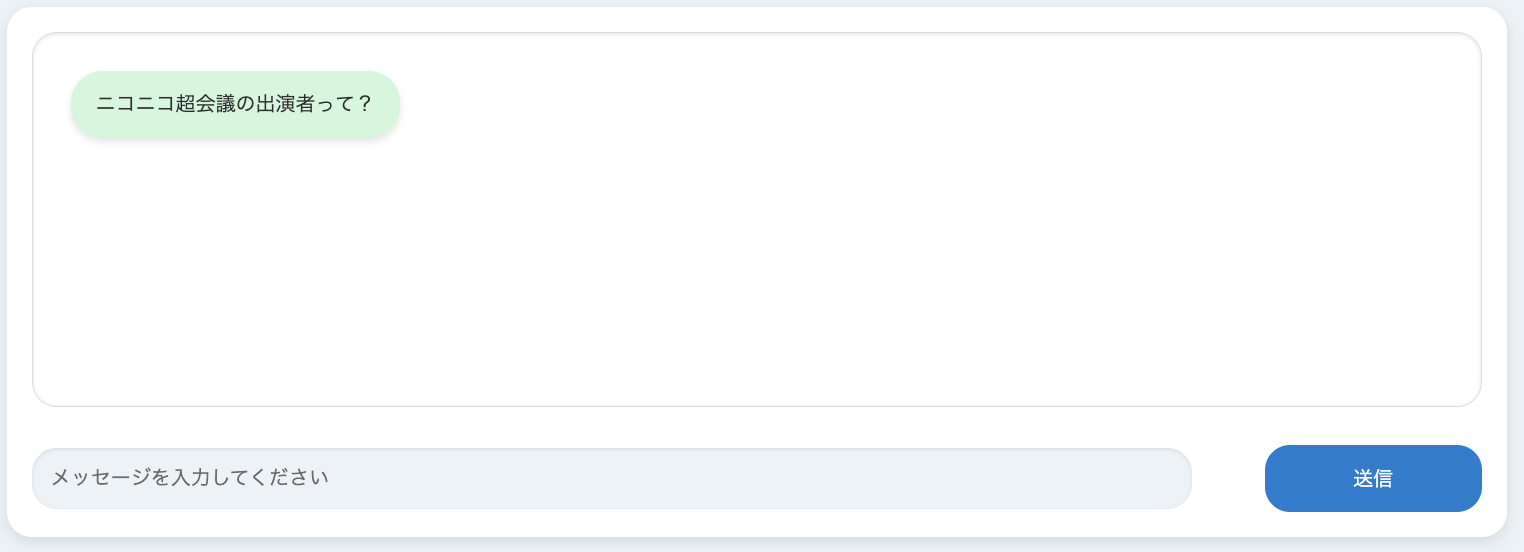
15秒ほど待つと、回答が出力されると思います。
ちゃんと出演者について答えることができていますね、賢い!
また、JavaScript(main.js)ファイルを追加したことでスクロール処理が可能となりました。
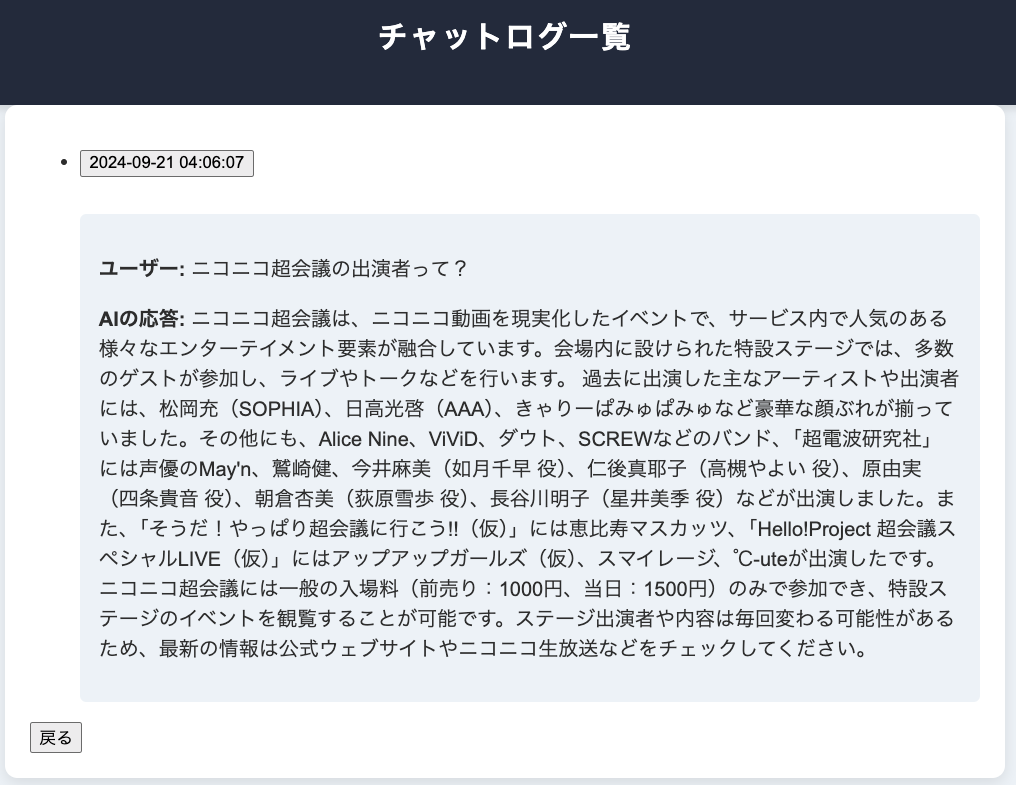
さらに"ログを見る"ボタンを押すと質問に回答した日付が表示され、
日付をクリックすると質問と回答が表示されるようになっています。
ログ機能もバッチリです✨
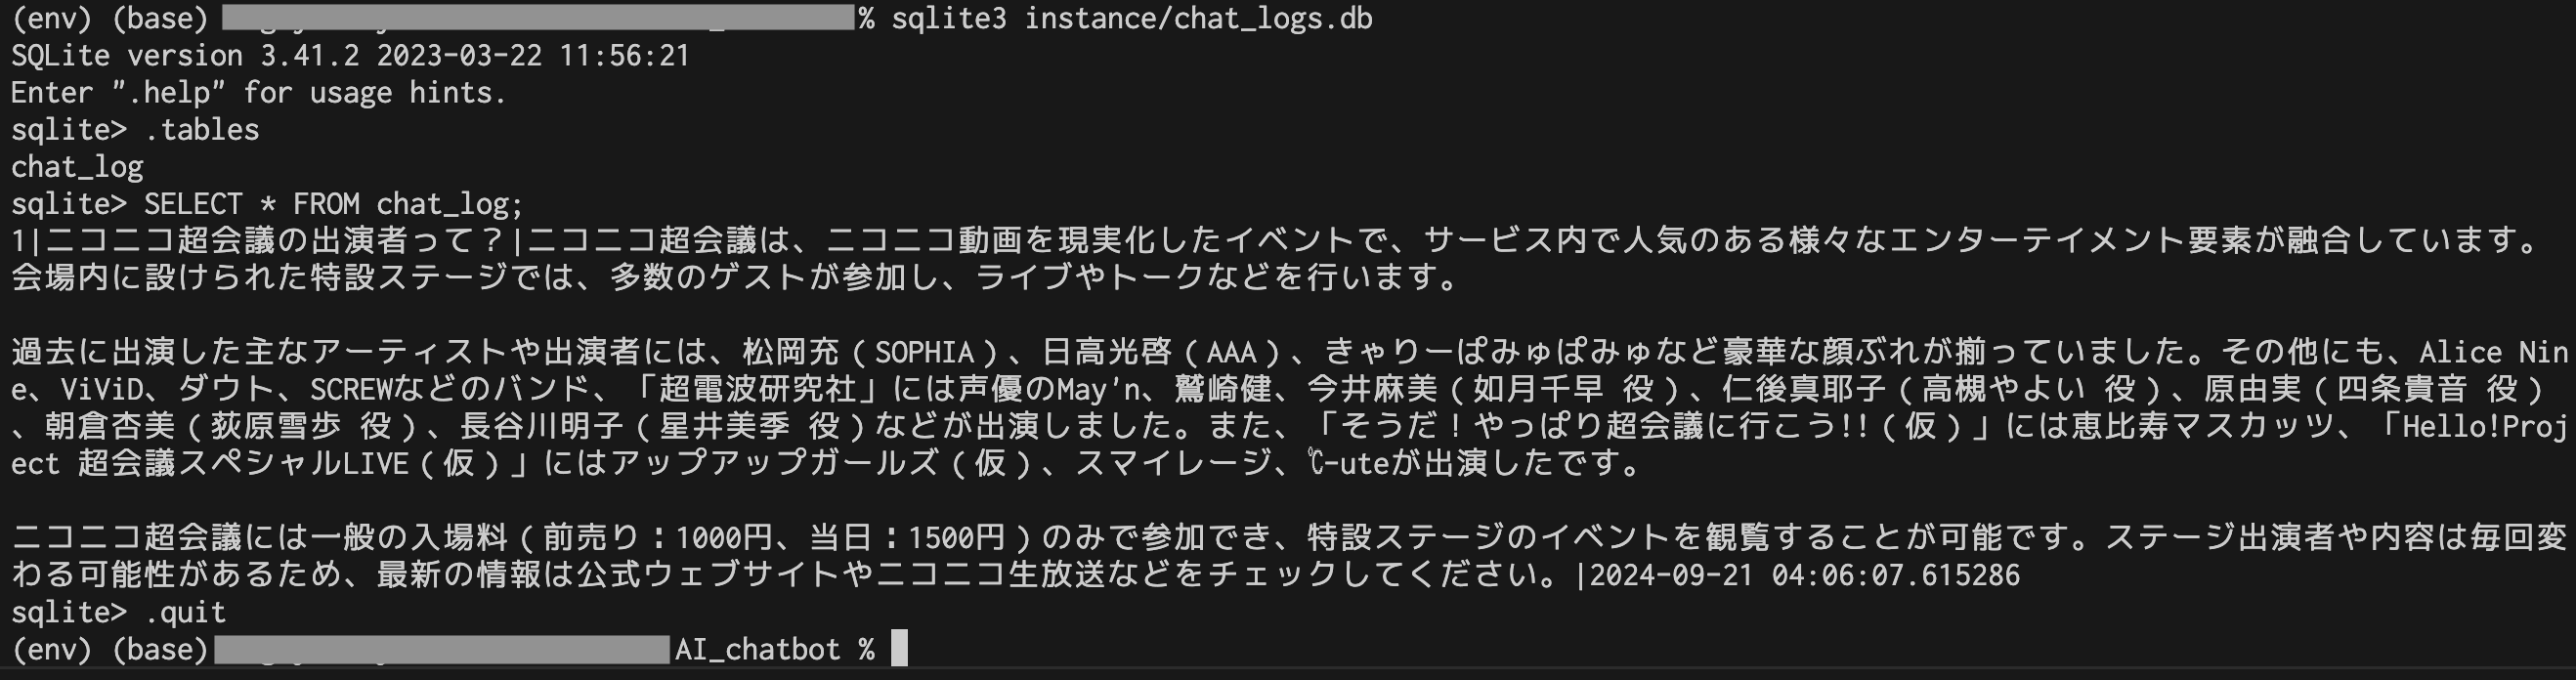
ここで、ちゃんとデータベースにログが記録されているかの確認も行なってみましょう。ターミナルで以下のコマンドを実行します。
sqlite3 instance/chat_logs.db
これでSQLの操作が可能になります。続けて、次のコードを実行します。
.tables
これは現在のデータベース内のすべてのテーブルの一覧を表示するコマンドです。"chat_log"と表示されると思います。
続けて次のコードを実行します。
SELECT * FROM chat_log;
これで、"chat_log"内のデータを全て表示できます。
質問と回答の内容が表示され、ちゃんと記録されてるっぽいです!
最後に、".quit"で処理を抜けたいと思います。
流れがわかりやすいようにターミナルの画面も載せておきます。
こちらを参照するとわかりやすいです↓
実装は以上となります、お疲れ様でした!
より良いアプリケーションにするために、
まだまだ改善の余地はあると思います。例えば、保存されたログから特定のクエリや日時をフィルタリングできる検索機能を追加したり、ログをCSVやExcelファイルとしてエクスポートする機能を追加したりがあります。
RAGについてもデータの前処理方法や、モデルの変更によって精度が上がる可能性があります。また"LangChain"や"LlamaIndex"などのフレームワークを使うことで、もっと簡単に実装もできます。
いろいろと試してみましょう!
RAGの精度を上げる戦略について↓
終わりに
ここまで読んでいただきありがとうございます。
PythonでのWebアプリ開発の強みは、AIを取り入れやすいことだと思います。今後もAIアプリ開発について知識を深め、より良いものを作っていきたいと思います!
参考文献