Spring Bootの公式チュートリアル(Webアプリケーションの保護)を参考に、セキュリティー保護されたフォームを備えたwebページを作成しました。
環境
Maven 3.6.3(Maven 3.2以降ならOK)
OS: macOS Mojave バージョン10.14.6
テキストエディタ: VSCode
Java: 11.0.2
作成
Spring Initializrを開き、以下の内容で土台を作成します。
今回は依存関係として「Spring Web」と「Thymeleaf」を追加します。

出来上がったzipファイルを解凍し、エディターで開きます。
pom.xmlを確認してみましょう。
自動で作成されたpomファイルの内容は以下のとおりです。
<?xml version="1.0" encoding="UTF-8"?>
<project xmlns="http://maven.apache.org/POM/4.0.0" xmlns:xsi="http://www.w3.org/2001/XMLSchema-instance"
	xsi:schemaLocation="http://maven.apache.org/POM/4.0.0 https://maven.apache.org/xsd/maven-4.0.0.xsd">
	<modelVersion>4.0.0</modelVersion>
	<parent>
		<groupId>org.springframework.boot</groupId>
		<artifactId>spring-boot-starter-parent</artifactId>
		<version>2.2.2.RELEASE</version>
		<relativePath/> <!-- lookup parent from repository -->
	</parent>
	<groupId>com.example</groupId>
	<artifactId>securing-web</artifactId>
	<version>0.0.1-SNAPSHOT</version>
	<name>securing-web</name>
	<description>Demo project for Spring Boot</description>

	<properties>
		<java.version>1.8</java.version>
	</properties>

	<dependencies>
		<dependency>
			<groupId>org.springframework.boot</groupId>
			<artifactId>spring-boot-starter-thymeleaf</artifactId>
		</dependency>
		<dependency>
			<groupId>org.springframework.boot</groupId>
			<artifactId>spring-boot-starter-web</artifactId>
		</dependency>

		<dependency>
			<groupId>org.springframework.boot</groupId>
			<artifactId>spring-boot-starter-test</artifactId>
			<scope>test</scope>
			<exclusions>
				<exclusion>
					<groupId>org.junit.vintage</groupId>
					<artifactId>junit-vintage-engine</artifactId>
				</exclusion>
			</exclusions>
		</dependency>
	</dependencies>

	<build>
		<plugins>
			<plugin>
				<groupId>org.springframework.boot</groupId>
				<artifactId>spring-boot-maven-plugin</artifactId>
			</plugin>
		</plugins>
	</build>

</project>
まずは、何もセキュリティ保護されていないWebアプリを作ってみます。
構造はhome画面と「Hello World」が表示されるだけのシンプルなものです。
home画面から作成します。src/main/resources/templates下にhome.htmlファイルを作ります。
内容は以下のとおりです。
<!DOCTYPE html>
<html xmlns="http://www.w3.org/1999/xhtml" xmlns:th="https://www.thymeleaf.org" xmlns:sec="https://www.thymeleaf.org/thymeleaf-extras-springsecurity3">
    <head>
        <title>Spring Security Example</title>
    </head>
    <body>
        <h1>Welcome!</h1>

        <p>Click <a th:href="@{/hello}">here</a> to see a greeting.</p>
    </body>
</html>
次にhello画面を作成します。src/main/resources/templates下にhello.htmlファイルを作ります。
内容は下記の通りです。
<!DOCTYPE html>
<html xmlns="http://www.w3.org/1999/xhtml" xmlns:th="https://www.thymeleaf.org"
      xmlns:sec="https://www.thymeleaf.org/thymeleaf-extras-springsecurity3">
    <head>
        <title>Hello World!</title>
    </head>
    <body>
        <h1>Hello world!</h1>
    </body>
</html>
htmlタグ以外はいたって普通のhrmlです。こちらはセキュリティを実装する時にまた編集します。
では次に、src/main/java/com/example/securingweb下にMvcConfig.javaファイルを作ります。
内容は以下のとおりです。
package com.example.securingweb;

import org.springframework.context.annotation.Configuration;
import org.springframework.web.servlet.config.annotation.ViewControllerRegistry;
import org.springframework.web.servlet.config.annotation.WebMvcConfigurer;

@Configuration
public class MvcConfig implements WebMvcConfigurer {

	public void addViewControllers(ViewControllerRegistry registry) {
		registry.addViewController("/home").setViewName("home");
		registry.addViewController("/").setViewName("home");
		registry.addViewController("/hello").setViewName("hello");
		registry.addViewController("/login").setViewName("login");
	}

}
MvcConfigクラスが継承しているWebMvcConfigurerクラスは、addViewControllersメソッドをオーバーライドしているので、このようなConfigクラスを作ればコントローラーを作らずにMVCの構成を実現することができます。
@Configurationは、Springの様々な設定を行えるようにするためのものです。また、Configurationクラスでは、クラスに@Configurationをつけます。
では、アプリを実行してみましょう。この時点では何もセキュリティ保護されていません。
実行
以下のコマンドを実行します。
./mvnw spring-boot:run
起動したら、ブラウザで http://localhost:8080/hello を開いてみましょう。
ログインすることなくhello画面に行き着くはずです。
Spring Securityを設定する
では、ここからはログインしていないユーザーがhello画面を表示できないようにしていきます。
今の仕様だと、ユーザーがhome画面にあるリンクをクリックすると、そのまますぐhello画面に行ってしまいます。これをログイン後のみに表示するように、Spring Securityを使って変えていきましょう。
pomファイルに以下の依存関係を追加します。
<dependency>
  <groupId>org.springframework.boot</groupId>
  <artifactId>spring-boot-starter-security</artifactId>
</dependency>
<dependency>
  <groupId>org.springframework.security</groupId>
  <artifactId>spring-security-test</artifactId>
  <scope>test</scope>
</dependency>
次に、src/main/java/com/example/securingweb下に、以下の内容でWebSecurityConfig.javaファイルを作成します。
package com.example.securingweb;

import org.springframework.context.annotation.Bean;
import org.springframework.context.annotation.Configuration;
import org.springframework.security.config.annotation.web.builders.HttpSecurity;
import org.springframework.security.config.annotation.web.configuration.EnableWebSecurity;
import org.springframework.security.config.annotation.web.configuration.WebSecurityConfigurerAdapter;
import org.springframework.security.core.userdetails.User;
import org.springframework.security.core.userdetails.UserDetails;
import org.springframework.security.core.userdetails.UserDetailsService;
import org.springframework.security.provisioning.InMemoryUserDetailsManager;

@Configuration
@EnableWebSecurity
public class WebSecurityConfig extends WebSecurityConfigurerAdapter {
	@Override
	protected void configure(HttpSecurity http) throws Exception {
		http
			.authorizeRequests()
                                // "/", "/home"は全ユーザーがアクセス可能
				.antMatchers("/", "/home").permitAll()
                                // それ以外のアクセスは認証が必要
				.anyRequest().authenticated()
				.and()
                        // ログイン、ログアウトは全ユーザーがアクセス可能
			.formLogin()
				.loginPage("/login")
				.permitAll()
				.and()
			.logout()
				.permitAll();
	}

	@Bean
	@Override
	public UserDetailsService userDetailsService() {
		UserDetails user =
                         // デフォルトでのユーザー名とパスワードを指定
			 User.withDefaultPasswordEncoder()
				.username("user")
				.password("password")
				.roles("USER")
				.build();

		return new InMemoryUserDetailsManager(user);
	}
}
@EnableWebSecurity
セキュリティ機能を使うことができるアノテーションです。
permitAll()
全ユーザーにアクセスを許可するメソッドです。反対に、匿名アクセスは許可しません。
authenticated()
認証を求めるためのメソッドです。
UserDetailsServiceは、UserDetailsServiceクラスをオーバーライドしてユーザーの設定を指定しています。
これでログイン後のユーザーのみがhello画面に行くことができます。
次に、ログインページを作ります。src/main/resources/templates下にlogin.htmlファイルを作成します。
<!DOCTYPE html>
<html xmlns="http://www.w3.org/1999/xhtml" xmlns:th="https://www.thymeleaf.org"
      xmlns:sec="https://www.thymeleaf.org/thymeleaf-extras-springsecurity3">
    <head>
        <title>Spring Security Example </title>
    </head>
    <body>
        <div th:if="${param.error}">
            Invalid username and password.
        </div>
        <div th:if="${param.logout}">
            You have been logged out.
        </div>
        <form th:action="@{/login}" method="post">
            <div><label> User Name : <input type="text" name="username"/> </label></div>
            <div><label> Password: <input type="password" name="password"/> </label></div>
            <div><input type="submit" value="Sign In"/></div>
        </form>
    </body>
</html>
${param.error}や${param.logout}で、errorやlogoutのパラメータを取得しています。
errorがtrueならエラーメッセージを、logoutがtrueならログアウトメッセージを表示するようにしています。
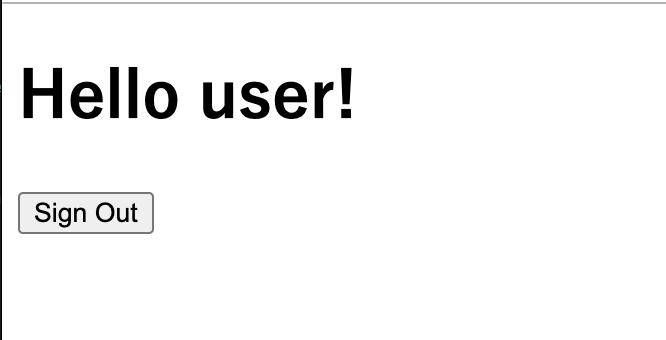
最後に、現在のユーザー名を表示してサインアウトできるようにします。これを行うには、hello.htmlで現在のユーザーに挨拶し、サインアウトフォームを表示するようにします。
では、hello.htmlを以下の内容に編集します。
<!DOCTYPE html>
<html xmlns="http://www.w3.org/1999/xhtml" xmlns:th="https://www.thymeleaf.org"
      xmlns:sec="https://www.thymeleaf.org/thymeleaf-extras-springsecurity3">
    <head>
        <title>Hello World!</title>
    </head>
    <body>
        <h1 th:inline="text">Hello
// ユーザー名を取得して画面に表示する
[[${#httpServletRequest.remoteUser}]]!</h1>
        <form th:action="@{/logout}" method="post">
            <input type="submit" value="Sign Out"/>
        </form>
    </body>
</html>
Sign Outフォームは/logoutにPOST送信をします。ログアウトすると、/login?logoutにリダイレクトします。
最後にアプリ実行用に、SecuringWebApplication.javaに少し書き加えます。
src/main/java/com/example/securingweb下にあるSecuringWebApplication.javaを下記の内容に編集します。
package com.example.securingweb;

import org.springframework.boot.SpringApplication;
import org.springframework.boot.autoconfigure.SpringBootApplication;

@SpringBootApplication
public class SecuringWebApplication {

	public static void main(String[] args) throws Throwable {
		SpringApplication.run(SecuringWebApplication.class, args);
	}

}
再度実行
以下のコマンドでアプリを起動してみます。
./mvnw spring-boot:run
起動したら http://localhost:8080 を開いてみましょう。
リンクをクリックすると最初のページにきます。

hereをクリックするとログイン画面に遷移します。
User Nameにuser、Passwordにpasswordを打ち込みます。

ログインできました。
User NameとPasswordに違うものを入れるとちゃんと弾かれます。

Sign Outボタンをクリックすると認証が取り消され、ログアウトメッセージとともにログインページに戻ります。
