まえおき
先日投稿した「実践コンピュータビジョン」の全演習問題をやってみたの詳細です。なお、あくまで「やってみた」であって、模範解答ではありません。「やってみた」だけなので、うまくいかなかった、という結果もあります。
この記事は「実践コンピュータビジョン」(オライリージャパン、Jan Erik Solem著、相川愛三訳)の演習問題に関する記事です。この記事を書いた人間と書籍との間には何の関係もありません。著者のJan氏と訳者の相川氏にはコンピュータビジョンについて学ぶ機会を与えて頂いたことに感謝します。
実践コンピュータビジョンの原書("Programming Computer Vision with Python")の校正前の原稿は著者のJan Erik Solem氏がCreative Commons Licenseの元で公開されています。。
回答中で使用する画像の多く、また、sfm.py, sift.py, stereo.pyなどの教科書中で作られるファイルはこれらのページからダウンロードできます。
オライリージャパンのサポートページ
Jan Erik Solem氏のホームページ
相川愛三氏のホームページ
ここで扱うプログラムはすべてPython2.7上で動作を確認しています。一部の例外を除きほとんどがJupyter上で開発されました。また必要なライブラリーを適宜インストールしておく必要があります。Jupyter以外の点は、上記の書籍で説明されています。
結構な分量なので章毎に記事をアップしています。今回は第7章です。
7章 画像検索
内容に基づく検索から画像検索、さらにはデータベースやWebサーバーなどを学びます
この章で使うファイルのうち非常に重要なのがimagesearchなのですが、私の環境ではそのままでは動作しませんでした。まずpysqlite2が使えません。sqlite3に置き換えられたようです。そこでsqlite3をインストールします。Ubuntu16.04では
sudo apt-get install sqlite3 libsqlite3-dev
でインストールできました。
次に、imagesearch.py内の以下の行を
from pysqlite2 import dbapi2 as sqlite
以下のように置き換えます
from sqlite3 import dbapi2 as sqlite
ukbenchの公開が終了していたので、教科書でも紹介されているcaltechの画像データベースであるCaltech1011を使いました。
http://www.vision.caltech.edu/Image_Datasets/Caltech101/
このデータベースは数が多いのでデータベースの構築などに結構な時間がかかりました。
更に、予め教科書7.1.1の内容に従い、SIFT特徴量を抽出し、7.2.1の内容に従いヴォキャブラリーなどをpickleしておきます('caltech_imlist.pkl')。さらに、7.3の内容にしたがいデータベース('test.db')を作成しておきます。このあたりは教科書の内容に従えば済むので省きます。
7.7.1 Try to speed up queries by only using part of the words in the query image to construct the list of candidates. Use the idf weight as a criteria for which words to use.
ビジュアルワードの一部だけを使うことで検索を高速化
私の回答
教科書中で作成するライブラリーのimagesearch.py2を使います。
候補のリストを作っているのはこの中のcandidates_from_histogramの部分なので、これを変更し、別のライブラリ(imagesearchE.py)にします。
    def candidates_from_histogramw(self, imwords):
        """ Get list of images with similar words. """

        # get the word ids
        wd = imwords.nonzero()[0]

     # ここから演習問題のための変更
        words = [(w, imwords[w]) for w in wd]
        words.sort(cmp=lambda x, y: cmp(x[1], y[1]))
        words.reverse()
        wordmax = 10
        if len(words)>wordmax:
            words = words[:wordmax]
        # ここまで演習問題のための変更

        # find candidates
        candidates = []
        for word in words:
            c = self.candidates_from_word(word[0])
            candidates += c

        # take all unique words and reverse sort on occurrence
        tmp = [(w, candidates.count(w)) for w in set(candidates)]
        tmp.sort(cmp=lambda x, y: cmp(x[1], y[1]))
        tmp.reverse()

        # return sorted list, best matches first
        return [w[0] for w in tmp]
これでヒストグラムのうち上位10個だけをつかって候補を作るようになりました。
他の部分は元のimagesearch.pyと同じです。
実際の検索部分です
from PIL import Image
from numpy import *
from pylab import *
import os
import pickle
import sift
import imagesearch

with open('caltech_imlist.pkl', 'rb') as f:
    imlist = pickle.load(f)
    featlist = pickle.load(f)
nbr_images = len(imlist)
with open('vocabulary.pkl', 'rb') as f:
    voc = pickle.load(f)
src = imagesearch.Searcher('test.db', voc)

# 画像読み取りの確認
imshow(Image.open(imlist[920]))
title(imlist[920])
axis('off')
show()
この画像を検索します

# まずは教科書通りの方法
imagesearch = reload(imagesearch)
src = imagesearch.Searcher('test.db', voc)
res = [w[1] for w in src.query(imlist[920])[:10]]
print res
imagesearch.plot_results(src, res)
[921, 2330, 2405, 3278, 4287, 664, 2311, 654, 1823, 771]

# 次は上位10個のみをつかった方法
import imagesearchE
imagesearchE = reload(imagesearchE)
srcE = imagesearchE.Searcher('test.db', voc)
nbr_results = 10
res = [w[1] for w in srcE.query(imlist[920])[:nbr_results]]
print res
imagesearchE.plot_results(srcE, res)
[921, 2330, 2405, 3278, 664, 2311, 654, 1823, 771, 2190]
少しだけ結果が変わりました。期待した高速化はあまり実現されていません。おそらく候補の絞り込みにかかる時間の方が、候補を選ぶのにかかる時間よりも長いのでしょう。
7.7.2 Implement a visual stop word list of the most common visual words in your vocabulary (say the top 10%) and ignore these words. How does this change the search quality?
頻出10%などを使ったビジュアルストップワードを作り、これらを無視するようにせよ。
私の回答
(githubでは演習7.7.1と一緒においてあります)
https://github.com/moizumi99/CVBookExercise/blob/master/Chapter-7/CV%20Book%20Ch%207%20Exercise%201.ipynb
あまりに頻出するビジュアルワードは価値が少ないということでしょうか。
ここではimagesearch.pyにstopwordを使った新しいクラスsearcher2を追加して、新しいライブラリimagesearchE.pyを作りました。
class Searcher2(object):

    def __init__(self, db, voc):
        """ Initialize with the name of the database. """

        self.con = sqlite.connect(db)
        self.voc = voc
        self.stopwords = None

    def __del__(self):
        self.con.close()

    def candidates_from_word(self,imword):
        """ Get list of images containing imword. """

        im_ids = self.con.execute(
            "select distinct imid from imwords where wordid=%d" % imword).fetchall()
        return [i[0] for i in im_ids]

    def candidates_from_histogram(self, imwords):
        """ Get list of images with similar words. """

        # get the word ids
        wd = imwords.nonzero()[0]
        words = [(w, imwords[w]) for w in wd]
        words.sort(cmp=lambda x, y: cmp(x[1], y[1]))
        words.reverse()
        if len(words)>20:
            words = words[:20]

        # find candidates
        candidates = []
        for word in words:
            c = self.candidates_from_word(word[0])
            candidates += c

        # take all unique words and reverse sort on occurrence
        tmp = [(w, candidates.count(w)) for w in set(candidates)]
        tmp.sort(cmp=lambda x, y: cmp(x[1], y[1]))
        tmp.reverse()

        # return sorted list, best matches first
        return [w[0] for w in tmp]

    def get_imhistogram(self, imname):
        """ Return the word histogram for an image. """

        im_id = self.con.execute(
            "select rowid from imlist where filename='%s'" % imname).fetchone()
        s = self.con.execute(
            "select histogram from imhistograms where rowid='%d'" % im_id).fetchone()

        # use pickle to decode NumPy arrays from string
        return pickle.loads(str(s[0]))

    def query(self, imname):
        """ Find a list of matching images for imname """

        self.find_stop_words()
        #print "self.stopwords", self.stopwords
        h = self.get_imhistogram(imname)
        h[self.stopwords] = 0   # ignore the stop words == too frequent words
        # print h.nonzero()[0]
        candidates = self.candidates_from_histogram(h)

        # if you want to select every picture as candidates, use this
        #candidates = self.con.execute("select rowid from imlist").fetchall()
        #candidates = [w[0] for w in candidates]

        matchscores = []
        j = 0
        for imid in candidates:
            # get the name
            cand_name = self.con.execute(
                "select filename from imlist where rowid=%d" % imid).fetchone()
            cand_h = self.get_imhistogram(cand_name)
            cand_h[self.stopwords]=0
            # cand_dist = sqrt(sum((h-cand_h)**2))  # use L2 distance
            cand_dist = abs(sum(h*cand_h))          # Cross correlation
            cand_dist = cand_dist/(sqrt(sum(h**2))*sqrt(sum(cand_h**2)))
            matchscores.append((cand_dist, imid))
            # print j, ': ', imid, cand_name, cand_dist
            j += 1

        # return a sorted list of distances and database ids
        matchscores.sort(reverse=True)
        return matchscores    # correlation is larger if they are close

    def get_filename(self, imid):
        """ Return the filename for an image id"""

        s = self.con.execute(
            "select filename from imlist where rowid='%d'" % imid).fetchone()
        return s[0]

    def find_stop_words(self, force=False):
        """ record the stop words = most common 10% """

        if (not self.stopwords==None) and (force==False):
            return

        wds = self.con.execute("select wordid from imwords").fetchall()
        l = len(set(wds))/10
        frq = [(w, wds.count(w)) for w in set(wds)]
        frq.sort(cmp=lambda x, y: cmp(-x[1], -y[1]))
        #print "frq[:l]", frq[:l]
        self.stopwords = [int(w[0][0]) for w in frq[:l]]
実際の検索部分(ライブラリのインポートやデータベースの読み込みは演習1と同じなので省きます)
import imagesearchE
imagesearchE = reload(imagesearchE)
src2 = imagesearchE.Searcher2('test.db', voc)
nbr_results = 10
res = [w[1] for w in src2.query(imlist[920])[:nbr_results]]
print res
imagesearchE.plot_results(src2, res)

あれ?全然おかしいですねえ。何か間違えたのかもしれません。(「やってみた」なのでこういうこともあります)
7.7.3 Visualize a visual word by saving all image features that are mapped to a given word id. Crop image patches around the feature locations (at the given scale) and plot them in a figure. Do the patches for a given word look the same?
ビジュアルワードを可視化せよ
私の回答
指示が曖昧な気がしますが、できるだけやってみます。
from PIL import Image
from numpy import *
import numpy as np
from pylab import *
import os
from scipy.cluster.vq import *
from sqlite3 import dbapi2 as sqlite
import matplotlib.pyplot as plt

# 準備
import pickle
import sift
import imagesearch
with open('caltech_imlist.pkl', 'rb') as f:
    imlist = pickle.load(f)
    featlist = pickle.load(f)
nbr_images = len(imlist)
with open('vocabulary.pkl', 'rb') as f:
    voc = pickle.load(f)
db = 'test.db'
con = sqlite.connect(db)

# 全id_listを見つける
id_list = con.execute("select rowid from imlist").fetchall()
id_list = [i[0] for i in id_list]

target_word = 45
cnt=0
figure(figsize=(8, 8))
gray()
for id in id_list[:80]:
    locs, descr  = sift.read_features_from_file(featlist[id-1])
    words, distance = vq(descr, voc.voc)
    index = np.where(words==target_word)
    if len(index[0])<=0:
        continue
    print id, ':', locs[id]
    scale = uint(locs[id][2]*4+0.5)
    im = array(Image.open(imlist[id-1]).convert('L'))
    y1 = locs[id][1]-scale  # locs is x, y, scale, angle
    x1 = locs[id][0]-scale
    y2 = y1 + scale*2
    x2 = x1 + scale*2
    y1 = y1 if (0<=y1) else 0
    x1 = x1 if (0<=x1) else 0
    y2 = y2 if (y2<im.shape[0]) else im.shape[0]  # shape is ysize, xsize
    x2 = x2 if (x2<im.shape[1]) else im.shape[1]
    x1 = int(x1)
    x2 = int(x2)
    y1 = int(y1)
    y2 = int(y2)
    imsmall = im[y1:y2, x1:x2]
    if x2-x1<scale*2:
        imsmall = hstack((imsmall, zeros((imsmall.shape[0], int(scale*2-(x2-x1))))))
    if y2-y1<scale*2:
        imsmall = vstack((imsmall, zeros((int(scale*2-(y2-y1)), imsmall.shape[1]))))
    subplot(4, 10, cnt+1)
    imshow(imsmall)
    axis('off')
    cnt = cnt+1
show()
1 : [ 260.366 16.2702 0.944967 6.11679 ]
3 : [ 50.5488 18.7735 1.12843 3.96347]
15 : [ 228.456 47.6591 0.937656 6.08131 ]
30 : [ 266.872 66.2148 1.31523 1.71622]
32 : [ 78.7353 89.0433 1.15863 5.78077]
35 : [ 75.8466 153.086 1.11213 1.05926]
37 : [ 266.812 48.6936 1.13796 2.02118]
42 : [ 134.362 117.231 1.09622 5.33781]
43 : [ 143.345 119.231 1.02152 2.12856]
46 : [ 85.4556 210.34 0.998186 1.2156 ]
49 : [ 54.8159 164.446 1.10709 5.45106]
54 : [ 100.914 118.207 0.917513 3.13865 ]
57 : [ 109.477 167.533 0.903172 5.54998 ]
58 : [ 69.5916 239.319 1.37062 5.74288]
68 : [ 215.675 75.6031 1.04391 1.36544]
71 : [ 84.2096 165.022 1.11689 1.87105]
74 : [ 92.4025 196.353 0.814783 0.420242]
77 : [ 28.2653 211.337 0.943219 4.60741 ]
80 : [ 68.5352 120.076 0.911099 2.63911 ]
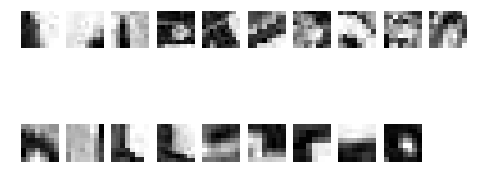
自分でコードを書いてからだいぶたったので、何がしたかったのかうろおぼえですが、各画像の特徴点を抜き出して表示しています。問題の方も何をさせたいのかよくわかりませんし、これで良しとします。
7.7.4 Experiment with using different distance measures and weighting in the query() method. Use the score from compute_ukbench_score() to measure your progress.
距離の尺度を変えてみなさい
私の回答
imageserch.pyを改造します。他は演習1と同じです。imagesearch.pyのquery()の定義中
cand_dist = sqrt( sum( self.voc.idf*(h-cand_h)**2 ) )
を
            h1 = (h - average(h))
            h1 = h1/sqrt(sum(h1**2))
            cand_h = cand_h - average(cand_h)
            cand_h = cand_h/sqrt(sum(cand_h**2))
            cand_dist = 1-abs(sum(h1*cand_h))
に変更して、相互相関関数を距離の関数とします。相関関数は大きい方が距離が近いので符号を反転します。結果
# 差の二乗和(教科書の方法)
imagesearch = reload(imagesearch)
src = imagesearch.Searcher('test.db', voc)
res = [w[1] for w in src.query(imlist[920])[:10]]
print res
imagesearch.plot_results(src, res)
差の二乗和(教科書の方法)

# 相互相関関数の結果
import imagesearchE
imagesearchE = reload(imagesearchE)
srcE = imagesearchE.Searcher('test.db', voc)
nbr_results = 10
res = [w[1] for w in srcE.query(imlist[920])[:nbr_results]]
print res
imagesearchE.plot_results(srcE, res)
相互相関関数の結果

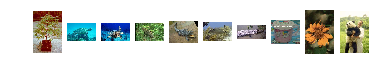
左端の絵と似た絵を探しています。
相互相関関数の方が良い結果なような気がします
7.7.5 Throughout this chapter we only used SIFT features in our vocabulary. This completely disregards the color information as you can see in the example results in Figure 7.2. Try to add color descriptors and see if you can improve the search results.
色の情報も使え
私の回答
ここではimagesearch.pyに色情報を扱うadd_to_index_colorなどの機能を付け加えました。以下変更点のみです。
    def create_tables(self):
        """ Create the database table. """

        self.con.execute('create table imlist(filename)')
        self.con.execute('create table imwords(imid, wordid, weight, vocname)')  # weight is added
        self.con.execute('create table imcolor(imid, col0, col1, col2)')  # new: color information
        self.con.execute('create table imhistograms(imid, histogram, vocname)')
        self.con.execute('create index im_idx on imlist(filename)')
        self.con.execute('create index wordid_idx on imwords(wordid)')
        self.con.execute('create index imid_idx on imwords(imid)')
        self.con.execute('create index imidhist_idx on imhistograms(imid)')
        self.db_commit()

    def add_to_index_color(self, imname, col):
        """ Take an image with the color """

        if self.is_indexed_color(imname):
            return
        print 'indexing', imname, ' color'
         # get the imid
        imid = self.get_id(imname)

        # add color to the index
        self.con.execute("insert into imcolor(imid, col0, col1, col2) \
			values (?,?,?,?)", (imid, col[0], col[1], col[2]))

    def is_indexed_color(self, imname):
        """ Returns True if imname has been indexed. """

        im = self.con.execute("select rowid from imlist where \
			filename='%s'" % imname).fetchone()
        if (im==None):
            return False

        imcolor = self.con.execute("select rowid from imcolor where \
			imid='%s'" % im).fetchone()
        return imcolor != None

    def query(self, imname):
        """ Find a list of matching images for imname """

        h = self.get_imhistogram(imname)
        print "h.nonzero()[0]", h.nonzero()[0]
        candidates = self.candidates_from_histogram(h)
        print "candidates", candidates

        col = array(self.get_color(imname))
        matchscores = []
        for imid in candidates:
            cand_name = self.con.execute(
                "select filename from imlist where rowid=%d" % imid).fetchone()
            cand_h = self.get_imhistogram(cand_name)
            cand_col = array(self.get_color(cand_name))
            cand_dist = abs(sum(h*cand_h))          # Cross correlation
            cand_dist = cand_dist/(sqrt(sum(h**2))*sqrt(sum(cand_h**2)))
            col_dist = abs(sum(col*cand_col))
            col_dist = col_dist/(sqrt(sum(col**2))*sqrt(sum(cand_col**2)))
            matchscores.append((cand_dist+col_dist, imid))
        matchscores.sort(reverse=True)
        return matchscores    # correlation is larger if they are close
実行部分は演習1とほぼ同じなので省きます。結果は


上がターゲット、下が検索結果です。
似た感じの色のものが検索できています。
7.7.6 For large vocabularies using arrays to represent the visual word frequencies is inefficient since most of the entries will be zero (think of the case with a few hundred thousand words and images with typically a thousand features). One way to overcome this inefficiency is to use dictionaries as sparse array representations.
Replace the arrays with a sparse class of your own and add the necessary methods. Alternatively, try to use the scipy.sparse module.
スパース配列を使って効率化せよ
私の回答
ヒントではscipy.sparseを使っても良いとありますが、勉強を兼ねてここではmysparse.pyというモジュールを使ってみました。
class mysparse(object):

    def __init__(self, l=[]):
        self.l = [[index for index, value in enumerate(l) if not value==0], [value for index, value in enumerate(l) if not value==0]]
        self.size = len(l)

    def get_list(self):
        result = [0]*self.size
        for (i, v) in zip(*self.l):
            result[i] = v
        return result

    def get_value_at(self, i):
        if not i in self.l[0]:
            return 0
        else:
            ii = self.l[0].index(i)
            return self.l[1][ii]

    def set_value_at(self, i, v):
        if i>self.size:
            self.size = i+1
            self.l[0].append(i)
            self.l[1].append(v)
        elif not i in self.l[0]:
            self.l[0].append(i)
            self.l[1].append(v)
        else:
            ii = self.l[0].index(i)
            self.l[1][ii] = v
結果


同じですね。パフォーマンスに関してはあまり変わっていません。高速化したければ定評のあるライブラリーを使うべきです。
7.7.7 As you try to increase the size of the vocabulary the clustering time will take too long and the projection of features to words also becomes slower. Implement a hierarchical vocabulary using hierarchical k-mean clustering and see how this improves scaling. See the paper [23] for details and inspiration.
規模が大きくなるに連れクラスタリングに時間がかかるようになる。階層型k平均クラスター法を使い、スケーラビリティの向上を確認せよ。
私の回答
なんだかずいぶんざっくりした問題分ですね。階層型k平均クラスター法を使うために、次のような関数を使いました。
def divide_branch_with_center(data, branch, k, min_size, depth):
    global cnt
    # print depth, ':', len(branch)
    div = min(k, len(branch))
    if (div<=1) or (len(branch)<=min_size):
        return []
    centroids, distortion = kmeans(data[branch], k)
    code, distance = vq(data[branch], centroids)
    new_branch = []
    for i in range(k):
        ind = where(code==i)[0]
        if len(ind)==0:
            continue
        else:
            cnt += 1
            word_list.append(centroids[i])
            new_branch.append((centroids[i], distance[i], divide_branch_with_center(data, branch[ind], k, min_size, depth+1), cnt-1))
    return new_branch

def get_distance(l1, l2):
    try:
        return sqrt(sum([(i1-i2)**2 for i1, i2 in zip(l1, l2)]))
    except:
        print l1, l2
        raise

def get_word(node, d):
    if len(node[2])==0:
        return node[3]
    min_distance = get_distance(node[2][0][0], d)
    next_node = 0
    for i in arange(1, len(node)):
        distance = get_distance(node[2][i][0], d)
        if (distance<min_distance):
            min_distance = distance
            next_node = i
    return get_word(node[2][next_node], d)
全体のコードは長くなるので上記のgithubをご覧ください。結果です。


肝心のパフォーマンスに関してですが、何ヶ月か前に実際問題を解いていた当時のメモに「やっては見た。階層型クラスターの実装はできた。残念ながら全然速くない」と疲れた感じで書いてあります。実際遅いです。
第7章終わり
この章はライブラリーの相性やらなにやらで随分苦労しましたが、同時にずいぶん勉強になった気がします。ただ答えの質はよくないですね。幸い誰に採点されるだけでも無いのいいのですが。
-
今気がついたのですが、Caltech256というものが公開されているようですね。 ↩