LaTeXをWSL2で使う
WSL2でLaTeXを使ってみたところネイティブのWindows上で使うより速かったので記事を書きました。間違いなどありましたらご指摘お願いします。
なお、環境構築に関してはtexlive2020(basic)のインストール on WSL - 晴耕雨読の記事を全面的に参考にさせていただいています。
WSL2を入れる
Windows 10 用 Windows Subsystem for Linux のインストール ガイド
今回はディストリビューションとしてUbuntu 20.04 LTSを選択しました。入れたらsudo apt update とsudo apt upgradeしておきましょう。
TeX Liveのインストール
まず先にインストール先のレポジトリを作っておきます。
$ sudo mkdir /usr/local/texlive
$ sudo chown -R $(whoami):$(whoami) /usr/local/
適当なミラーサーバーからインストール用のパッケージを取ってきます。関東だと理研のサーバーが一番近いのでしょうか。
$ wget http://ftp.riken.jp/CTAN/systems/texlive/tlnet/install-tl-unx.tar.gz
$ tar -zxvf install-tl-unx.tar.gz
$ cd install-tl-*    #*には日付が入っているはず
$ $ ./install-tl
あとはCUIに従ってポチポチインストールしていきます。僕は
- schemeはcustom(fullかcustomでないと日本語パッケージが入らない)
- collectionsからGame, Humanities, TeXworks editor, Musicを外す
- optionからシンボリックリンクを配置するために
Oから
===============================================================================
Options customization:

 <P> use letter size instead of A4 by default: [ ]
 <E> execution of restricted list of programs: [X]
 <F> create all format files:                  [X]
 <D> install font/macro doc tree:              [X]
 <S> install font/macro source tree:           [X]
 <L> create symlinks in standard directories:  [ ]
            binaries to:
            manpages to:
                info to:

Actions: (disk space required: 6940 MB)
 <R> return to main menu
 <Q> quit

Enter command:
L押してからEnter3回連打して
===============================================================================
Options customization:

 <P> use letter size instead of A4 by default: [ ]
 <E> execution of restricted list of programs: [X]
 <F> create all format files:                  [X]
 <D> install font/macro doc tree:              [X]
 <S> install font/macro source tree:           [X]
 <L> create symlinks in standard directories:  [X]
            binaries to: /usr/local/bin
            manpages to: /usr/local/man
                info to: /usr/local/info

Actions: (disk space required: 6940 MB)
 <R> return to main menu
 <Q> quit

Enter command:
としました。あとはIを押せばインストールが始まります。30分から1時間ぐらいすれば終わるはずです。終わった後にtex --versionとかしてバージョン表示が出れば成功しているはずです。
VScode側の設定
テキストエディタとして今回はVScodeを使います。とりあえず拡張機能からRemote - WSLとLaTeX Workshopを入れておいて、latexmkでluatexとuptexを使うためにsettings.jsonで以下を設定します。LaTeX WorkshopについてはLaTeX Workshopってなに?どうやって使うの?調べてみた!もどうぞ
"latex-workshop.latex.recipes": [
        {
            "name": "latexmk(lualatex)",
            "tools": [
                "latexmk(lualatex)",
            ]
        },
        {
            "name": "latexmk(uplatex)",
            "tools": [
                "latexmk(uplatex)",
            ]
        }
    ],
"latex-workshop.latex.tools": [
        {
            "name": "latexmk(lualatex)",
            "command": "latexmk",
            "args": [
                "-e",
                "$lualatex=q/lualatex %O -synctex=1 -interaction=nonstopmode -file-line-error %S/",
                "-e",
                "$bibtex=q/upbibtex %O %B/",
                "-e",
                "$biber=q/biber %O --bblencoding=utf8 -u -U --output_safechars %B/",
                "-e",
                "$makeindex=q/upmendex %O -o %D %S/",
                "-norc",
                "-gg",
                "-pdflua",
                "%DOC%"
            ],
        },
        {
            "name": "latexmk(uplatex)",
            "command": "latexmk",
            "args": [
                "-e",
                "$latex=q/uplatex %O -kanji=utf8 -no-guess-input-enc -synctex=1 -interaction=nonstopmode -file-line-error %S/",
                "-e",
                "$bibtex=q/upbibtex %O %B/",
                "-e",
                "$biber=q/biber %O --bblencoding=utf8 -u -U --output_safechars %B/",
                "-e",
                "$makeindex=q/upmendex %O -o %D %S/",
                "-e",
                "$dvipdf=q/dvipdfmx %O -o %D %S/",
                "-norc",
                "-gg",
                "-pdfdvi",
                "%DOC%"
            ]
        },
    ],
これはそのままWindowsでも使えるみたいです。
速度比較
弊学科は卒業設計とかいうのがあるせいで他の学科より卒業論文の締め切りが他の学科より早いです。というわけでここに57ページの 小学5年生の夏休みの自由研究 卒業論文があります. こいつをベンチマークとしてコンパイルしてみます.

なおWSLからWindowsのC:側にあるものにアクセスすると遅いのでファイルはWSLでコンパイルするときにはファイルはWSL上に置きました。
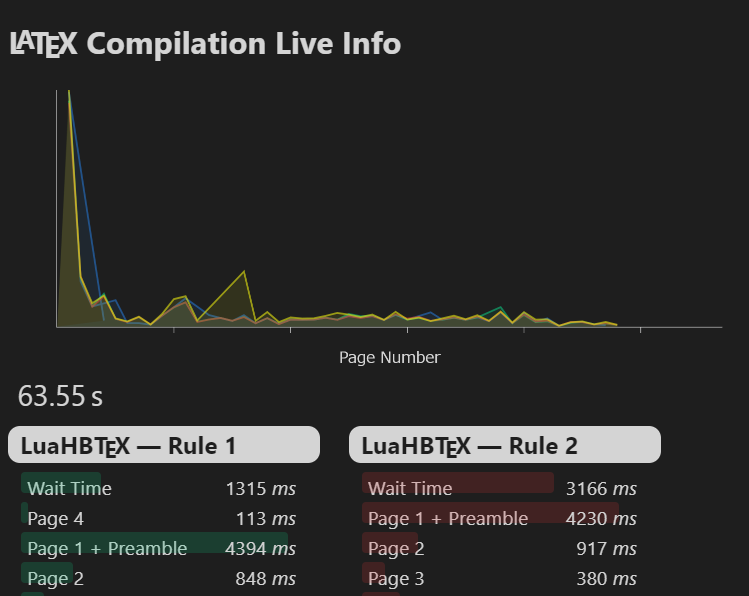
Windows(LuaLaTeX)
WSL2(LuaLaTeX)

Windows(upLaTeX)
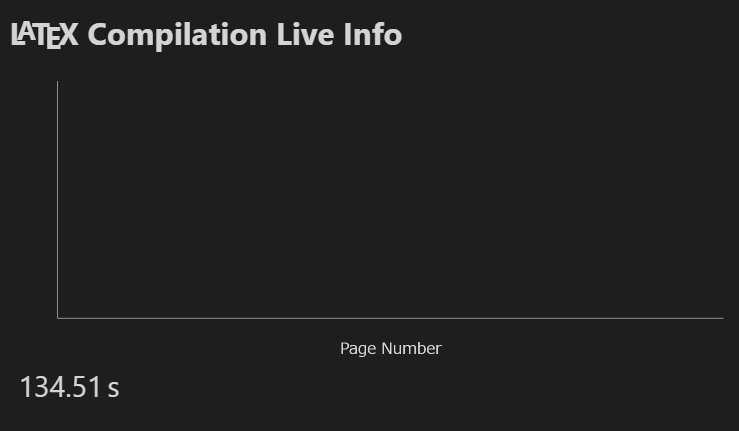
画像が多いせいかめっちゃかかった。
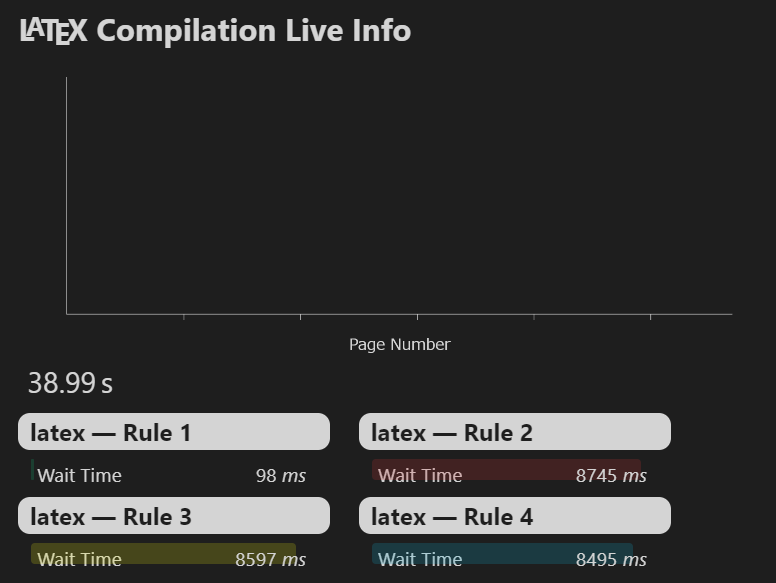
WSL2(upLaTeX)
まとめ
| LuaLaTeX | upLaTeX | |
|---|---|---|
| Windows | 63.55 s | 134.51s |
| WSL2 | 44.53 s | 38.99 s |
| というわけでWSL2の方が全体的にWindowsよりも速いという結果が出ました。 |
参考URL
texlive2020(basic)のインストール on WSL - 晴耕雨読
Windows 10 用 Windows Subsystem for Linux のインストール ガイド
LaTeX Workshopってなに?どうやって使うの?調べてみた! - Qiita