こんにちは。もぐめっとです。

歳のせいか、おでこのシワが最近隠せません。
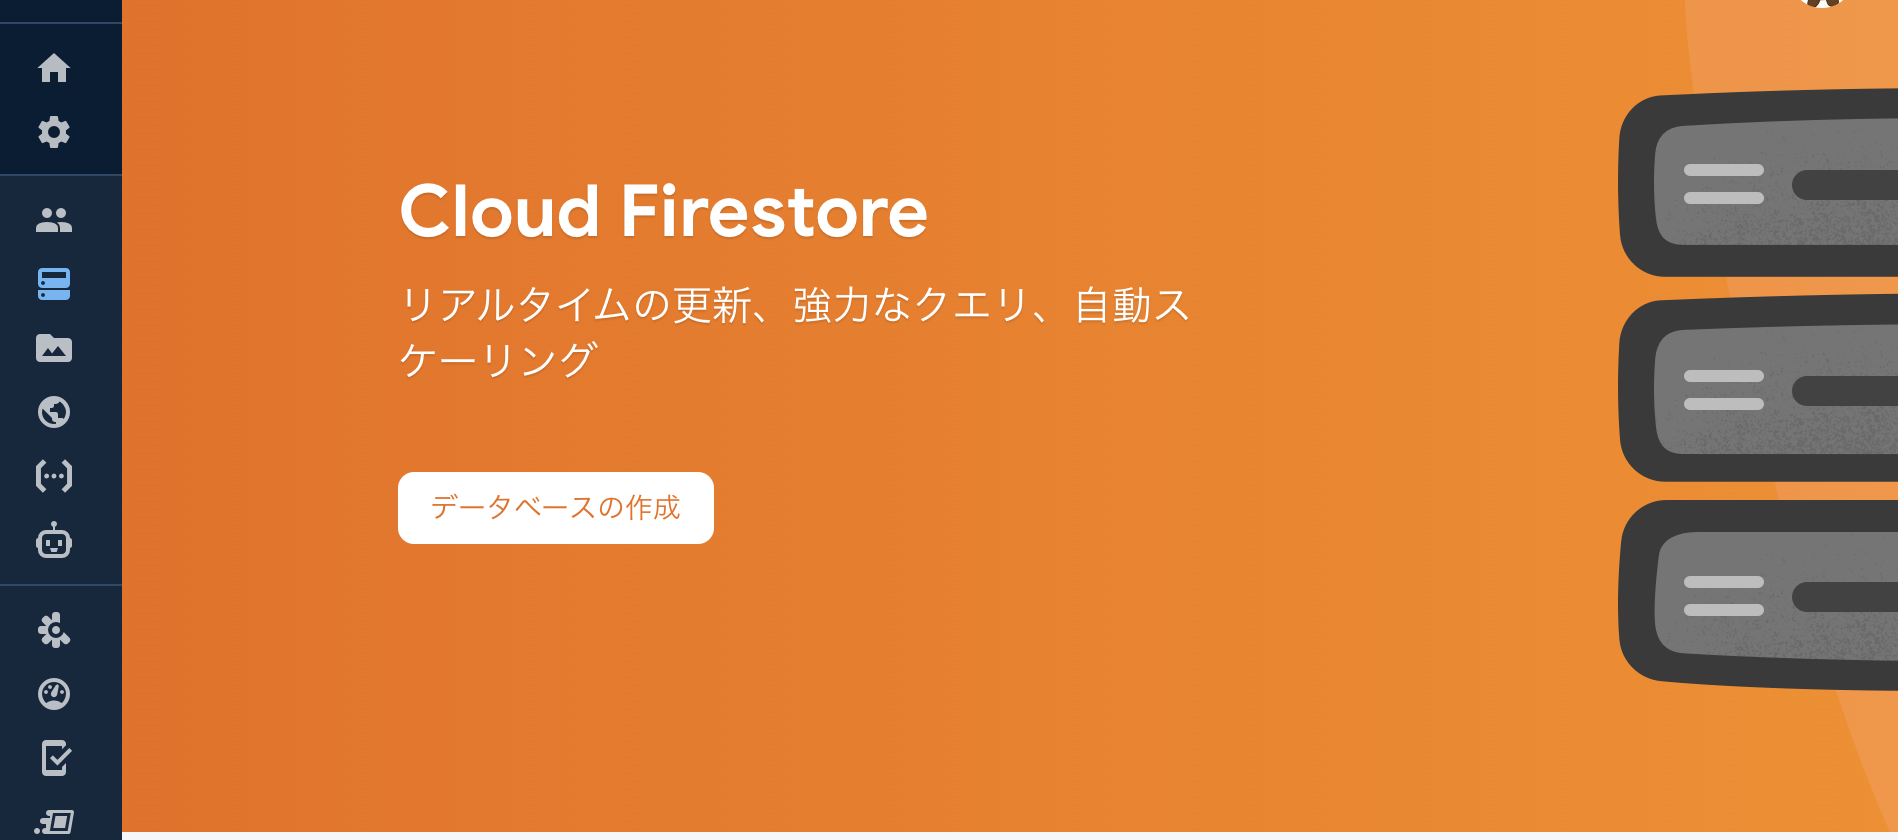
話は戻り、最近とうとうfirebase extensionsでstripeのextensionが発表されましたね!
🚨New Extensions alert! 🚨
— Firebase (@Firebase) July 16, 2020
We’re unveiling two brand new Extensions with @StripeDev that help you run subscription payments and send invoices in your web apps.
Find them here → https://t.co/xte7tKcqZf pic.twitter.com/RCiHrXYQvz
ということで早速使ってみたので、使えるようになるまで丁寧に解説してみようと思います。
※2022-10-07追記
現在本記事は古い手順になっており、一部実施しなくてもいい手順なども含まれております。
最新の手順は下記の本に記載しておりますのでよかったらご参照ください。
目標
このサンプルを使って、stripeのsandbox環境で月額課金購入ができるまでがんばります
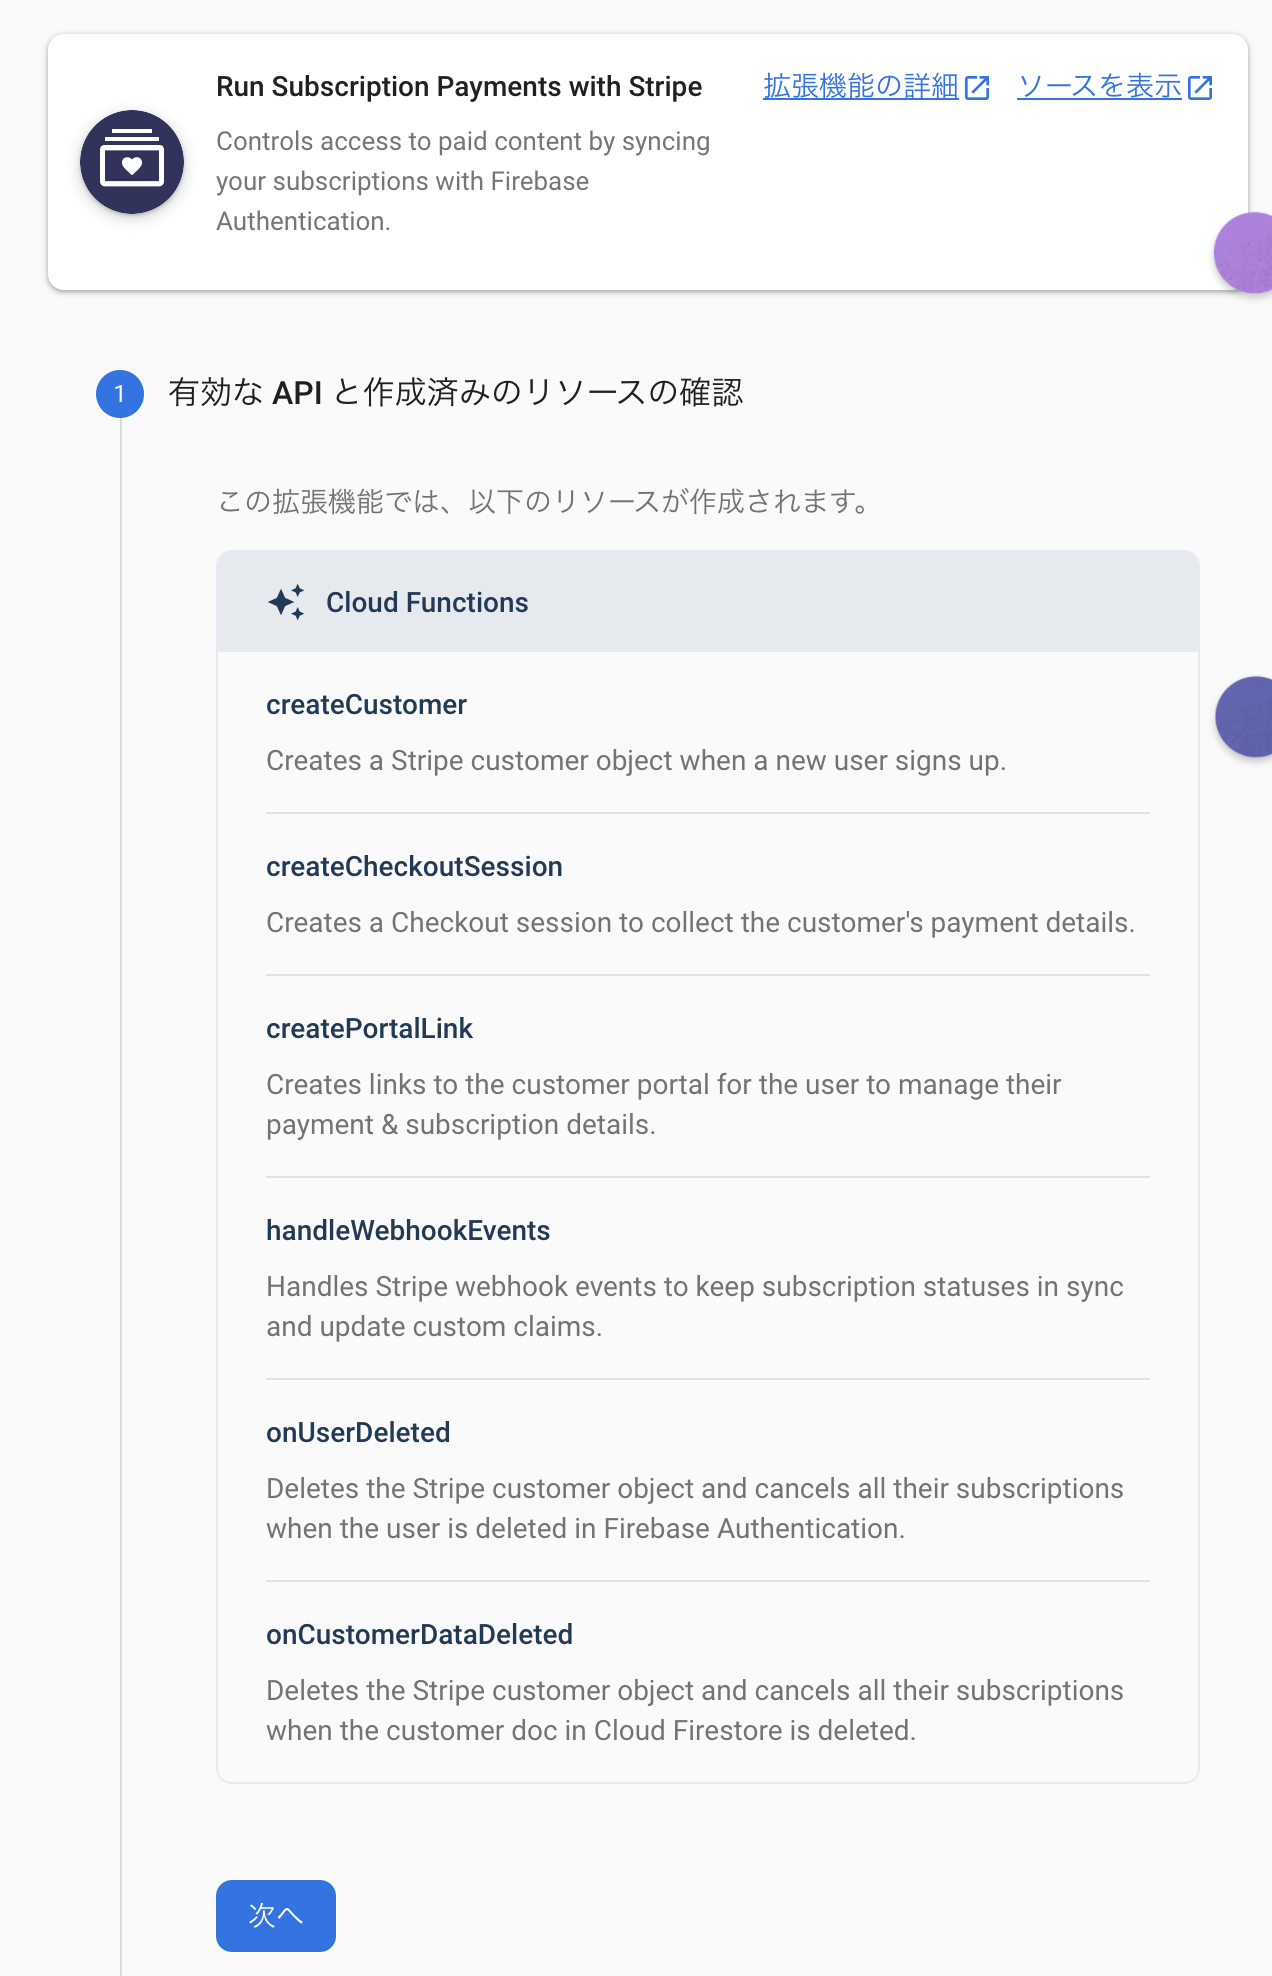
Run Subscription Payments with Stripeセットアップ
Run Subscription Payments with Stripeのextensionをインストールします。
インストールするプロジェクトを選択しましょう。

リソースを確認して次へ
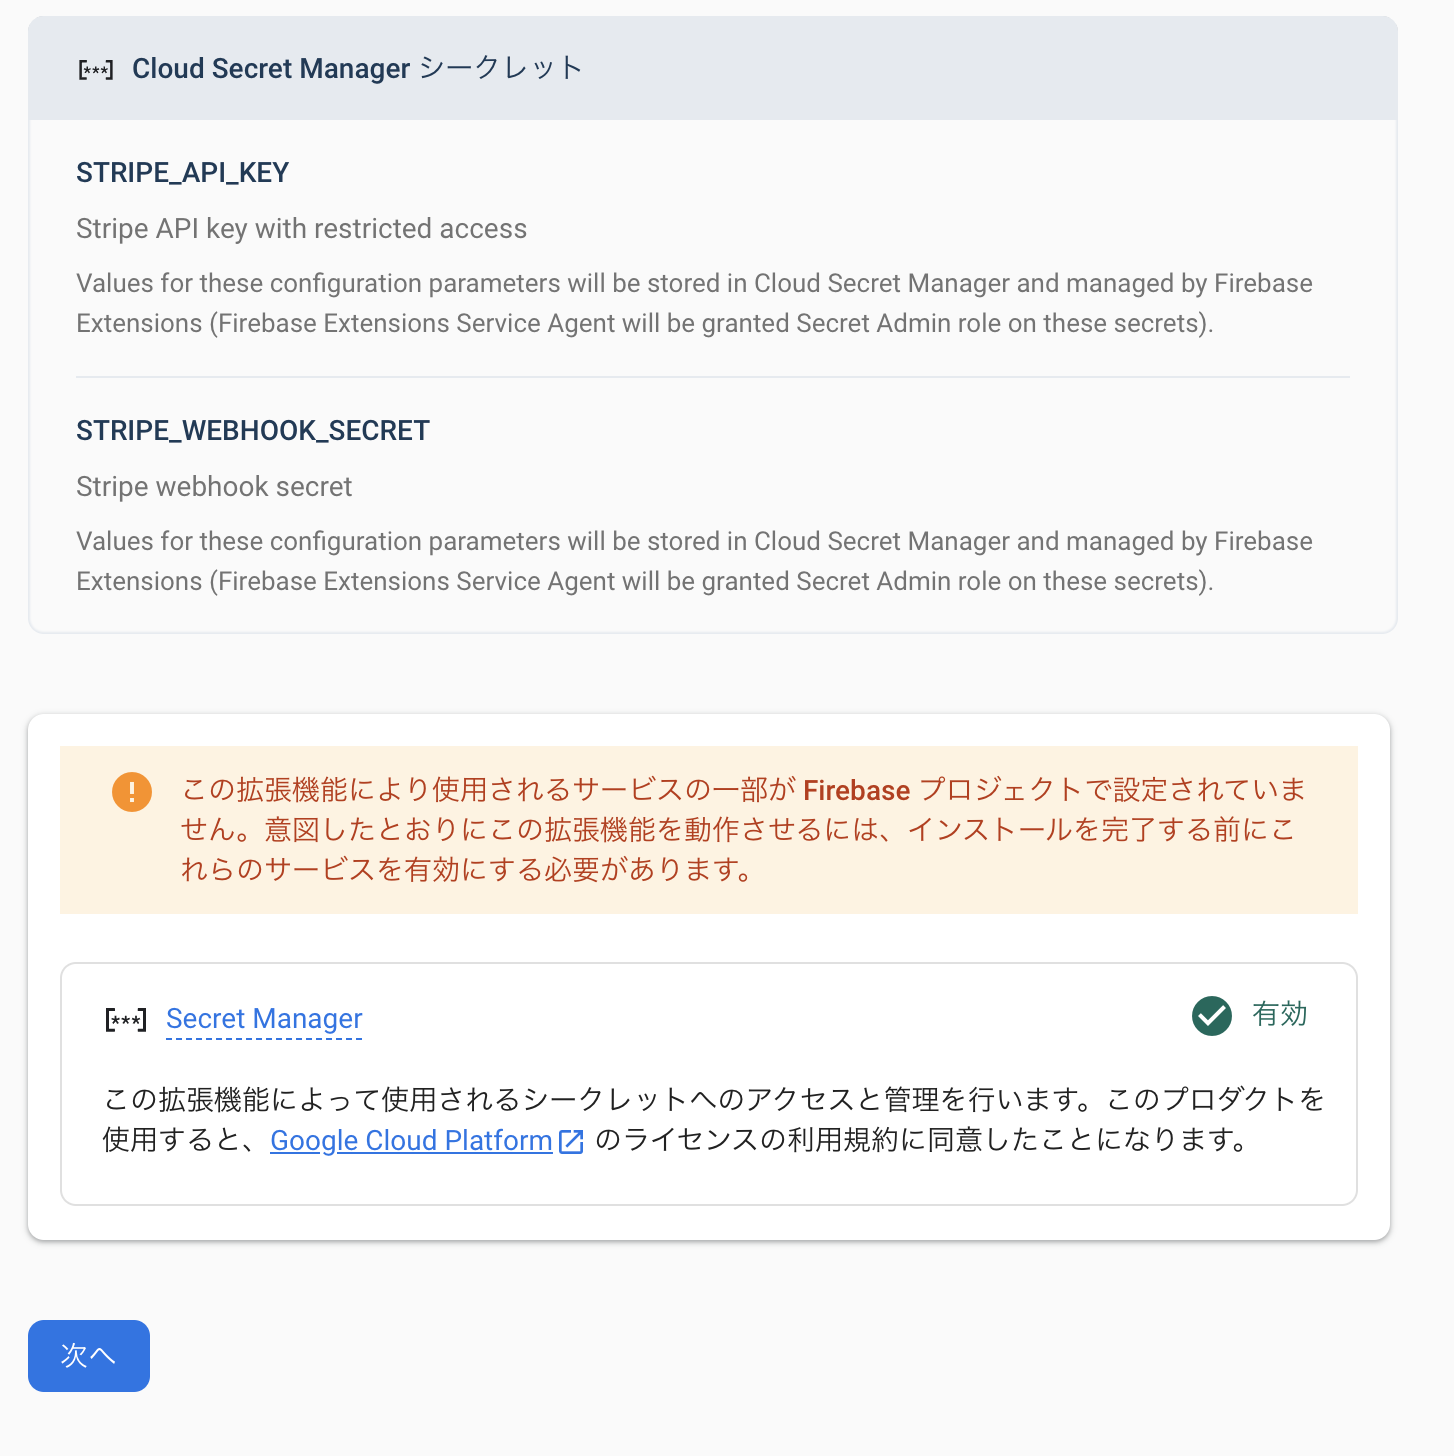
2021/11/15 追記
新たに下記も追加されていたのでSecreteManagerを有効にして次へ押しておきましょう。
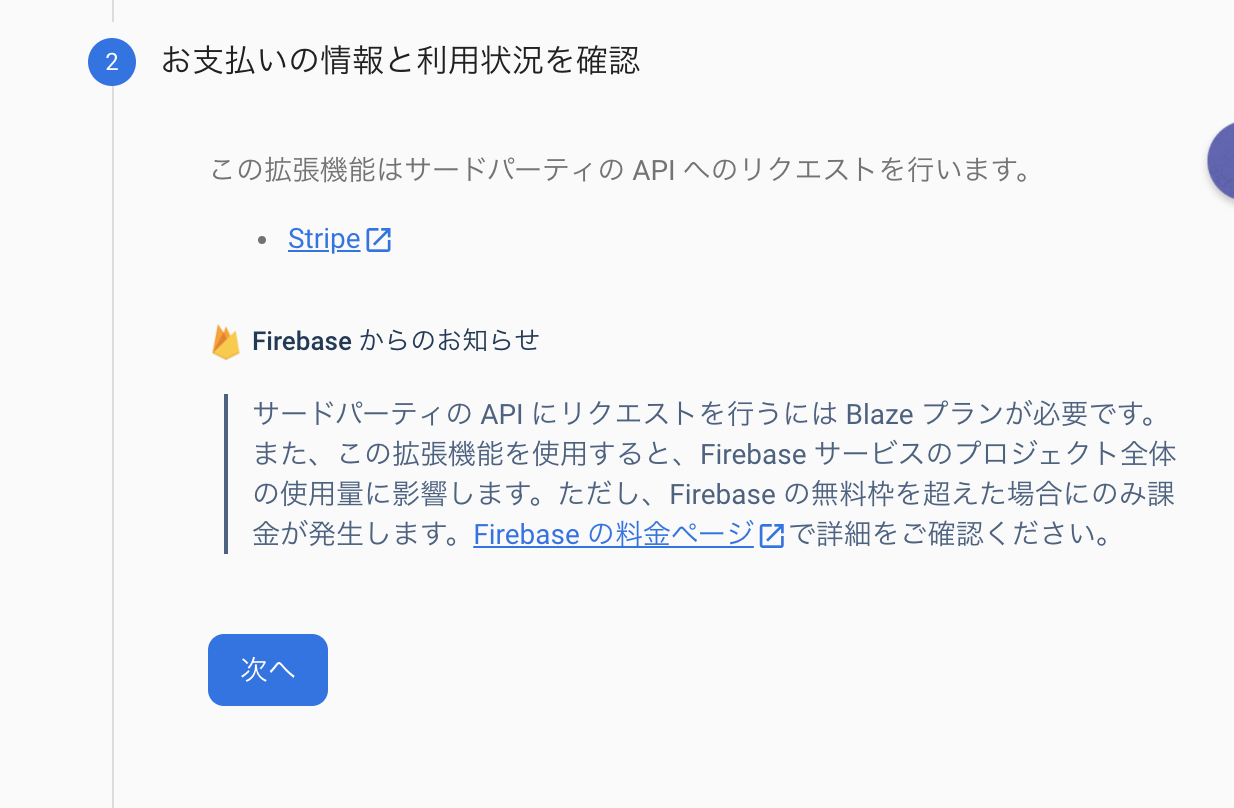
料金プランをblazeプランにアップグレードしてないと「次へ」ボタンが表示されませんが、アップグレードしたら次へ進めます。アップグレードしていない方はアップグレードしましょう。利用状況を確認して次へ
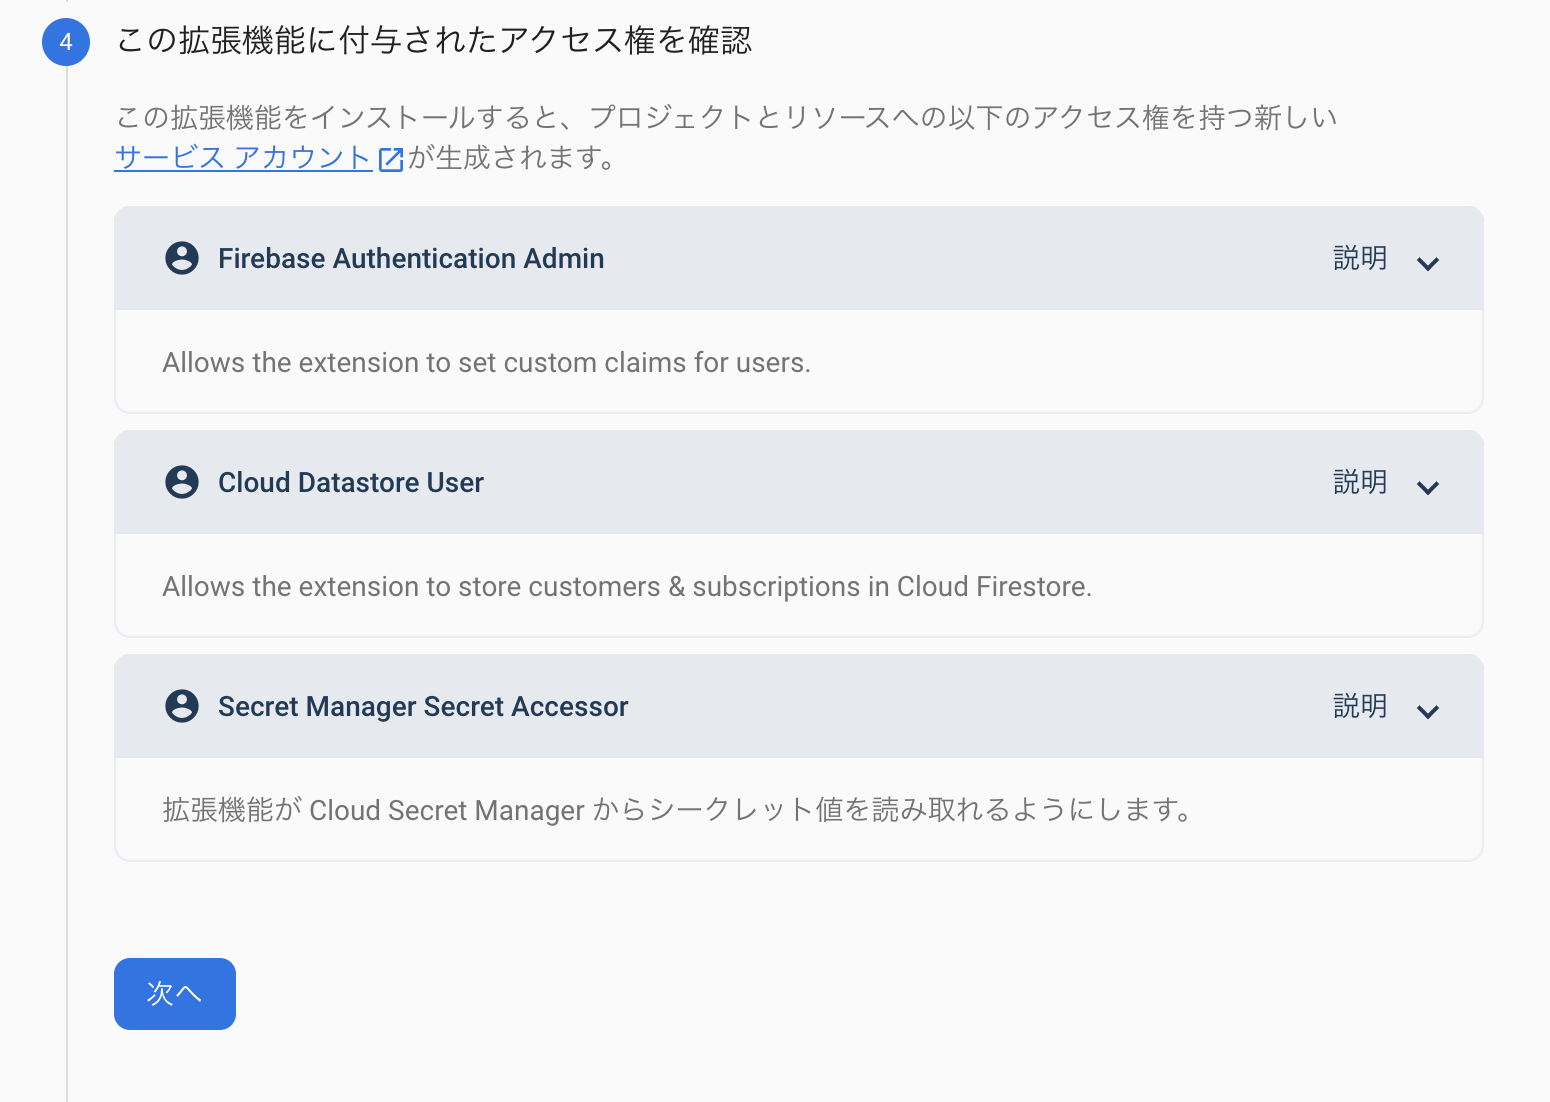
アクセス権を確認して次へ
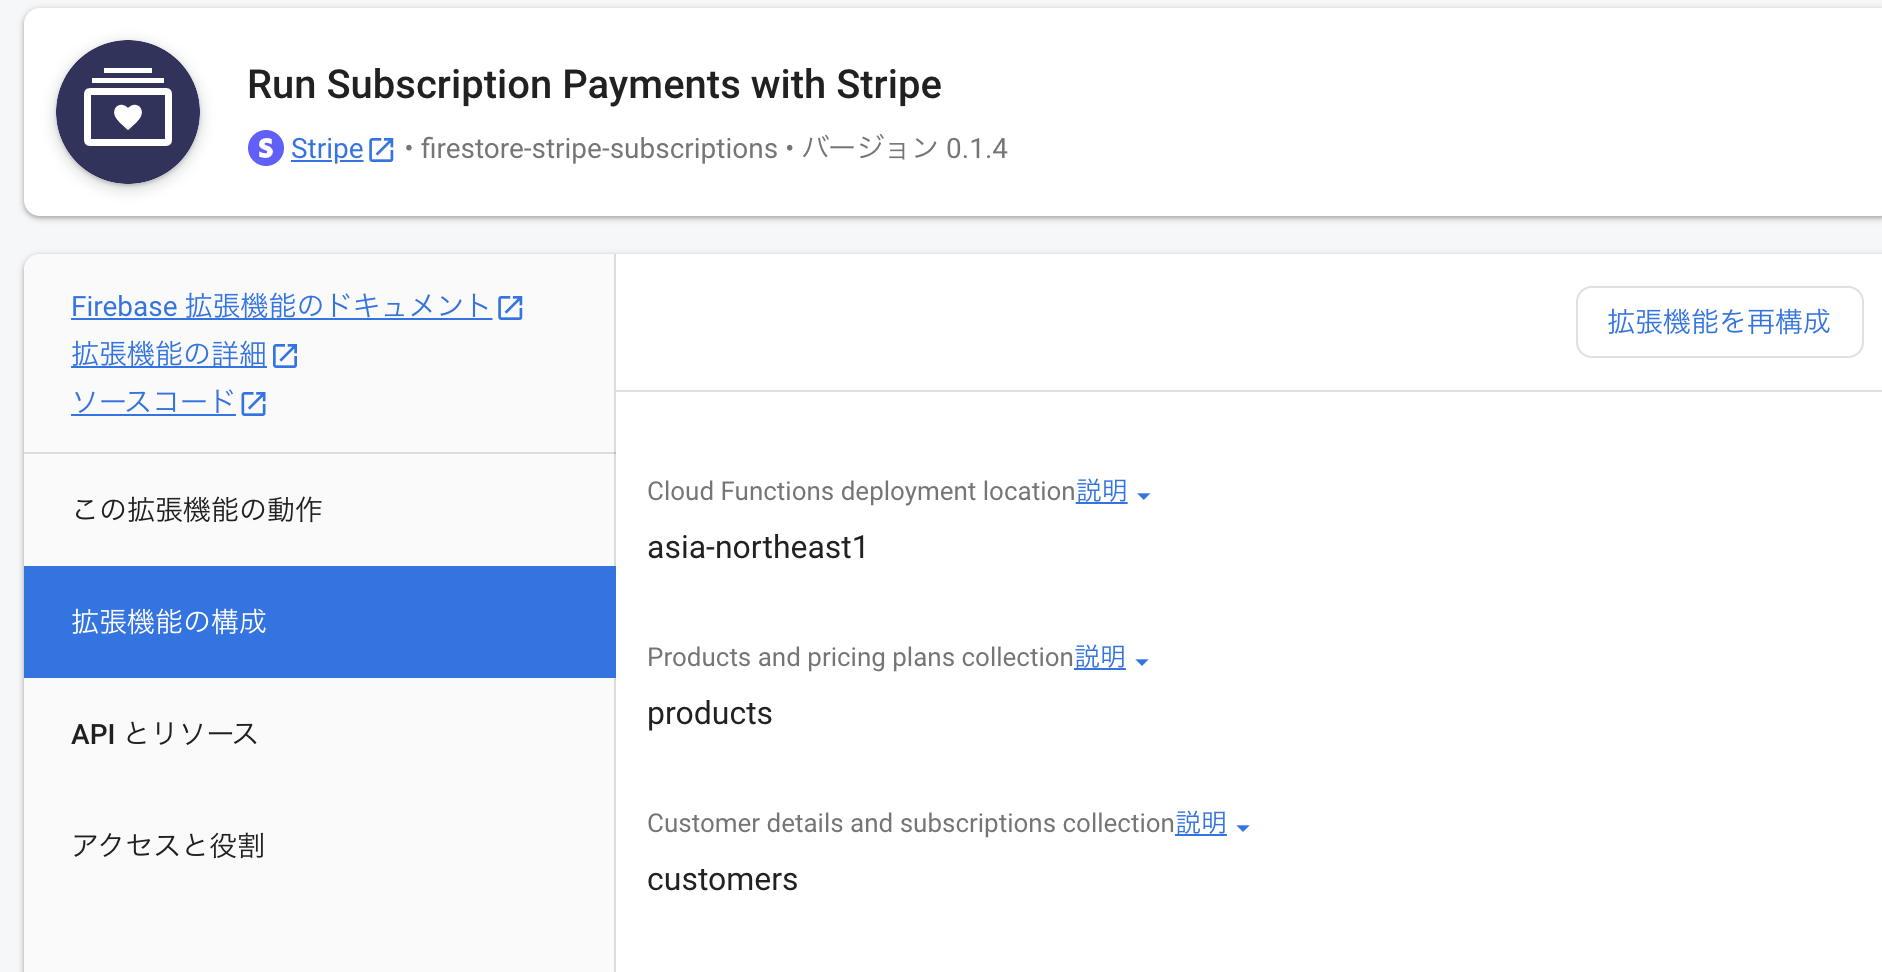
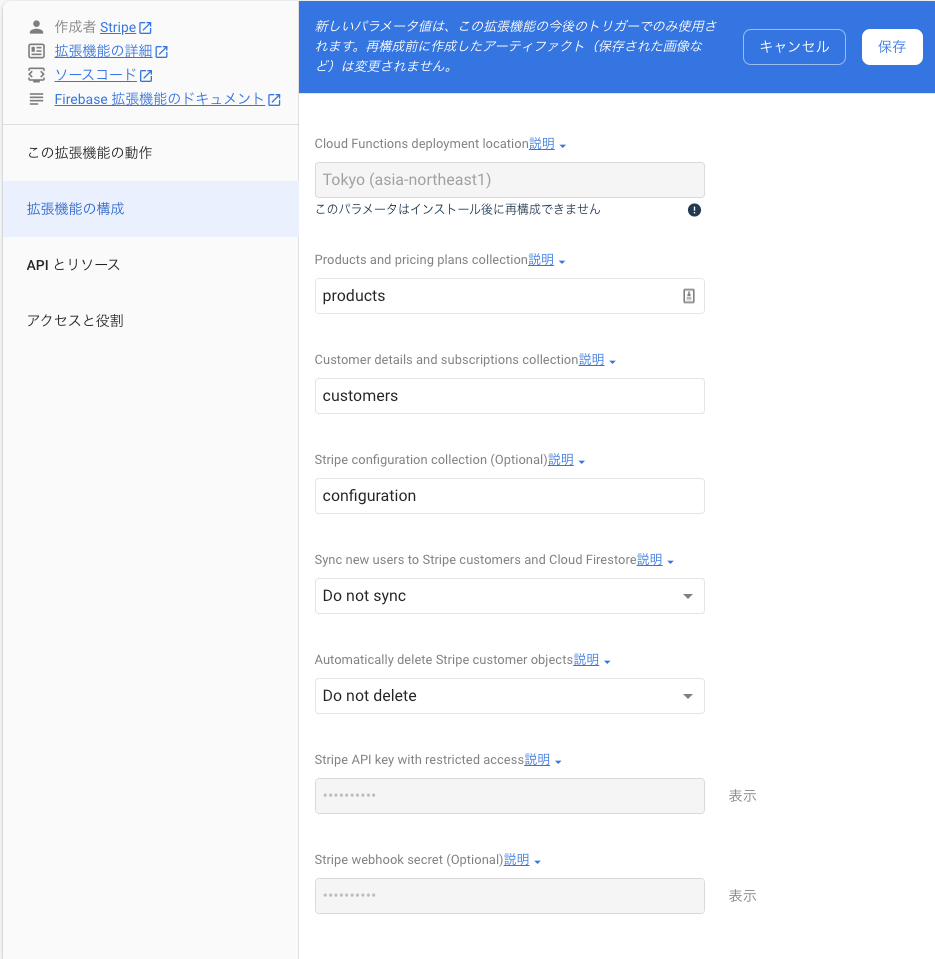
次からいろいろと入れるものがたくさんある。
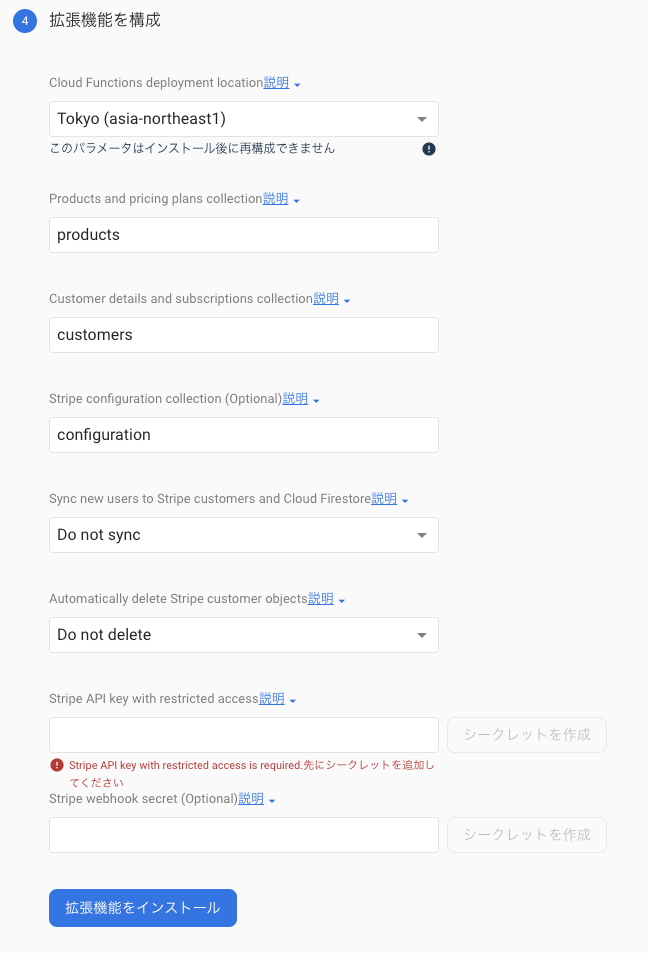
Cloud Functions deployment location
Cloud Functionsをどこのロケーションで動かすか。日本人なのでTokyoにしておきましょう。
Products and pricing plans collection
stripeで入力した商品や値段情報のfirestoreの格納先コレクションの指定。デフォルト値のproductsにしておきます。
Customer details and subscriptions collection
顧客情報のfirestore格納先コレクションの指定。デフォルト値のcustomersにしておきます。
Stripe configuration collection
stripeの設定値を保管しておくfirestore格納先コレクションの指定。デフォルト値のconfigurationにしておきます。
Sync new users to Stripe customers and Cloud Firestore
stripeの顧客とcloud firestoreを同期させるかどうか。
sync似設定するとFirebase認証で新規ユーザが登録されるとStripeに顧客オブジェクトを作ってくれるようになります。
匿名認証の場合だとアクセスされるたびに作られてしまうのでプロダクトによって使い分けましょう。
Do not syncに設定した場合は最初のチェックアウトセッション作成時に作られるのでデフォルトのDo not syncでよさそう。
Automatically delete Stripe customer objects
stripeで顧客情報を消したらfirestoreでも削除するかどうか。
データはとりあえず残しておきたいのでDo not deleteにします。
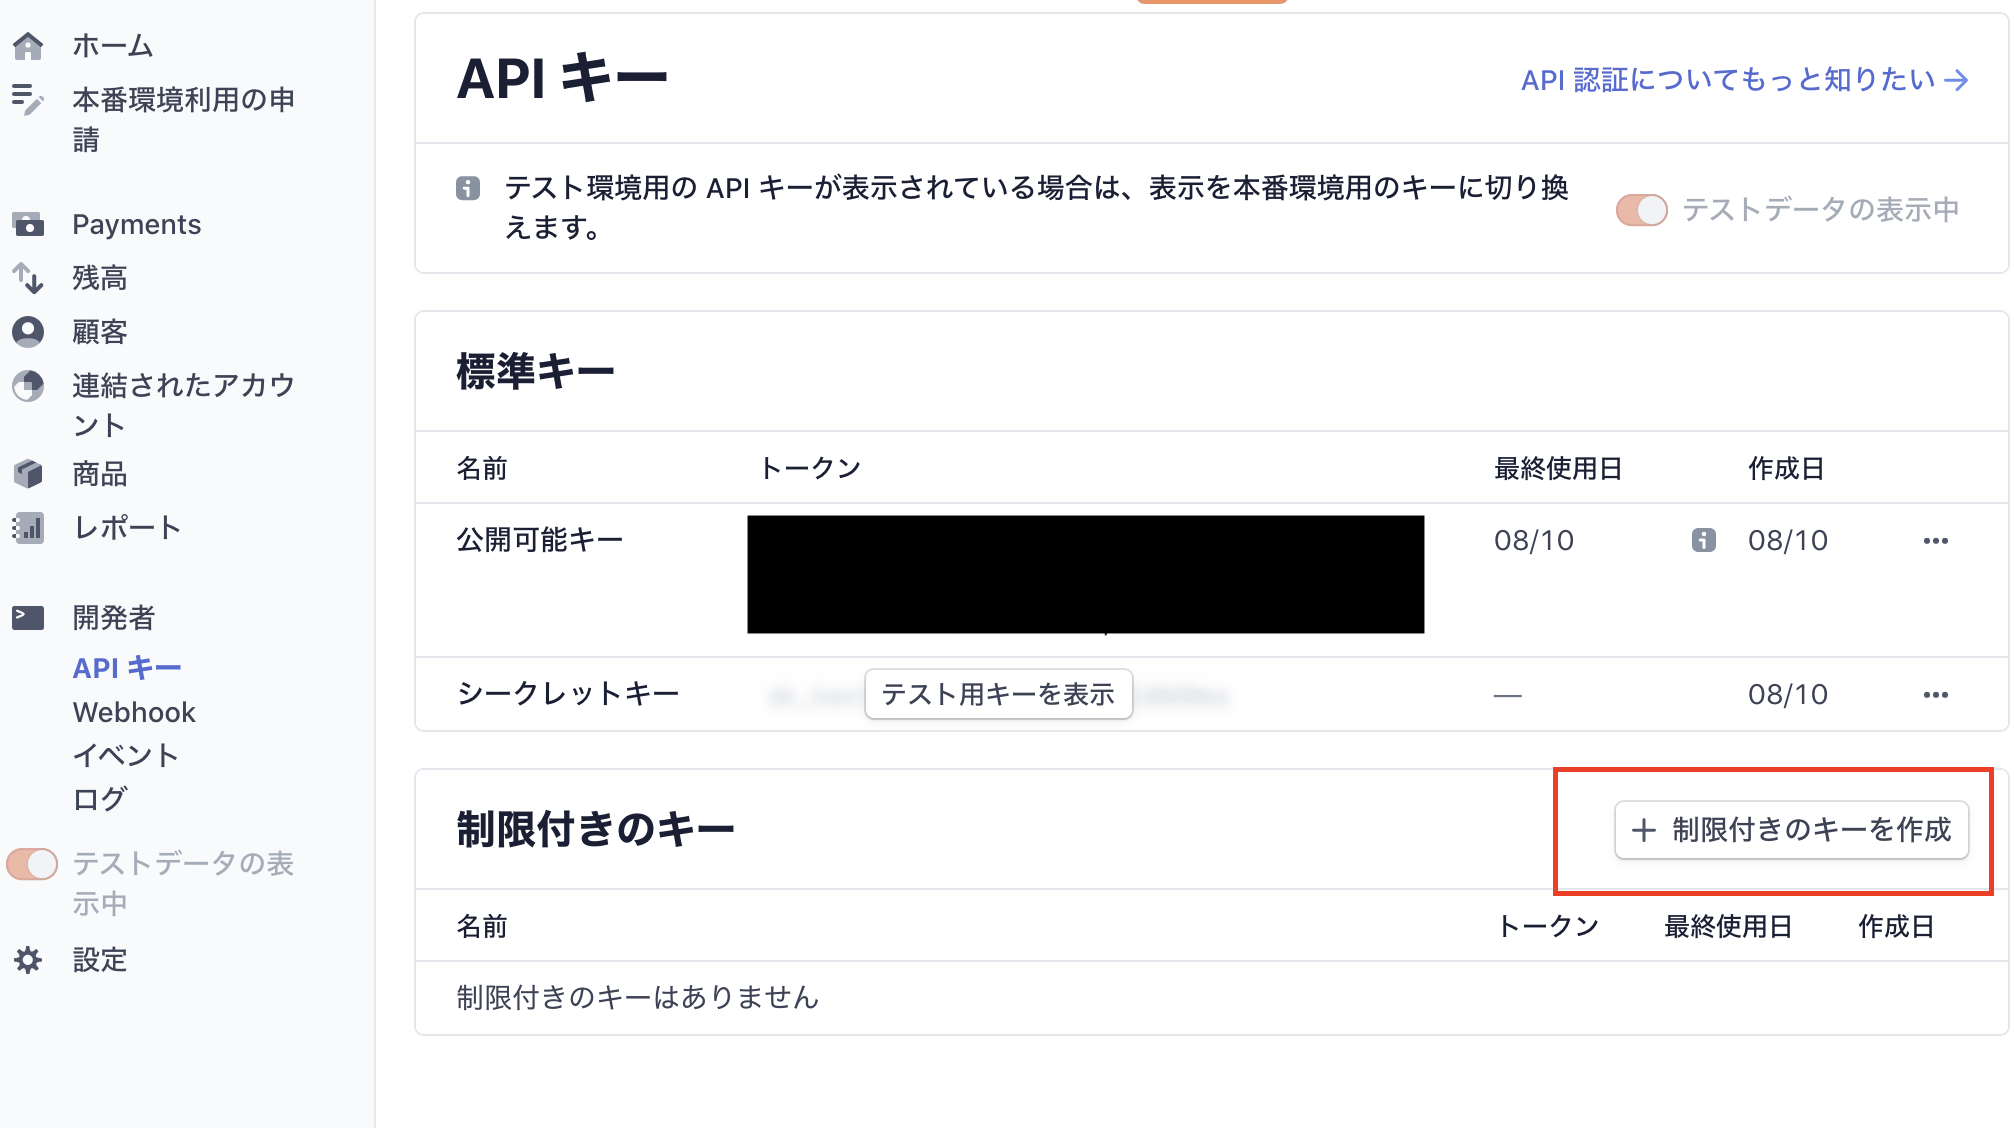
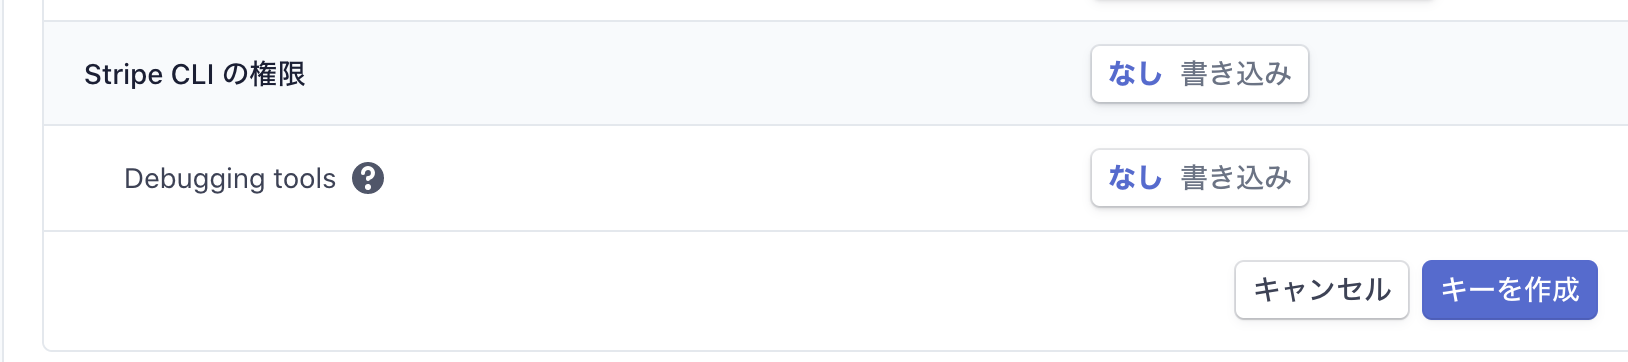
Stripe API key with restricted access
stripeのダッシュボードを開いて、「開発者」→「APIキー」で表示される画面で、「制限付きのキーを作成」を押下します。
キーの名前を適当につけて、
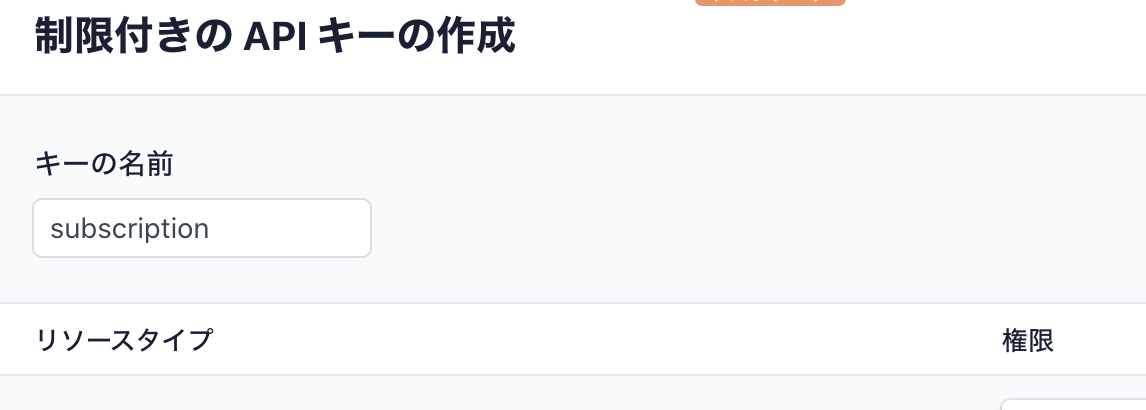
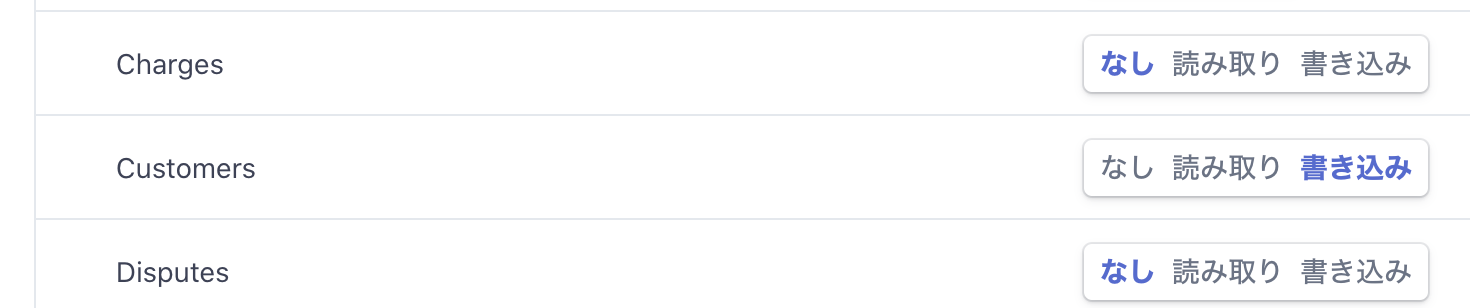
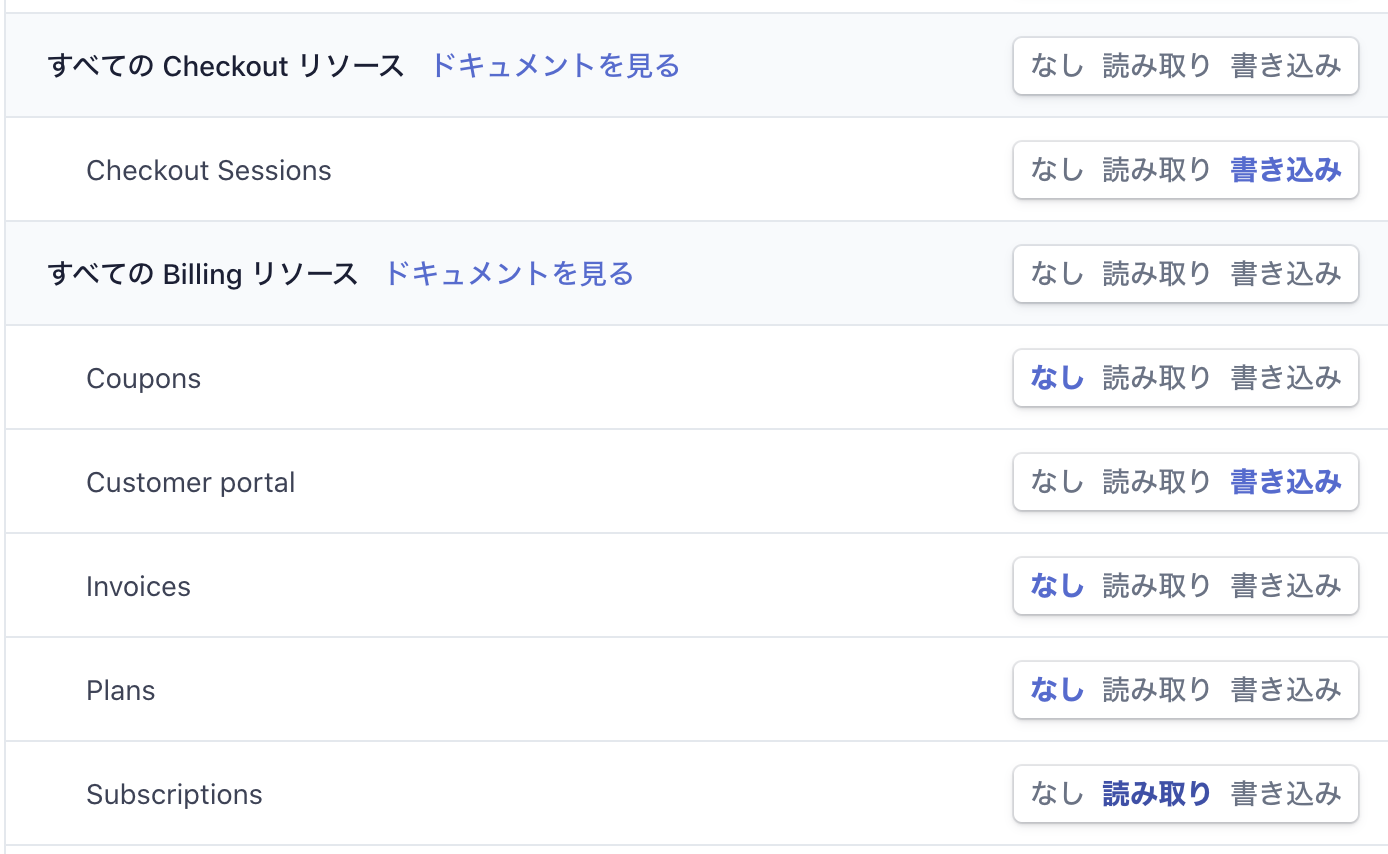
「Customers」、「Checkout Sessions」、「Customer portal」の書き込み権限と、「Subscriptions」の読み取り権限を付与します。
設定したら下部にある「キーを作成」を押下
無事作れたので、rk_xxx_XXX...というトークンをコピーして、はっつたあと、「シークレットを作成」ボタンをおしましょう。
すると下記のような表示になる

Stripe webhook secret
これは後ほど設定するので一旦据え置きの値にしておきます。
すべての項目を入力したら「拡張機能をインストール」を押下します。
頑張って作り始めます。
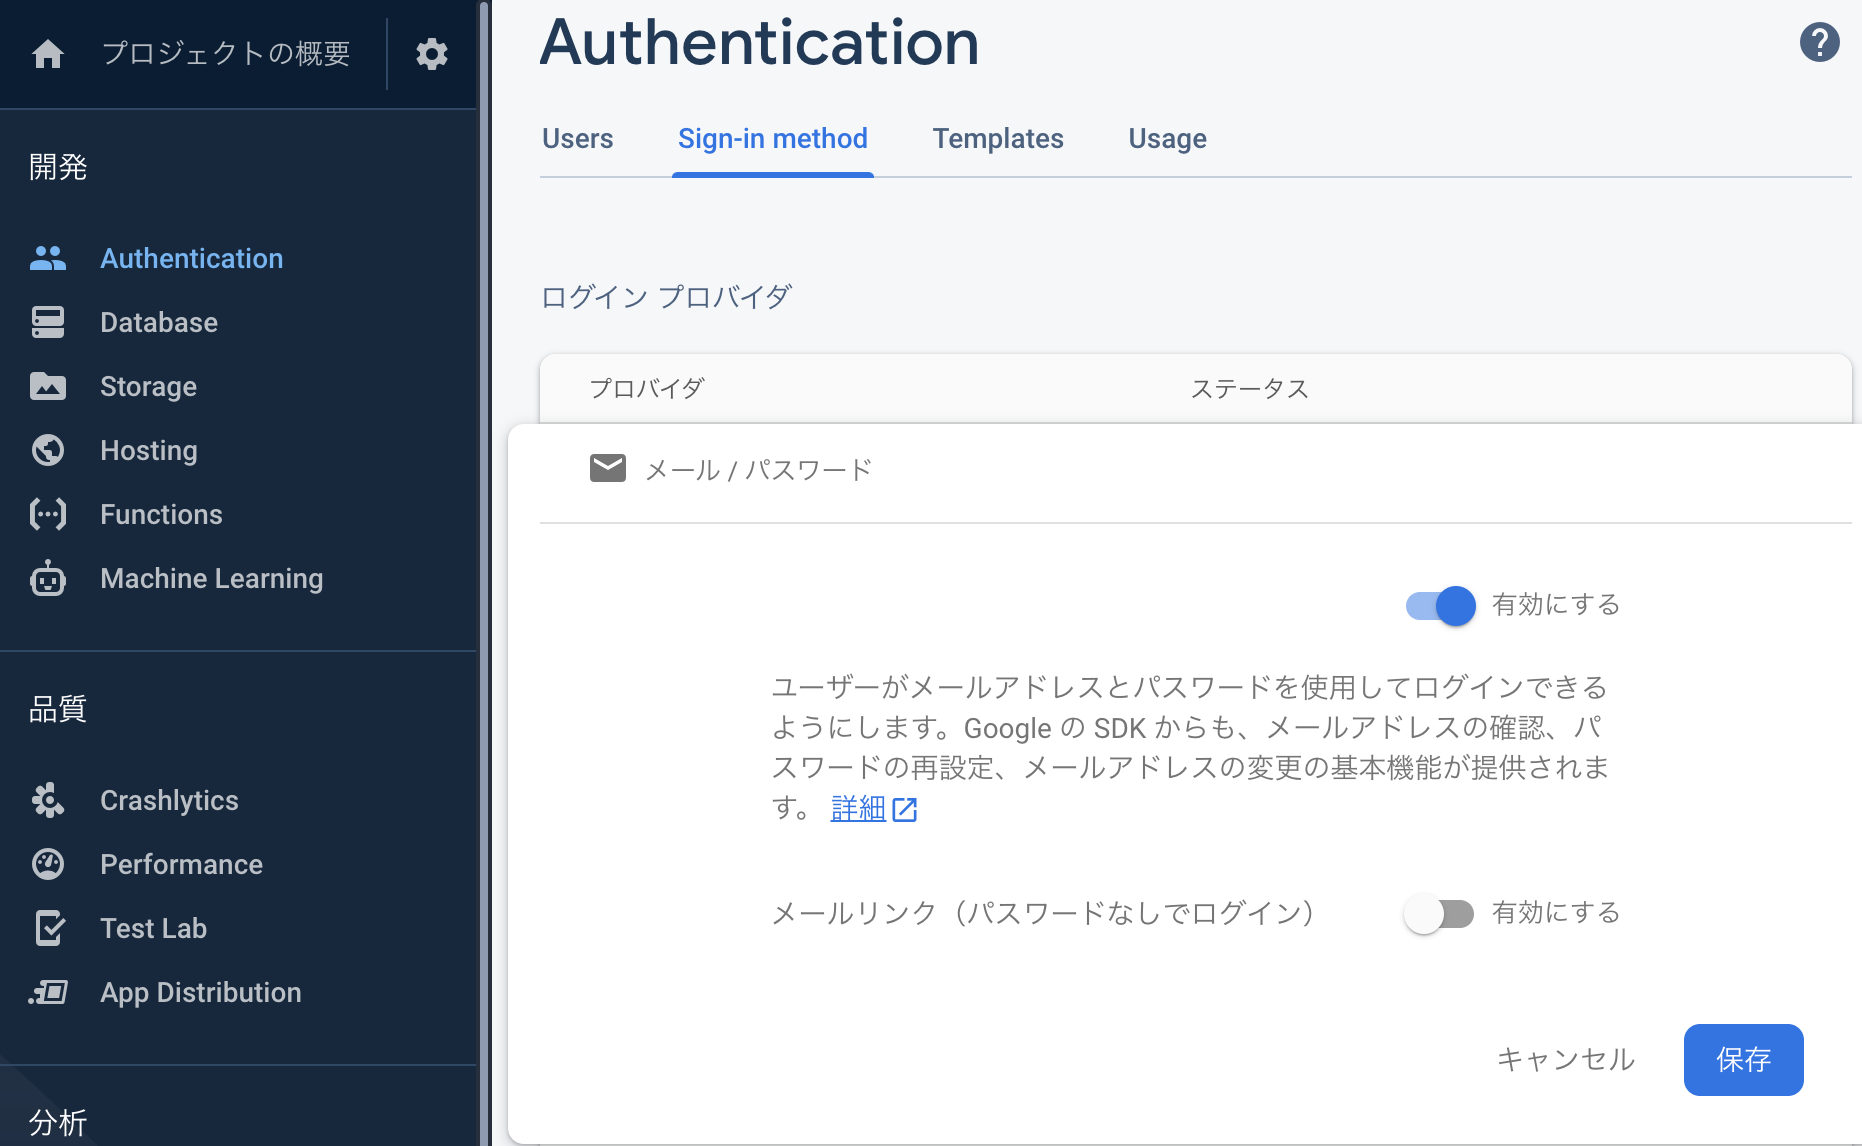
authenticationとfirestoreのセットアップ
今回はメールアドレス認証で課金をさせるため、Firebase Authenticationでメールアドレス認証を許可しておきます。
有効にして保存。
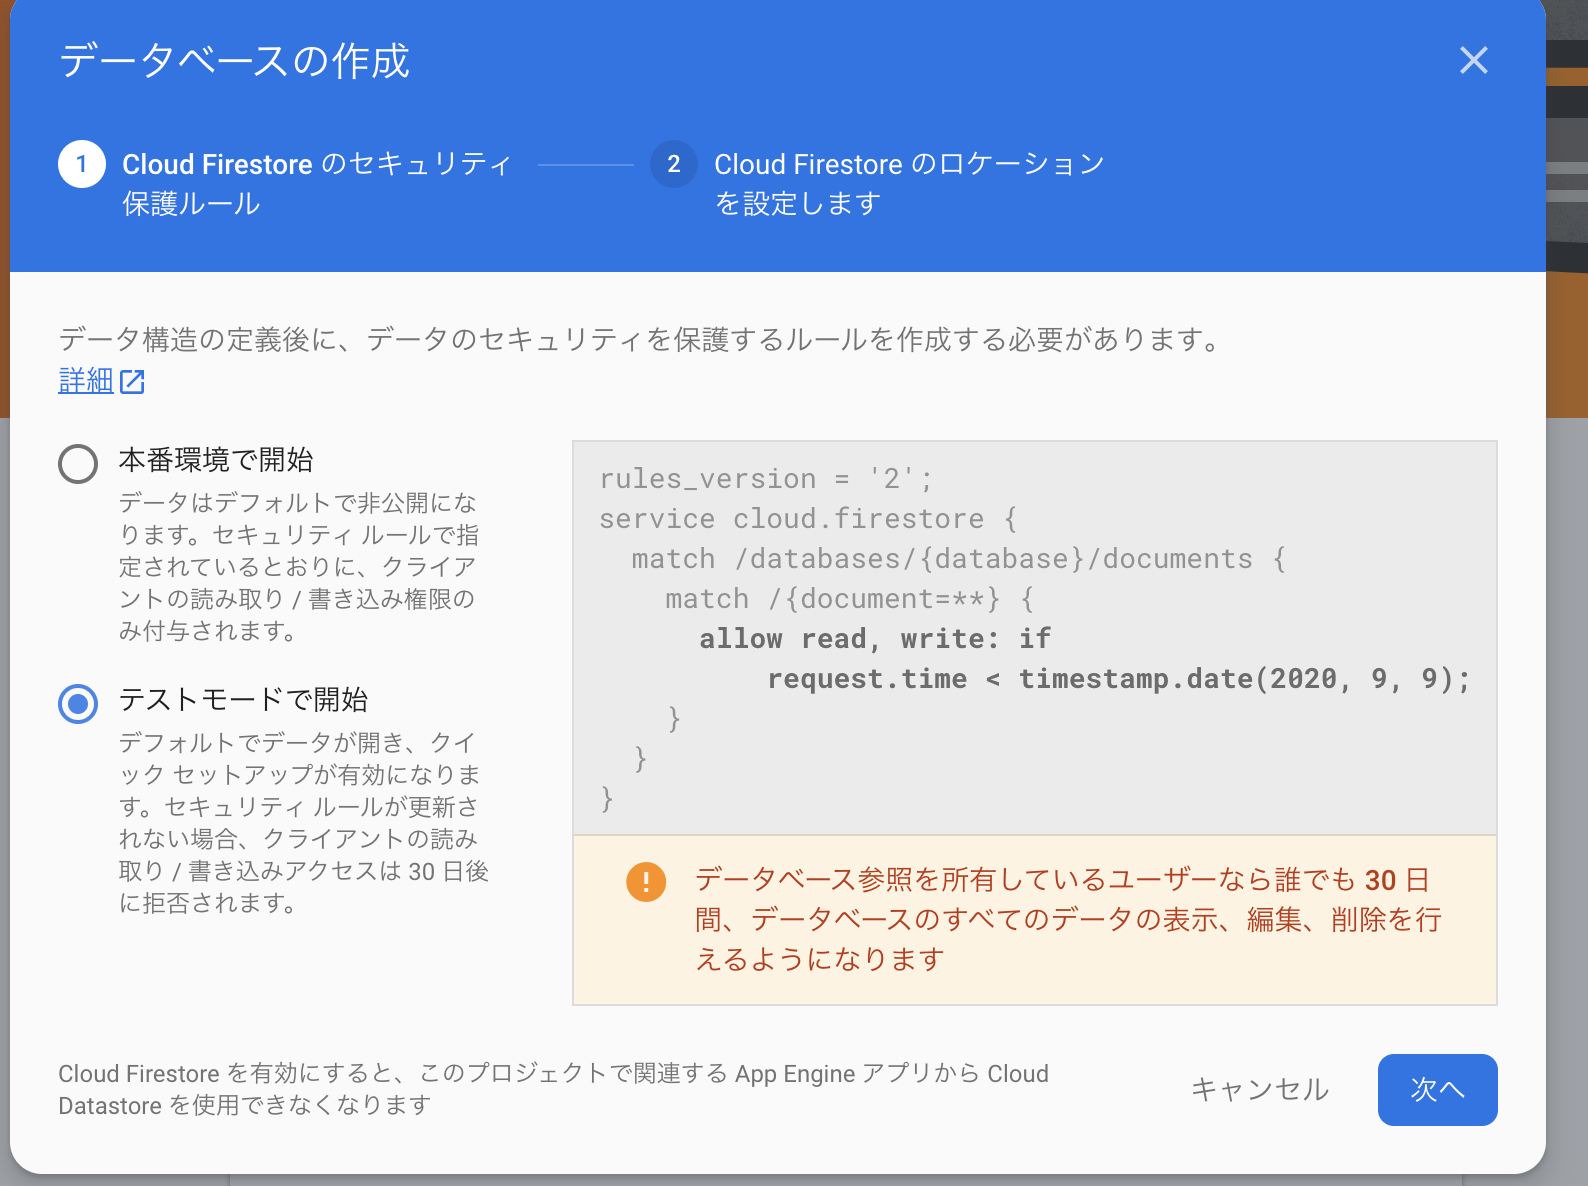
Cloud Firestoreを初期化してない方はfirebase consoleから初期化をしておきましょう。
「データベースの作成」で初期化。
とりあえずテストモード。
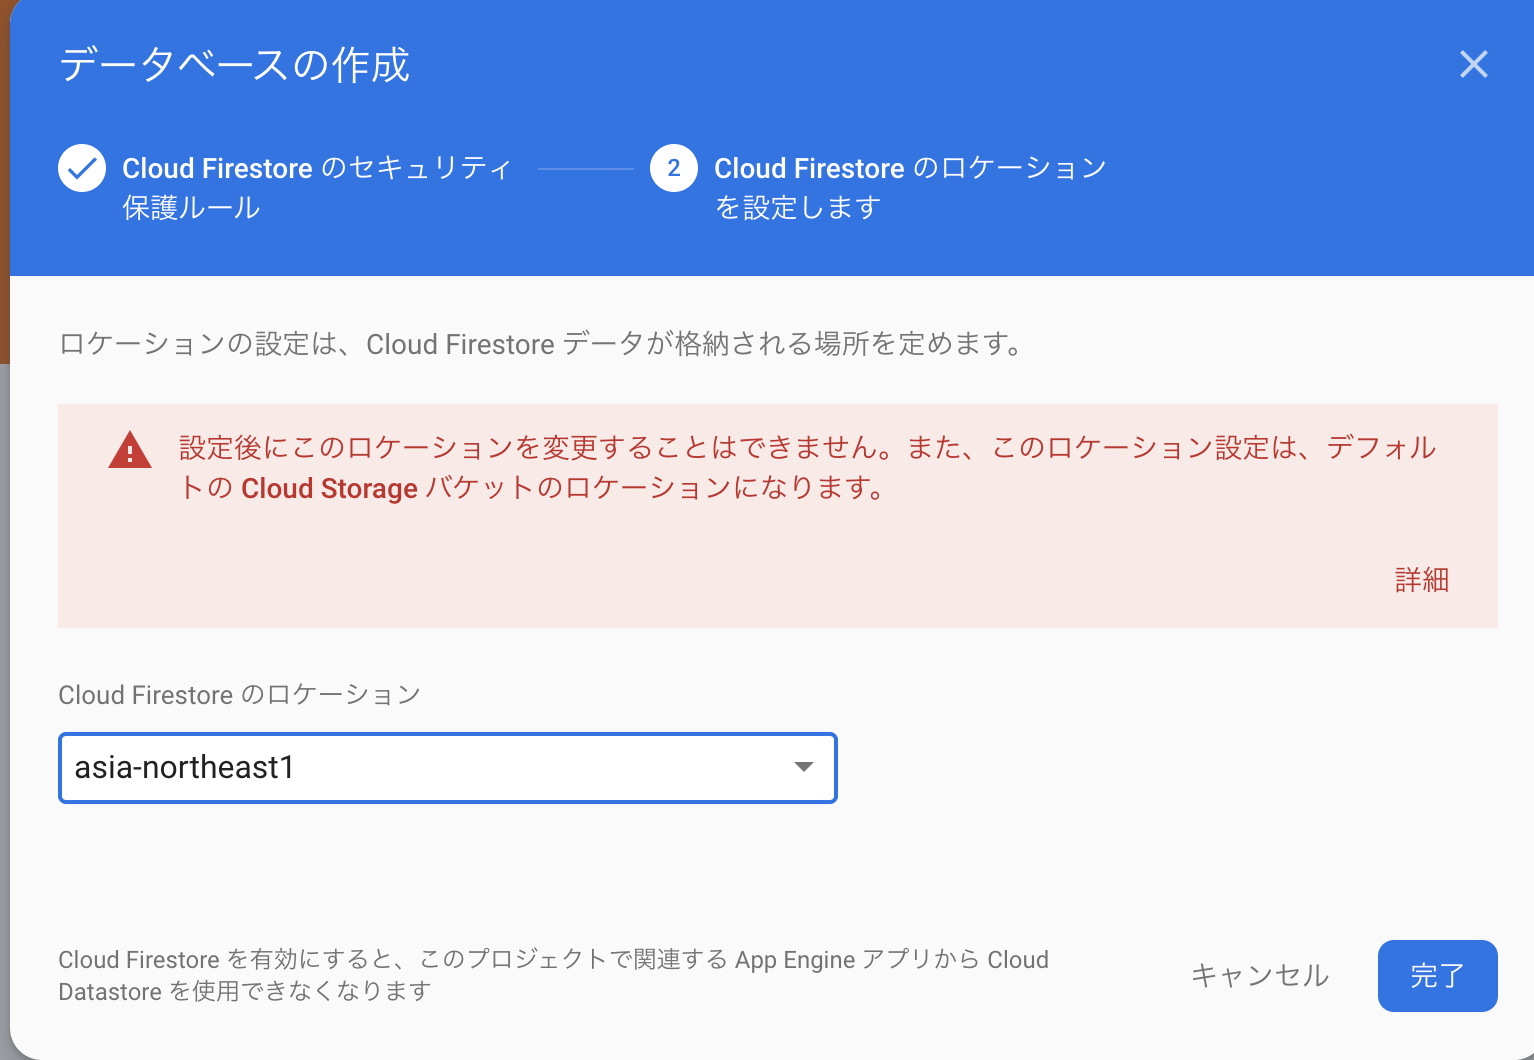
ロケーションは日本人なんで、asia-northeast1にしておきましょう。
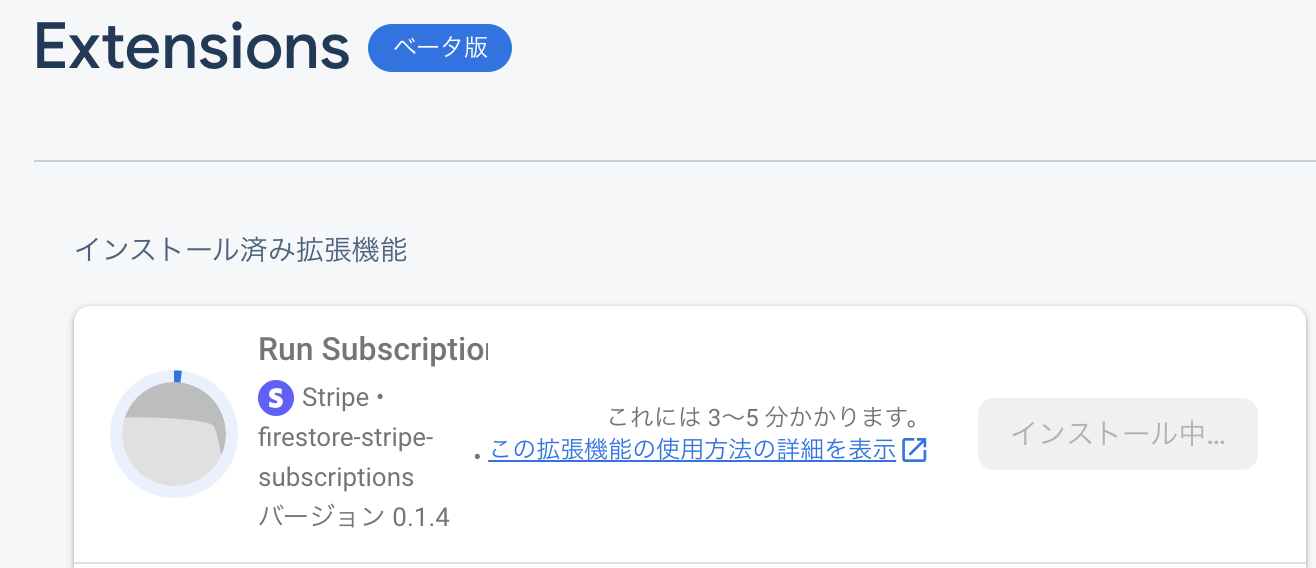
firestore及びextensionのインストールができたら、別窓でextensionのページから先程インストールしたRun Subscription Payments with Stripeを開きます。
(後ほどこのページは何度か参照するので別窓で開いておくことを推奨です)
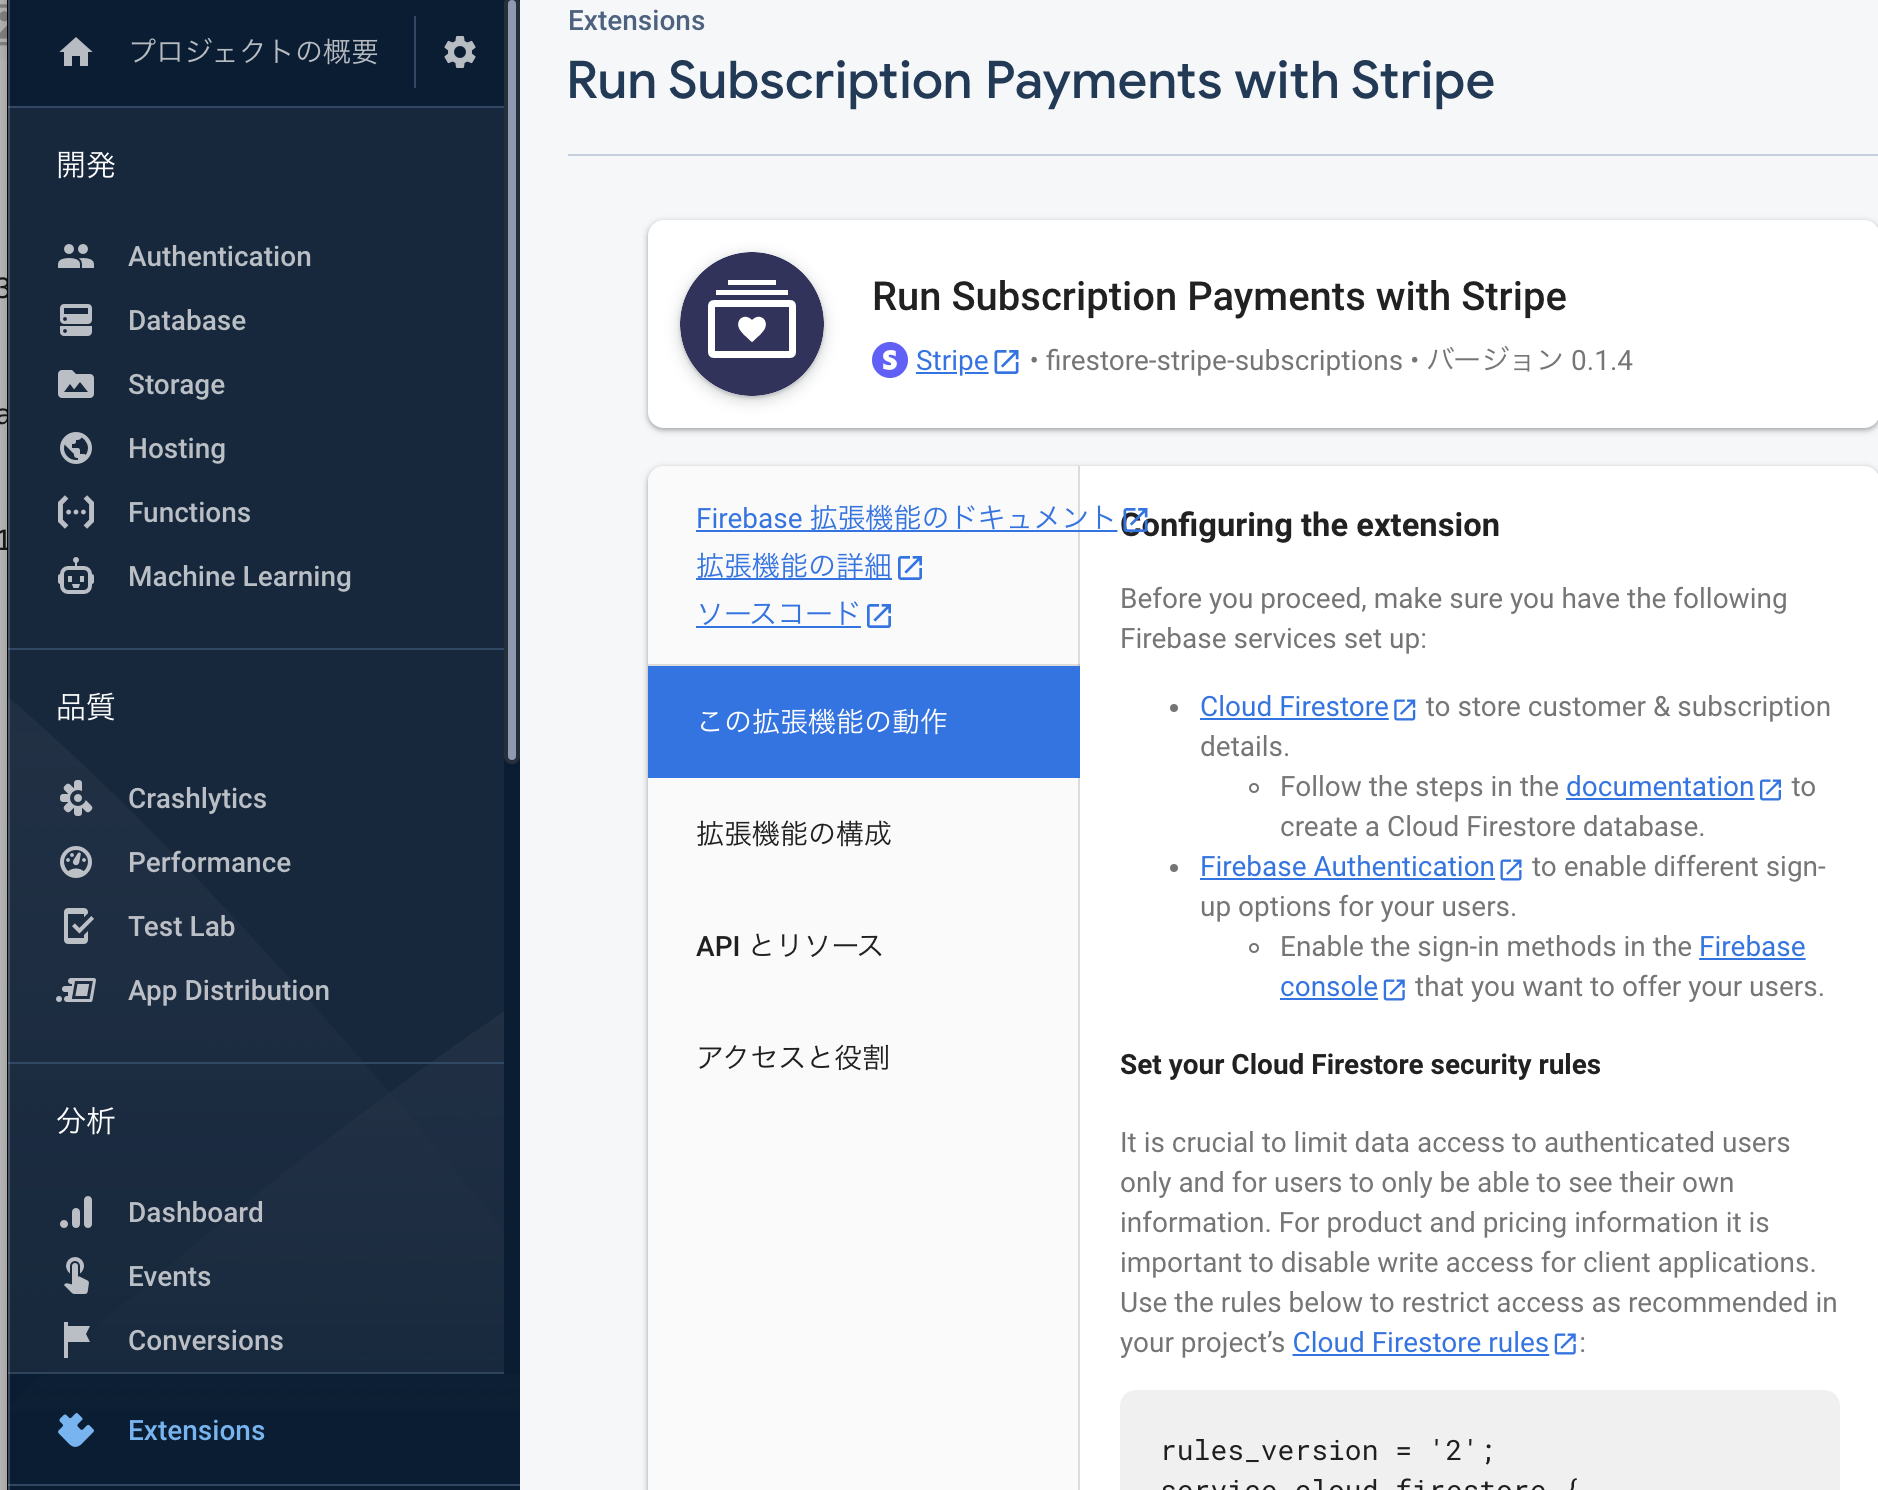
「この拡張機能の動作」に記載されているセキュリティールールをfirestoreに記載します。
セキュリティールールはfirestoreのルールタブにて、貼り付けましょう。(ちなみにセキュリティールールは各環境ごとに動的生成されているので、下記をコピーせず、「この拡張機能の動作」に表示されているルールをコピーしてください。)
↓セキュリティサンプル例↓
rules_version = '2';
service cloud.firestore {
  match /databases/{database}/documents {
    match /customers/{uid} {
      allow read: if request.auth.uid == uid;

      match /checkout_sessions/{id} {
        allow read, write: if request.auth.uid == uid;
      }
      match /subscriptions/{id} {
        allow read: if request.auth.uid == uid;
      }
      match /payments/{id} {
        allow read: if request.auth.uid == uid;
      }
    }

    match /products/{id} {
      allow read: if true;

      match /prices/{id} {
        allow read: if true;
      }

      match /tax_rates/{id} {
        allow read: if true;
      }
    }
  }
}
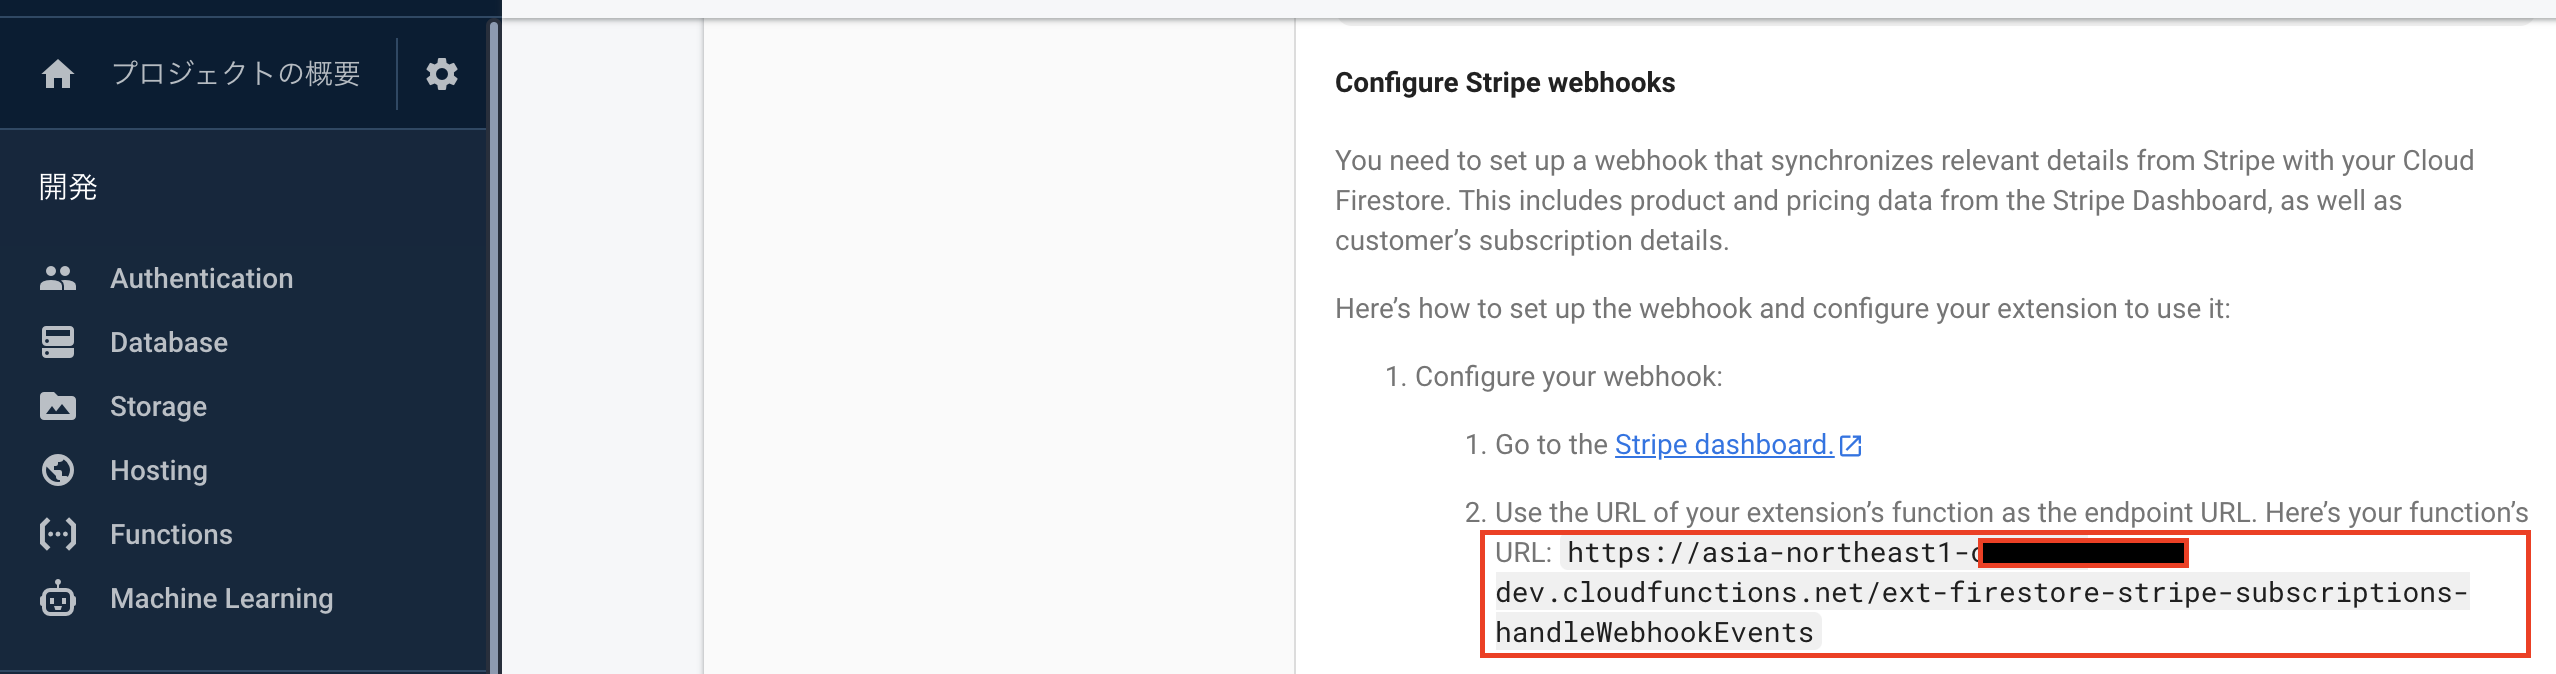
webhookの設定
初回設定時に放置していたwebhookの設定を行います。
別窓で開いている「この拡張機能の動作」のページにあるConfigure Stripe webhooksの章に記載されているURLをコピーしておきます。
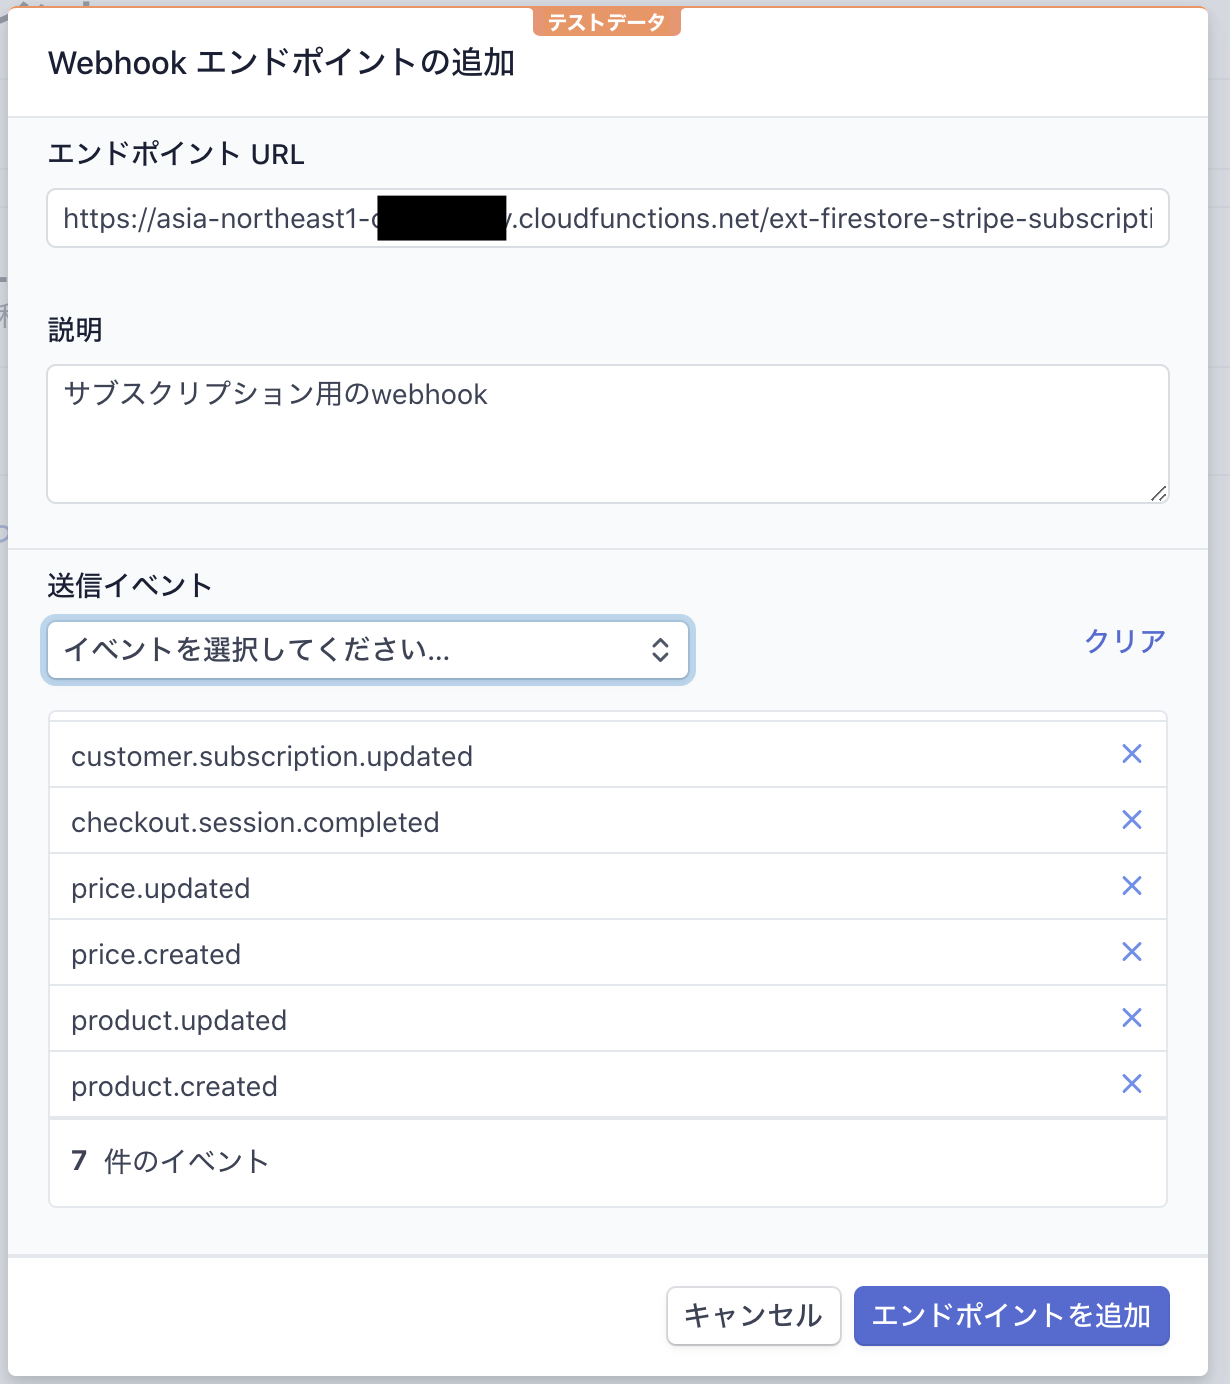
次にstripeのwebhooks画面を開き、「エンドポイントを追加」を押下します。

「エンドポイント URL」に先程コピーしたURLを貼り付けます。
「送信イベント」に下記イベントを追加します。
product.created
product.updated
product.deleted
price.created
price.updated
price.deleted
checkout.session.completed
customer.subscription.created
customer.subscription.updated
customer.subscription.deleted
payment_intent.processing
payment_intent.succeeded
payment_intent.canceled
payment_intent.payment_failed
tax_rate.created (optional)
tax_rate.updated (optional)
invoice.paid (optional, invoiceをFirestoreに同期する時に使う)
invoice.payment_succeeded (optional, invoiceをFirestoreに同期する時に使う)
invoice.payment_failed (optional, invoiceをFirestoreに同期する時に使う)
invoice.upcoming (optional, invoiceをFirestoreに同期する時に使う)
invoice.marked_uncollectible (optional, invoiceをFirestoreに同期する時に使う)
invoice.payment_action_required (optional, invoiceをFirestoreに同期する時に使う)
全項目を入力して「エンドポイントを追加」を押下
webhookの署名シークレットが生成されるので、それをコピーしておきます。
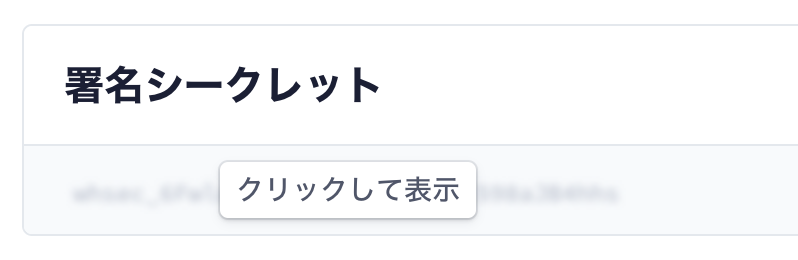
次に別窓で開いているfirebase extensionsに戻って、「拡張機能の構成」画面からextensionを再構成します。「拡張機能を再構成」を押下。
コピーしておいたwebhookの署名シークレットを「Stripe webhook secret」に貼り付けして、「シークレットを作成」を押下した後に「保存」を押下します。
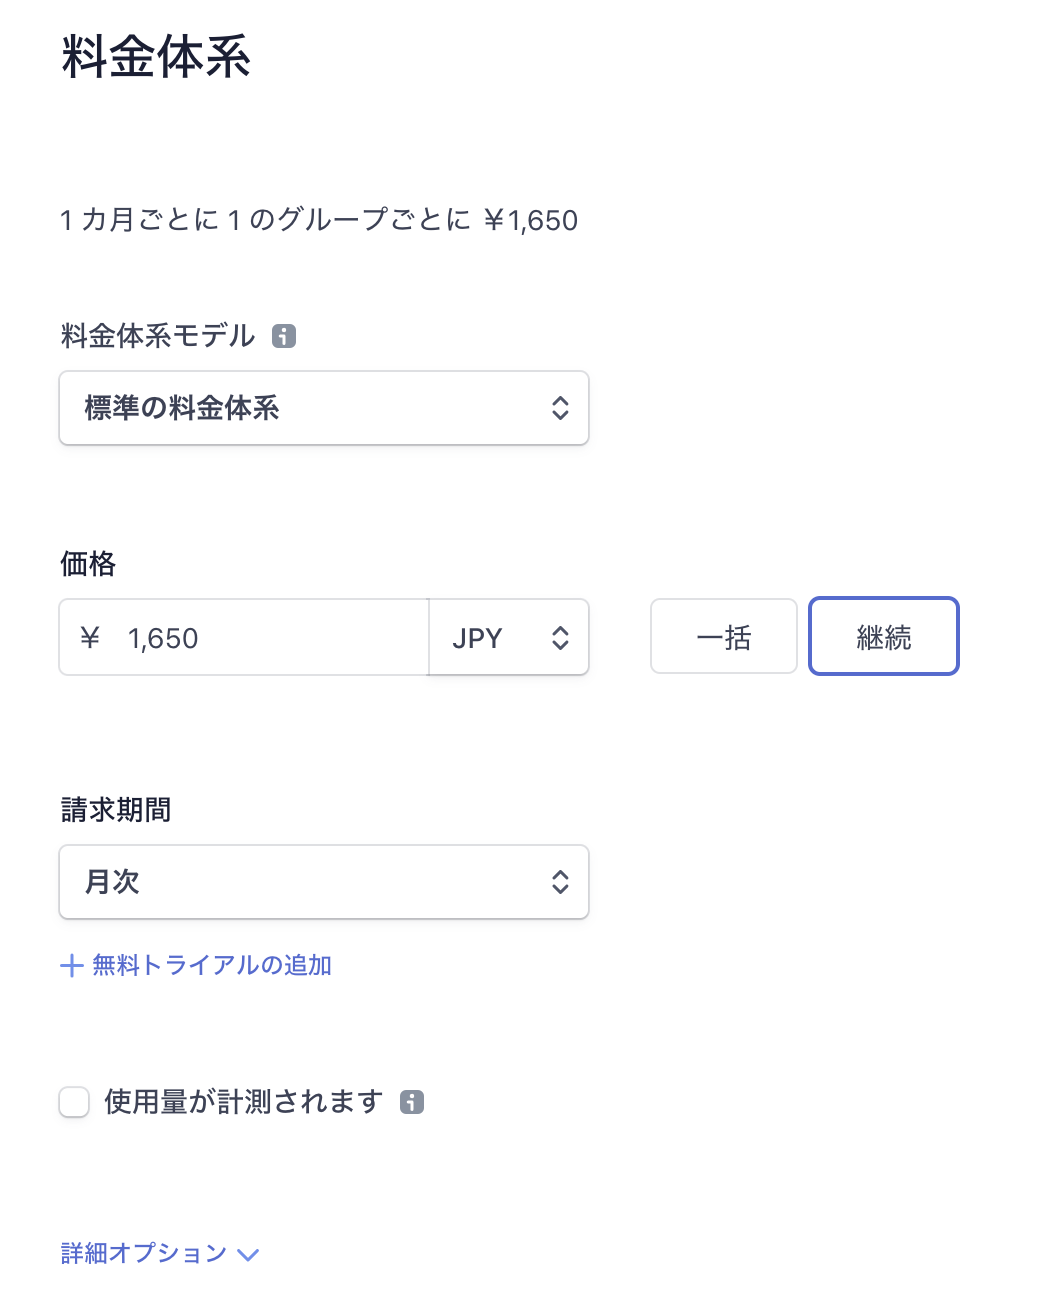
商品の準備
再構成が終了したら次に商品の追加をします。
stripeの商品画面から「商品を追加」を押下します。

商品情報と料金体系を入力し、右上の 「商品を保存ボタン」を押下します。
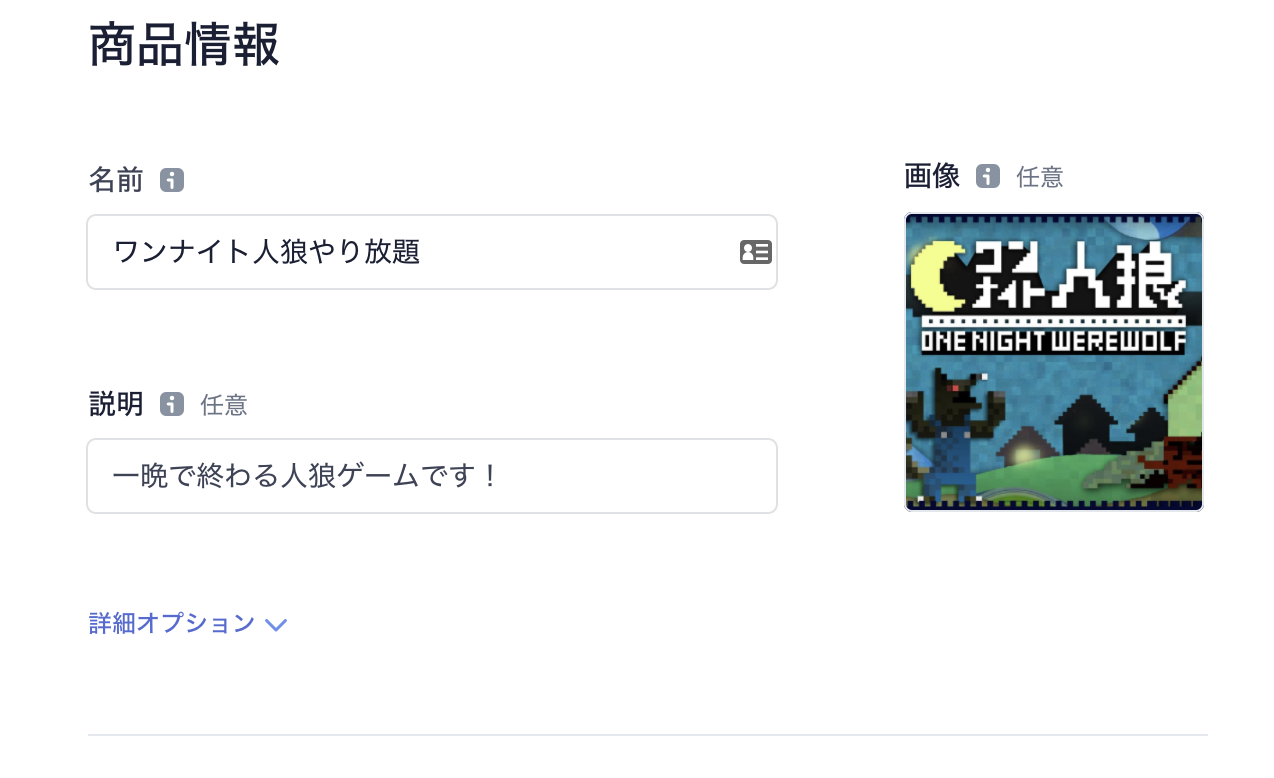
[宣伝]ちなみにワンナイト人狼は絶賛amazonでも販売中のボドゲです!アプリもあるのでやってみてね!
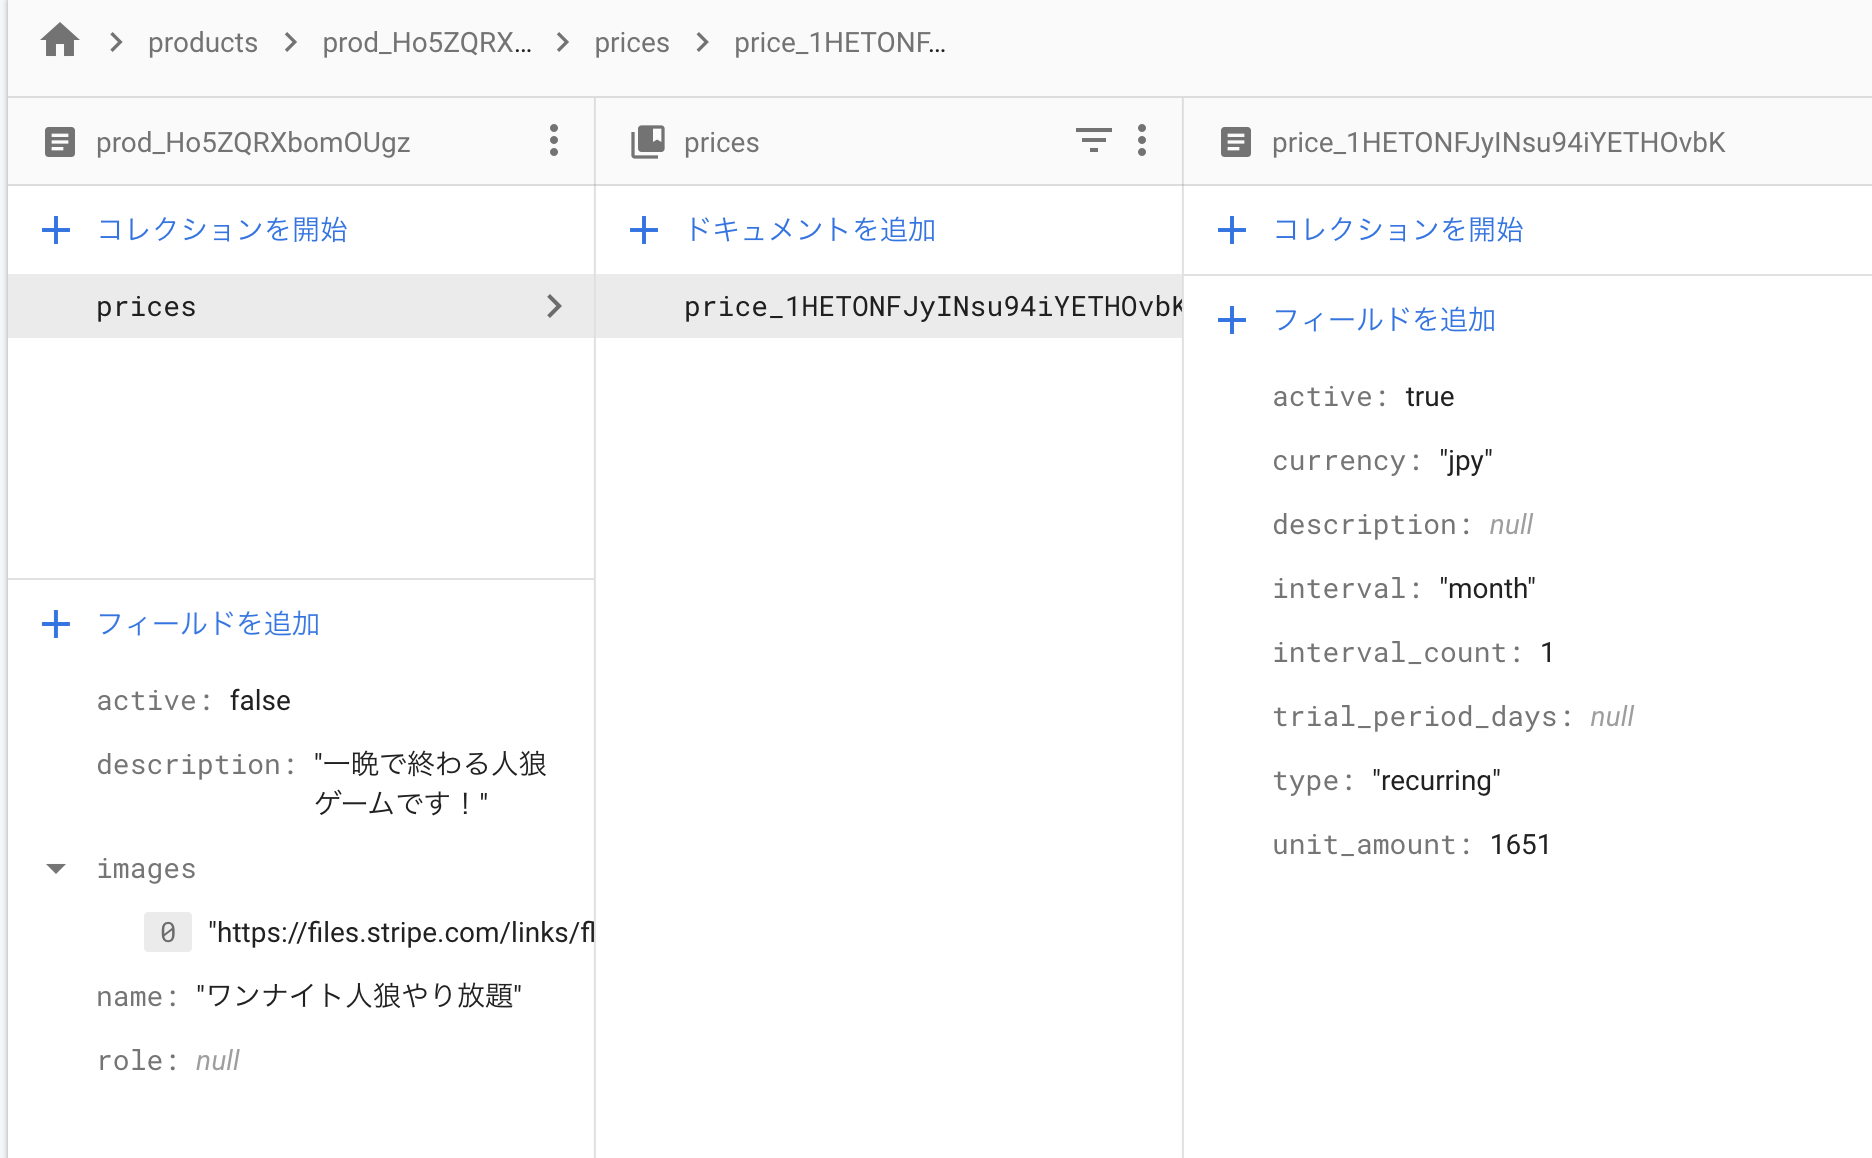
商品を保存するとwebhookによってcloud functionsが起動して自動的にfirestoreのproductsコレクションにレコードが挿入され参照することができるようになります。
カスタマーポータルの設定
購入したサブスクリプションをユーザ側でstripeのページで確認できるようにするためにポータルページの準備をします。
カスタマーポータルの設定画面へ遷移し、利用規約とプライバシーポリシーを入力しておきます。
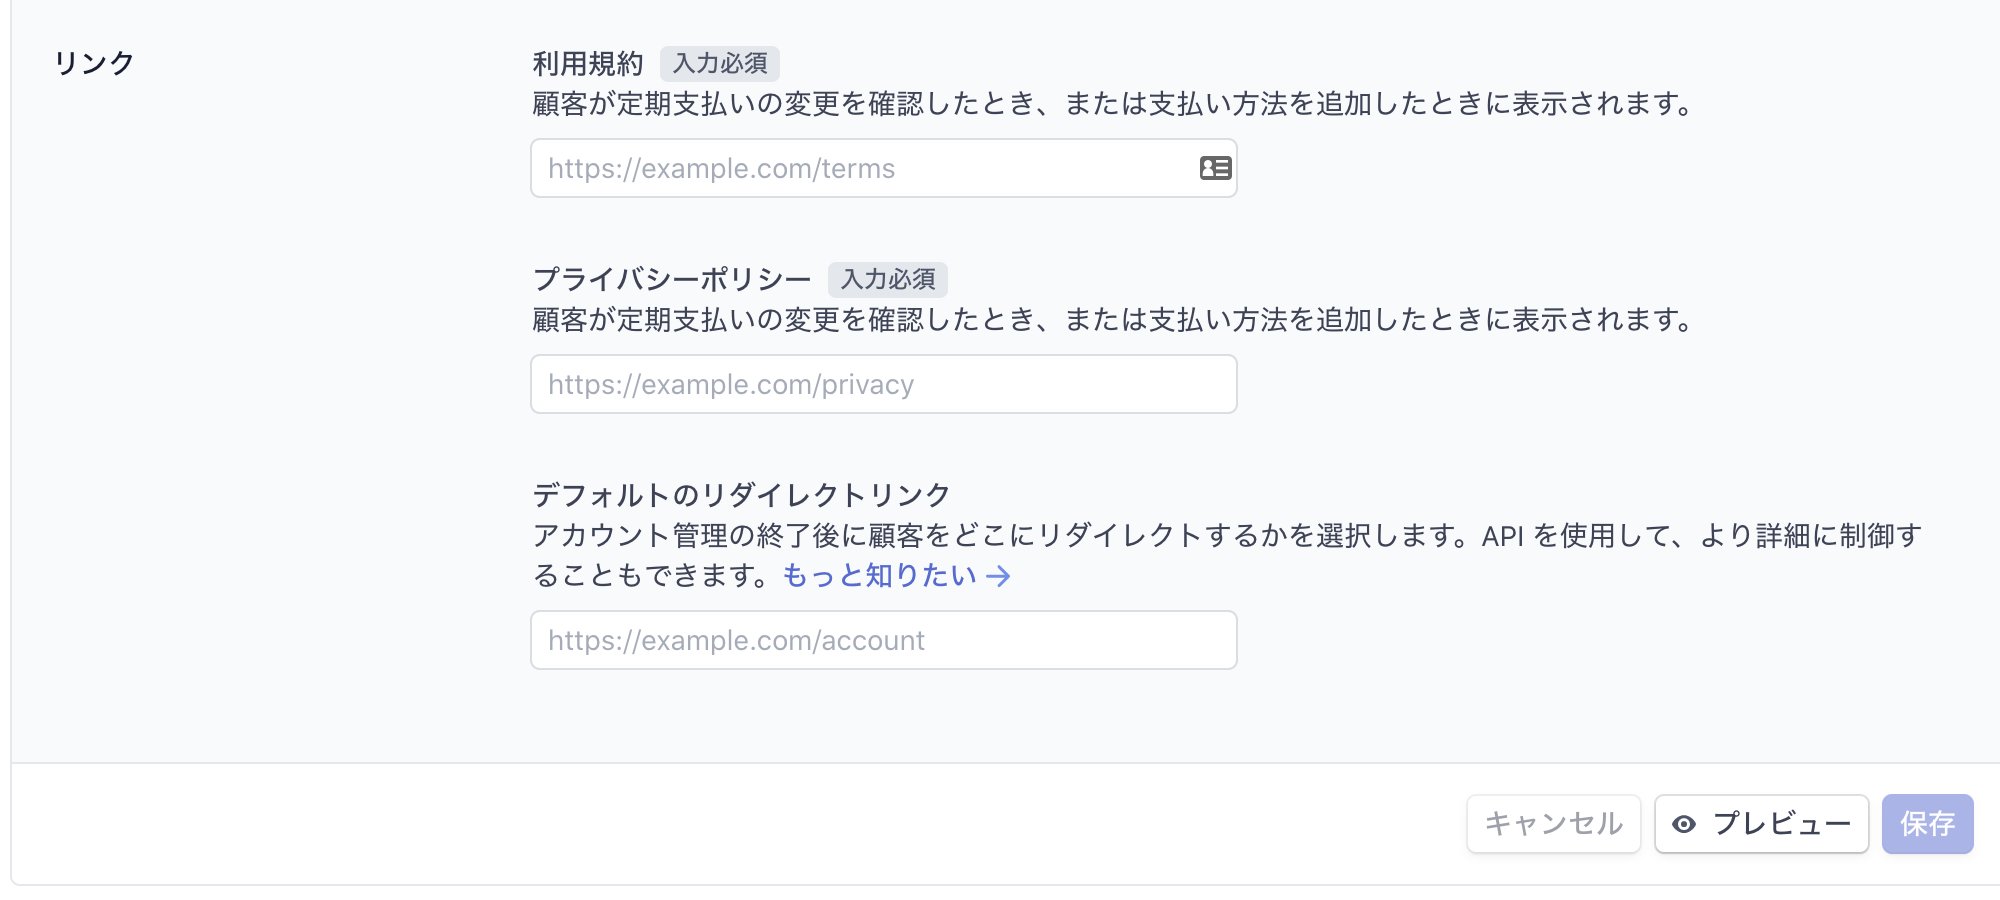
ちなみにこれをやっておかないと後ほど顧客用stripeポータルに遷移しようとすると下記エラーで怒られて遷移できなくなります。
You can’t create a portal session in test mode until you save your customer portal settings in test mode
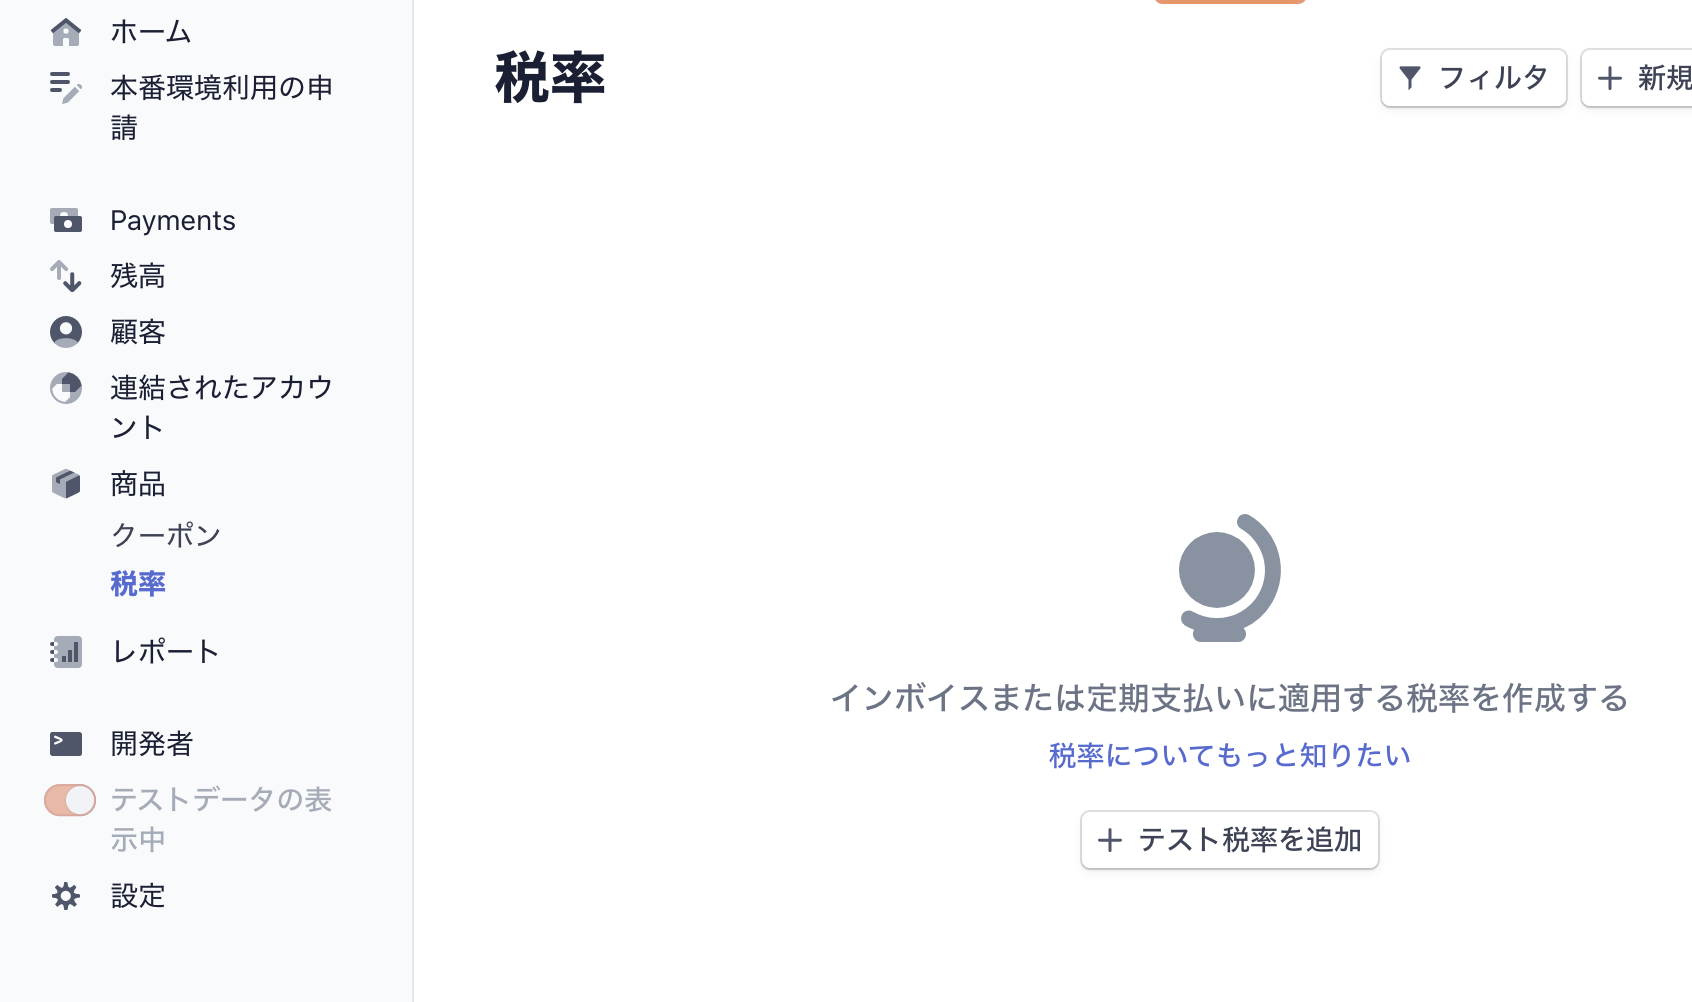
税率の準備
お国によっても違う税率の準備をします。
stripeの税率画面から税率を追加します。「テスト税率を追加」ボタンを押下します。
日本は今10%なので10といれておきましょう。
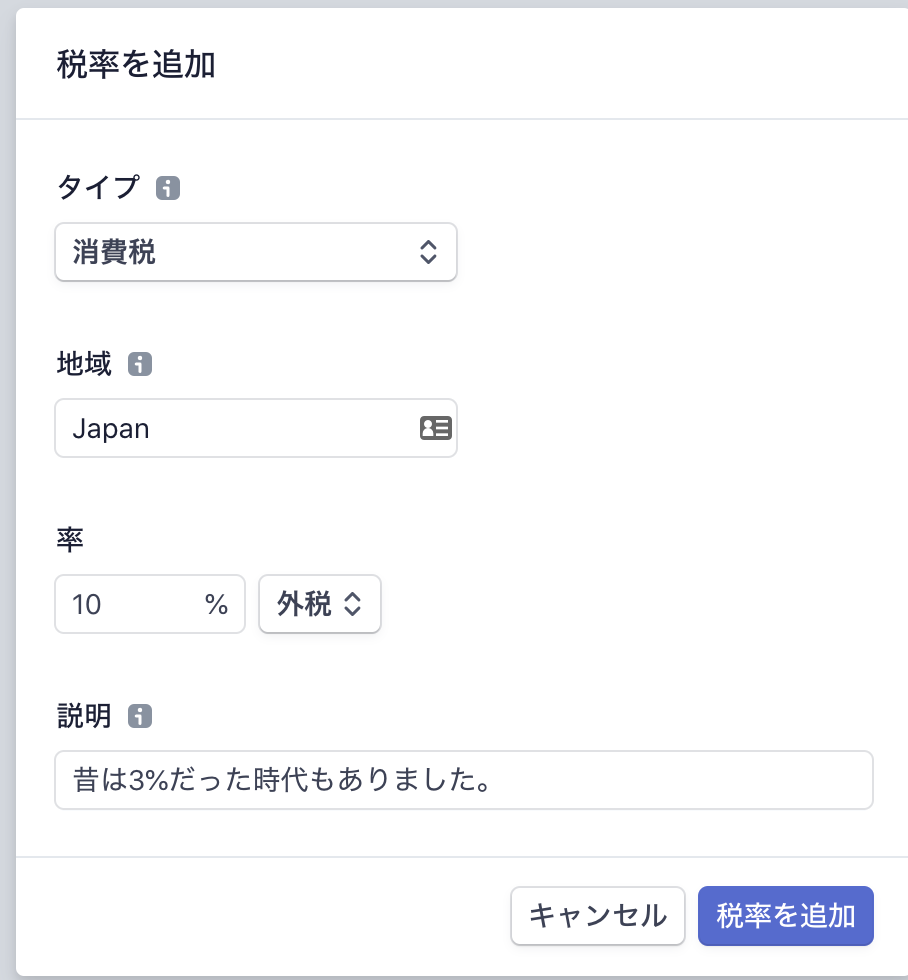
作成されました。消費税の欄をタップします。

IDをコピーしておきます。

サンプルの下準備
ようやく準備ができたので早速サンプルを動かしてみます。
まずサンプルをcloneしてきましょう。
git clone git@github.com:stripe-samples/firebase-subscription-payments.git
クローンしたら忘れないうちにpublic/javascript/app.jsファイル内のtax_ratesの値を先程コピーした税率のIDに置き換えておきます。
APIキーのdashboard画面から、公開可能キーをコピーします。
今回は標準キーの方で問題ないです。
コピーしたら、public/javascript/app.jsファイル内のSTRIPE_PUBLISHABLE_KEYの値と置き換えます。
次に、プロジェクトの設定を準備します。
firebaseコンソールのプロジェクトの設定を開きます。
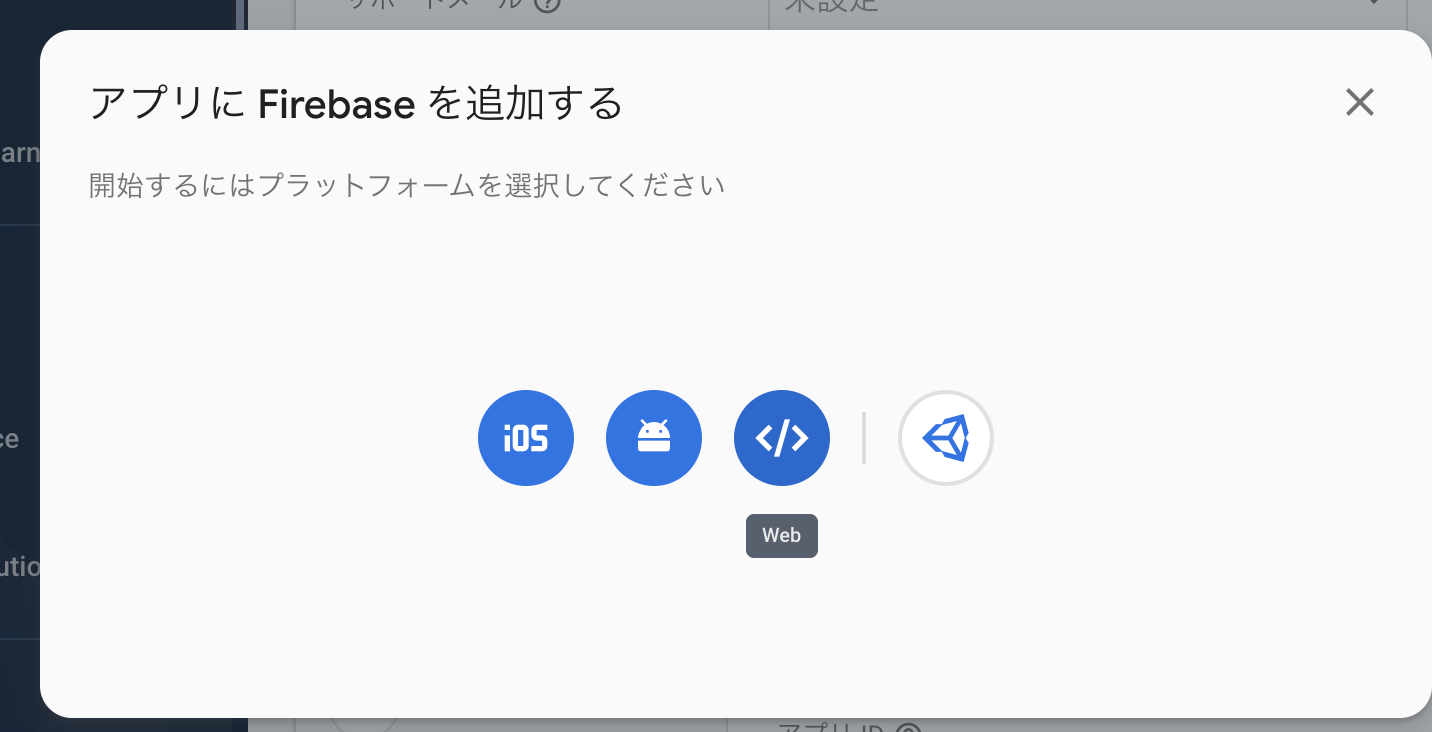
さらに、マイアプリの「アプリを追加」を押下

webを選択
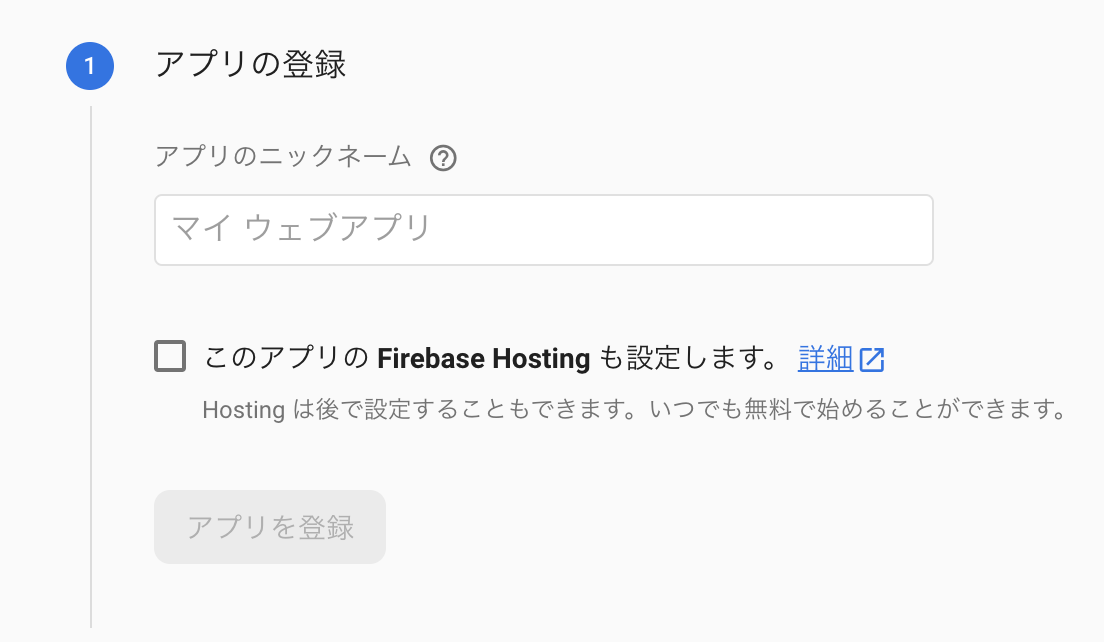
アプリのニックネームをいれて登録します。
次へ
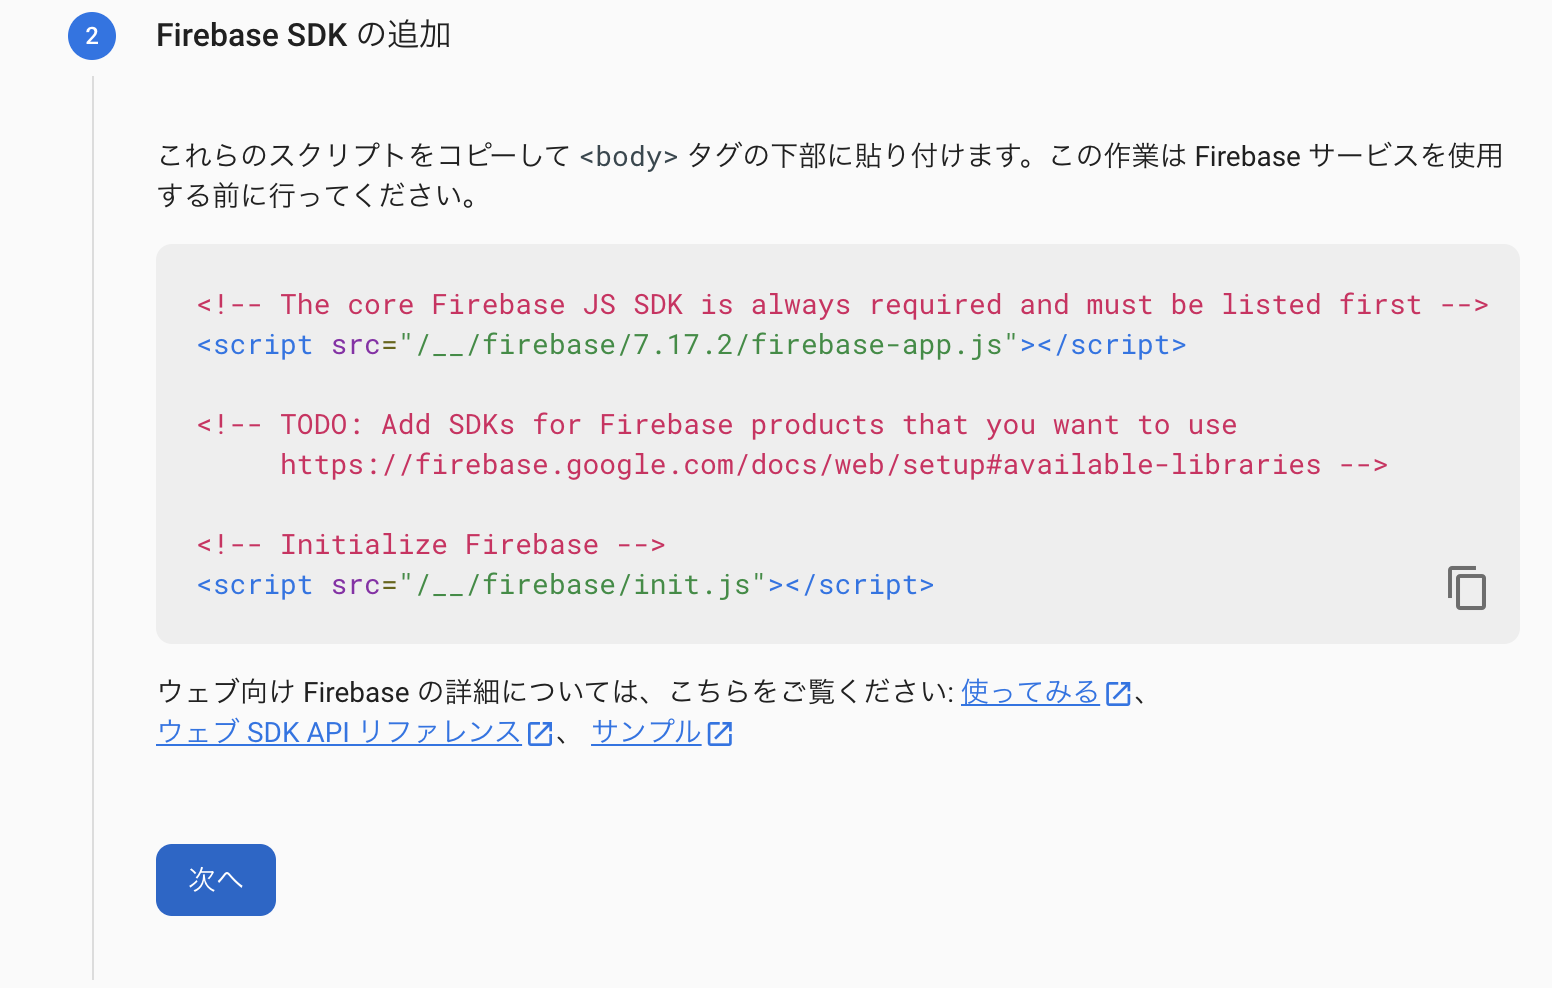
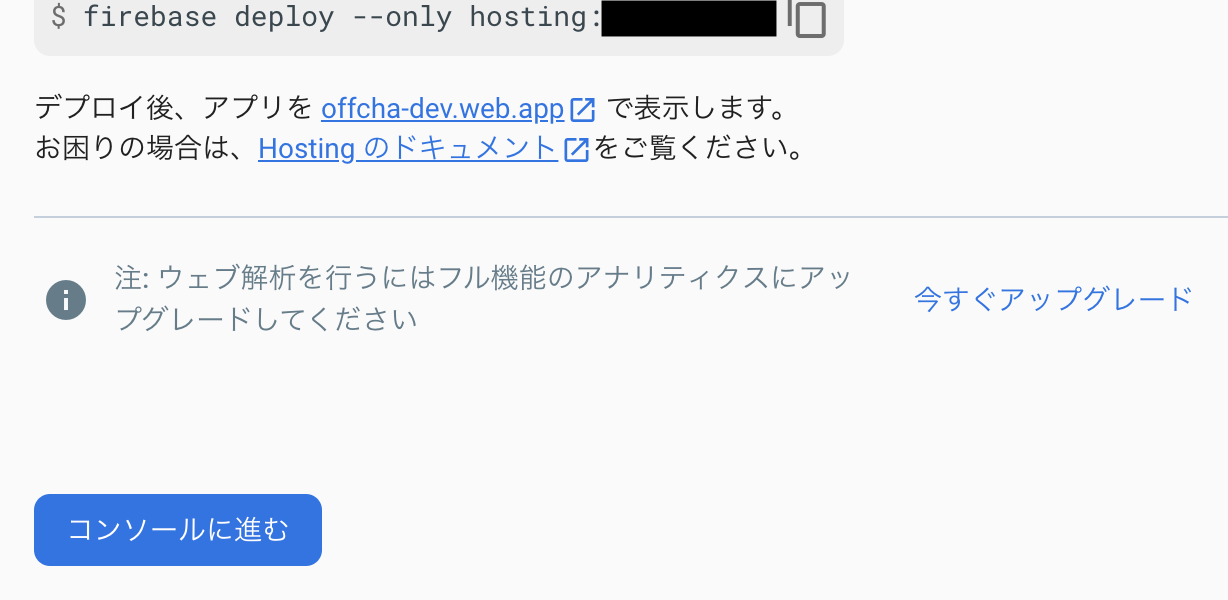
次へ
コンソールに進む
コンソールに戻るとWebAppの構成を押下するとfirebaseのkeyが色々とみれます。
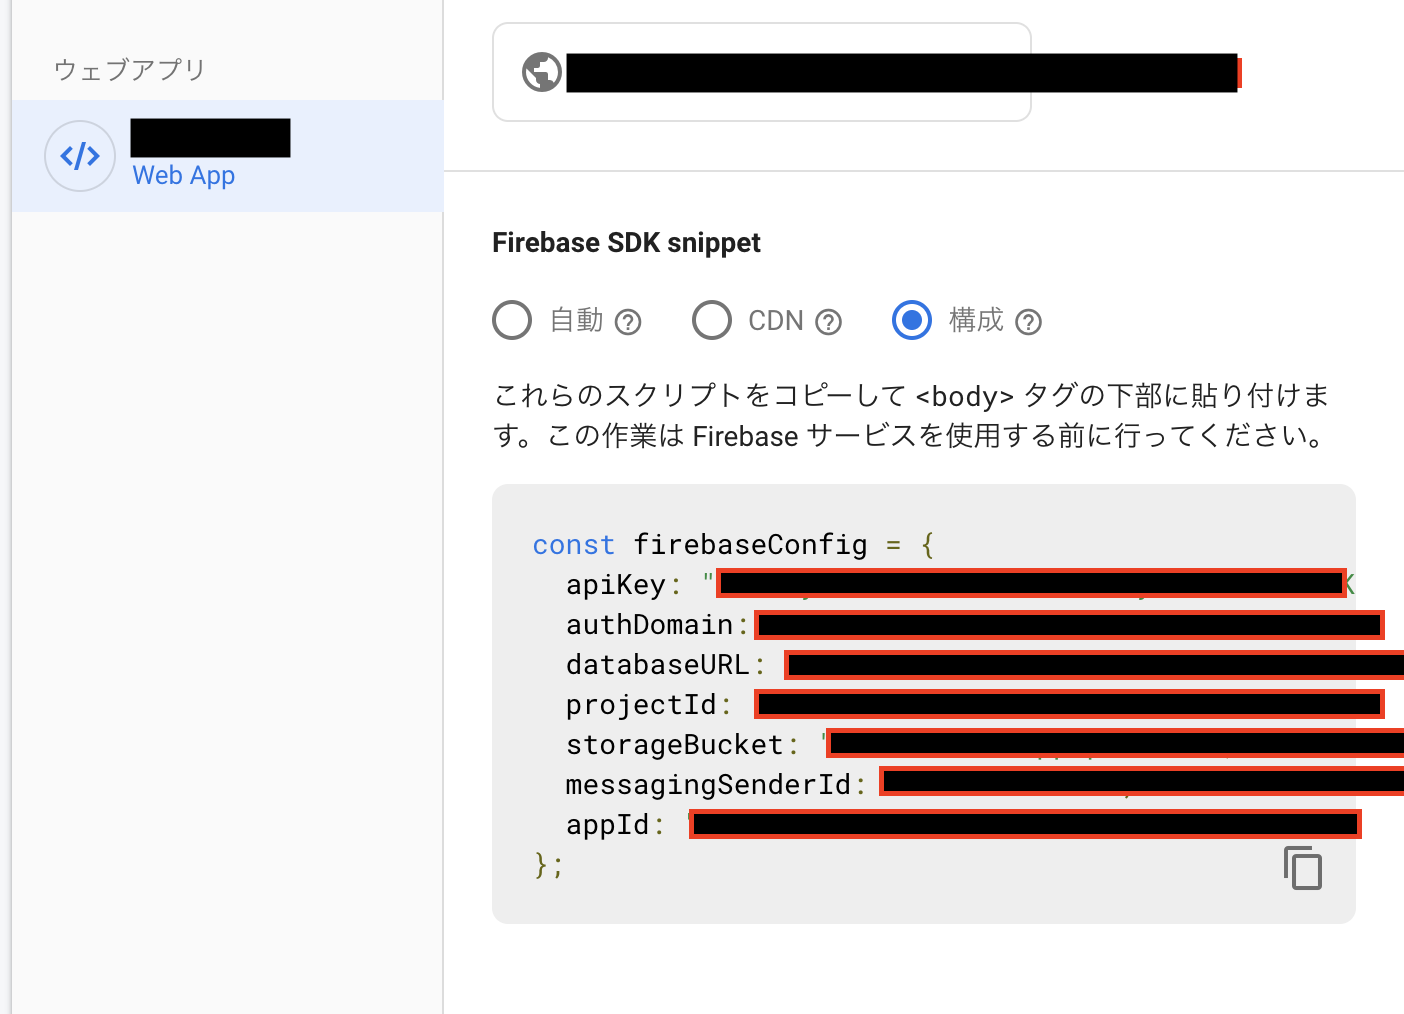
この情報をpublic/javascript/app.jsのfirebaseConfigの値と入れ替えちゃいましょう。
次に、public/javascript/app.jsのcloud functionのlocationをfirebase extensionsで設定した時のlocationに変更しましょう。
今回これを見ながらやってる人はasia-northeast1になるはずです。
これをやらないとstripeのポータル画面を開こうとした時にロケーションが違うのでCORSエラーが発生して困ったことになります。
サンプルを動かしてみる
いよいよ準備が終わったところで、サンプルの準備に入ります。
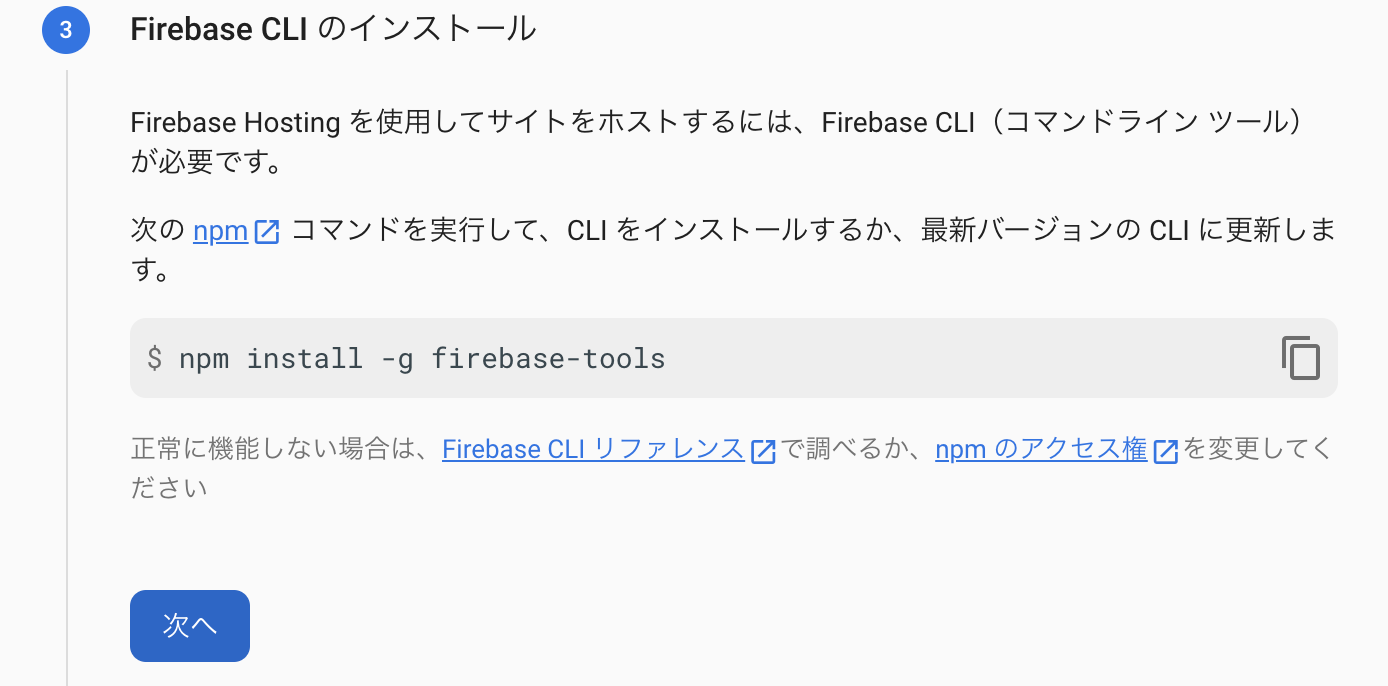
firebaseコマンドを使ってfirebaseを初期化します。(インストールしてない人はnpm install -g firebase-toolsと打ってインストールしておこう)
firebase init
色々聞かれますが基本はデフォルトで答えます。firestoreとhostingは必須でインストールをお願いします。
下記のような感じで答えます。
? Please select an option: Use an existing project // 既存のプロジェクトから選ぶ
i  Don't want to scroll through all your projects? If you know your project ID, you can initialize it directly using firebase init --project <project_id>.

? Select a default Firebase project for this directory: test-**** (test) // プロジェクトを選択
i  Using project test-**** (test)

=== Firestore Setup

Firestore Security Rules allow you to define how and when to allow
requests. You can keep these rules in your project directory
and publish them with firebase deploy.

? What file should be used for Firestore Rules? firestore.rules
? File firestore.rules already exists. Do you want to overwrite it with the Firestore Rules from the Firebase Console? No

Firestore indexes allow you to perform complex queries while
maintaining performance that scales with the size of the result
set. You can keep index definitions in your project directory
and publish them with firebase deploy.

? What file should be used for Firestore indexes? firestore.indexes.json

=== Functions Setup

A functions directory will be created in your project with a Node.js
package pre-configured. Functions can be deployed with firebase deploy.

? What language would you like to use to write Cloud Functions? TypeScript
? Do you want to use ESLint to catch probable bugs and enforce style? Yes
✔  Wrote functions/package.json
✔  Wrote functions/.eslintrc.js
✔  Wrote functions/tsconfig.json
✔  Wrote functions/tsconfig.dev.json
✔  Wrote functions/src/index.ts
✔  Wrote functions/.gitignore
? Do you want to install dependencies with npm now? No

=== Hosting Setup

Your public directory is the folder (relative to your project directory) that
will contain Hosting assets to be uploaded with firebase deploy. If you
have a build process for your assets, use your build's output directory.

? What do you want to use as your public directory? public
? Configure as a single-page app (rewrite all urls to /index.html)? No
? Set up automatic builds and deploys with GitHub? No
✔  Wrote public/404.html
? File public/index.html already exists. Overwrite? No
i  Skipping write of public/index.html

=== Emulators Setup
? Which Firebase emulators do you want to set up? Press Space to select emulators, then Enter to confirm your choices. (Press <space> to select, <a> to toggle all, <i> to invert selection)Firestore Emulator, Hosting Emulator
? Which port do you want to use for the firestore emulator? 8080
? Which port do you want to use for the hosting emulator? 5000
? Would you like to enable the Emulator UI? Yes
? Which port do you want to use for the Emulator UI (leave empty to use any available port)?
? Would you like to download the emulators now? Yes

i  Writing configuration info to firebase.json...
i  Writing project information to .firebaserc...

✔  Firebase initialization complete!
firestore.indexes.jsonにindexをセットしておきます。
{
  "indexes": [
    {
      "collectionGroup": "prices",
      "queryScope": "COLLECTION",
      "fields": [
        {
          "fieldPath": "active",
          "order": "ASCENDING"
        },
        {
          "fieldPath": "unit_amount",
          "order": "ASCENDING"
        }
      ]
    },
  ],
  "fieldOverrides": []
}
セットしたindexをデプロイします。
firebase deploy --only firestore:indexes
firebaseの準備ができたのでnpmコマンドで起動します。
npm run dev
サーバ起動後、http://localhost:5000/にアクセスしてみます。
無事起動できました。
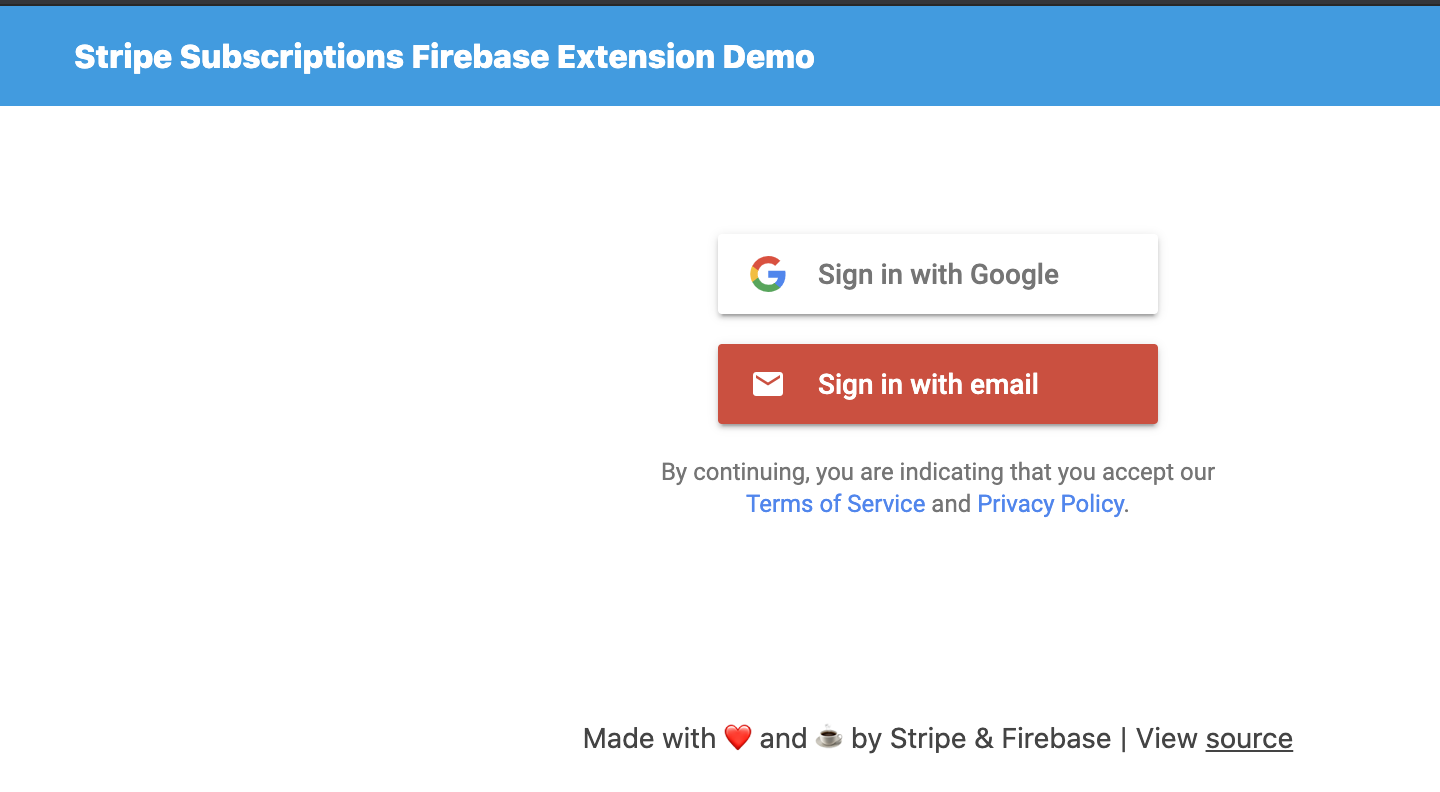
さっそくSign in with emailで入ってみましょう!
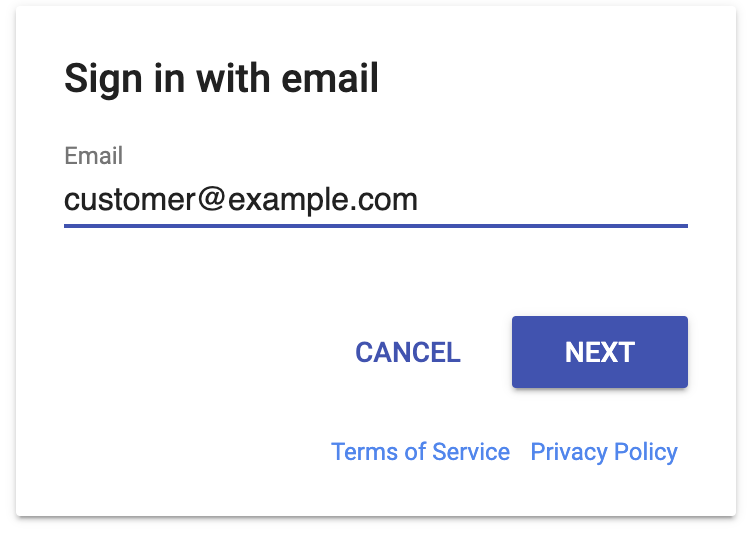
サンプルではユーザがいなければ作ってくださいと言われるので入力してSaveしましょう。
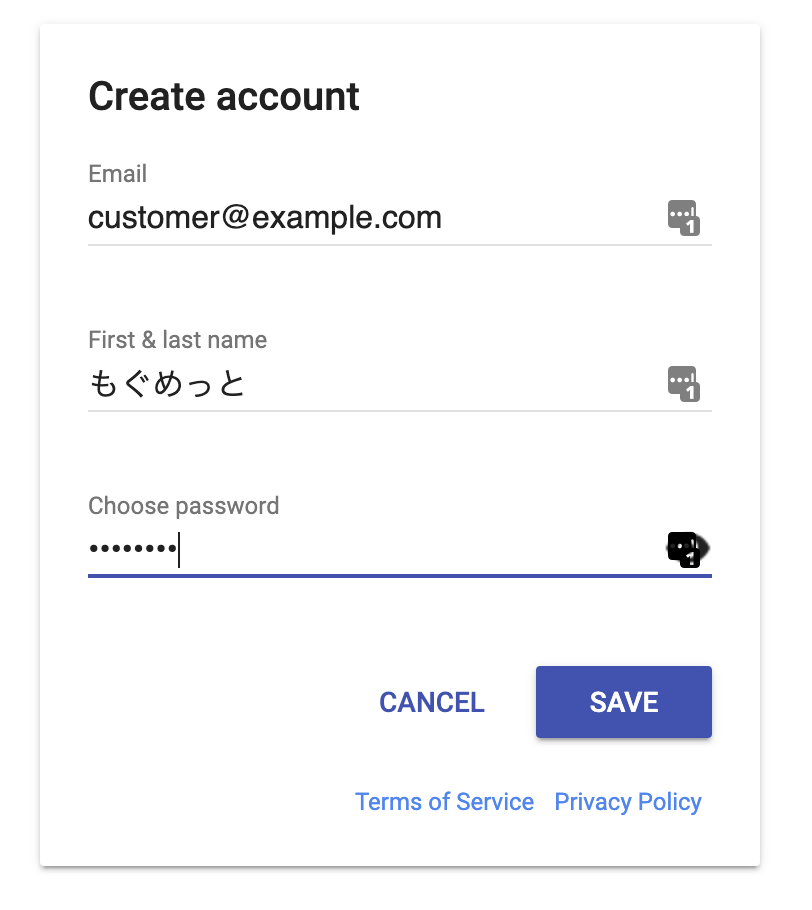
無事登録処理もしくはログインがおわれば先程登録した商品が表示されるはずです。

(ちなみにサンプルだと本来はドル表記になるため2桁足りない表記になってます。)
実際に購入処理を試してみます。テストできるカード一覧はこちらにあります。(名前とか日付、CVCは何でもいいみたいです)

購入処理が終わると再びサンプルページに戻ってきます。無事購入できてるようですね。
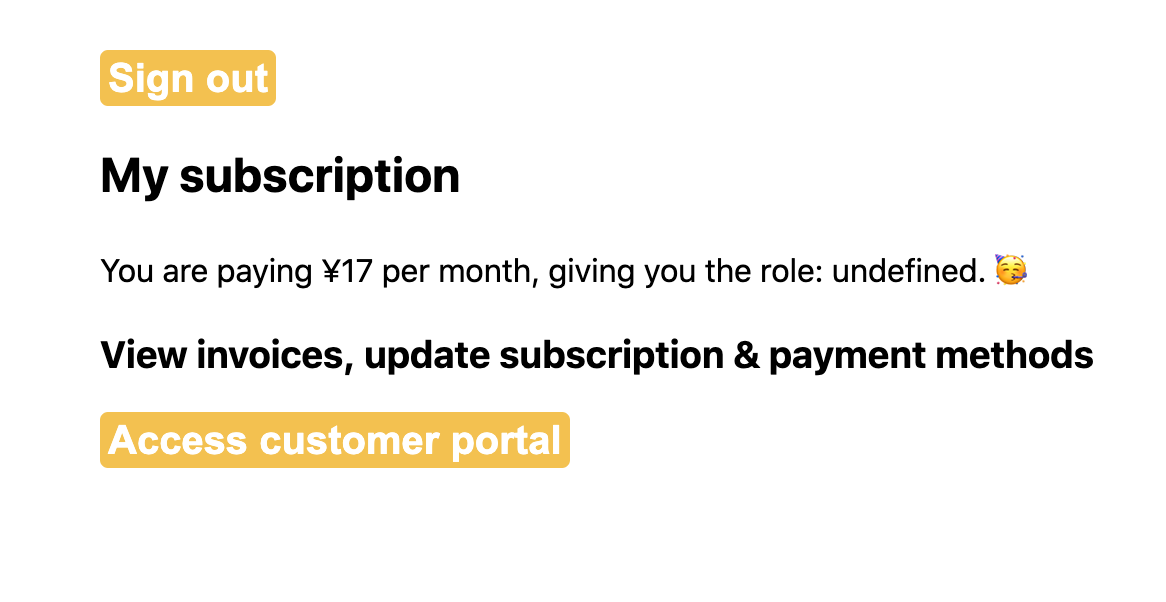
「Access customer portal」を押下すると、stripe上で現在購入中のサブスクリプションを確認することが出来ます。
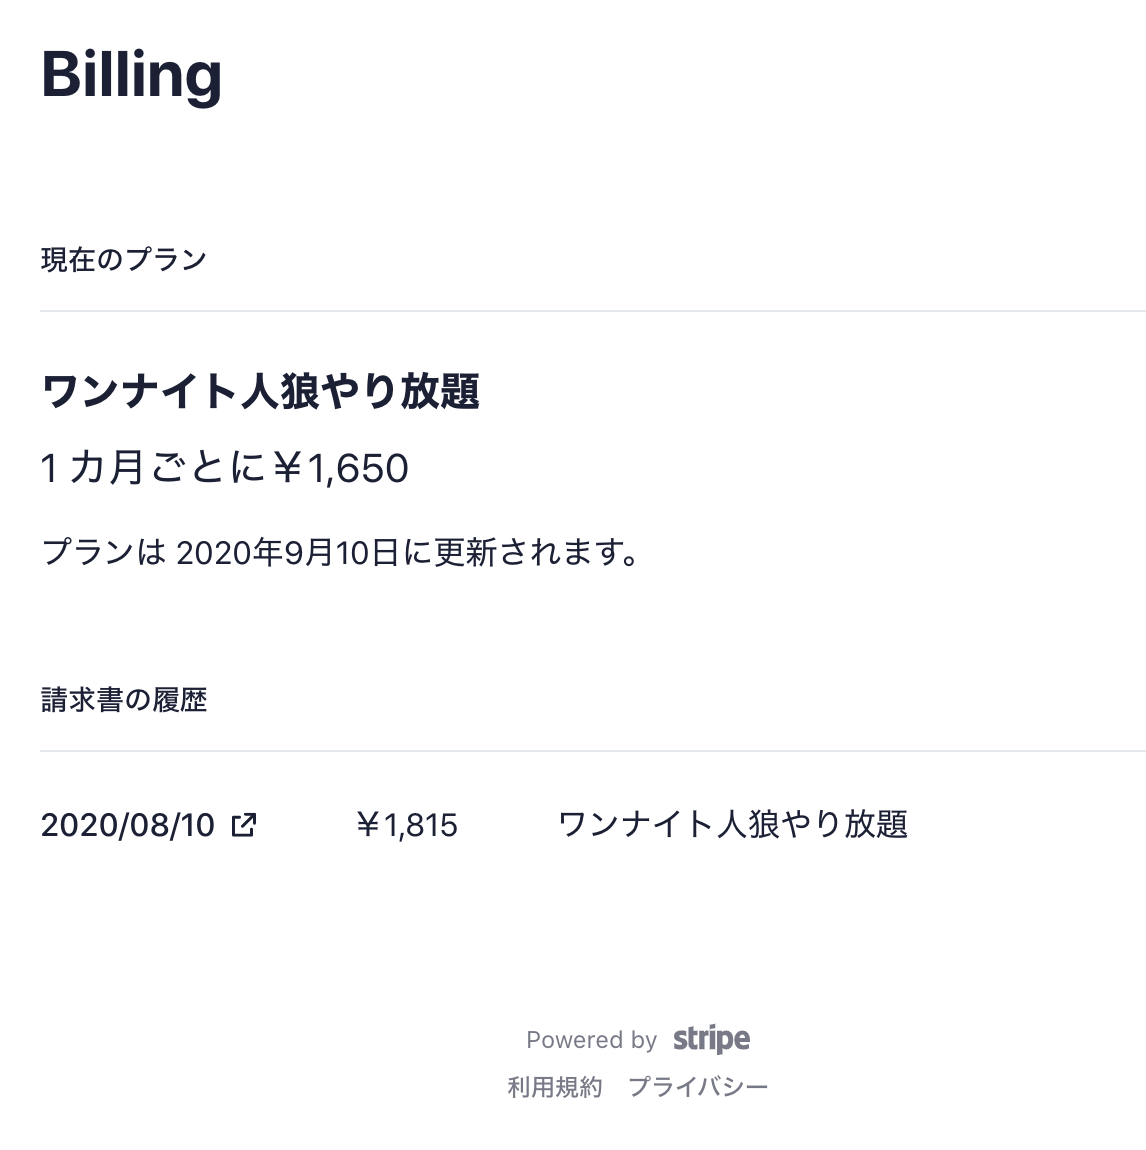
また、stripeの定期支払画面でも見てみると、購入処理が無事できて、課金状態になっていることがわかります。

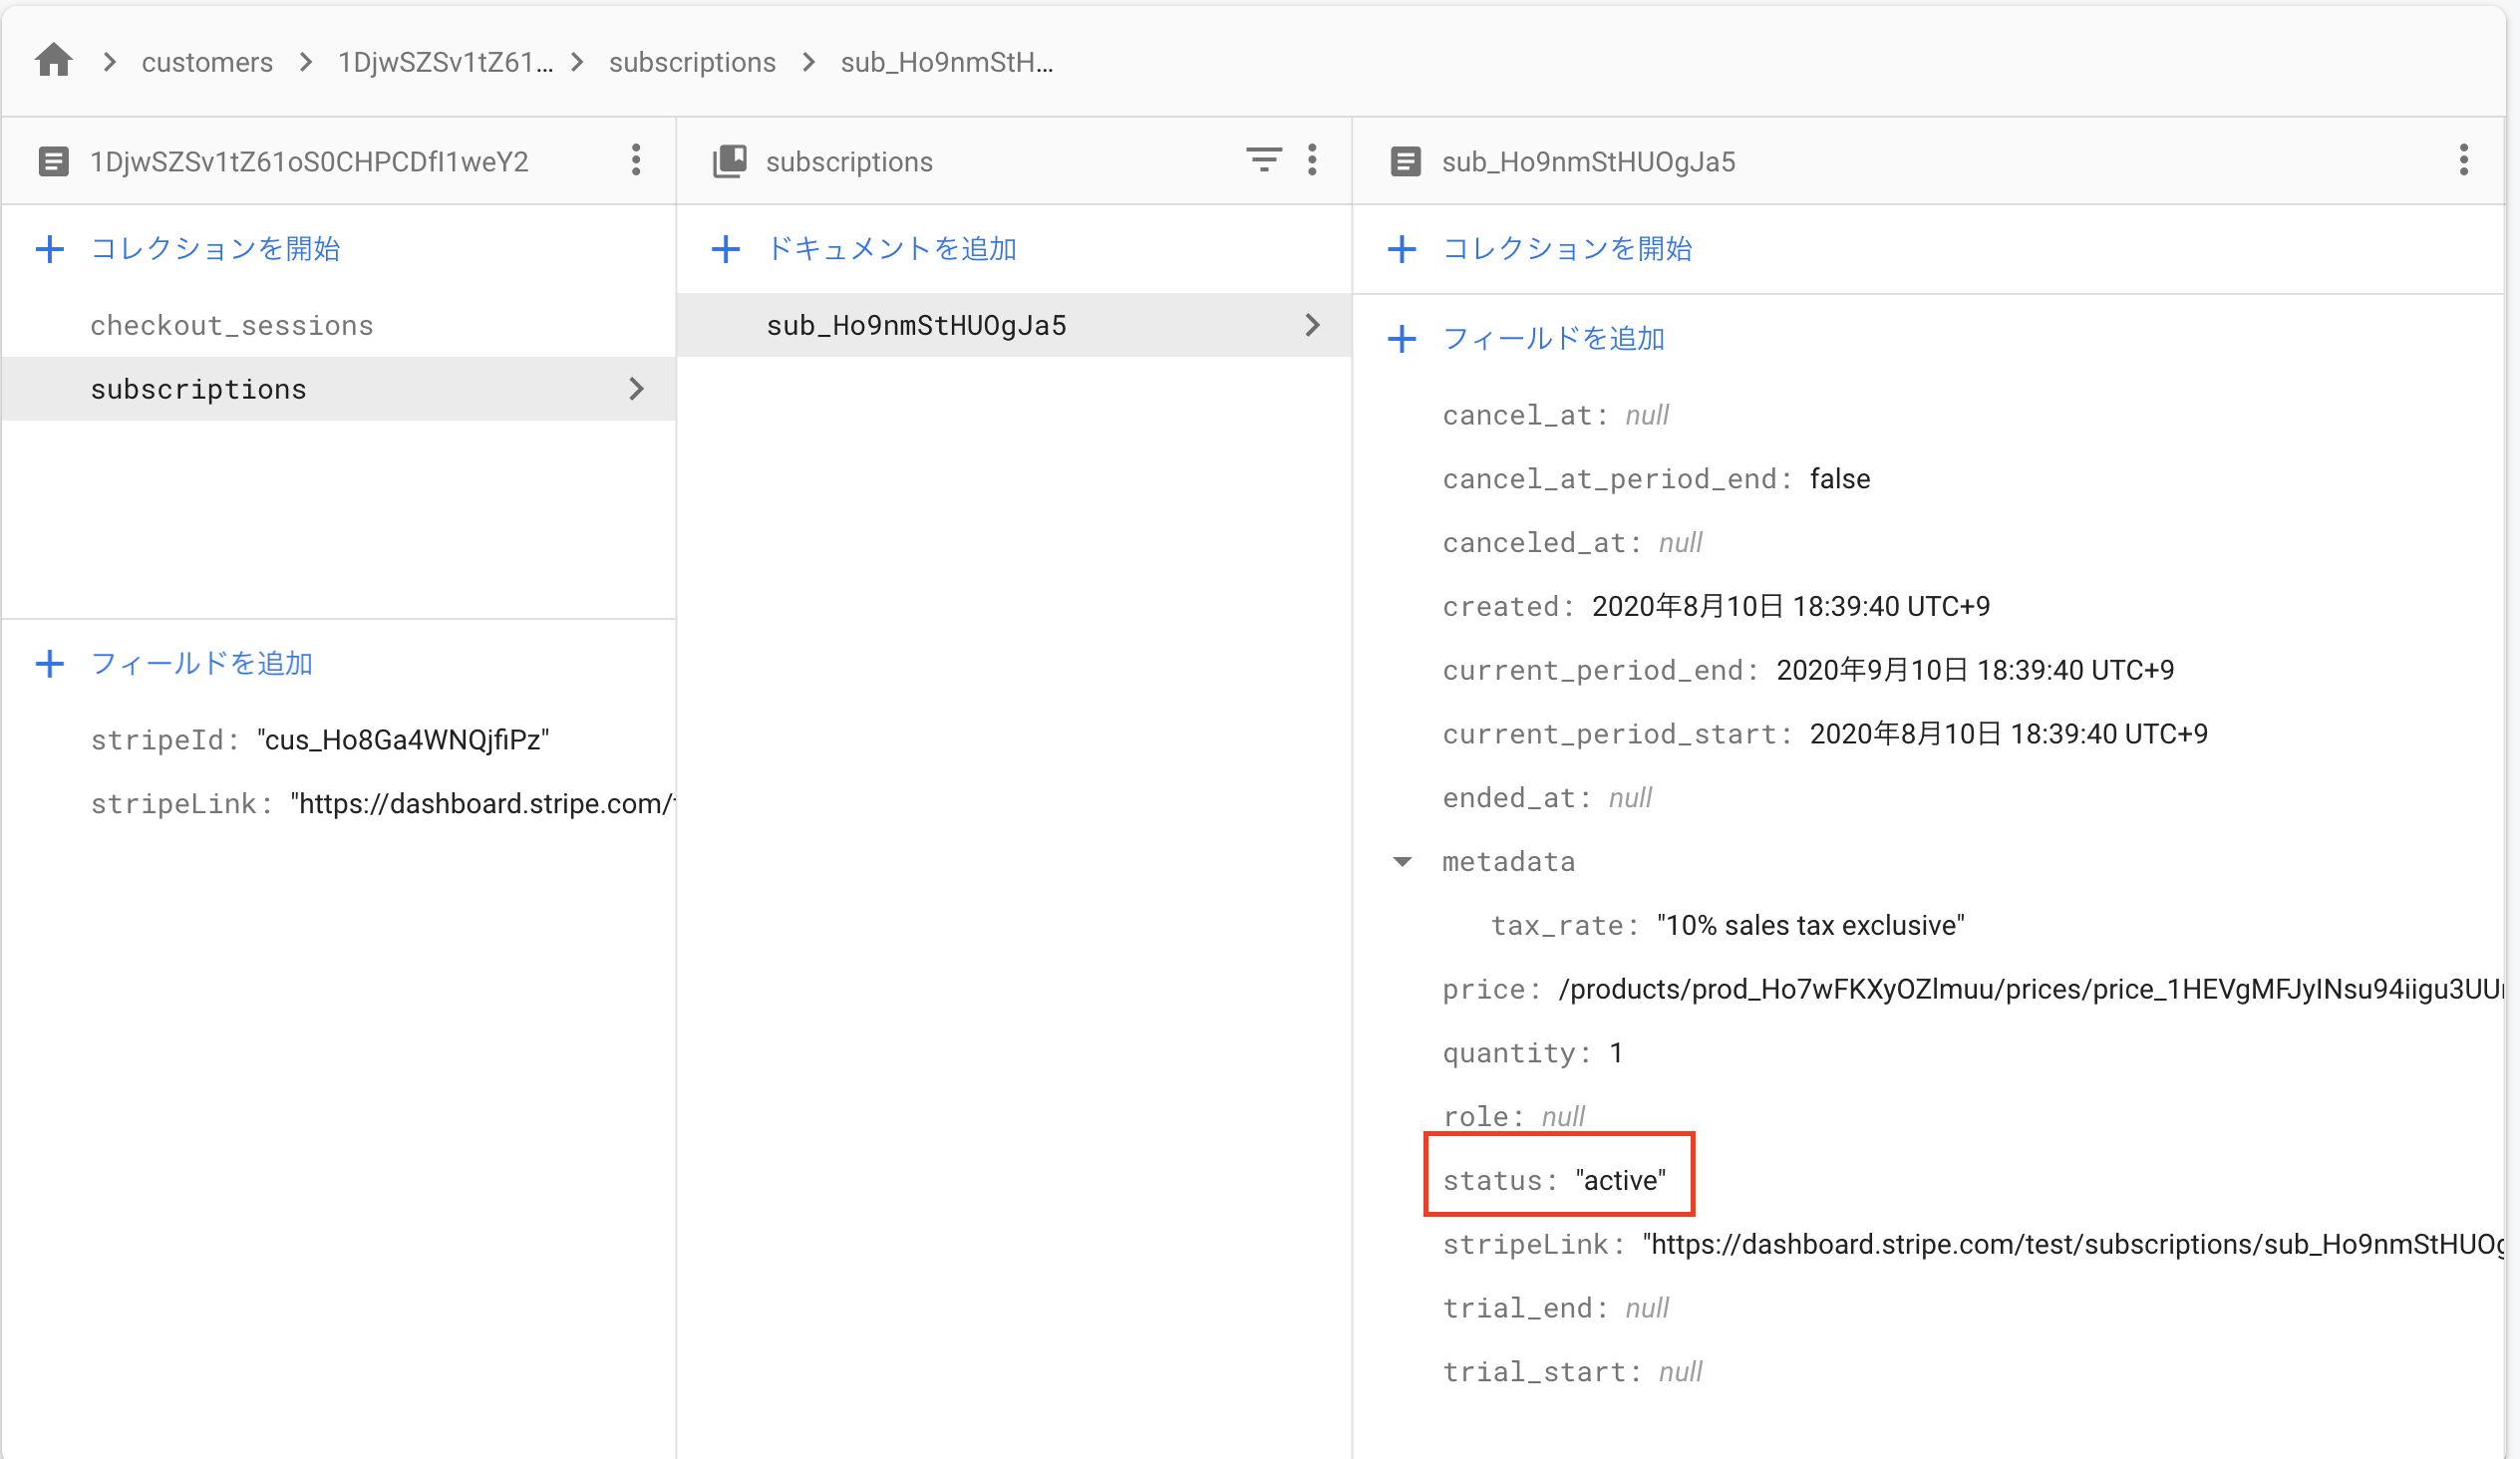
firestoreでもちゃんとレコードが反映されてます。
まとめ
手順は多いですが、ほぼコードを書かずに月額課金の仕組みを作ることが出来てしまいました。
本当にいい時代になりました。
少しでも皆さんのサービス制作にお役に立てればと存じます。
また、続編である、買い切りタイプの実装や設定の仕方については別記事で記載しました。
[最後に宣伝]
こんなサービス作ってるのでよかったら使ってみてください!
ワンナイト人狼 for mobile
ワンナイト人狼オンライン(ガッツリfirebase使ってます。)
気軽に投稿できるフォトコンサイト - Camecon
連絡先を交換しなくてもグルチャができる - Offcha