概要
C++から使えるGoogle製の高速なJavascriptエンジン「V8」のビルド方法を書いていきます。
Duktapeよりは日本語の資料もぼちぼちありますが、ちょっと古くてその通りにやってもうまくいかなかったのでメモを残しておきます。(2018年11月現在の内容)
環境
以下のものが既に正常にインストールされていることが前提です。
- Winndows10 X64
- Visual Studio Community 2017(https://visualstudio.microsoft.com/ja/vs/)
- Windows10 SDK(https://developer.microsoft.com/ja-jp/windows/downloads/windows-10-sdk)
- Git(https://gitforwindows.org/)
depot-toolsインストール
- Vs2017用x64 Native Tools コマンドプロンプトを起動※1
- Cドライブに「v8」フォルダーを作成しその中にインストール※2
- 環境変数を通す※3
※1:スタート→Visual Studio 2017→Vs2017用x64 Native Tools コマンドプロンプト
※2:以下のコマンド実行
cd c:\
mkdir v8
cd v8
git clone https://chromium.googlesource.com/chromium/tools/depot_tools.git
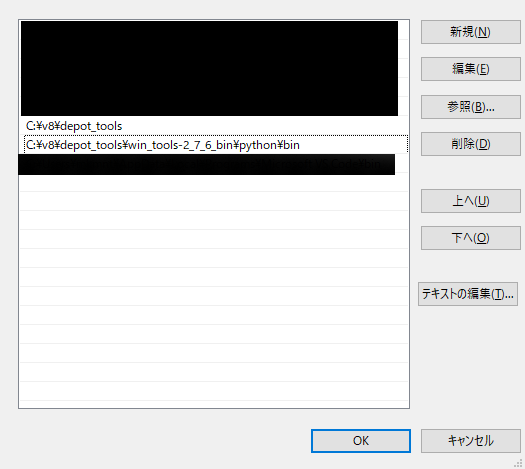
※3:スタート→Windowsシステムツール→コントロールパネル→システムとセキュリティ→システム→システム詳細設定→環境変数→Pathをダブルクリック→新規作成→depot_toolsとその中のpythonのバイナリがあるパスを通す→コマンドプロンプト再起動→cd c:\v8
「set PATH=C:\v8\depot_tools;C:\v8\depot_tools\win_tools-2_7_6_bin\python\bin;%PATH%」とコマンドを打ってもいいです。
V8のソースコードをダウンロード(フェッチ)
以下のコマンドを実行
set DEPOT_TOOLS_WIN_TOOLCHAIN=0
set GYP_MSVS_VERSION=2017
set GYP_MSVS_OVERRIDE_PATH=C:\Program Files (x86)\Microsoft Visual Studio\2017\Community
set WINDOWSSDKDIR = C:\Program Files (x86)\Windows Kits\10
fetch v8
gclient sync
- GYP_MSVS_OVERRIDE_PATH → VisualStudioがインストールされているパス
- WINDOWSSDKDIR → windows10 SDKがインストールされているパス
ビルド設定&ビルド
以下のコマンドを実行
cd /d e:\v8\v8
python tools\dev\v8gen.py x64.release -vv
gn args out.gn\x64.release
ninja -C out.gn\x64.release
途中メモ帳もしくは既定のテキストエディタが起動するので
以下のように記述します。
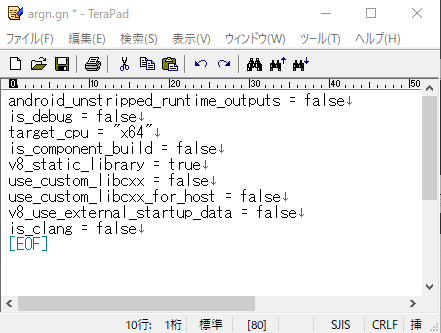
android_unstripped_runtime_outputs = false
is_debug = false
target_cpu = "x64"
is_component_build = false
v8_static_library = true
use_custom_libcxx = false
use_custom_libcxx_for_host = false
v8_use_external_startup_data = false
is_clang = false
※この「is_clang = false」というのを忘れると出来上がったライブラリをリンクするときに「ライブラリが壊れています」とエラーがでます。どうやら最近のはデフォルトでClangでビルドされるようです。
保存して閉じるとビルドが開始されます。
そしてビルドは1時間くらいかかります。スペック良かったら30分くらいで終わるかも?
C++で使う
無事ビルドが完了したらC:\v8\v8\out.gn\x64.releaseに*.libファイルがあります。
インクルードパスはC:\v8\v8\includeです。
それをリンクすればいえい!使えるようになったぜ!
#include <libplatform/libplatform.h>
#include <v8.h>

#pragma comment(lib, "v8_base_0.lib")
#pragma comment(lib, "v8_base_1.lib")
#pragma comment(lib, "v8_snapshot.lib")
#pragma comment(lib, "v8_nosnapshot.lib")
#pragma comment(lib, "v8_libbase.lib")
#pragma comment(lib, "v8_libplatform.lib")
#pragma comment(lib, "v8_libsampler.lib")
#pragma comment(lib, "third_party/icu/icuuc.lib")
#pragma comment(lib, "third_party/icu/icui18n.lib")
#pragma comment(lib, "src/inspector/inspector.lib")

#pragma comment(lib, "winmm.lib")
#pragma comment(lib, "dbghelp.lib")
#pragma comment(lib, "shlwapi.lib")
X86でビルドする場合
Vs2017用x86 Native Tools コマンドプロンプトを起動するか
以下のバッチファイルを実行します。
call "C:\Program Files (x86)\Microsoft Visual Studio\2017\Community\VC\Auxiliary\Build\vcvars32.bat"
そして
cd c:\v8\v8
python tools\dev\v8gen.py ia32.release -vv
gn args out.gn\ia32.release
ninja -C out.gn\ia32.release
target_cpu = "x64"→target_cpu = "x86"にして
あとは同じ。
なんだけど、なぜか途中でエラーが。
assembler-ia32-inl.hの112行付近でどうやらoperator!=のオーバーロードが解決できないらしい。operator!=(nullptr_t)が定義されてない?
とりあえずv8::internal::Object*にキャストしておいた。
  if (write_barrier_mode == UPDATE_WRITE_BARRIER && host() != nullptr) {
    WriteBarrierForCode(host(), this, target);
  }
↓
  if (write_barrier_mode == UPDATE_WRITE_BARRIER && host() != (v8::internal::Object*)nullptr) {
    WriteBarrierForCode(host(), this, target);
  }
あともう一か所あって(279行目付近)
今度は型変換のオーバーロードが解決できないらしい。
operator bool()が定義されてない?
んんーとりあえずポインタ変換はオーバーロードされているようなので
voidポインターにキャストしておこう((
void Assembler::deserialization_set_special_target_at(
    Address instruction_payload, Code code, Address target) {
  set_target_address_at(instruction_payload,
                        code ? code->constant_pool() : kNullAddress, target);
}
↓
void Assembler::deserialization_set_special_target_at(
    Address instruction_payload, Code code, Address target) {
  set_target_address_at(instruction_payload,
                        (void*)code ? code->constant_pool() : kNullAddress, target);
}
ん~~いいのかなこの修正((
とりあえずこれでビルドは通りましたし、リンクして実行もできました。