Xdebug
PHP のデバッグツールである Xdebug にはリモートデバッグという機能があります。リモートデバッグ (Remote Debugging) とは、実行中の PHP とは別の場所にデバッグを制御するものが存在する方式です。
Xdebugのリモートデバッグを使用すると、データ構造を解釈することができます。Xdebugの拡張モジュールでは、PHPスクリプトのデバッグおよびプロファイリング機能を提供します。また、Xdebugは、PHP 5.4、5.5、5.6、7.0、7.1、7.2、および7.3をサポートしています。
print_r() やvar_dump() などの組み込み(ビルトイン)関数、またはログファイルを使用してPHPコーディングをデバッグできますが、開発中に速度が低下します。しかし、Magento2 + xdebugを使用することで開発中の速度が向上し、楽になります
Xdebugの設定
前提条件
Preconditions
1.Magento2+Vagrant環境構築済み。
※ Magento2+Vagrant 環境がまだできていない場合は、このチュートリアル magento2:magento2:開発環境構築 Vagrant
2. PHPバージョン7.1以上。
3. PHPSTORMインストール済み。
Xdebugのインストール(vagrant中)
sudo pecl install xdebug
サーバー側では、次のoutputが得られました。
Build process completed successfully
Installing '/usr/lib/php/20151012/xdebug.so'
install ok: channel://pecl.php.net/xdebug-2.6.1
configuration option "php_ini" is not set to php.ini location
You should add "zend_extension=/usr/lib/php/20151012/xdebug.so" to php.ini
次に、php.ini構成ファイルを編集して、xdebugモジュールを有効にする必要があります。
/etc/php/7.1/fpm/php.ini または /etc/php/7.1/fpm/conf.d/20-xdebug.ini
sudo vim /etc/php/7.1/fpm/php.ini
zend_extension=/usr/lib/php/20151012/xdebug.so
xdebug.remote_host=192.168.33.10
xdebug.remote_enable=1
xdebug.remote_port=9900
xdebug.idekey="PHPSTORM"
xdebug.remote_log="/tmp/xdebug.log"
xdebug.remote_host: 特定のドメインまたはIPアドレスに設定できます。この場合は192.168.33.10 に設定します(私のvagrantプライベートネットワークIP)。
xdebug.remote_port: デフォルトで特定のポート9000に設定できます。
xdebug.idekey: PHPSTORM IDを使用しているためPHPSTORMに設定しました。
xdebug.remote_log:すべてのリモートデバッガー通信が記録されるファイル名として使用されます。
設定が終わった後、Webサーバーを再起動します。
Apacheの場合
sudo /etc/init.d/apache2 restart
Nginxの場合
sudo /etc/init.d/nginx restart
xdebugが正常に有効化されるかどうかを確認するために、phpinfo() を[magento-folder]/pub/index.phpに追加します。私の場合、それは/var/www/html/pub/index.phpでした。このようなoutputが得られるはずです。
XDebugクライアントの構成
私の場合、PHPStorm IDEAを構成します。phpstormでプロジェクトを開きます。
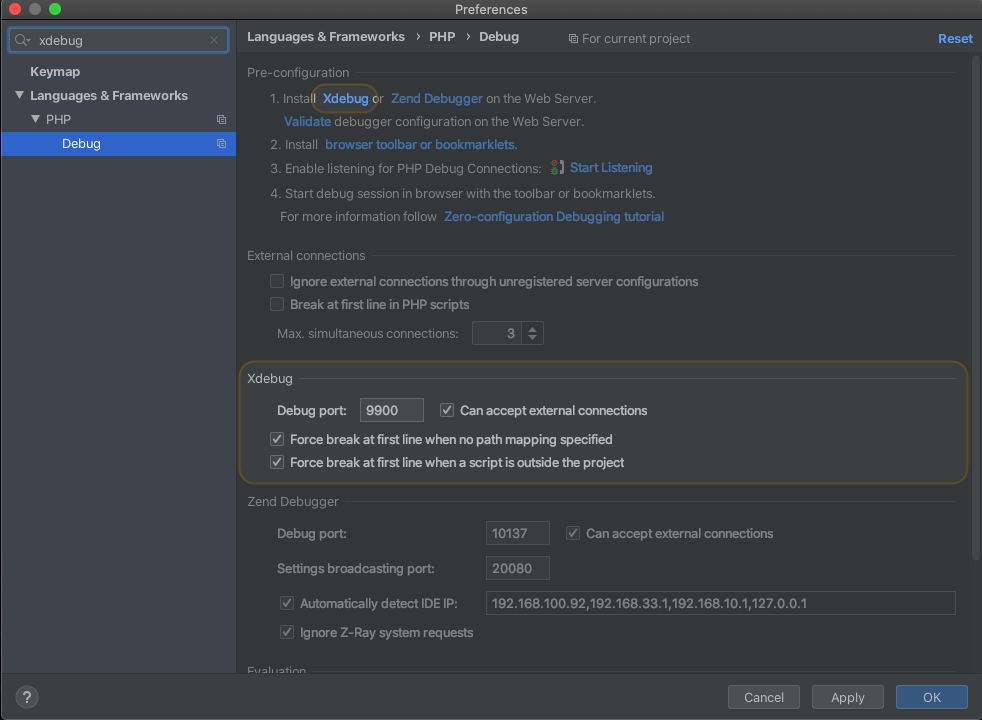
php.iniで設定したとおりにxdebug.remote_portのポートを設定します。
PHPSTORM -> Preference -> Languages & Frameworks -> PHP -> Debug
PHPstorm 構成
Deployment (デプロイ)構成
phpstorm -> Preference -> Build, Execution, Deployment -> Deployment
[+]アイコンをクリックして、新しいリモートサーバーを追加します。
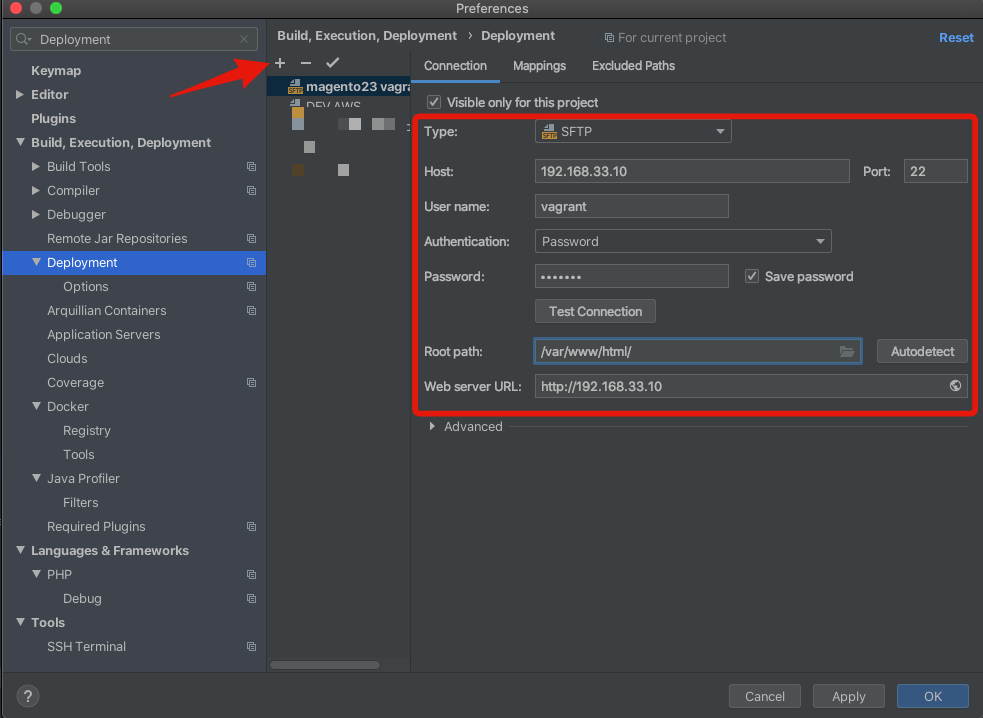
host 特定のドメインまたはIPアドレスに設定できます。
usernameリモートサーバーのユーザー名です。vagrantを使用しているため、ユーザー名はvagrantになります。
password リモートサーバーのパスワードです。vagrantを使用しているため、パスワードはvagrant になります。
root path vagrant Magentoフォルダーの絶対場所/var/www/html/に設定します。
サーバー構成
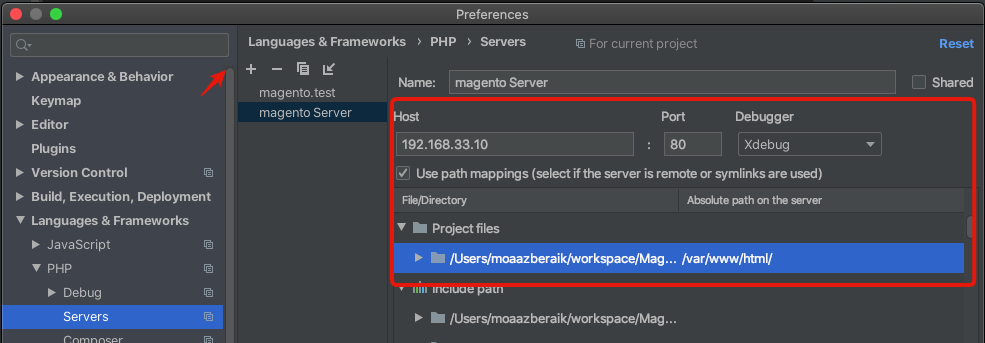
PHPSTORM -> Preference -> Languages & Frameworks -> PHP -> Servers
[+]アイコンをクリックして新しいサーバーを追加します。
host 特定のドメインまたはIPアドレスに設定できます。
Use path mapping チェックボックスにチェックを入れます。
under project files vagrant Magentoフォルダーの絶対場所/var/www/html/に設定します。
Run/debug 構成
PHPSTORM ->Toolbar ->Edit Configurations
- [+]アイコンをクリックして、新しいデバッグを追加します。
- PHP Remote Debugを選択します 。
Server 上の手順で既に作成したサーバーを選択します。
IDE key xdebug.idekeyのphp.ini で設定したとおりにIDE key を設定します
ブラウザ構成
-
xdebug chrome拡張機能 Xdebug helperをインストールします。
-
拡張機能をインストール後、IDE keyを設定します。
-
chrome -> toolbar-> xdebug chrome extension iconを右クリック。
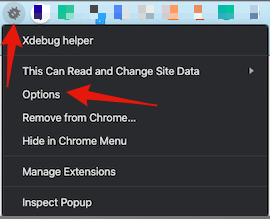
2.Phpstormを選択します。xdebug.idekeyのphp.iniで設定したとおりにIDE keyを設定します

3.保存ボタンをクリック -
-
xdebug chrome拡張機能を有効にします。
-
chrome -> toolbar-> xdebug chrome extension iconを左クリック。

-
debugをクリックします。
デバッグの時間!
PHPSTORM -> toolbar
2.コードにブレークポイントを設定します。ブレークポイントは、Magentoの pub/index.php に設定したPHPコンテキス内トに設定できます。
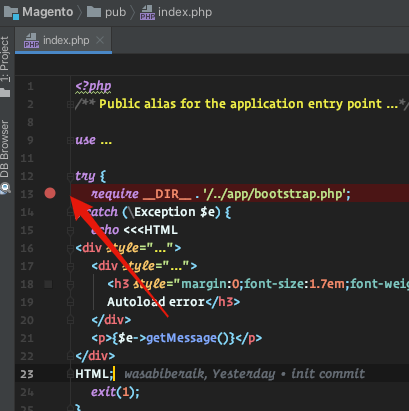
3. ブラウザでWebサイトをリフレッシュしたら、自動的にPHPstormにリダイレクトされます。
https://gyazo.com/c11de6afa9e6b666a5ff3ef7b983a37d

