背景と目的
今までは Microsoft ホステッドエージェントしか使っていなかったのですが、クローズドネットワークやオンプレ環境内での利用を想定して Linux VM に Azure Devops セルフホステッドエージェントをインストールして動作を確認してみました。AKS やオンプレの Kubernetes 環境があれば、セルフホステッドエージェント入りのコンテナイメージを作成して使う方法も Microsoft のドキュメントにあるようなので、ますます使い勝手が良くなりそうです。
前提条件
コマンドの実施環境は、Mac + Azure CLI です。
$ sw_vers
ProductName:    macOS
ProductVersion: 12.1
BuildVersion:   21C52

$ az version
{
  "azure-cli": "2.30.0",
  "azure-cli-core": "2.30.0",
  "azure-cli-telemetry": "1.0.6",
  "extensions": {}
}
検証用 Azure DevOps 組織を作成
https://docs.microsoft.com/ja-jp/azure/devops/user-guide/sign-up-invite-teammates?view=azure-devops
上記サイトを参考に、検証で使用する Azure DevOps の組織を作成(サインアップ)します。こちらで作成した組織名、https://dev.azure.com/{yourorganization} の {yourorganization} にあたる箇所が、後で作成するリソースの prefix に設定する前提で検証します。
https://aex.dev.azure.com/signup/
Azure DevOps 組織にプロジェクトを作成
# リソースのリージョンを設定します
region=japaneast

# Azure DevOps 組織名を設定します(サインアップした組織名です)
prefix=mnrdevopsagent

# Azure CLI に拡張機能を追加します
az extension add \
  --name azure-devops

# 拡張機能に Azure DevOps 組織をデフォルト設定します
az devops configure \
  --defaults organization=https://dev.azure.com/${prefix}/

# Azure DevOps のプロジェクトを作成します
az devops project create \
  --name ${prefix}

# 作成したプロジェクトにサンプルアプリをインポートします
az repos import create \
  --git-source-url https://github.com/MicrosoftDocs/pipelines-dotnet-core \
  --repository ${prefix} \
  --project ${prefix}
PAT (パーソナルアクセストークン)を作成
上記サイトを参考に、「+ New Token」から「Code の Read & Write」を選択した PAT を作成し、後で git clone する時に PAT 使用します。
プロジェクトに Azure Pipeline を作成
# サンプルアプリをローカルにダウンロードします
git clone $(az repos show \
  --project ${prefix} \
  --repository ${prefix} \
  --query remoteUrl \
  --output tsv)

# サンプルアプリのディレクトリに移動します
cd ${prefix}

# パイプラインを作成します(初回のパイプライン実行を手動で行いたいため、ファーストランをスキップします)
az pipelines create \
  --name first-pipeline \
  --skip-first-run true
パイプラインの設定ウィザードで下記を選択します。
- Which template do you want to use for this pipeline? : ASP.NET Core
- Do you want to view/edit the template yaml before proceeding? : View or edit the yaml
ここでエディタが起動するので変数の箇所を書き換えて保存します。
{{ branch }} -> master
{{ pool }} -> vmImage: ubuntu-latest
残りの設定ウィザードは下記を選択します。
- Do you want to proceed creating a pipeline? : Proceed with this yaml
- How do you want to commit the files to the repository? : Commit directly to the master branch.
# 作成されたパイプラインを確認します
az pipelines list \
  --output table

# パイプラインを手動実行します
az pipelines run \
  --name first-pipeline \
  --output table

# パイプラインの実行状況を確認します
az pipelines runs list \
  --output table

# 最初のパイプラインの詳細を確認します
az pipelines runs show \
  --id 1 \
  --output table

# Microsoft ホステッドエージェントの無料枠が無い = Billing を設定していない環境だと以下のように Result が failed になります
ID    Number      Status     Result    Definition ID    Definition Name    Source Branch    Queued Time                 Reason
----  ----------  ---------  --------  ---------------  -----------------  ---------------  --------------------------  --------
1     20220103.1  completed  failed    1                first-pipeline     master           2022-01-03 10:27:07.985314  manual

# ブラウザーでビルド結果ページを開きます
az pipelines runs show \
  --id 1 \
  --open

# ブラウザーで Errors を確認すると下記のメッセージが表示されます
No hosted parallelism has been purchased or granted. To request a free parallelism grant, please fill out the following form https://aka.ms/azpipelines-parallelism-request
セルフホステッド Linux エージェントが使用する PAT を作成
上記サイトを参考に「エージェントプール(読み取り、管理)」を選択にした PAT を作成して、後で作成する pat 変数に設定します。
セルフホステッド検証用の Linux VM を作成
# エージェントプール(読み取り、管理)を選択した PAT を設定します
pat=yourpathere

# リソースグループを作成します
az group create \
  --name ${prefix}-rg \
  --location $region

# VM を作成します( run-command を使用してセットアップするのでパスワードは何でも良いです)
az vm create \
  --resource-group ${prefix}-rg \
  --name ${prefix}-vm \
  --os-disk-name ${prefix}-vmOSDisk \
  --image UbuntuLTS \
  --admin-username azureuser \
  --admin-password $(openssl rand -base64 16) \
  --size Standard_A2_v2 \
  --nsg-rule NONE \
  --public-ip-address "" \
  --storage-sku Standard_LRS

# VM 上で実行するスクリプトを作成します
cat <<EOF > ${prefix}.sh
sudo -u azureuser bash <<EOS
mkdir ~/work
cd ~/work
wget -q https://vstsagentpackage.azureedge.net/agent/2.195.2/vsts-agent-linux-x64-2.195.2.tar.gz
tar xvfz vsts-agent-linux-x64-2.195.2.tar.gz
./config.sh --unattended \\
  --agent "\\\$(hostname)" \\
  --url "https://dev.azure.com/${prefix}" \\
  --auth PAT \\
  --token "${pat}" \\
  --pool "default" \\
  --work "_work" \\
  --replace \\
  --acceptTeeEula
ls -al
sudo ./svc.sh install
sudo ./svc.sh start
sudo ./svc.sh status
EOS
EOF

# VM にセルフホステッドエージェントをインストールします
az vm run-command invoke \
  --command-id RunShellScript \
  --resource-group ${prefix}-rg \
  --name ${prefix}-vm \
  --query "value[0].message" \
  --output tsv \
  --scripts @${prefix}.sh

# VM 上で実行するスクリプトを作成します
cat <<EOF > ${prefix}.sh
wget -O packages-microsoft-prod.deb https://packages.microsoft.com/config/ubuntu/18.04/packages-microsoft-prod.deb
dpkg -i packages-microsoft-prod.deb
rm packages-microsoft-prod.deb
apt-get update && apt-get install -y apt-transport-https dotnet-sdk-6.0
EOF

# VM に dotnet をインストールします
az vm run-command invoke \
  --command-id RunShellScript \
  --resource-group ${prefix}-rg \
  --name ${prefix}-vm \
  --query "value[0].message" \
  --output tsv \
  --scripts @${prefix}.sh
Default エージェントプールのパーミッションを設定
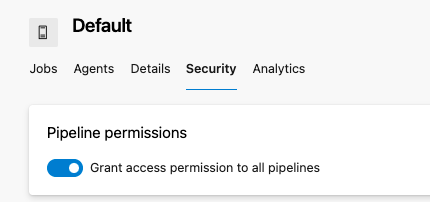
Azure Devops -> Project settings -> Agent pools -> Defalut -> Security タブを開き、パーミッションを有効にします。
パイプラインをセルフホステッドで実行するように更新
# Azure Repos から azure-pipelines.yml をダウンロードします
git pull

# パイプラインを修正します
cat <<EOF > azure-pipelines.yml
trigger:
- master

pool: default

variables:
  buildConfiguration: 'Release'

steps:
- script: dotnet build --configuration \$(buildConfiguration)
  displayName: 'dotnet build \$(buildConfiguration)'
EOF

# Azure Repos にプッシュします(パイプラインが自動実行されます)
git add azure-pipelines.yml
git commit -m update
git push

# パイプラインの実行状況を確認します
az pipelines runs list \
  --output table

# パイプラインの詳細を確認します
az pipelines runs show \
  --id 4 \
  --output table

# Result が succeeded になりました
Run ID    Number      Status     Result     Pipeline ID    Pipeline Name    Source Branch    Queued Time                 Reason
--------  ----------  ---------  ---------  -------------  ---------------  ---------------  --------------------------  --------
4         20220103.4  completed  succeeded  1              first-pipeline   master           2022-01-03 11:58:53.508152  manual
参考
# リソースグループを削除します
az group delete \
  --name ${prefix}-rg

# Azure DevOps のプロジェクトを削除します
az devops project delete \
  --id $(az devops project show \
  --project ${prefix} \
  --query id \
  --output tsv)

# Azure CLI に追加した拡張機能を削除します
az extension remove \
  --name azure-devops
https://docs.microsoft.com/ja-jp/azure/devops/user-guide/sign-up-invite-teammates?view=azure-devops
https://docs.microsoft.com/ja-jp/azure/devops/pipelines/agents/v2-linux?view=azure-devops
https://docs.microsoft.com/ja-jp/azure/devops/pipelines/agents/docker?view=azure-devops#linux
