はじめに
データベース設計時、テーブル定義書を作成しながらCREATE文を同時に生成できるツールがあったら便利だと思いませんか?本記事では、Pythonの軽量なWebフレームワーク「Flask」を使い、テーブル定義書とCREATE文を自動生成するWebツールを作る方法を解説します。
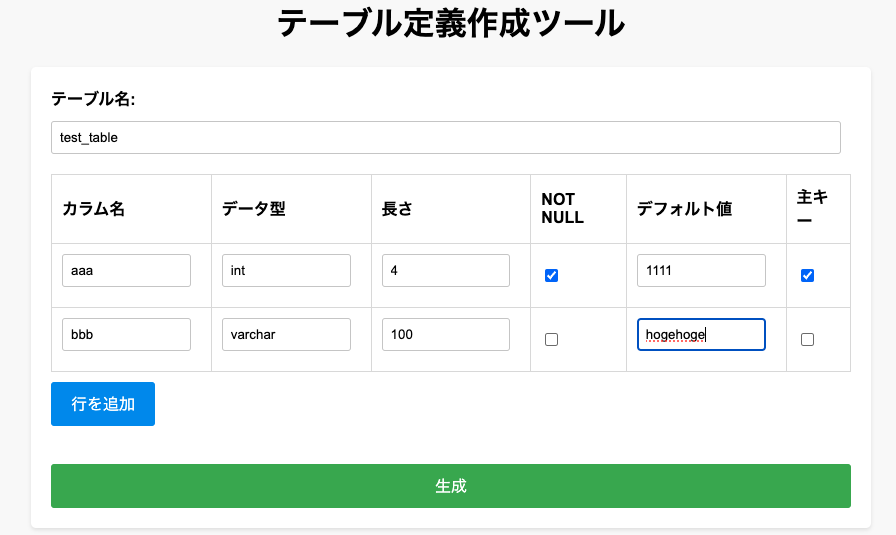
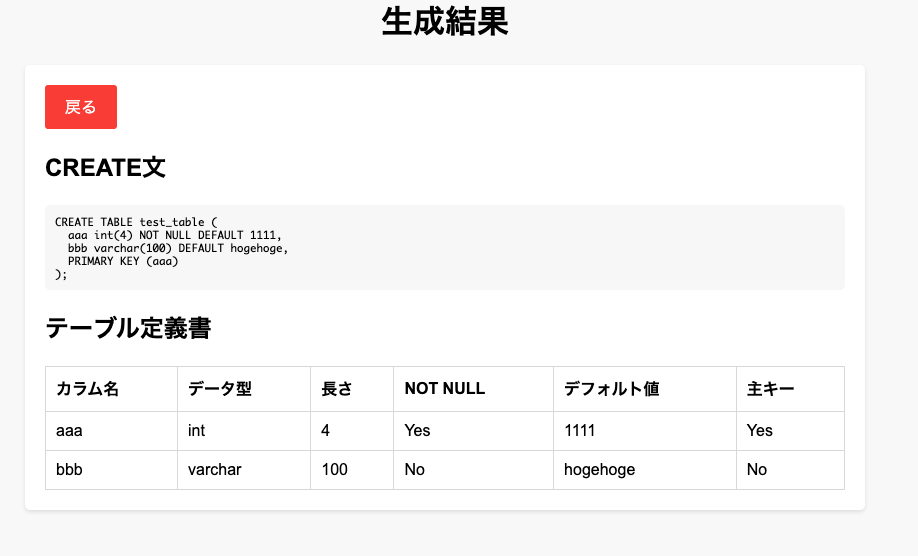
完成イメージ:
- ユーザーがWebフォームにテーブル名とカラム情報を入力
- 「生成」ボタンをクリック
- 結果画面に以下を表示:
- テーブル定義書(カラム情報を表形式で表示)
- CREATE文
完成イメージ
構成と準備
必要なツール
- Python(バージョン3.7以上)
- Flask(軽量Webフレームワーク)
- pandas(テーブルデータを扱うためのライブラリ)
以下のコマンドで必要なライブラリをインストールします。
pip install flask pandas
ディレクトリ構成
作成するディレクトリ構成は以下の通りです:
table_generator/
├── app.py                   # Flaskアプリケーションのメインコード
├── requirements.txt         # 必要なライブラリのリスト
├── templates/               # HTMLテンプレートを格納
│   ├── index.html           # 入力フォームページ
│   └── result.html          # 結果表示ページ
├── static/                  # 静的ファイルを格納
│   ├── css/                 # CSSファイルを格納
│   │   └── styles.css       # スタイルシート
│   └── js/                  # JavaScriptファイルを格納
│       └── scripts.js       # 行追加用スクリプト
コード詳細
1. Flaskアプリケーション: app.py
app.pyは、Flaskアプリケーションの中心となるコードです。ユーザーの入力データを受け取り、CREATE文とテーブル定義書を生成します。
from flask import Flask, render_template, request
import pandas as pd

app = Flask(__name__)

@app.route('/')
def index():
    """入力フォームページを表示"""
    return render_template('index.html')

@app.route('/generate', methods=['POST'])
def generate():
    """フォームデータからCREATE文とテーブル定義書を生成して結果ページを表示"""
    try:
        # フォームデータを取得
        table_name = request.form.get('table_name', '').strip()  # テーブル名
        columns = request.form.getlist('columns[]')  # カラム名リスト
        data_types = request.form.getlist('data_types[]')  # データ型リスト
        lengths = request.form.getlist('lengths[]')  # 長さリスト
        not_nulls = request.form.getlist('not_nulls[]')  # NOT NULL制約リスト
        defaults = request.form.getlist('defaults[]')  # デフォルト値リスト
        primary_keys = request.form.getlist('primary_keys[]')  # 主キーリスト

        # 入力データのバリデーション
        if not table_name:
            return "テーブル名を入力してください。", 400
        if not columns or not any(columns):
            return "少なくとも1つのカラム情報を入力してください。", 400

        # データ整合性を補正
        max_length = max(len(columns), len(data_types), len(lengths), len(not_nulls), len(defaults), len(primary_keys))

        def pad_list(lst, length):
            return lst + [''] * (length - len(lst))

        # 配列を補正して長さを揃える
        columns = pad_list(columns, max_length)
        data_types = pad_list(data_types, max_length)
        lengths = pad_list(lengths, max_length)
        not_nulls = pad_list(not_nulls, max_length)
        defaults = pad_list(defaults, max_length)
        primary_keys = pad_list(primary_keys, max_length)

        # CREATE文を生成
        create_sql = f"CREATE TABLE {table_name} (\n"
        primary_keys_list = []

        for i in range(max_length):
            if not columns[i]:
                continue
            line = f"  {columns[i]} {data_types[i]}"
            if lengths[i]:
                line += f"({lengths[i]})"
            if not_nulls[i] == 'Yes':
                line += " NOT NULL"
            if defaults[i]:
                line += f" DEFAULT {defaults[i]}"
            if primary_keys[i] == 'Yes':
                primary_keys_list.append(columns[i])
            line += ",\n"
            create_sql += line

        # 主キー定義を追加
        if primary_keys_list:
            create_sql += f"  PRIMARY KEY ({', '.join(primary_keys_list)}),\n"

        create_sql = create_sql.rstrip(',\n') + "\n);"

        # テーブル定義データを作成
        table_definition = [
            {
                "column": columns[i],
                "data_type": data_types[i],
                "length": lengths[i],
                "not_null": "Yes" if not_nulls[i] == "Yes" else "No",
                "default": defaults[i],
                "primary_key": "Yes" if primary_keys[i] == "Yes" else "No",
            }
            for i in range(max_length)
            if columns[i]
        ]

        return render_template('result.html', create_sql=create_sql, table_definition=table_definition)

    except Exception as e:
        return f"エラーが発生しました: {e}", 500

if __name__ == '__main__':
    app.run(debug=True)
2. フォーム入力ページ: templates/index.html
フォームにテーブル情報を入力できるページです。
<!DOCTYPE html>
<html lang="en">
<head>
    <meta charset="UTF-8">
    <meta name="viewport" content="width=device-width, initial-scale=1.0">
    <title>テーブル定義作成ツール</title>
    <link rel="stylesheet" href="{{ url_for('static', filename='css/styles.css') }}">
</head>
<body>
    <h1>テーブル定義作成ツール</h1>
    <form action="/generate" method="POST">
        <label>テーブル名:</label>
        <input type="text" name="table_name" required>

        <table id="columns-table">
            <tr>
                <th>カラム名</th>
                <th>データ型</th>
                <th>長さ</th>
                <th>NOT NULL</th>
                <th>デフォルト値</th>
                <th>主キー</th>
            </tr>
            <tr>
                <td><input type="text" name="columns[]" required></td>
                <td><input type="text" name="data_types[]" required></td>
                <td><input type="text" name="lengths[]"></td>
                <td><input type="checkbox" name="not_nulls[]" value="Yes"></td>
                <td><input type="text" name="defaults[]"></td>
                <td><input type="checkbox" name="primary_keys[]" value="Yes"></td>
            </tr>
        </table>
        <button type="button" onclick="addRow()">行を追加</button>
        <button type="submit">生成</button>
    </form>
    <script src="{{ url_for('static', filename='js/scripts.js') }}"></script>
</body>
</html>
3. 結果表示ページ: templates/result.html
生成されたCREATE文とテーブル定義書を表示します。
<!DOCTYPE html>
<html lang="en">
<head>
    <meta charset="UTF-8">
    <meta name="viewport" content="width=device-width, initial-scale=1.0">
    <title>生成結果</title>
    <link rel="stylesheet" href="{{ url_for('static', filename='css/styles.css') }}">
</head>
<body>
    <h1>生成結果</h1>
    <form action="/">
        <button type="submit">戻る</button>
    </form>
    <h2>CREATE文</h2>
    <pre>{{ create_sql }}</pre>
    <h2>テーブル定義書</h2>
    <table>
        <tr>
            <th>カラム名</th>
            <th>データ型</th>
            <th>長さ</th>
            <th>NOT NULL</th>
            <th>デフォルト値</th>
            <th>主キー</th>
        </tr>
        {% for row in table_definition %}
        <tr>
            <td>{{ row.column }}</td>
            <td>{{ row.data_type }}</td>
            <td>{{ row.length }}</td>
            <td>{{ row.not_null }}</td>
            <td>{{ row.default }}</td>
            <td>{{ row.primary_key }}</td>
        </tr>
        {% endfor %}
    </table>
</body>
</html>
4. スタイル: static/css/styles.css
見た目を整えるためのCSSです。
body {
    font-family: Arial, sans-serif;
    margin: 0;
    padding: 0;
    background-color: #f9f9f9;
}

h1 {
    text-align: center;
    margin: 20px 0;
}

.form-container {
    max-width: 800px;
    margin: 20px auto;
    padding: 20px;
    background: #ffffff;
    border-radius: 5px;
    box-shadow: 0 2px 4px rgba(0, 0, 0, 0.1);
}

label {
    display: block;
    margin-bottom: 10px;
    font-weight: bold;
}

input[type="text"] {
    width: calc(100% - 10px);
    padding: 8px;
    margin-bottom: 10px;
    border: 1px solid #ccc;
    border-radius: 3px;
    box-sizing: border-box;
}

table {
    width: 100%;
    border-collapse: collapse;
    margin-top: 10px;
}

th, td {
    padding: 10px;
    text-align: left;
    border: 1px solid #ddd;
}

button {
    background-color: #4CAF50;
    color: white;
    padding: 10px 20px;
    border: none;
    border-radius: 3px;
    cursor: pointer;
    font-size: 16px;
}

button:hover {
    background-color: #45a049;
}

.add-row {
    margin-top: 10px;
    background-color: #2196F3;
}

.add-row:hover {
    background-color: #1976D2;
}

.submit-btn {
    display: block;
    width: 100%;
    margin-top: 20px;
}

.result-container {
    max-width: 800px;
    margin: 20px auto;
    background: #ffffff;
    padding: 20px;
    border-radius: 5px;
    box-shadow: 0 2px 4px rgba(0, 0, 0, 0.1);
}

.sql-preview {
    background: #f8f8f8;
    padding: 10px;
    border-radius: 5px;
    font-family: monospace;
    overflow-x: auto;
}

.back-btn {
    background-color: #f44336;
}

.back-btn:hover {
    background-color: #d32f2f;
}
5. 動的行追加スクリプト: static/js/scripts.js
function addRow() {
    const table = document.getElementById('columns-table');
    const newRow = table.insertRow();
    ['columns[]', 'data_types[]', 'lengths[]', 'not_nulls[]', 'defaults[]', 'primary_keys[]'].forEach((name) => {
        const cell = newRow.insertCell();
        if (name.includes('not_nulls') || name.includes('primary_keys')) {
            cell.innerHTML = `<input type="checkbox" name="${name}" value="Yes">`;
        } else {
            cell.innerHTML = `<input type="text" name="${name}" required>`;
        }
    });
}
実行方法
-
サーバーを起動します。
python app.py -
ブラウザで
http://localhost:5000にアクセス。
まとめ
この記事では、Flaskを使った簡単なWebツールの作成方法を解説しました。このツールをカスタマイズして、より複雑なデータベーススキーマ設計にも応用できます。

