イントロダクション
以前以下の記事でカレンダーアプリを作成しました。
PythonとHTMLで簡単に作れる!動的カレンダーアプリの作成方法
https://qiita.com/mnoguchi/items/c2971680af3b20e8fad8
今回は前回からレベルアップということで、Python標準ライブラリの calendar モジュールと軽量ウェブフレームワークの Flask を活用して、任意の月を切り替えられるカレンダーアプリを構築します。プログラミング初心者の方でも試しやすいシンプルな構造で、必要な月を表示できる便利な機能を追加しています。
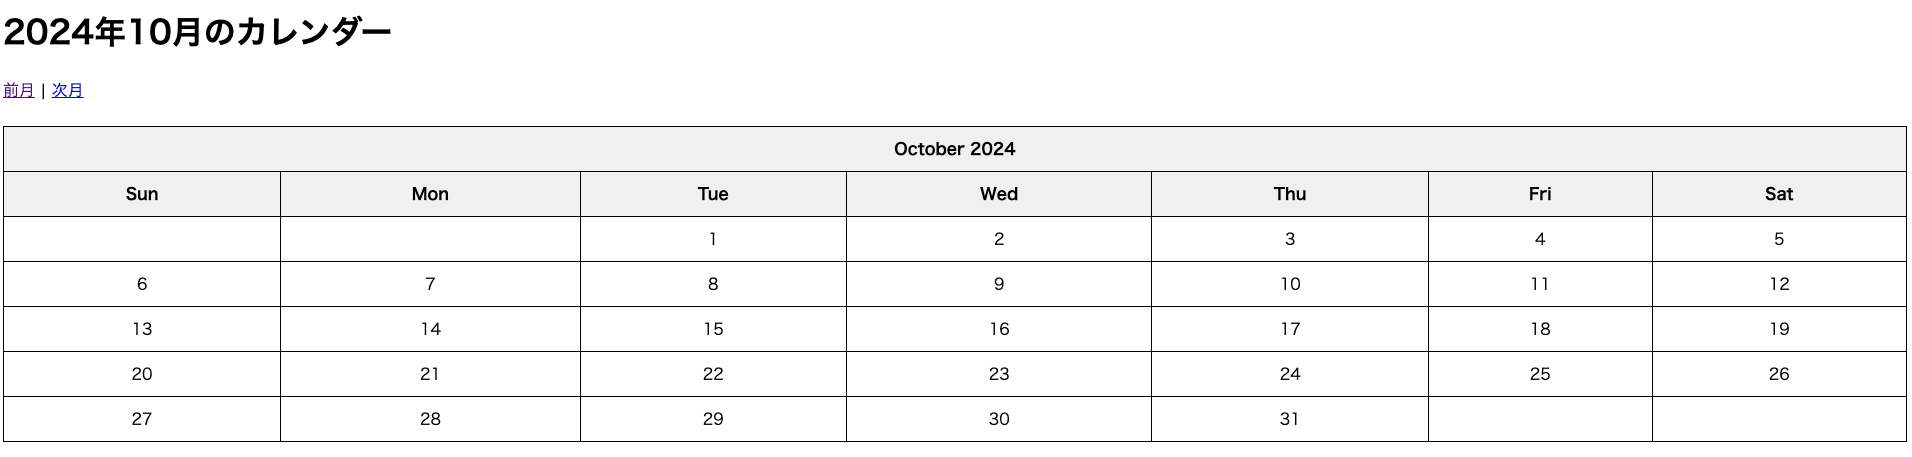
完成画面
必要なライブラリ
使用するライブラリはPythonの標準ライブラリ calendar と、軽量なウェブフレームワーク Flask です。Flaskをインストールしていない場合は、以下のコマンドでインストールしてください。
pip install flask
ディレクトリ構造
プロジェクトのファイル構造は以下の通りです。
calendar_app/
│
├── app.py
└── templates/
    └── calendar.html
- calendar_app/: プロジェクトのルートディレクトリ
- app.py: Flaskアプリケーションのメインファイル
- templates/: HTMLテンプレートを格納するディレクトリ
- calendar.html: カレンダーを表示するためのHTMLテンプレート
カレンダーアプリケーションのコード
まず、app.py ファイルを以下の内容で作成します。このコードでは、Flaskを使ってカレンダーを表示し、さらにユーザーが月を自由に切り替えられるようにしています。
from flask import Flask, render_template, request
import calendar
from datetime import datetime

app = Flask(__name__)

@app.route('/')
def calendar_view():
    # 現在の年と月を取得
    year = request.args.get('year', default=datetime.now().year, type=int)
    month = request.args.get('month', default=datetime.now().month, type=int)

    # 月の調整
    if month < 1:
        month = 12
        year -= 1
    elif month > 12:
        month = 1
        year += 1

    # カレンダーをHTML形式で作成
    cal = calendar.HTMLCalendar(calendar.SUNDAY)
    calendar_html = cal.formatmonth(year, month)

    # テンプレートにレンダリング
    return render_template('calendar.html', year=year, month=month, calendar_html=calendar_html)

if __name__ == '__main__':
    app.run(debug=True)
HTMLテンプレート (calendar.html)
次に、templates ディレクトリ内に calendar.html を作成し、以下のHTMLコードを記述します。このテンプレートには、カレンダーを表示しつつ、「前月」「次月」へ移動できるリンクを追加しています。
<!DOCTYPE html>
<html lang="ja">
<head>
    <meta charset="UTF-8">
    <title>{{ year }}年{{ month }}月のカレンダー</title>
    <style>
        table {
            width: 100%;
            border-collapse: collapse;
        }
        th, td {
            border: 1px solid #000;
            text-align: center;
            padding: 10px;
        }
        th {
            background-color: #f2f2f2;
        }
    </style>
</head>
<body>
    <h1>{{ year }}年{{ month }}月のカレンダー</h1>
    <div>
        <a href="/?year={{ year }}&month={{ month - 1 }}">前月</a>
        |
        <a href="/?year={{ year }}&month={{ month + 1 }}">次月</a>
    </div>
    <br>
    {{ calendar_html|safe }}
</body>
</html>
コードの解説
-
月と年の取得・調整
request.args.get()を使ってクエリパラメータからyearとmonthの値を取得します。デフォルトでは現在の年月を設定しているため、初回アクセス時にも対応しています。また、monthが1より小さくなると前年の12月に切り替わり、12より大きくなると次年の1月に移行する仕組みになっています。 -
HTMLCalendarクラスでのカレンダー作成
calendar.HTMLCalendarクラスを使用し、月単位でカレンダーのHTMLテーブルを生成します。生成されたカレンダーはcalendar_htmlに格納され、テンプレートに渡して表示されます。 -
HTMLテンプレートでのナビゲーション
calendar.htmlでは、月の移動リンクとして「前月」「次月」を設置しています。リンクに指定した{{ month - 1 }}および{{ month + 1 }}により、クリックするとその月に対応するカレンダーが表示されます。
アプリケーションの起動と使用
-
app.pyを実行し、ローカルサーバーを起動します。python app.py -
ブラウザで
http://127.0.0.1:5000/にアクセスし、カレンダーが表示されることを確認します。 -
「前月」「次月」のリンクをクリックして、自由に月が切り替わることを確認してください。
まとめ
この記事では、PythonとFlaskを用いたカレンダーアプリケーションの作成方法を紹介しました。ユーザーが任意の月にナビゲートできる機能を追加することで、シンプルながらも実用的なカレンダーが完成しました。今後はイベントの追加機能や、年単位での移動機能を追加することで、さらに使いやすいカレンダーに拡張していくことができます。