はじめに
英語で書かれた温度湿度センサーの AHT20 のデータシートのうち、センサーとの通信、測定データの読み取り、生データから温度・湿度の値を計算する方法について記載された部分をElixir 言語で意訳してみます。
なぜElixirかというと、Elixirは表現力が豊かな言語で、言葉で説明するよりElixirコードで書いたほうがわかりやすい場合もあると思うからです。例えば強力なパターンマッチ機能によりバイナリから必要な情報を抽出する際に直感的に理解しやすい記述が可能です。
AHT20 が接続されているRaspberry Pi 4の上で実際にElixirコードを動かしながらデータシートを読み進めました。
IoT プラットフォームとして、Nervesを使用しています。Elixirコードだけで何でもできる素晴らしい開発環境です。
Nerves Livebookといういい感じに仕上がってるサンプルファームウエアイメージをダウンロードして SD カードに焼き、その SD カードをRaspberry Pi 4に差し込んで起動しています。
AHT20 センサーやNerves、Nerves Livebookについての詳しいことは他の記事に譲ります。有志の方々が知見を共有してくださっているので、色んな所からヒントが得られると思います。
動作環境
- Host OS: Linux Mint Debian Edition 6
- Nerves target: Raspberry Pi 4
- Nerves firmware: Nerves Livebook
Host マシンにインストールされている Elixir は以下のとおりです。今回はほとんどの Elixir コードを Nerves 対象マシン(Raspberry Pi 4)上で動かしているので、あまり関係ないかもしれません。
$ elixir --version
Erlang/OTP 27 [erts-15.0] [source] [64-bit] [smp:20:20] [ds:20:20:10] [async-threads:1] [jit:ns]

Elixir 1.17.2 (compiled with Erlang/OTP 27)
AHT20 センサーには色んな製品があり
色んな接続方式が存在するようですが、どれでもいいと思います。たまたま手元にあるのは以下の製品です。

Seeedstudio のGroveも人氣だと聞いたことがあります。
Circuits.I2C
I2C プロトコルを使用して AHT20 と通信します。
ElixirでI2Cで通信するときは一般的に circuits_i2cがよく利用されます。
I2C バスを開く方法は以下のとおりです。
{:ok, i2c_ref} = Circuits.I2C.open("i2c-1")
便利な関数をいくつか紹介します。
-
Circuits.I2C.read!(i2c_ref, bus_address, how_many_bytes_to_read)- I2C デバイスから指定されたバイト長のデータを読み取る
-
Circuits.I2C.write!(i2c_ref, bus_address, data)- I2C デバイスにデータを書き込む
-
Circuits.I2C.write_read!(i2c_ref, bus_address, data, how_many_bytes_to_read)- I2C デバイスにデータを書き込んで、すぐに指定されたバイト長のデータを読み取る
その他の関数については公式ドキュメントをご参照ください。
AHT20 センサーと通信する準備
AHT20 センサーを任意の方法でRaspberry Pi 4に接続してください。
I2C プロトコルを使用して AHT20 センサーと通信できるように準備します。
I2C バスを開く
{:ok, i2c_ref} = Circuits.I2C.open("i2c-1")
センサーのアドレスを確認
I2C バス上のデバイスには番地があります。データシートによると AHT20 センサーの住所は0x38と決まっているようです。それを覚えておきます。
aht20_address = 0x38
AHT20 センサーから測定結果を受信する手順
データシートの「5.4 Sensor reading process」と「6 Signal Transformation」に手順が説明されています。それを日本語と Elixir に意訳してみます。
Step 1: センサーの状態を確認し、必要に応じて初期化
原文
Wait 40ms after power-on. Before reading the temperature
and humidity values, first check whether the calibration
enable bit Bit [3] of the status word is 1 (you can get a byte of
status word by sending 0x71). If not 1, need to send 0xbe
command (for initialization), this command parameter has
two bytes, the first byte is 0x08, the second byte is 0x00,
and then wait for 10ms.
日本語意訳
- 電源投入後、40ms 待つ
-
0x71を送信しセンサーの状態を取得 - 「キャリブレーション有効ビット」 (
calibrated)が1でない場合は初期化(コマンド0xbeを2バイトのパラメータ<<0x08, 0x00>>と共に送信)が必要 - 初期化を実施した後、10ms 待つ
Elixir 意訳
Process.sleep(40)

<<_::1, _::3, calibrated::1, _::3>> =
  Circuits.I2C.write_read!(i2c_ref, aht20_address, <<0x71>>, 1)

if calibrated == 0 do
  Circuits.I2C.write!(i2c_ref, aht20_address, [<<0xBE>>, <<0x08, 0x00>>])
  Process.sleep(10)
end
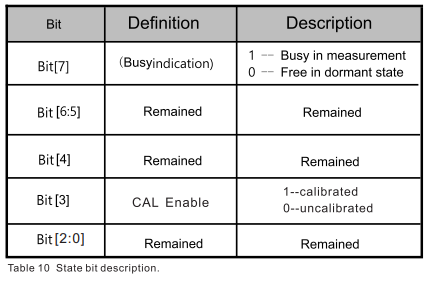
データシートの「5.3 Send Command」に「Stateビット」の読み方が記載されています。
Step 2: 測定をトリガー
原文
Send the 0xAC command directly (trigger measurement).
The parameter of this command has two bytes, the first byte
is 0x33 and the second byte is 0x00.
日本語意訳
- 測定トリガコマンドとして
0xACコマンドを送信 -
0xACコマンドのパラメータは 2 バイトで、1 バイト目は0x33、2 バイト目は0x00
Elixir 意訳
Circuits.I2C.write!(i2c_ref, aht20_address, [<<0xAC>>, <<0x33, 0x00>>])
Step3: 測定完了を確認
原文
Wait for 80ms to wait for the measurement to be completed.
If the read status word Bit [7] is 0, it indicates that the
measurement is completed, and then six bytes can be read
in a row; otherwise, continue to wait.
日本語意訳
- 測定が完了するまで 80 ミリ秒待つ
-
0x71を送信しセンサーの状態を取得 - 測定ビジー状態 ビット が
1であれば、まだ測定中なので待つ - 測定完了後、6 バイトの測定結果データを読み込み可能
Elixir 意訳
Process.sleep(80)

<<busy::1, _::3, _::1, _::3>> =
  Circuits.I2C.write_read!(i2c_ref, aht20_address, <<0x71>>, 1)

case busy do
  1 -> IO.puts("測定中")
  0 -> IO.puts("測定完了")
end
Step 4: 測定結果を読み込み
原文
After receiving six bytes, the next byte is the CRC check
data, the user can read it as needed, if the receiving end
needs CRC check, then send it after receiving the sixth byte
ACK response, otherwise NACK is sent out, CRC initial value
is 0XFF, CRC8 check polynomial is: …
日本語意訳
- 6 バイトの計測結果データと1バイトのCRC(巡回冗長検査、Cyclic Redundancy Check)を受信します
- CRC は受信データの誤り・破損を検出するのに適宜利用します
Elixir 意訳
<<state::8, raw_humidity::20, raw_temperature::20, crc::8>> =
  Circuits.I2C.read!(i2c_ref, aht20_address, 7)
CRC の計算
CRC のアルゴリズムは多種多様です。ElixirではErlang備え付けのChecksum関連関数やcerlc パッケージを用いて様々なアルゴリズムの CRC を計算できます。
AHT20 では CRC8 の一種が使用されていますが、cerlc パッケージがそれに対応しているようです。
デフォルトのNerves Livebookにはcerlc パッケージがインストールされていないので利用することができません。ホストマシン上で対話型 Elixir コンソールを起動して CRC を計算してみました。
Mix.install [{:cerlc, "~> 0.2.0"}]

data = <<28, 154, 13, 70, 93, 7>>

crc_alg = :cerlc.init(:crc8_sensirion)
:cerlc.calc_crc(data, crc_alg)
Step 5: 温度と湿度の値を計算
原文
Calculate the temperature and humidity values.
Note: The calibration status check in the first step
only needs to be checked at power-on. No operation
is required during the normal acquisition process.

日本語意訳
- (6 バイトの計測結果データのうち)1バイト目にセンサーの状態が含まれていますが、それを毎回確認する必要はありません。
相対湿度の計算
AHT20 センサーから取得した相対湿度の生データを百分率に変換する計算を行います。
calc_humidity_rh_from_raw =
  fn raw_humidity ->
    raw_humidity / 1_048_576.0 * 100.0
  end

calc_humidity_rh_from_raw.(raw_humidity)
温度の計算
AHT20 センサーから取得した温度の生データを摂氏度に変換する計算を行います。
calc_temperature_c_from_raw =
  fn raw_temperature ->
    raw_temperature / 1_048_576.0 * 200.0 - 50.0
  end

calc_temperature_c_from_raw.(raw_temperature)
各処理をモジュールにまとめる
一旦、操作のやり方を理解したら、適切な粒度のモジュールを作り、その中で書く処理を関数としてまとめれば、それらを呼び出したいときに簡単に再利用することができます。また、きれいに整理されていれば、コードが読みやすくなります。
一例としてAHT20センサーとの通信の部分をAHT20.Commにまとめてみました。
defmodule AHT20.Comm do
  @aht20_address 0x38
  @aht20_cmd_status [0x71]
  @aht20_cmd_soft_reset [0xBA]
  @aht20_cmd_initialize [0xBE, <<0x08, 0x00>>]
  @aht20_cmd_trigger_measurement [0xAC, <<0x33, 0x00>>]

  def get_status(i2c_ref) do
    <<_busy::1, _::3, _calibrated::1, _::3>> =
      Circuits.I2C.write_read!(i2c_ref, @aht20_address, @aht20_cmd_status, 1)
  end

  def calibrated?(i2c_ref) do
    match?(<<_::4, 0x1::1, _::3>>, get_status(i2c_ref))
  end

  def busy?(i2c_ref) do
    match?(<<0x1::1, _::7>>, get_status(i2c_ref))
  end

  def reset(i2c_ref) do
    Circuits.I2C.write!(i2c_ref, @aht20_address, @aht20_cmd_soft_reset)
  end

  def init(i2c_ref) do
    Circuits.I2C.write!(i2c_ref, @aht20_address, @aht20_cmd_initialize)
    Process.sleep(10)
  end

  def read_data(i2c_ref) do
    Circuits.I2C.write!(i2c_ref, @aht20_address, @aht20_cmd_trigger_measurement)
    Process.sleep(80)
    Circuits.I2C.read!(i2c_ref, @aht20_address, 7)
  end
end
煩雑なセンサーとの通信が抽象化されたので、それらの詳細は一旦忘れて、温度湿度の計測に専念できます。
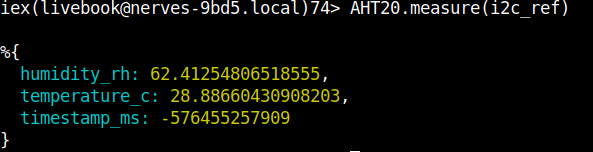
defmodule AHT20 do
  alias AHT20.Comm

  def measure(i2c_ref) do
    if not Comm.calibrated?(i2c_ref), do: Comm.init(i2c_ref)
    if Comm.busy?(i2c_ref), do: raise("只今測定中です")
    Comm.read_data(i2c_ref) |> parse_data()
  end

  def parse_data(<<_state, raw_humidity::20, raw_temperature::20, _crc>>) do
    %{
      humidity_rh: raw_humidity / 1_048_576.0 * 100.0,
      temperature_c: raw_temperature / 1_048_576.0 * 200.0 - 50.0,
      timestamp_ms: System.monotonic_time(:millisecond)
    }
  end
end
知見のパッケージ化
以上のようにデータシートをしっかり読んで、Elixirコードに置き換えれば、自分で好きなようにセンサーを操作することができます。
せっかくいい知見を得たのですから、世界のみんなと共有してみてはいかがでしょうか。
Elixirのオープンソースコミュニティーは非常に活発で誰でも気軽に参加できる感じです。
まずは、Elixir/Erlangエコシステムにあるパッケージを検索してみて、もしなければ自分で作って公開してみましょう。あればそれをみんなで改善していきましょう。
AHT20パッケージは既に存在しますが、世の中には他にも無数のセンサーやデバイスがあります。