この記事はGatsby.js Advent Calendar 2019 23日目の記事です。
2時間ぐらい納期過ぎました。すみません。
次の記事は@kazuooooo さんの まるで名刺のようなポートフォリオサイトを作れるCardfolio!を公開しました! です。
これは
フロントエンド職に就きたいのでReact, TypeScriptの勉強にGatsbyでブログを作ってみた記事です。
ブログがどんな感じで作られてるのか、ライブラリ, プラグイン, ツールの紹介も交えながらかんたんに解説していきます。
使うもの
スタイリングに関するもの
ブログの記事を書くのに使うもの
Gatsbyって?
ReactとGraphQLを使って高速なサイトを作るフレームワークです。今回の文脈上は__SSG(Static Site Generator: 静的サイトジェネレータ)__ですが、SSG以外でも使えるそうです。
Gatsbyの具体的な仕組みについては、先人の皆さんの記事を読むと理解が深まると思います。
Reactの最強フレームワークGatsby.jsの良さを伝えたい!! (Gatsby.js Advent Calendar 2019 1日目)
- 脳死でサイトが作れる簡単さ & サーバを意識しなくていい!
- 生成されたサイトがSPA & サイトがとにかく早い
- プラグインによって導入が超速 -> めんどくさいことをしなくていい
- 初心者がとっつきやすい
ぜひ節目ごとに「Gatsby最高!」と叫びながら読んでみてください。気持ちが高まります。
叫びたくないですか?では私が代わりに叫びます。
Gatsby最高!!!!!
Reactベース静的サイトジェネレータGatsbyの真の力をお見せします
自分が当初Gatsbyについて理解できていなかったのは、Reactとの関係です。
静的サイトジェネレータというぐらいだから、GatsbyはReactコードをSSR(Server Side Rendering)のようにあらかじめレンダリングして、静的なHTMLを事前に生成するのかな、と思いました。だから、JSコードはビルド時のみに実行されて、閲覧時には実行されないのかな、と。
(中略)
しかし、調べると、そうではありませんでした。
GatsbyはSSR的な静的HTML生成に加えて、それと連動する通常のReactアプリも生成します。
Create React AppやNext.jsと同様に、Reactで開発するSPAの自由度を完全に具備するものです。
プロジェクトを作る
npx gatsby new hogefuga https://github.com/gatsbyjs/gatsby-starter-hello-world
starterというのはプロジェクトのテンプレートのようなもので、余計な環境構築を飛ばすのに便利です。
gatsby-starter-hello-worldはその名の通りHello, worldを表示するstarterであり、最もシンプルなstaterでもあります。
Hello, worldする
npm start
localhost:8000にアクセスしましょう。Hello, worldできました。

LAN上から見る
npm start(gatsby develop)が走っている間はlocalhost:8000からサイトを見ることができます。
ところで、サイトをスマホから見れたら、デザインの確認に便利じゃないですか?
やりましょう。
{
  "scripts":{
    "develop": "gatsby develop --host 0.0.0.0",
  }
}
"scripts"の中の"develop"というスクリプトに--host 0.0.0.0という文言を付け加えます。
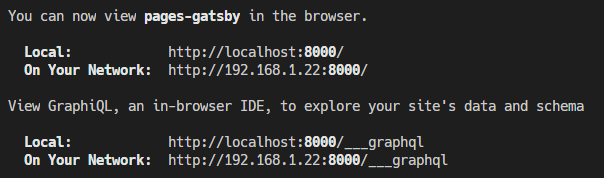
こんな感じの表示(192.168.1.xx)が出たら成功です。LAN上の端末からアクセスしてみましょう。

gatsby-config.jsの書き方
Gatsbyの設定ファイルはgatsby-config.jsです。gatsby-starter-hello-worldの初期状態ではこんな内容です。
/**
 * Configure your Gatsby site with this file.
 *
 * See: https://www.gatsbyjs.org/docs/gatsby-config/
 */

module.exports = {
  /* Your site config here */
}
一番大事なpluginsを作ってみます。プラグインを登録, 設定します。
module.exports = {
  plugins: [

  ]
}
pluginsは配列です。要素はプラグイン名のstringか, {resolve: プラグイン名, options: オプションのオブジェクト}という形になります。
TypeScript化
筆者は(静的サイトだけに)静的型の信者であり「TS化できるならTS化する」というTypeScriptの型システム並に硬い意志を持っています。
npm i -S gatsby-plugin-typescript typescript ts-node @types/react @types/node @types/react-dom gatsby-plugin-graphql-codegen
-
gatsby-plugin-typescript: GatsbyでTypeScriptを使うためのプラグインです。 -
ts-node: Node.jsからTypeScriptコンパイラを呼び出します。gatsby-node.jsをTSで書くのに使います。後で解説します。 -
gatsby-plugin-graphql-codegen: ソース中のGraphQLクエリから自動的に型定義ファイルを吐き出します。
インストールしたプラグインをgatsby-config.jsのpluginsに書いてみましょう。
  plugins: [
    {
      resolve: `gatsby-plugin-typescript`,
      options: {
        isTSX: true,
        allExtensions: true,
      },
    },
    {
      resolve: `gatsby-plugin-graphql-codegen`,
      options: {
        fileName: `types/graphqlTypes.d.ts`,
      },
    },
  ]
gatsby-plugin-graphql-codegenのオプションのfilenameは、読んで字の如く型定義ファイルが吐き出される場所ですが、src/以下の更新を察知してファイルを吐き出しているためsrc/typesとかに吐き出させると__まあ悲惨なことになります__。srcの外に出しましょう。
tsconfig.jsonも書いてみます。
{
  "compilerOptions": {
    "strict" : true,
    "esModuleInterop": true,
    "jsx": "react"
  }
}
スタイリングする
真っ白なキャンパスに色をつけましょう。
今回は TailwindCSS, PostCSS, __Emotion__を使います。
基本はTailwindCSSでスタイリングしていき、こいつで表現できないもの(::beforeとか)はEmotionを使うというスタンスでいきます。
そのほか、不要で低速化の原因になる未使用CSSを PurgeCSS でバチュっとしちゃって軽量化を図ります。
Tailwindを使ってみる
Tailwindって?
1つのクラスに対し1つのプロパティを割り当てる粒度の細かさが特徴の、Utility-first なCSSフレームワークです。
フレームワーク臭さのないサイトを自分でデザインしたい人におすすめです。
Gatsbyで使うにはPostCSSを使う方法と, BabelマクロでCSS-in-JSと使う方法がありますが、今回のブログでは両方やります。
<div class="text-gray-900 hover:text-blue-500">Hello, world!</div>
こういうclassを指定すると
.text-gray-900 {
	color: #1a202c;
}
.hover\:text-blue-500:hover {
	color: #4299e1;
}
こういうCSSが適用されます。クラスはtailwind.config.jsからカスタマイズできます。
Tailwind + PostCSS
まずはPostCSSから。
npm i -S tailwindcss postcss gatsby-plugin-postcss
パッケージを入れて、
module.exports = () => ({
  plugins: [require("tailwindcss")("./tailwind.config.js")],
})
plugins: [
  // ...
    "gatsby-plugin-postcss",
  // ...
],
module.exports = {}
configファイルを書きます。
次に適当な感じで.cssファイルを作ります。今回はsrc/styles/style.cssにしてみました。
@tailwind base;

@tailwind components;
@tailwind utilities;
で、こいつをコンポーネントから読み込みます。
import React from "react"
import "../styles/style.css"

export default () => <div className="text-blue-500">Hello world!</div>

いちいちimportするのは面倒なので、「すべてのページが読み込むコンポーネント」を作って、そこ1つに読み込ませるのが賢明かと思われます。
Emotionを使ってみる
Emotionって?
CSS-in-JSライブラリです。今回はTailwindでカバーできない複雑なスタイリングに使います。
npm i -S @emotion/core @emotion/styled gatsby-plugin-emotion tailwind.macro@next
tailwind.macro@next: EmotionとTailwindを連携させる。
使う準備
plugins: [
  // ...
    "gatsby-plugin-emotion",
  // ...
]
使う
Visual Studio Codeでは vscode-styled-components を使うと、タグ付きテンプレートリテラル(css` から始まるとこ)にハイライトが効いて幸せになれます。
//タグ付きテンプレートリテラルでCSSを書くならこいつをimportしておく
import { css } from "@emotion/core"

(<div css={css`
  color: #ff0;
`}>
  ほげほげ~
</div>)
Tailwindと使う
babel-plugin-macros-config.jsを一番上のディレクトリに作ります。
module.exports = {
  tailwind: {
    styled: "@emotion/styled",
    config: "./tailwind.config.js",
    format: "auto",
  },
}
そうしたら、
import { css } from "@emotion/core"
import tw from "tailwind.macro"

(<div css={css`
    ${tw`text-blue-500`}
    font-size: 10em;
`}>
  ほげほげ~
</div>)
こんな感じで、タグ付きテンプレートリテラルとして呼び出します。

ちなみに、TypeScriptに「型定義がねえぞ」と怒られます。
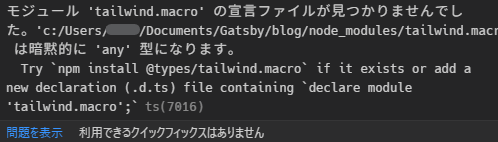
気になるなら書きましょう。
declare module "tailwind.macro" {
  export const tw: (r: TemplateStringsArray) => any
  export default tw
}
PurgeCSSでバチュッと
PurgeCSS, gatsby-plugin-purgecssを導入。
npm i -S purgecss gatsby-plugin-purgecss
plugins: [
  // ...
  // Sass, Less, ,Stylus, PostCSSのプラグインよりあとに書く
  {
    resolve: "gatsby-plugin-purgecss",
    options: {
      content: [
        require("path").join(
          process.cwd(),
          "src/**/!(*.d).{js,jsx,ts,tsx,md,mdx}"
        ),
      ],
      printRejected: true, // 被害者リストをprintする
      develop: false, // gatsby develop の実行時にもPurgeCSSを発動させるか
      tailwind: true, // Tailwindと使う時にonする
      whitelist: ["emoji"], // ここに書いたのは消されない
    },
  },
  // ...
]
あとはbuild時に勝手に消し飛ばしてくれます。
MDXで記事を書いてみる

MDXって?
__JSX, TSXのMarkdown版__です。MarkdownからReactコンポーネントを呼び出して使えます。
また、frontmatter というフォーマットで、ファイルの先頭に日付やら執筆者やらの情報を記述できます1。
frontmatterに書いた値は gatsby-plugin-mdx によってGraphQLで取得できるよう変形され、記事の構築で使用できます。
---
path: "gatsby-blog"
date: "2019-10-23"
title: "亜光速ブログ戦隊: [Gatsby, TypeScript, Emotion, Tailwind, MDX]"
status: "public"
---
import { Hoge } from "hogefuga"

**この記事は[Gatsby.js Advent Calendar 2019](https://qiita.com/advent-calendar/2019/gatsby) 23日目の記事です。**

# これは
pathは名前通り記事のpathです。
dateは日付で、記事一覧ページではここの値でソートします。
titleは記事上部に表示するほか、HTMLの<title>に渡す値にもします。
準備
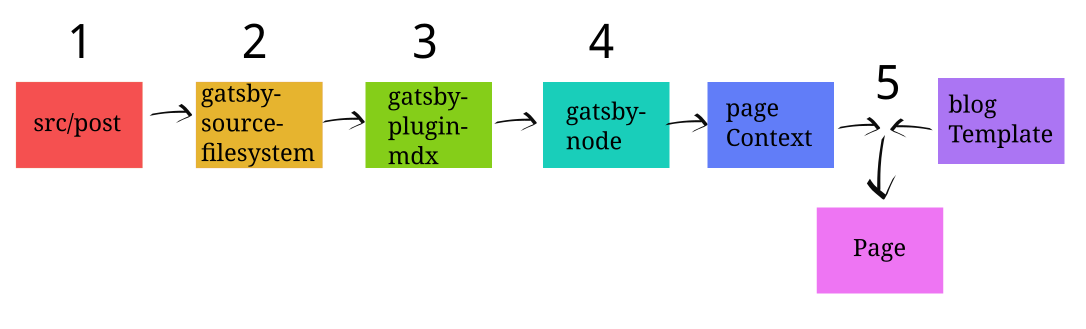
MDXをブログの記事にするには以下の工程が必要です。
-
src/post/に記事のもとになる.mdxファイルを用意する - ファイルシステムからMDXファイルを吸い出す…
gatsby-source-filesystem - 吸い出したMDXをGraphQLでクエリできるようにする…
gatsby-plugin-mdx - クエリしてきたデータからページを作る…
gatsby-node.js - データをテンプレートに突っ込み、実際のページの形を作る…
blogTemplate.tsx(名前はなんでもいい)
npm i -S gatsby-plugin-mdx gatsby-source-filesystem @mdx-js/mdx @mdx-js/react
gatsby-source-から始まる Source Plugin は、いろいろな場所(PCのディスク, WordPress, …)からデータを引っ張ってこれるようにします。
gatsby-source-filesystemはその名の通り__開発するPCのファイルシステム__からデータを吸い上げ、次の工程に回します。
gatsby-transformer-から始まる Transformer Plugin は、Source Pluginから受け取ったファイルをGraphQLでクエリできるように変形します。今回のgatsby-plugin-mdxは名前的にアレですが立派なTransformerです。
ではconfigを書きます。
    {
      resolve: `gatsby-source-filesystem`,
      options: {
        name: `posts`,
        path: `${__dirname}/src/posts`,
      },
    },
    {
      resolve: `gatsby-plugin-mdx`,
    },
これで、src/posts/以下に.mdxファイルを書けば変換してくれることになりました。
gatsby-nodeを書く
gatsby-node.jsは、__ビルド時にNode.jsで実行__したい処理を書くファイルです。ブラウザでは実行されません。
3. クエリしてきたデータをテンプレートに突っ込み、ページを作る ということをするためにこいつを使います。
TypeScript化
gatsby-node.jsを.tsにしてTypeScriptで書いても動きません。なので、
-
ts-nodeを使い - TypeScriptコンパイラを呼び出して
- 適当なところから
requireした.tsファイルをコンパイルし - exports.createPages(ページを作成するのに使うとこ)に渡す
という工程をとります。
「そこまでしてTypeScriptを使いたいのかー!?」
『ええ使いたいですとも!静的型付け万歳!コード補完万歳!Null安全万歳!』
ts-nodeとtsconfig.jsonの準備はできてますかー?
"use strict"
require("ts-node").register(require("./tsconfig.json"))
exports.createPages = require("./config/gatsby-node").createPages
今回はconfig/gatsby-node.tsに書くことにします。

tsconfig.jsonにコメントが含まれてるとパース時に死にます。
規格守らないのも悪いが、コメントひとつ書けないJSONもJSONだと思う。
config/gatsby-node.tsを書く
やってることをざっくり解説すると、
- GraphQLでMDXファイルのデータを取る
const result = await graphql<Data>(`ら辺) -
resultにエラー情報が入ってたらそれを吐いて処理は中止 -
data.allMdx.edgesがMDXファイル(を変形したデータ)の配列になっているのでforEachで全部に対してcreatePage()を実行する -
nullが出ると困るところがnullだったらやっぱり中止 -
createPages()でページのパス, テンプレート, コンテキストを指定してページを作る
import { GatsbyNode } from "gatsby"
import Path from "path"
import { MdxConnection, MdxEdge } from "../types/graphqlTypes"
// gatsby-plugin-graphql-codegenで自動生成された型↑

export const createPages: GatsbyNode["createPages"] = async ({
  graphql,
  actions,
  reporter,
}) => {
  type Data = {
    allMdx: MdxConnection
  }
  const { createPage } = actions
//////↓1 MDXのデータを取ってくる//////
  const result = await graphql<Data>(`
    query gatsbyNode {
      allMdx(
        sort: { fields: frontmatter___date, order: ASC }
        filter: { frontmatter: { status: { ne: "private" } } }
      ) {
        edges {
          node {
            id
            body
            excerpt
            frontmatter {
              path
              status
              tags
              title
              date
              description
            }
          }
          next {
            frontmatter {
              path
              title
            }
          }
          previous {
            frontmatter {
              path
              title
            }
          }
        }
      }
    }
  `)
  if (result.errors) {
    reporter.panicOnBuild(result.errors)
    return
  }
 //↓ 2. エラーだったら中止 ↑/////////
  if (!result.data) return
  const data = result.data

// ↓ 3. MDXファイルそれぞれに対し実行する
  data.allMdx.edges.forEach(post => {
    if (post.node.frontmatter == null) {
      throw new Error("frontmatter is null")
    }
//////↓ 4. pathとかがnullだと困るのでErrorを投げちゃう ↑//////
    if (post.node.frontmatter.path == null) {
      throw new Error("path is null")
    }
////// 5. パス, テンプレート, コンテキストを渡してページを作る
    createPage({
      path: "/blog/" + post.node.frontmatter.path,
      component: Path.resolve(`./src/components/blog/general/blogTemplate.tsx`),
      context: { post, id: post.node.id },
    })
  })
}
frontmatterが早速出てきてますね。
ブログ記事のテンプレートを書く
gatsby-nodeでsrc/components/blog/general/blogTemplate.tsxと指定しているブログ記事のテンプレートを用意します。たぶんこのファイルがいちばんカオス。
ここでやっていることは以下です。
-
gatsby-nodeからpageContextを受け取る - 事前に用意しておいたテンプレートに突っ込む
// MDX描画に使う
import { MDXProvider } from "@mdx-js/react"
import { MDXRenderer } from "gatsby-plugin-mdx"
import React from "react"
// gatsby-plugin-graphql-codegenで自動生成された型定義
import { MdxEdge } from "../../../../types/graphqlTypes"

export const BlogTemplate = ({
  pageContext,
}: {
  pageContext: { post: MdxEdge }
}) => {
  const { post } = pageContext,
    node = post.node
  return (
    <article className="p-3 md:p-5">
      <MDXProvider components={blogArticleComponents}>
        <MDXRenderer>{post.node.body}</MDXRenderer>
      </MDXProvider>
    </article>
  )
}

export default BlogTemplate
簡単ですね!
それでは現実に作ったブログでのテンプレートを見てみましょう。
地獄の窯の蓋。そのうち解説を入れる
A. 画面幅が1024pxより小さいかチェックし、resize(画面のリサイズ)イベントのたびにチェックするようイベントリスナーを貼る
B. ページのタイトル(<head>内の<title>に書くやつ)と, <meta name="description"/>を指定
C. <BlogPageWithTOC>の中は、上から 記事のヘッダー, 書きかけ記事の注意, 画面幅が1024pxより小さいときに表示される目次, ブログの本文, 前後の記事2。
// MDX描画に使う
import { MDXProvider } from "@mdx-js/react"
import { MDXRenderer } from "gatsby-plugin-mdx"
import React, { useState } from "react"
// gatsby-plugin-graphql-codegenで自動生成された型定義
import { MdxEdge } from "../../../../types/graphqlTypes"
// TOC(目次)つきのレイアウト
import { BlogPageWithTOC } from "../../Wrappers"
// 目次のコンポーネントと、それに突っ込むデータの型
import { TableOfContents, TOC } from "./TableOfContents"
// ブログのヘッダー
import BlogPostHead from "../BlogPostHead"
// 前の記事, 次の記事
import PrevNextLink from "../PrevNextLink"
// 警告 Qiitaでいうなら「この記事は最終更新日から1年以上が経過しています。」と同じ
import { Warn } from "../Notes"
// MDXからHTMLを作るための要素たち
import blogArticleComponents from "./blogArticleComponents"
// Custom Hooks。 最初のレンダリングで実行される
import { onFirstRender } from "../../../hooks/onFirstRender"

export const BlogTemplate = ({
  pageContext,
}: {
  pageContext: { post: MdxEdge }
}) => {
  const { post } = pageContext,
    node = post.node,
    TOC: TOC = node.tableOfContents
  const [isSmallerThanMd, setISTM] = useState(false)
  onFirstRender(() => {
    setISTM(matchMedia("(max-width: 1023px)").matches)
    addEventListener("resize", () =>
      setISTM(matchMedia("(max-width: 1023px)").matches)
    )
  })
  return (
    <BlogPageWithTOC
      title={`${node.frontmatter?.title} - KKRN.ME`}
      description={node.frontmatter?.description ?? node.excerpt}
      TOC={TOC}
      visible={isSmallerThanMd}
    >
      <BlogPostHead post={post} />

      <article className="p-3 md:p-5">
        {node.frontmatter?.status === "draft" ? (
          <Warn>この記事は書きかけです。</Warn>
        ) : null}
        {isSmallerThanMd ? (
          <TableOfContents TOC={TOC} className="my-1" />
        ) : null}
        <MDXProvider components={blogArticleComponents}>
          <MDXRenderer>{post.node.body}</MDXRenderer>
        </MDXProvider>
      </article>
      <PrevNextLink post={post} />
    </BlogPageWithTOC>
  )
}

export default BlogTemplate
テスト(20-01-05追記)
Gatsby公式ドキュメントのUnit Testingのとこを見ながらテストします。
おわりに
初アドベントカレンダーに対し雑な見込みを立ててしまい、結果的に遅刻してしまいすみませんでした。SEO/PWAやテンプレートの奥深いところに踏み込めていないので、たくさん加筆修正することになると思います。まだGatsbyの奥は深いようです。
可能性は無限大!!Gatsby最高!!!!!!!!!!!!!!!!!!!!!!!!
参考リンク
Reactの最強フレームワークGatsby.jsの良さを伝えたい!!
GatsbyでGoogle Lighthouseで満点を取るブログを一から作る
Reactベース静的サイトジェネレータGatsbyの真の力をお見せします
Using Tailwind CSS with Gatsby, React & Emotion Styled Components