これまでVue.jsを使うことが何度かあったが、Vue.jsのフレームワークとしてよく聞く「Nuxt.js」を使ったことがなかったため、入門として触ってみた話をまとめる。
今回作るもの
create-nuxt-app で作成されるサンプルをベースに、とても単純なテキストフォームアプリを作成する。
言語はTypescriptにし、また、Vue.jsでは主流となりつつあるComposition APIも合わせて使ってみる。
レンダリングについては、静的ホスティングを想定してSPAモードを選択する。
https://nuxtjs.org/ja/docs/concepts/static-site-generation
セットアップ
バージョン
- Node.js v14.17.1
- Yarn: v1.22.17
プロジェクトの作成
ドキュメントのインストール方法にある通りに create-nuxt-app を使ってプロジェクトを作成する。
ドキュメント: https://nuxtjs.org/ja/docs/get-started/installation
今回プロジェクト名は nuxt-ts-practiceとする。
yarn create nuxt-app nuxt-ts-practice
作成時の各質問に対する回答。
? Project name: nuxt-ts-practice
? Programming language: TypeScript
? Package manager: Yarn
? UI framework: Vuetify.js
? Nuxt.js modules: Axios - Promise based HTTP client
? Linting tools: (Press <space> to select, <a> to toggle all, <i> to invert selection)
? Testing framework: None
? Rendering mode: Single Page App
? Deployment target: Static (Static/Jamstack hosting)
? Development tools: jsconfig.json (Recommended for VS Code if you're not using typescript)
? What is your GitHub username? shintaro yamasaki
? Version control system: Git
今回はTypeScriptを使い、また、静的ホスティングすることを想定してSPAとする。
TypeScriptの導入
create-nuxt-appによる作成時にTypeScriptを選択すると、必要なパッケージが一緒にインストールされる。
@nuxt/types@nuxt/typescript-build
参考: https://typescript.nuxtjs.org/ja/guide/setup
また、Nuxt.jsの設定ファイルである nuxt.config.js の buildModules に @nuxt/typescript-build が自動的に追加される。
  buildModules: [
      ...
      '@nuxt/typescript-build'
  ]
この時点で各VueファイルではJavaScriptが使われているため、必要であれば適宜書き換える。
Composition APIの導入
追加で、@nuxtjs/composition-api モジュールをインストールする。
yarn add @nuxtjs/composition-api
インストール後、 nuxt.config.jsのbuildModulesに記述追加
  buildModules: [
      ...
      '@nuxtjs/composition-api/module'
  ]
参考: https://composition-api.nuxtjs.org/getting-started/setup
layouts/default.vue のTypeScript + Composition API化
試しに layouts/default.vue のscript部を、TypeScript + Composition APIで書き換えてみる。
<template>
....
</template>

<script lang="ts">
import { defineComponent, ref } from '@vue/composition-api'

type Item = {
  icon: string
  title: string
  to: string
}

export default defineComponent({
    setup() {
        const clipped = ref(false)
        const drawer = ref(false)
        const fixed = ref(false)

        const items = ref<Item[]>([
            {
                icon: 'mdi-apps',
                title: 'Welcome',
                to: '/'
            },
            {
                icon: 'mdi-chart-bubble',
                title: 'Inspire',
                to: '/inspire'
            }
        ])
        const miniVariant = ref(false)
        const right = ref(false)
        const rightDrawer = ref(false)
        const title = ref('Vuetify.js')

        return {
            clipped,
            drawer,
            fixed,
            items,
            miniVariant,
            right,
            rightDrawer,
            title
        }
    }
})
</script>
ローカルで実行
yarn dev
ポート番号はデフォルトが3000となっているが、これを変更 (例. 5000へ変更) する場合は、package.jsonのscriptsの記述を以下のように変更する
"dev": "PORT=5000 nuxt",
ページ追加
ページを自分で作成して追加する。
ページの構成
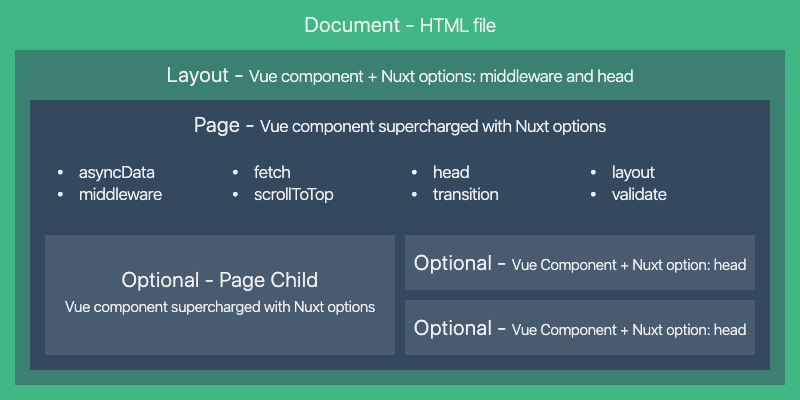
Nuxt.jsのビューの構成は、以下の図ように一番の大枠としてHTMLファイル (ディレクトリ内にファイルとして存在せずコンパイル時に生成される) があり、その中に各ページがあるような構成となっている。また、各ページはレイアウトという、ページ間で流用可能な見た目に関するテンプレートによって括られる。
参考: https://nuxtjs.org/ja/docs/concepts/views
レイアウトの追加
初期状態で用意されているデフォルトのレイアウト layouts/default.vue があるが、新しく専用のレイアウトを追加する。
<template>
    <v-app flat>
        <v-main>
            <v-container>
                <div class="text-h2" >
                    Note
                </div>
                <Nuxt />
            </v-container>
        </v-main>
    </v-app>
</template>
シンプルに、タイトルのみが上部に表示されるだけ。
参考: https://nuxtjs.org/ja/docs/concepts/views#%E3%83%AC%E3%82%A4%E3%82%A2%E3%82%A6%E3%83%88
コンポーネントの追加
テキストを画面上に表示し、また、ボタンで削除するコンポーネントを作成する。
<template>
    <div>
        <v-card>
            <v-card-text>
                {{ text }}
            </v-card-text>
        </v-card>
        <br />
        <v-btn @click="onClear">
            clear
        </v-btn>
    </div>
</template>
<script lang="ts">
import { defineComponent, ref, SetupContext } from '@nuxtjs/composition-api'

type Props = {
    text: string,
};

export default defineComponent({
    props: {
        text: {
            type: String,
        }
    },

    setup(props: Props, context: SetupContext) {
        const title = ref<string>('Note');

        const onClear = () => {
            context.emit("clear");
        };

        return {
            title,
            onClear,
        };
    },
})
</script>
ページの追加
作成したレイアウトとコンポーネントも使って、専用のページを作成する。
<template>
    <v-container fluid>
        <v-row>
            <v-col>
                <v-textarea
                    v-model="text"
                    hint="Text here"
                    ></v-textarea>
                <br />
                <v-btn @click="onSubmit">
                    Submit
                </v-btn>
            </v-col>
        </v-row>
        <v-row>
            <v-col>
                <Note
                    :text="shown_text"
                    @clear="onClear"
                    />
            </v-col>
        </v-row>
    </v-container>
</template>
<script lang="ts">
import { defineComponent, ref, onMounted, useContext} from '@nuxtjs/composition-api'

export default defineComponent({
    setup() {
        const text = ref<string>("")
        const shown_text = ref<string>("")

        const onSubmit = () => {
            console.log("onsubmit")
            shown_text.value = text.value
            text.value = ""
        }

        const onClear = () => {
            shown_text.value = ""
        }

        const { $config } = useContext()

        onMounted(() => {
            console.log('mounted!')
            console.log($config.stage)
        })

        return {
            text,
            shown_text,
            onSubmit,
            onClear,
        }
    },
    layout: 'note',
})
</script>
Vuexの利用
store の実装は様々な方法があるが、Nuxtの場合に限らずTypeScriptとの相性の面で複雑化しやすい。
-
vuex-module-decoratorsを使ったクラスベースの実装 -
nuxt-typed-vuexを使った実装
今回はVuexによる状態管理の実装は見送ることとする。
また、今回はNuxt2を利用しているが、次バージョンのNuxt3ではStateという機能が追加され、Vuexを使わず状態管理ができるようになる。
参考: https://v3.nuxtjs.org/docs/usage/state/
パスを追加
pages ディレクトリ内のファイルパスがそのままルーティングになるため、別途どこかに記載する必要なし。
参考: https://nuxtjs.org/ja/docs/features/file-system-routing
環境変数の読み込み
今回は環境変数を使う場面はなかったが、環境変数の読み込み方についてもまとめる。
nuxt.config.js のRuntime configで読み込む。
  publicRuntimeConfig: {
    "stage": process.env.STAGE   // STAGE環境変数
  },
vueファイルからの参照方法については、SetupContextは $context を要素として持っていないようなのでエラーとなる。以下のように@nuxtjs/composition-apiのuseContextで取得する
const { $config } = useContext()
console.log($config.stage)
https://nuxtjs.org/docs/directory-structure/nuxt-config#using-your-config-values
https://composition-api.nuxtjs.org/API/useContext
できた画面
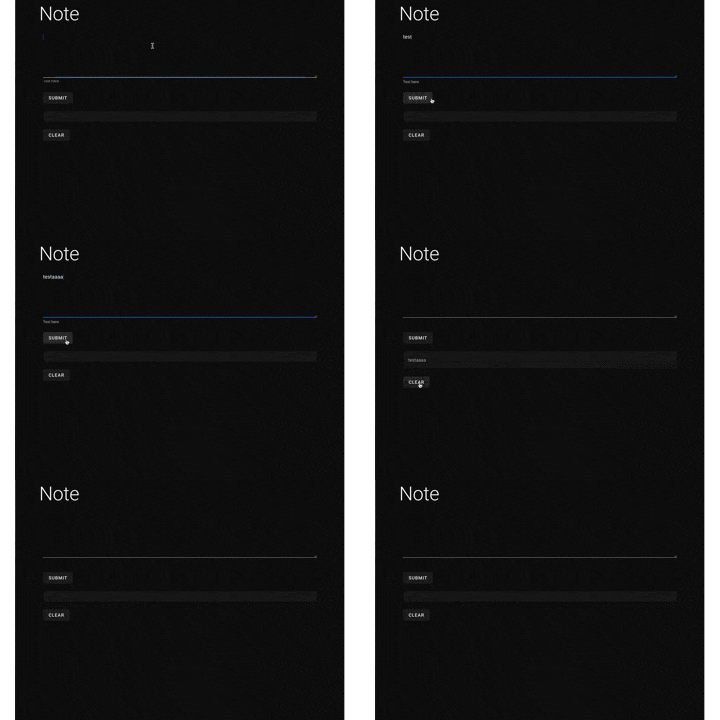
ページを追加して出来上がった画面
ローカルで実行し、/noteにアクセス。
テキストエリアに入力した文字列をSubimitすると下の領域に表示させるだけの簡単なアプリ。
ソースコード
感想
Nuxt.jsが定めているディレクトリ構成とビューやルーティング等との関係性さえ理解すれば、あとは通常通りのVue.jsによる開発と同じ印象。
普段よくディレクトリ構成を悩むことが多いので、純粋にフレームワークを使ったWeb開発として、そのあたりが統一して考えることができて良い。
SSRの文脈でよくNuxt.jsが出てくることが多いが、SPAにも対応しており、フレームワークとしての効果は十分にあるため積極的に使っていきたいと感じた。
また、Composition APIについても初めて触ってみたが、小規模であったこともありあまり恩恵は感じられず。。ある程度触るとすぐ慣れそうなので今後はこっちを使って開発していきたい。
Nuxt3について
今回はNuxt2を利用したが、執筆時現在Nuxt3がbeta版として公開されている。
このバージョン3ではTypeScriptやComposition APIが標準対応しているためセットアップもより楽になりそう。

