はじめに
画面で何かを入力している時に、別画面で検索画面を出して項目を選択するということがあります。
たとえば、購入画面があって、商品を選ぶためにリストを表示させるなんていうことがあります。
(これは昔開発にかかわった画面です)

でももう少し格好よく画面を作りたいなと思い、検索ボタンを押したら、画面の横から別画面がスライドしてくれたらいいなと思いました。
何かないかなと探していたところ、MaterialDesignで引き出し機能というものがありました。
具体的には、MaterialDesighのDrawerHostという機能です。
MaterialDesignDemo
MaterialDesignDemo.exeで見るとこんなものがありました。

矢印を押すと、上下左右から引き出しが出てくるという機能です。
このソースコードをコピペして、コードを自分の使用するフォームに合わせて修正しました。
例

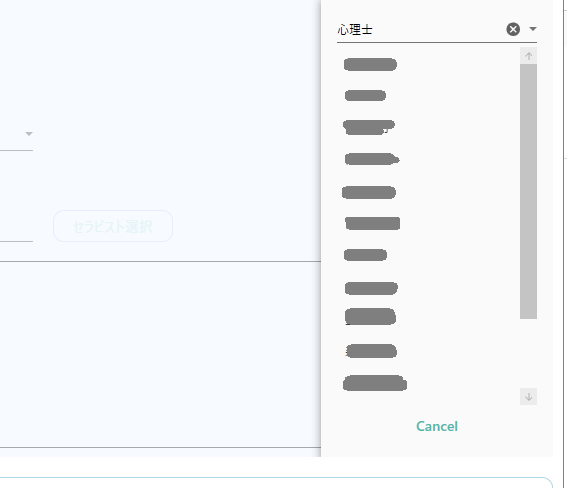
この[セラピスト選択]ボタンを押すと右側からDrawerが出てくるようにします。
コード
ちなみに .ValueがあるのはReactivePropertyを使用しているためです
xmlns:materialDesign="http://materialdesigninxaml.net/winfx/xaml/themes"

    <materialDesign:DrawerHost Grid.Row="1" Grid.RowSpan="5"
                               Grid.Column="0" Grid.ColumnSpan="2"
                               IsRightDrawerOpen="{Binding IsRightDrawerOpen.Value}">
            <materialDesign:DrawerHost.Style>
                <Style TargetType="materialDesign:DrawerHost"
                       BasedOn="{StaticResource {x:Type materialDesign:DrawerHost}}">
                    <Setter Property="OverlayBackground" Value="AliceBlue"/>
                </Style>
            </materialDesign:DrawerHost.Style>
            <materialDesign:DrawerHost.RightDrawerContent>
                    <Grid Margin="16" Width="200">
                        <Grid.RowDefinitions>
                            <RowDefinition Height="36"/>
                            <RowDefinition/>
                            <RowDefinition Height="36"/>
                        </Grid.RowDefinitions>
                    <ComboBox ItemsSource="{Binding TherapistKinds}"
                              SelectedItem="{Binding SelectedTherapistKinds.Value}"
                              Text="{Binding SelectedTherapistKidns.Value}"
                              materialDesign:TextFieldAssist.HasClearButton="True"/>
                    <ListBox Grid.Row="1"
                             ItemsSource="{Binding TherapistList}"
                             SelectedItem="{Binding SelectedTherapist.Value}">
                         <i:Interaction.Triggers>
                             <i:EventTrigger EventName="MouseDoubleClick">
                                <i:InvokeCommandAction Command="{Binding TherapistSelectCommand, Mode=OneWay}" />
                             </i:EventTrigger>
                         </i:Interaction.Triggers>
                    </ListBox>
                        <Button Grid.Row="2"
                                Command="{x:Static materialDesign:DrawerHost.CloseDrawerCommand}"
                                CommandParameter="{x:Static Dock.Right}"
                                Margin="4"
                                HorizontalAlignment="Center"
                                Style="{DynamicResource MaterialDesignFlatButton}"
                                Content="Cancel"/>
                </Grid>
            </materialDesign:DrawerHost.RightDrawerContent>
                <Button Content="セラピスト選択"
                        HorizontalAlignment="Left"
                        VerticalAlignment="Bottom"
                        Width="120"
                        Style="{StaticResource MaterialDesignOutlinedButton}"
                        Command="{x:Static materialDesign:DrawerHost.OpenDrawerCommand}"
                        CommandParameter="{x:Static Dock.Right}"
                        materialDesign:ButtonAssist.CornerRadius="10"
                        BorderBrush="MediumSlateBlue"/>
    </materialDesign:DrawerHost>
解説
xmlns:materialDesign="http://materialdesigninxaml.net/winfx/xaml/themes" でMaterialDesignを利用できるように参照設定します
< materialDesign:DrawerHost />内で、Styleで表示したときのBackgroundの色を指定しています。
右側から出てくるようにするために、< materialDesign:DrawerHost.RightDrawerContent >を記述して、その中にComboBoxやListBoxなど必要なコントロールを配置しています。
このコンテントを表示する場合は、< materialDesign:DrawerHost />内にボタンを配置して、Commandとして"{x:Static materialDesign:DrawerHost.OpenDrawerCommand}"と、CommandParameterとして"{x:Static Dock.Right}"を指定します。
このCommandParameterで上下左右を判別しているみたいです。
これだけで引き出し機能(Drawer)が使えます。とても簡単でびっくりしました。
デザイン画面を見ると、Drawerが画面外にデザインされているのが分かります。

リストから値が選択されたときに、Drawerを戻すときは、IsRightDrawerOpenプロパティをViewModelでFalseにすることで実現しています。