#はじめに
MessageBoxをMVVMパターンで自作するが面倒で、これまでMessageBoxをそのまま使ってきたのですが、新しくアプリを作るにあたって、改めてメッセージボックスを自作したので記事にしました。
昔自作しようとしたときに、途中でよくわからなくなってしまった経験があったため、この記事では初めて作る方向けに丁寧な説明を心がけてみようと思います。
このメッセージボックスを作ることで、インターフェースの使い方や、PrismのApp.xamlの使用方法やDIについて、データテンプレートなど勉強になることがたくさんあります。
作ったことがない方は一度やってみることをお勧めします。
開発前提はC#、Prism、WPF、.Net Coreです。
#実装計画
- 表示について
- PrismのIDialogServiceでViewを表示(ShowDialog)させる
- 表示されたViewのボタンを[Okのみ]・[Yes/No]・[OK/Cancel]に切り替えられるようにする
- コーディング内容
- 呼び出し用のインターフェースを作成する
- インターフェースの実装クラスでパラメータを受け取り、ShowDialogする
- 表示するViewデザイン内でTemplateSelectorを使用してボタンを切り替えられるようにする
#実装手順
実際は自分のやりやすい手順でいいと思いますが、せっかく記事にするので、初めての人が迷わないように、なるべくエラーが出ない順番で作成します。
そのため、少し行ったり来たりしているところがありますのでご容赦ください。
##プロジェクト・フォルダ準備
- Prism Blank App(.NET Core)テンプレートから作成したMessageBoxSampleプロジェクト
- フォルダは初期値のままです
- Prism Module(.NET Core)テンプレートから作成したModule.MessageBoxプロジェクト
- Modelsフォルダ作成
- Serviceフォルダ作成
- TemplateSelectorsフォルダ作成
- Views,ViewModelsの初期時に入っているViewAは削除しました
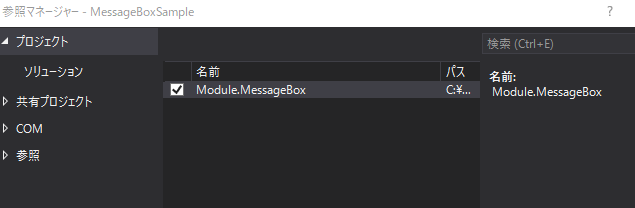
##プロジェクト依存関係
MessageBoxSampleプロジェクトの依存関係を右クリックして「プロジェクト参照の追加」を選び、Module.MessageBoxプロジェクトを選択します
##App.xamlにモジュールを登録
Module.MessageBoxプロジェクトを使用できるようにするために、モジュールをApp.xamlのConfigureModuleCatalogで登録します
        protected override void ConfigureModuleCatalog(IModuleCatalog moduleCatalog)
        {
            moduleCatalog.AddModule<MessageBoxModule>();
        }
##Module.MessageBoxプロジェクト
###Modelsフォルダにenumクラス作成
メッセージに表示させるボタンの種類を指定するためのenumクラスを以下のように作成します
namespace Module.MessageBox.Models
{
    public enum MessageDialogType
    {
        OkOnly,
        YesNo,
        OkCancel
    }
}
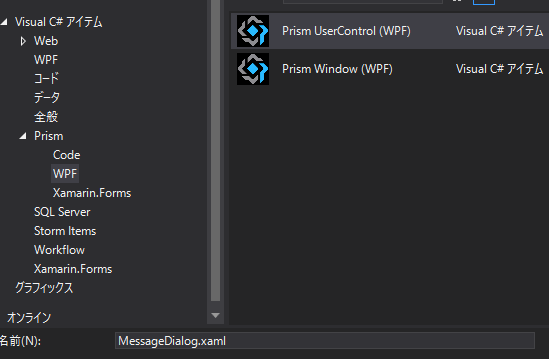
###View,ViewModel作成
Prism UserControlとしてMessageDialog.xamlを作成します。
###ViewModelにIDialogAware継承
ViewをPrismのダイアログとして利用するためにはIDialogAwareを継承させる必要があります
こんな感じになると思います。
namespace Module.MessageBox.ViewModels
{
    public class MessageDialogViewModel : BindableBase, IDialogAware
    {
        public string Title => throw new NotImplementedException();

        public event Action<IDialogResult> RequestClose;

        public MessageDialogViewModel()
        {

        }

        public bool CanCloseDialog()
        {
            throw new NotImplementedException();
        }

        public void OnDialogClosed()
        {
            throw new NotImplementedException();
        }

        public void OnDialogOpened(IDialogParameters parameters)
        {
            throw new NotImplementedException();
        }
    }
}
ViewをPrismのダイアログとして登録します。
具体的にはMessageBoxModuleのRegisterTypesでRegisterDialogとして登録します
namespace Module.MessageBox
{
    public class MessageBoxModule : IModule
    {
        public void OnInitialized(IContainerProvider containerProvider)
        {

        }

        public void RegisterTypes(IContainerRegistry containerRegistry)
        {
            containerRegistry.RegisterDialog<MessageDialog>();
        }
    }
}
ViewModel内に先ほど作成したenum値のプロパティを書きます
        private MessageDialogType _messageDialogValue;
        public MessageDialogType MessageDialogValue { get => _messageDialogValue; set => SetProperty(ref _messageDialogValue, value); }
###TemplateSelector作成
TemplateSelectorsフォルダにMessageDialogTemplateSelectorクラスを作成し、ViewModelのプロパティ値(MessageDialogValue)に対応するデータテンプレートを返すようにコーディングします
namespace Module.MessageBox.TemplateSelectors
{
    class MessageDialogTemplateSelector : DataTemplateSelector
    {
        public DataTemplate OkOnlyTemplate { get; set; }
        public DataTemplate OkCancelTemplate { get; set; }
        public DataTemplate YesNoTemplate { get; set; }

        public override DataTemplate SelectTemplate(object item, DependencyObject container)
        {
            MessageDialogType messageDialogType = ((MessageDialogViewModel)item).MessageDialogValue;

            switch (messageDialogType)
            {
                case MessageDialogType.OkOnly:
                    {
                        return OkOnlyTemplate;
                    }
                case MessageDialogType.OkCancel:
                    {
                        return OkCancelTemplate;
                    }
                case MessageDialogType.YesNo:
                    {
                        return YesNoTemplate;
                    }
            }

            return base.SelectTemplate(item, container);
        }
    }
}
###Viewデザイン
MessageDialog.xamlのデザイン画面を開きます。
いっぺんにコードを乗せるとかなりの量になって混乱するかもしれないので、丁寧に少しずつ説明しながら書いていきます
慣れている人は当たり前になっている部分も多いのですっ飛ばしてください
####参照
まずは< UserControl...... >となっているところに以下のように参照や値を書きます
MinWidthとMinHeightは適当です。実際に使用していくと、MaxWidthとかも設定したほうがよかったりいろいろですが、ここでは省いています
    xmlns:templateSelector="clr-namespace:Module.MessageBox.TemplateSelectors"
    xmlns:d="http://schemas.microsoft.com/expression/blend/2008"
    xmlns:mc="http://schemas.openxmlformats.org/markup-compatibility/2006"
    mc:Ignorable="d"
    MinWidth="250"
    MinHeight="100"
####WindowStyle
次にダイアログが表示されたときに、最大化とかできないようにしたり、タスクバーに表示されないようにするために以下のコードを書きます。ここでTitleプロパティを記述しておくことで、ViewModelのTitleを表示させることができ、メッセージのタイトルとして利用できます
    <prism:Dialog.WindowStyle>
        <Style TargetType="Window">
            <Setter Property="ResizeMode" Value="NoResize" />
            <Setter Property="ShowInTaskbar" Value="False" />
            <Setter Property="SizeToContent" Value="WidthAndHeight"/>
            <Setter Property="Title" Value="{Binding Title}"/>
        </Style>
    </prism:Dialog.WindowStyle>
####UserControl.Resourcesにデータテンプレートを作成する
データテンプレートとしてOkOnlyTemplate、YesNoTemplate、OkCancelTemplateを作成します。
このデータテンプレートはボタンの表示部分に関するものとなります。
データテンプレートにx:Key=""でキーをセットしていて、これとMessageDialogTemplateSelector クラスのプロパティとが対応することになり、templateSelector:MessageDialogTemplateSelector.... で表示を切り替えられるようにしています
    <UserControl.Resources>
        <DataTemplate x:Key="OkOnlyTemplate">
            <Button Content="OK"
                    HorizontalAlignment="Center"
                    Width="100"
                    Command="{Binding OkCommand}"
                    IsDefault="True"/>
        </DataTemplate>
        <DataTemplate x:Key="YesNoTemplate">
            <StackPanel Orientation="Horizontal" HorizontalAlignment="Center">
                <Button Content="はい"
                        Margin="0,0,10,0"
                        Width="100"
                        Command="{Binding YesCommand}"/>
                <Button Content="いいえ"
                        Margin="10,0,0,0"
                        Width="100"
                        Command="{Binding NoCommand}"
                        IsDefault="True"/>
            </StackPanel>
        </DataTemplate>
        <DataTemplate x:Key="OkCancelTemplate">
            <StackPanel Orientation="Horizontal" HorizontalAlignment="Center">
                <Button Content="OK"
                        Margin="0,0,10,0"
                        Width="100"
                        Command="{Binding OkCommand}"/>
                <Button Content="キャンセル"
                        Margin="10,0,0,0"
                        Width="100"
                        Command="{Binding CancelCommand}"
                        IsDefault="True"/>
            </StackPanel>
        </DataTemplate>
        <templateSelector:MessageDialogTemplateSelector
            x:Key="MessageDialogTemplateSelector"
            OkOnlyTemplate="{StaticResource OkOnlyTemplate}"
            YesNoTemplate="{StaticResource YesNoTemplate}"
            OkCancelTemplate="{StaticResource OkCancelTemplate}"/>
    </UserControl.Resources>
####実際の表示部分(Grid)
さきほど説明した通り、データテンプレートはボタンの表示切替のためのものです。
最後はメッセージ表示部分も含めたデザインを作りますが、ここでポイントとなるのがボタン表示部分です。
ContentControlを使用しているのですが、d:ContentTemplateというものがあります。これを使用することで、任意のデータテンプレートを使用しながらデザインすることができます。
    <Grid>
        <Grid.RowDefinitions>
            <RowDefinition/>
            <RowDefinition Height="25"/>
        </Grid.RowDefinitions>
        <TextBlock Grid.Row="0"
                   Text="{Binding Message}"
                   TextWrapping="Wrap"/>
        <ContentControl Grid.Row="1"
                        Content="{Binding}"
                        VerticalAlignment="Center"
                        d:ContentTemplate="{StaticResource YesNoTemplate}"
                        ContentTemplateSelector="{StaticResource MessageDialogTemplateSelector}"/>
    </Grid>
###ViewModelのコーディング
ViewModelのコーディングを行おうと思いますが、その前に先に、メッセージなどを受け取るためのパラメータ用クラスを作成しておきます
####パラメータ用クラス作成
ModelフォルダにMessageContentクラスを作成し、以下のコードを書きます
namespace Module.MessageBox.Models
{
    public class MessageContent
    {
        public string Title { get; set; }
        public string Message { get; set; }
        public MessageDialogType MessageDialogValue { get; set; }
    }
}
####ViewModlのプロパティ・フィールド部分
コマンドやプロパティ値、フィールドのコード宣言をします。さきほどのMessageDialogTypeも再度記載しています
MessageContentを受け取るフィールド
タイトル、メッセージ、ボタン用のプロパティ
ViewのCommandでBinding設定したICommandの宣言
IDialogAwareで実装されたDialogResult, Actionのコード となります
        private MessageContent messageContent;

        private string _title;
        public string Title { get => _title; set => SetProperty(ref _title, value); }

        private string _message;
        public string Message { get => _message; set => SetProperty(ref _message, value); }

        private MessageDialogType _messageDialogValue;

        public MessageDialogType MessageDialogValue { get => _messageDialogValue; set => SetProperty(ref _messageDialogValue, value); }

        public ICommand OkCommand { get; }
        public ICommand CancelCommand { get; }
        public ICommand YesCommand { get; }
        public ICommand NoCommand { get; }

        private DialogResult result = new DialogResult(ButtonResult.None);

        public event Action<IDialogResult> RequestClose;
####コンストラクタ
ViewModelのコンストラクタでICommandの初期化、メソッド呼び出しを作成します。メソッド名は説明しやすいように書いているので別の名称にしてもらっても構いません
        public MessageDialogViewModel()
        {
            OkCommand = new DelegateCommand(SelectedOk);
            CancelCommand = new DelegateCommand(SelectedCancel);
            YesCommand = new DelegateCommand(SelectedYes);
            NoCommand = new DelegateCommand(SelectedNo);
        }
####コマンドから呼び出されるメソッドを作成します
SelectedOk, SelectedCancel, SelectedYes, SelectedNoメソッドを作成します。
ButtonResult値を引数としてAction RequestCloseを呼び出しています。
        private void SelectedOk()
        {
            result = new DialogResult(ButtonResult.OK);
            RequestClose(result);
        }
        private void SelectedCancel()
        {
            result = new DialogResult(ButtonResult.Cancel);
            RequestClose(result);
        }
        private void SelectedYes()
        {
            result = new DialogResult(ButtonResult.Yes);
            RequestClose(result);
        }
        private void SelectedNo()
        {
            result = new DialogResult(ButtonResult.No);
        }
####ダイアログが呼び出された時のパラメータ取得
OnDialogOpenedがViewが表示されるときに使用されます。この引数のIDialogParameters parametersを利用して、タイトル、メッセージ、ボタンの種類を取得します
ついでに、ビープ音も鳴らせるようにしておきました。
        public bool CanCloseDialog() => true;

        public void OnDialogClosed() { }

        public void OnDialogOpened(IDialogParameters parameters)
        {
            messageContent = new MessageContent();
            messageContent = parameters.GetValue<MessageContent>("MessageContent");
            Title = messageContent.Title;
            Message = messageContent.Message;
            MessageDialogValue = messageContent.MessageDialogValue;

            // ビープ音を鳴らします
            SystemSounds.Asterisk.Play();
        }
以上でView, ViewModelまでは完成です
次にこのメッセージボックスを呼び出し・表示させるためのコードを作っていきます
##呼び出し用のサービス作成
###インターフェース作成
Module.MessageBoxプロジェクトのServiceフォルダ内に次のようにインターフェースを作成します
    public interface IMessageDialogService
    {
        ButtonResult ShowMessage(string message, string title, MessageDialogType messageDialogType);
    }
###インターフェースの実装
次に、作成したインターフェースの実装クラス(MessageDialogService)を作成します。
同じようにServiceフォルダ内の作成します。
ちなみに、注意ですが、ここでは記事のためにフォルダを減らしてシンプルにしています。インターフェースと実装クラスを別にしたほうがいい場合はそうしてください。
インターフェースを継承すると初期状態はこんな感じになると思います。
    public class MessageDialogService : IMessageDialogService
    {
        public ButtonResult ShowMessage(string message, string title, MessageDialogType messageDialogType)
        {
            throw new NotImplementedException();
        }
    }
####コンストラクタ
このなかでPrismのIDialogServiceを使用できるようにしたいので、コンストラクタを宣言します。依存オブジェクトの注入ですがここでは説明は割愛します。とりあえずこうすれば使えるよというぐらいでとらえておきましょう。
        private readonly IDialogService _dialogService;

        public MessageDialogService(IDialogService dialogService)
        {
            _dialogService = dialogService;
        }
####ShowMessageのコーディング
メッセージボックスの呼び出し時に実際に処理が行われる部分で、メッセージを表示後、閉じたときのボタンが戻る処理となります
        public ButtonResult ShowMessage(string message, string title, MessageDialogType messageDialogType)
        {
            MessageContent messageContent = new MessageContent()
            {
                Message = message,
                Title = title,
                MessageDialogValue = messageDialogType
            };

            IDialogResult dialogResult = null;
            _dialogService.ShowDialog(nameof(MessageDialog), new DialogParameters { { "MessageContent", messageContent } }, result => dialogResult = result);

            return dialogResult.Result;
        }
###サービスをApp.xamlに登録する
最後に、作成したサービスが使用できるように、App.xamlのRegisterTypesで以下のように登録します
        protected override void RegisterTypes(IContainerRegistry containerRegistry)
        {
            // Message Dialog Service
            containerRegistry.Register<IMessageDialogService, MessageDialogService>();
        }
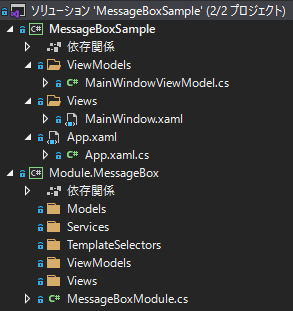
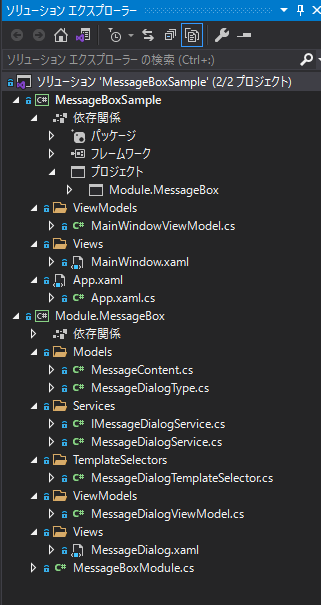
##ソリューション・プロジェクト構造の確認
ここまでで以下のようなソリューションとなっていれば大丈夫です。
もし動かないときは、どこかが違っているかもしれないので確認してください。
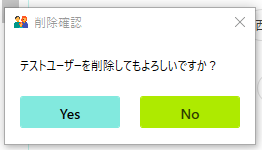
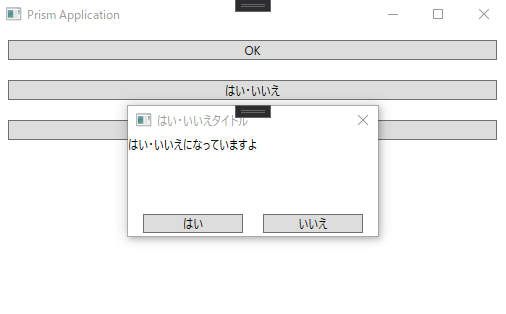
##動かしてみた
以上でメッセージボックスは完成したので、実際に動くか確認してみたいと思います。
MainWindowのデザインを以下のようにして
    <Grid>
        <StackPanel>
            <Button Content="OK"
                    Command="{Binding ShowOKMessageBox}"
                    Margin="10"/>

            <Button Content="はい・いいえ"
                    Command="{Binding ShowYesNoMessageBox}"
                    Margin="10"/>

            <Button Content="OK・キャンセル"
                    Command="{Binding ShowOKCancelMessageBox}"
                    Margin="10"/>
        </StackPanel>
    </Grid>
MainWindowViewModelをこんな感じでコーディング
    public class MainWindowViewModel : BindableBase
    {
        private string _title = "Prism Application";
        public string Title
        {
            get { return _title; }
            set { SetProperty(ref _title, value); }
        }

        private readonly IMessageDialogService _messageDialogService;

        public ICommand ShowOKMessageBox { get; }
        public ICommand ShowYesNoMessageBox { get; }
        public ICommand ShowOKCancelMessageBox { get; }

        public MainWindowViewModel(IMessageDialogService messageDialogService)
        {
            _messageDialogService = messageDialogService;

            ShowOKMessageBox = new DelegateCommand(ShowOkMessage);
            ShowYesNoMessageBox = new DelegateCommand(ShowYesNoMessage);
            ShowOKCancelMessageBox = new DelegateCommand(ShowOkCancalMesssage);
        }

        private void ShowOkCancalMesssage()
        {
            _messageDialogService.ShowMessage("OK・キャンセルになっていますよ", "OK・キャンセルタイトル", MessageDialogType.OkCancel);
        }

        private void ShowYesNoMessage()
        {
            _messageDialogService.ShowMessage("はい・いいえになっていますよ", "はい・いいえタイトル", MessageDialogType.YesNo);
        }

        private void ShowOkMessage()
        {
            _messageDialogService.ShowMessage("OKになっていますよ", "OKタイトル", MessageDialogType.OkOnly);
        }
    }
これで実行するとちゃんとメッセージが表示されました
#さいごに
メッセージの表示位置やボタンの表示位置などデザイン部分は、データテンプレートをいろいろといじってみて、好みのものに調整していただければと思います。
僕は、MaterialDesignとか使って、スタイル設定して最終的にこんな感じで表示されるようにしてアプリを作成しています