はじめに
ドラッグアンドドロップはPCを使っていれば当たり前の機能ですが、デスクトップアプリで実装しようと思うと結構な手間です。
マイクロソフトのドキュメントでWPFでのドラッグ アンド ドロップの概要を見ると、ドラッグアンドドロップの説明があり仕組みを学べます。
この記事では、自分が勉強した復習をかねて、ReactivePropertyとgong-wpf-dragdropを利用した実装を書かせていただきます。
(追記)2021/8/12 gong-wpf-dragdrop利用した実装例として、リスト同士のデータの入れ替え、リスト内でのデータの入れ替えを作成しました。
記事の内容を工夫することでこんな感じのカレンダーっぽいスケジュール登録画面が作れるようになります。

環境
Visual Studio 2019
Prism8.1.97 (*記事作成時に使用した環境で今回の記事に関係するところはあまりありません)
ReactiveProperty7.11.0
gong-wpf-dragdrop2.3.2
#ReactivePropertyを使用したファイルのDrag&Drop実装
まずはNuGetでReactivePropertyをインストール
ここで大切なのは、ReactiveProperty.WPFを入れておくことです

ViewModelで以下の参照を行います
xmlns:Interactivity="clr-namespace:Reactive.Bindings.Interactivity;assembly=ReactiveProperty
View実装
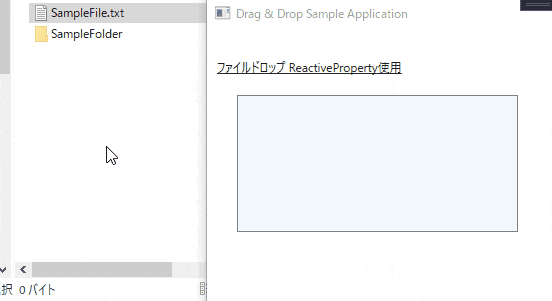
ドロップ先となるコントロールで AllowDrop="True" とします。
ここではBorderをドロップ先として使用します。
ついでにBoder.Styleを設定してDragEnterしたら色が変わるようにしています。
そして、i:Interaction.TriggersでDropイベントを購読して、EventToReactiveCommandでCommandに渡します。
ドロップしたら、TextBlockにその内容が表示されるようにします。
<Window x:Class="DragDropSmaple.Views.MainWindow"
        xmlns="http://schemas.microsoft.com/winfx/2006/xaml/presentation"
        xmlns:x="http://schemas.microsoft.com/winfx/2006/xaml"
        xmlns:Interactivity="clr-namespace:Reactive.Bindings.Interactivity;assembly=ReactiveProperty.WPF"
        xmlns:prism="http://prismlibrary.com/"
        xmlns:i="http://schemas.microsoft.com/xaml/behaviors"
        prism:ViewModelLocator.AutoWireViewModel="True"
        Title="{Binding Title}" Height="600" Width="800" >
    <Grid Margin="10">
        <Grid.RowDefinitions>
            <RowDefinition/>
            <RowDefinition/>
        </Grid.RowDefinitions>
        <Grid.ColumnDefinitions>
            <ColumnDefinition/>
            <ColumnDefinition/>
        </Grid.ColumnDefinitions>

        <Grid Grid.Row="0" Grid.Column="0" >
            <Grid.RowDefinitions>
                <RowDefinition Height="36"/>
                <RowDefinition/>
                <RowDefinition Height="36"/>
            </Grid.RowDefinitions>
            <TextBlock Grid.Row="0"
                       Text="ファイルドロップ ReactiveProperty使用"
                       VerticalAlignment="Bottom"
                       TextDecorations="Underline"/>
            <Border Grid.Row="1"
                    BorderThickness="1"
                    BorderBrush="Gray"
                    Margin="20"
                    AllowDrop="True">
                <i:Interaction.Triggers>
                    <i:EventTrigger EventName="Drop">
                        <Interactivity:EventToReactiveCommand Command="{Binding FileDropCommand}" />
                    </i:EventTrigger>
                </i:Interaction.Triggers>
                <Border.Style>
                    <Style TargetType="Border">
                        <Setter Property="Background" Value="AliceBlue"/>
                        <Style.Triggers>
                            <EventTrigger RoutedEvent="DragEnter">
                                <EventTrigger.Actions>
                                    <BeginStoryboard>
                                        <Storyboard>
                                            <ColorAnimation Storyboard.TargetProperty="Background.Color"
                                                        Duration="0:0:0.200" To="PowderBlue" />
                                        </Storyboard>
                                    </BeginStoryboard>
                                </EventTrigger.Actions>
                            </EventTrigger>
                            <EventTrigger RoutedEvent="DragLeave">
                                <EventTrigger.Actions>
                                    <BeginStoryboard>
                                        <Storyboard>
                                            <ColorAnimation Storyboard.TargetProperty="Background.Color"
                                                        Duration="0:0:0" To="AliceBlue" />
                                        </Storyboard>
                                    </BeginStoryboard>
                                </EventTrigger.Actions>
                            </EventTrigger>
                            <EventTrigger RoutedEvent="Drop">
                                <EventTrigger.Actions>
                                    <BeginStoryboard>
                                        <Storyboard>
                                            <ColorAnimation Storyboard.TargetProperty="Background.Color"
                                                        Duration="0:0:0" To="AliceBlue" />
                                        </Storyboard>
                                    </BeginStoryboard>
                                </EventTrigger.Actions>
                            </EventTrigger>
                        </Style.Triggers>
                    </Style>
                </Border.Style>
                <Grid >
                    <TextBlock VerticalAlignment="Center"
                           HorizontalAlignment="Center"
                           Text="{Binding DropFile.Value}"
                           TextWrapping="Wrap"
                           Foreground="DimGray"
                           FontSize="18"/>
                </Grid>
            </Border>
        </Grid>
    </Grid>
</Window>
ViewModel実装
Viewのxaml内にあるFileDropCommandとDropFileをコーディングします。
FileDropCommandでDragEventArgsを引数として、これを利用して、ドロップファイルのファイルパスを取得、DropFileに渡して、Viewに表示させています。
GetDataPresent メソッドを使用して、ドラッグされたデータがファイルかどうかを確認し、GetData メソッドを使用して、それを抽出します。
using Prism.Mvvm;
using Reactive.Bindings;
using Reactive.Bindings.Extensions;
using System;
using System.IO;
using System.Reactive.Disposables;
using System.Windows;

namespace DragDropSmaple.ViewModels
{
    public class MainWindowViewModel : BindableBase, IDisposable
    {
        private CompositeDisposable Disposable { get; } = new CompositeDisposable();
        public string Title => "Drag & Drop Sample Application";

        public ReactivePropertySlim<string> DropFile { get; }

        public ReactiveCommand<DragEventArgs> FileDropCommand { get; private set; }

        public MainWindowViewModel()
        {
            DropFile = new ReactivePropertySlim<string>().AddTo(Disposable);

            FileDropCommand = new ReactiveCommand<DragEventArgs>().AddTo(Disposable);
            FileDropCommand.Subscribe(e =>
            {
                if (e != null)
                {
                    OnFileDrop(e);
                }
            });
        }

        private void OnFileDrop(DragEventArgs e)
        {
            if (!e.Data.GetDataPresent(DataFormats.FileDrop))
                return;

            var dropFiles = e.Data.GetData(DataFormats.FileDrop) as string[];

            if (dropFiles == null)
                return;

            if (File.Exists(dropFiles[0]))
            {
                DropFile.Value = dropFiles[0];
            }
            else
            {
                DropFile.Value = "ドロップされたものはファイルではありません";
            }
        }


        public void Dispose()
        {
            Disposable.Dispose();
        }
    }
}
実行するとこんな感じです
さて、ここまでは外部のファイルをアプリにDrag&Dropする方法でしたが、次は、アプリ内でのDrag&Dropを実装していきたいと思います。
#アプリ内でのDrag&Drop実装
最初に紹介したマイクロソフトのドキュメントを活用して実装していくのはかなり手間なので、NuGetからgong-wpf-dragdropを参照します。gong-wpf-dragdropの製作者はMahAppのリポジトリにアクセスできる人でとても信用できると思っています。

gong-wpf-dragdropのコードを見ると、Drag&Dropの動作の勉強になります。さらに、これを利用した実装例がShowcaseとして示されているので、これを参考に実装をしていきたいと思います。
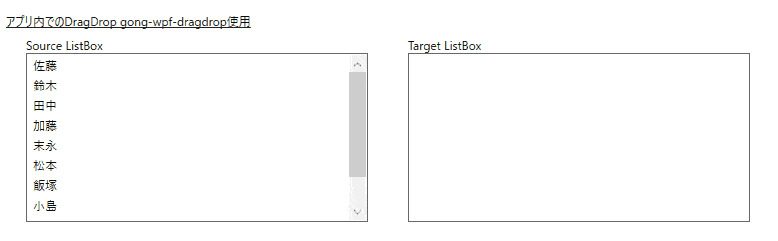
ListBoxからListBoxへのDrag&Drop
ソース側のListBoxでdd:DragDrop.IsDragSource="True"をセット、ターゲット側のListBoxでdd:DragDrop.IsDropTarget="True"とします。
dd:DragDrop.UseDefaultDragAdorner="True"を使うと、Adornerを使って、Dragしているデータを表示させることができます。
View実装
さきほどのViewに以下のxamlを追加しています
参照追加
xmlns:dd="urn:gong-wpf-dragdrop"
xaml
        <Grid Grid.Row="1" Grid.Column="0">
            <Grid.RowDefinitions>
                <RowDefinition Height="24"/>
                <RowDefinition Height="24"/>
                <RowDefinition/>
            </Grid.RowDefinitions>
            <TextBlock Grid.Row="0"
                       Text="アプリ内でのDragDrop gong-wpf-dragdrop使用"
                       VerticalAlignment="Bottom"
                       TextDecorations="Underline"/>
            <TextBlock Grid.Row="1"
                       Text="Source ListBox"
                       Margin="20,0,0,0"
                       VerticalAlignment="Bottom"/>
            <ListBox Grid.Row="2"
                     Margin="20,0"
                     BorderThickness="1"
                     ItemsSource="{Binding SampleData.SampleLists}"
                     DisplayMemberPath="SampleText"
                     BorderBrush="DimGray"
                     dd:DragDrop.IsDragSource="True"
                     dd:DragDrop.UseDefaultDragAdorner="True"/>
        </Grid>

        <Grid Grid.Row="1" Grid.Column="1">
            <Grid.RowDefinitions>
                <RowDefinition Height="24"/>
                <RowDefinition Height="24"/>
                <RowDefinition/>
            </Grid.RowDefinitions>
            <TextBlock Grid.Row="1"
                       Text="Target ListBox"
                       Margin="20,0,0,0"
                       VerticalAlignment="Bottom"/>
            <ListBox Grid.Row="2"
                     Margin="20,0"
                     BorderThickness="1"
                     DisplayMemberPath="SampleText"
                     BorderBrush="DimGray"
                     dd:DragDrop.IsDropTarget="True"
                     dd:DragDrop.UseDefaultDragAdorner="True"/>
        </Grid>
ViewModel実装
Sampleデータ用のクラスを作成
このデータクラス内でコレクションを記載しています。
あとで、TextBoxとのDrag&Dropを実装する際に利用できるようにするためです。
    public class SampleData : INotifyPropertyChanged
    {
        private ObservableCollection<SampleListBoxData> _sampleLists;
        public ObservableCollection<SampleListBoxData> SampleLists
        {
            get => _sampleLists;
            set
            {
                _sampleLists = value;
                OnPropertyChanged();
            }
        }

        public event PropertyChangedEventHandler PropertyChanged;

        protected void OnPropertyChanged([CallerMemberName] string name = null)
        {
            PropertyChanged?.Invoke(this, new PropertyChangedEventArgs(name));
        }
    }

    public class SampleListBoxData
    {
        public int SampleId { get; set; }
        public string SampleText { get; set; }
    }
ViewModel内でSamleDataの初期値を入れておきます
        private SampleData _sampleData;
        public SampleData SampleData { get => _sampleData; set => SetProperty(ref _sampleData, value); }

        private void SetLists()
        {
            SampleData = new SampleData();
            SampleData.SampleLists = new ObservableCollection<SampleItem>();
            SampleData.SampleLists.Add(new SampleItem() { SampleId = 1, SampleText = "佐藤" });
            SampleData.SampleLists.Add(new SampleItem() { SampleId = 2, SampleText = "鈴木" });
            SampleData.SampleLists.Add(new SampleItem() { SampleId = 3, SampleText = "田中" });
            SampleData.SampleLists.Add(new SampleItem() { SampleId = 4, SampleText = "加藤" });
            SampleData.SampleLists.Add(new SampleItem() { SampleId = 5, SampleText = "末永" });
            SampleData.SampleLists.Add(new SampleItem() { SampleId = 6, SampleText = "松本" });
            SampleData.SampleLists.Add(new SampleItem() { SampleId = 7, SampleText = "飯塚" });
            SampleData.SampleLists.Add(new SampleItem() { SampleId = 8, SampleText = "小島" });
            SampleData.SampleLists.Add(new SampleItem() { SampleId = 9, SampleText = "木村" });
            SampleData.SampleLists.Add(new SampleItem() { SampleId = 10, SampleText = "杉浦" });
        }
実行するとこんな感じです
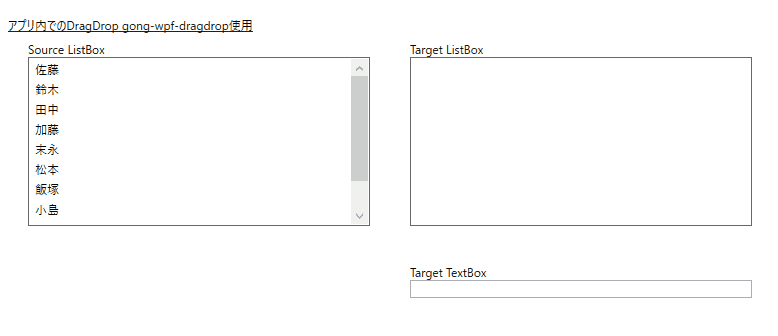
ListBoxからTextBoxへのDrag&Drop
ListBox同士の場合は、コーディングはあまりないのですが、異なるコントロールとなった場合、少々コーディングが必要となります。
gong-wpf-dragdropのShowCaseのコードを見ていくことで、実装方法を参考することができます。
ターゲット側にIDropTargetを実装させたDropHandlerを作成します。
Dropメソッドで元となったリストから項目を削除させることでMoveとして実装させています。削除しなければCopyとなります。
DropTargetHighlightAdorner は、ドロップ時にTextBoxの表示が変化するためのクラスです。これはShowCaceのコードを使用しています。
    public class TextBoxCustomDropHandler : IDropTarget
    {

        public void DragOver(IDropInfo dropInfo)
        {
            dropInfo.DropTargetAdorner = typeof(DropTargetHighlightAdorner);
            dropInfo.Effects = DragDropEffects.Move;
        }

        public void Drop(IDropInfo dropInfo)
        {
            if (dropInfo.Data.GetType().Equals(typeof(SampleItem)))
            {
                ((TextBox)dropInfo.VisualTarget).Text = ((SampleItem)dropInfo.Data).SampleText;

                // Sourceのリストから削除
                var data = DefaultDropHandler.ExtractData(dropInfo.Data).OfType<object>().ToList();
                var sourceList = dropInfo.DragInfo.SourceCollection.TryGetList();
                if (sourceList != null)
                {
                    foreach (var o in data)
                    {
                        var index = sourceList.IndexOf(o);
                        if (index != -1)
                        {
                            sourceList.RemoveAt(index);
                        }
                    }
                }
            }
        }
    }

    public class DropTargetHighlightAdorner : DropTargetAdorner
    {
        private readonly Pen _pen;
        private readonly Brush _brush;

        public DropTargetHighlightAdorner(UIElement adornedElement, DropInfo dropInfo)
            : base(adornedElement, dropInfo)
        {
            _pen = new Pen(Brushes.Tomato, 0.5);
            _pen.Freeze();
            _brush = new SolidColorBrush(Colors.Coral) { Opacity = 0.2 };
            this._brush.Freeze();

            this.SetValue(SnapsToDevicePixelsProperty, true);
        }

        protected override void OnRender(DrawingContext drawingContext)
        {
            var visualTarget = this.DropInfo.VisualTarget;
            if (visualTarget != null)
            {
                var translatePoint = visualTarget.TranslatePoint(new Point(), this.AdornedElement);
                translatePoint.Offset(1, 1);
                var bounds = new Rect(translatePoint,
                                      new Size(visualTarget.RenderSize.Width - 2, visualTarget.RenderSize.Height - 2));
                drawingContext.DrawRectangle(_brush, _pen, bounds);
            }
        }
    }
そして、さきほどのSampleDataにこのDropHandlerを追記します
    public class SampleData : INotifyPropertyChanged
    {
        private ObservableCollection<SampleItem> _sampleLists;
        public ObservableCollection<SampleItem> SampleLists
        {
            get => _sampleLists;
            set
            {
                _sampleLists = value;
                OnPropertyChanged();
            }
        }

        // これが追記したものです
        public TextBoxCustomDropHandler TextBoxCustomDropHandler { get; set; } = new TextBoxCustomDropHandler();

        public event PropertyChangedEventHandler PropertyChanged;

        protected void OnPropertyChanged([CallerMemberName] string name = null)
        {
            PropertyChanged?.Invoke(this, new PropertyChangedEventArgs(name));
        }
    }
View実装
さきほどのTextBoxCustomDropHandlerをTextBoxのdd:DragDrop.DropHandlerに設定します
        <Grid Grid.Row="2" Grid.Column="1">
            <Grid.RowDefinitions>
                <RowDefinition/>
                <RowDefinition/>
            </Grid.RowDefinitions>
            <TextBlock Grid.Row="0"
                       Text="Target TextBox"
                       Margin="20,0,0,0"
                       VerticalAlignment="Bottom"/>
            <TextBox Grid.Row="1"
                     VerticalAlignment="Top"
                     Margin="20,0"
                     Text="{Binding DropdText.Value}"
                     IsReadOnly="True"
                     dd:DragDrop.IsDropTarget="True"
                     dd:DragDrop.DropHandler="{Binding SampleData.TextBoxCustomDropHandler}"/>
        </Grid>
実行するとこんな感じです
ListBox同士でのデータの入れ替えと同じListBox内でのデータの入れ替え (追記)
gong-wpf-dragdropのデフォルトでの動作は、ListBoxに対しListBoxItemの移動もしくは追加のようです。
ただ、実際にアプリ開発をしようと思うと、ListBoxItemの位置は変更せずにしたいとか、追加や移動ではなくデータの入れ替えを行いたい場合があります。
この場合、どのようにできるのか、記事を書いた後、いろいろと試して一つの実装例ができたので、記事の追記をさせていただきます。
どんな動作となるか、先に実行した結果をみてください
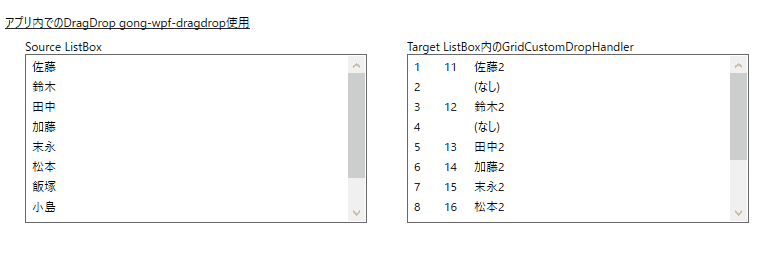
ポイントは、DragDrop.DropHandlerです。ここにIDropTargetを実装したクラスを指定することで、Drop時の動作を自作することができます。今回は、GridにIDropTargetを実装されたGridCustomDropHandlerを作成して動作を実現させています。
同じListBox内では、1列目の行番号は変化していないと思います。ID列とText列のみが入れ替わっていると思います。
また、別のListBoxからデータがきたときにも対応しています。
あとAdornerをデフォルトではなくTemplateを変更して実装する方法も記載しています
VewModelの実装
SampleData2用のデータクラス
    public class SampleItem : INotifyPropertyChanged
    {
        private int _number;
        private int? _sampleId;
        private string _sampleText;
        private bool _isDragSource = true;
        private bool _isDropTarget = true;

        public int Number
        {
            get => _number;
            set
            {
                if (_number != value)
                {
                    _number = value;
                    OnPropertyChanged();
                }
            }
        }

        public int? SampleId
        {
            get => _sampleId;
            set
            {
                if (_sampleId != value)
                {
                    _sampleId = value;
                    OnPropertyChanged();
                }
            }
        }
        public string SampleText
        {
            get => _sampleText;
            set
            {
                if (_sampleText != value)
                {
                    _sampleText = value;
                    OnPropertyChanged();
                }
            }
        }

        public bool IsDragSource
        {
            get => _isDragSource;
            set
            {
                if (_isDragSource != value)
                {
                    _isDragSource = value;
                    OnPropertyChanged();
                }
            }
        }

        public bool IsDropTarget
        {
            get => _isDropTarget;
            set
            {
                if (_isDropTarget != value)
                {
                    _isDropTarget = value;
                    OnPropertyChanged();
                }
            }
        }

        // IDropTargetを実装したクラス
        public GridCustomDropHandler GridCustomDropHandler { get; set; } = new GridCustomDropHandler();

        public event PropertyChangedEventHandler PropertyChanged;
        protected void OnPropertyChanged([CallerMemberName] string name = null)
        {
            PropertyChanged?.Invoke(this, new PropertyChangedEventArgs(name));
        }
    }
初期データ
        private void SetLists2()
        {
            SampleData2 = new SampleData();
            SampleData2.SampleLists = new ObservableCollection<SampleItem>();
            SampleData2.SampleLists.Add(new SampleItem() { Number = 1, SampleId = 11, SampleText = "佐藤2" });
            SampleData2.SampleLists.Add(new SampleItem() { Number = 2, SampleId = null, SampleText = "(なし)" });
            SampleData2.SampleLists.Add(new SampleItem() { Number = 3, SampleId = 12, SampleText = "鈴木2" });
            SampleData2.SampleLists.Add(new SampleItem() { Number = 4, SampleId = null, SampleText = "(なし)" });
            SampleData2.SampleLists.Add(new SampleItem() { Number = 5, SampleId = 13, SampleText = "田中2" });
            SampleData2.SampleLists.Add(new SampleItem() { Number = 6, SampleId = 14, SampleText = "加藤2" });
            SampleData2.SampleLists.Add(new SampleItem() { Number = 7, SampleId = 15, SampleText = "末永2" });
            SampleData2.SampleLists.Add(new SampleItem() { Number = 8, SampleId = 16, SampleText = "松本2" });
            SampleData2.SampleLists.Add(new SampleItem() { Number = 9, SampleId = 17, SampleText = "飯塚2" });
            SampleData2.SampleLists.Add(new SampleItem() { Number = 10, SampleId = 18, SampleText = "小島2" });
            SampleData2.SampleLists.Add(new SampleItem() { Number = 11, SampleId = 19, SampleText = "木村2" });
            SampleData2.SampleLists.Add(new SampleItem() { Number = 12, SampleId = 20, SampleText = "杉浦2" });
        }
GridCustomDropHandler
    public class GridCustomDropHandler : IDropTarget
    {

        public void DragOver(IDropInfo dropInfo)
        {
            if (dropInfo.VisualTarget == dropInfo.DragInfo.VisualSource)    // 同じItemのときはDropしません
            {
                dropInfo.NotHandled = dropInfo.VisualTarget == dropInfo.DragInfo.VisualSource;
            }
            else
            {
                dropInfo.DropTargetAdorner = typeof(DropTargetHighlightAdorner);
                dropInfo.Effects = DragDropEffects.Move;
            }

        }

        public void Drop(IDropInfo dropInfo)
        {
            if (dropInfo.VisualTarget == dropInfo.DragInfo.VisualSource)    // 同じItemのときはDropしません
            {
                dropInfo.NotHandled = dropInfo.VisualTarget == dropInfo.DragInfo.VisualSource;
            }
            else
            {
                int? targetId = null;
                string targetText = null;

                // Drop先のデータ処理
                foreach (var child in ((Grid)dropInfo.VisualTarget).Children)
                {
                    if (child.GetType().Equals(typeof(TextBlock)))
                    {
                        // コントロールのDataContextにアクセスして値をセットする
                        if (((TextBlock)child).Name == "SampleId")
                        {
                            targetId = ((SampleItem)((TextBlock)child).DataContext).SampleId;
                            ((SampleItem)((TextBlock)child).DataContext).SampleId = ((SampleItem)dropInfo.Data).SampleId;
                        }

                        if (((TextBlock)child).Name == "SampleText")
                        {
                            targetText = ((SampleItem)((TextBlock)child).DataContext).SampleText;
                            ((SampleItem)((TextBlock)child).DataContext).SampleText = ((SampleItem)dropInfo.Data).SampleText;
                        }
                    }
                }
                ((SampleItem)((Grid)dropInfo.VisualTarget).DataContext).IsDragSource = true;

                // Drag元のデータ処理
                if(targetId != null)
                {
                    // Darg先と入れ替え
                    ((SampleItem)dropInfo.DragInfo.SourceItem).SampleId = targetId;
                    ((SampleItem)dropInfo.DragInfo.SourceItem).SampleText = targetText;
                    ((SampleItem)dropInfo.DragInfo.SourceItem).IsDragSource = true;
                }
                else
                {
                    // Drag元を空にする
                    ((SampleItem)dropInfo.DragInfo.SourceItem).SampleId = null;
                    ((SampleItem)dropInfo.DragInfo.SourceItem).SampleText = "(なし)";
                    ((SampleItem)dropInfo.DragInfo.SourceItem).IsDragSource = false;
                }
            }
        }
    }
###View実装
        <Grid >
            <Grid.RowDefinitions>
                <RowDefinition Height="24"/>
                <RowDefinition Height="24"/>
                <RowDefinition/>
            </Grid.RowDefinitions>
            <TextBlock Grid.Row="1"
                       Text="Target ListBox内のGridCustomDropHandler"
                       Margin="20,0,0,0"
                       VerticalAlignment="Bottom"/>
            <ListBox Grid.Row="2"
                     Margin="20,0"
                     BorderThickness="1"
                     BorderBrush="DimGray"
                     ItemsSource="{Binding SampleData2.SampleLists}">
                <ListBox.ItemTemplate>
                    <DataTemplate>
                        <Grid dd:DragDrop.IsDropTarget="{Binding IsDropTarget}"
                              dd:DragDrop.IsDragSource="{Binding IsDragSource}"
                              dd:DragDrop.DropHandler="{Binding GridCustomDropHandler}"> // IDropTargetを実装したところ
                            <dd:DragDrop.DragAdornerTemplate>    // Adornerを変更するところ
                                <DataTemplate>
                                    <Border BorderThickness="0.3"
                                            BorderBrush="Blue"
                                            Padding="10,2"
                                            Background="AliceBlue">
                                        <TextBlock Text="{Binding SampleText}"/>
                                    </Border>
                                </DataTemplate>
                            </dd:DragDrop.DragAdornerTemplate>

                            <Grid.ColumnDefinitions>
                                <ColumnDefinition Width="30"/>
                                <ColumnDefinition Width="30"/>
                                <ColumnDefinition Width="240"/>
                            </Grid.ColumnDefinitions>
                            <TextBlock x:Name="Number"
                                       Grid.Column="0"
                                       VerticalAlignment="Center"
                                       Text="{Binding Number}"/>
                            <TextBlock x:Name="SampleId"
                                           Grid.Column="1"
                                           VerticalAlignment="Center"
                                           Text="{Binding SampleId}"/>
                            <TextBlock x:Name="SampleText"
                                           Grid.Column="2"
                                           VerticalAlignment="Center"
                                           Text="{Binding SampleText}"/>
                        </Grid>
                    </DataTemplate>
                </ListBox.ItemTemplate>
            </ListBox>
        </Grid>
以上ですが、ご参考にしていただければ幸いです。