はじめに
Next.jsにチャレンジしていく過程をメモ/備忘録として記録していきます。
同じようにこれから始める方の参考となればと思います。
やりたいこと
お試しで作っているTodoアプリのログインフォームを
ReactHookFormとZod を使って、バリデーションを実装したい
環境
下記のDocker開発環境にて行います。
ReactHookFormについて
フォームに関する様々なことを簡単に扱うことのできるライブラリです。
公式のデモ動画を見ると何となくやれることが理解できました。
まずはインストール
npm install react-hook-form
useForm
たくさん機能がありますが、今回は基本のuseFormを使います。
最低限使うものの確認から。
register
・基本となる関数で、入力フィールド作成する時に使います。
・register('email')のように引数としてフィールド名登録すると、そのフィールドの値は自動的にreact-hook-formによって管理されフォーム送信時にその値を収集できます。
・register関数を呼び出して入力の名前を指定すると、onChangeやname,refなどの複数のメソッドが返されますのでスプレッド構文で展開して使います。
const { onChange, onBlur, name, ref } = register('firstName');
// include type check against field path with the name you have supplied.

<input
  onChange={onChange} // assign onChange event
  onBlur={onBlur} // assign onBlur event
  name={name} // assign name prop
  ref={ref} // assign ref prop
/>
↑↓同じ
// same as above
<input {...register('firstName')} />
handleSubmit
・フォームの送信をハンドリングするための関数で、フォーム送信時に値を検証し、指定したコールバック関数を実行してくれるものです。
formState
・フォームの状態に関する情報を提供するオブジェクトで、主にエラーやフィールドの状態、フォーム全体の送信状態などを管理・追跡します。
・今回は送信中にボタンを非活性にしたいので、isSubmittingを使います。
※その他たくさんの機能が提供されていてるので詳しくは公式をご確認ください。
ログインフォーム
早速useFormを使ってフォームに導入していきます。
ついでに前回設定したReact-Toastifyも使っていきます。
'use client';

import { login, redirectToNextPath, State } from "./actions";
import { toast } from "react-toastify";
import { FieldValues, useForm } from "react-hook-form";

export default function LoginForm() {

  const { register, handleSubmit, formState: { isSubmitting } } = useForm();

  const onSubmit = async (data: FieldValues) => {
    const initialState: State = {
      state: 'pending',
      message: '',
    };
    const result = await login(initialState, data);
    if(result.state === 'resolved') {
      toast.success('Login success');
      redirectToNextPath();
    }
    if (result.state === 'rejected') {
      toast.error(result.message);
    }
  }

  return (
    <>
      <form onSubmit={handleSubmit(onSubmit)} className="card-body">
        <div className="form-control">
          <label className="label">
            <span className="label-text">Email</span>
          </label>
          <input
            {...register("email")}
            type="email"
            placeholder="email"
            className="input input-bordered w-full"
          />
        </div>
        <div className="form-control">
          <label className="label">
            <span className="label-text">Password</span>
          </label>
          <input
            {...register("password")}
            type="password"
            placeholder="password"
            className="input input-bordered w-full"
          />
        </div>
        <div className="form-control mt-6">
          <button className="btn btn-secondary" disabled={isSubmitting}>Login</button>
        </div>
      </form>
    </>
  );
}
まずは最低限の入力して関数実行のところ まで。
・emailとpasswordのinputをregisterで登録
・formのonSubmitにhandleSubmitを設定。作成したコールバック関数onSubmitを実行
・コールバック関数onSubmitはinputのデータを引数に持ち、それを使ってログイン処理。結果をトーストで表示
Zodについて
いよいよバリデーションをZod使って実装してみます。
ReactHookFormのregisterで実装することも出来ますが、
複雑なフォームや管理をしやすくするためにもZodを使ってみたいと思います。
1.インストール
まずはzodそのものと、ReactHookFormで使うためのresolverをインストールします。
npm install zod
npm install @hookform/resolvers
2.schemaファイル作成
次にバリデーションスキーマを記載したファイルを作成します。
string().email()でメールアドレス形式をチェックできます。
パスワードは8文字以上としました。
なんとスキーマから型生成もできます。
import { z } from "zod";

export const authSchema = z.object({
  email: z
    .string()
    .email({ message: "メールアドレスの形式で入力してください" }),
  password: z
    .string()
    .min(8, { message: "8文字以上で入力してください" }),
});


export type AuthSchema = z.infer<typeof authSchema>;
3.ReactHookFormに組み込む
・エラーを格納するために,formStateにerrorsを追加。
・Zodを使うためには、引数に{resolver: zodResolver(スキーマ名)}を設定
  const {
    register,
    handleSubmit,
    formState: { errors, isSubmitting }
  } = useForm<AuthSchema>(
    {
      mode: 'onBlur',
      resolver: zodResolver(authSchema)
    }
  );
各インプットの下にエラーメッセージを追加してこのようになりました。
'use client';

import { login, redirectToNextPath, State } from "./actions";
import { toast } from "react-toastify";
import { FieldValues, useForm } from "react-hook-form";
import { zodResolver } from '@hookform/resolvers/zod';
import { AuthSchema, authSchema } from "./schema";

export default function LoginForm() {

  const {
    register,
    handleSubmit,
    formState: { errors, isSubmitting }
  } = useForm<AuthSchema>(
    {
      mode: 'onBlur',
      resolver: zodResolver(authSchema)
    }
  );

  const onSubmit = async (data: FieldValues) => {
    const initialState: State = {
      state: 'pending',
      message: '',
    };
    const result = await login(initialState, data);
    if(result.state === 'resolved') {
      toast.success('Login success');
      redirectToNextPath();
    }
    if (result.state === 'rejected') {
      toast.error(result.message);
    }
  }

  return (
    <>
      <form onSubmit={handleSubmit(onSubmit)} className="card-body">
        <div className="form-control">
          <label className="label">
            <span className="label-text">Email</span>
          </label>
          <input
            {...register("email")}
            placeholder="email"
            className="input input-bordered w-full"
          />
          {errors.email && <p className="text-red-500 text-xs mt-1">{errors.email.message}</p>}
        </div>
        <div className="form-control">
          <label className="label">
            <span className="label-text">Password</span>
          </label>
          <input
            {...register("password")}
            type="password"
            placeholder="password"
            className="input input-bordered w-full"
          />
          {errors.password && <p className="text-red-500 text-xs mt-1">{errors.password.message}</p>}
        </div>
        <div className="form-control mt-6">
          <button className="btn btn-secondary" disabled={isSubmitting}>Login</button>
        </div>
      </form>
    </>
  );
}
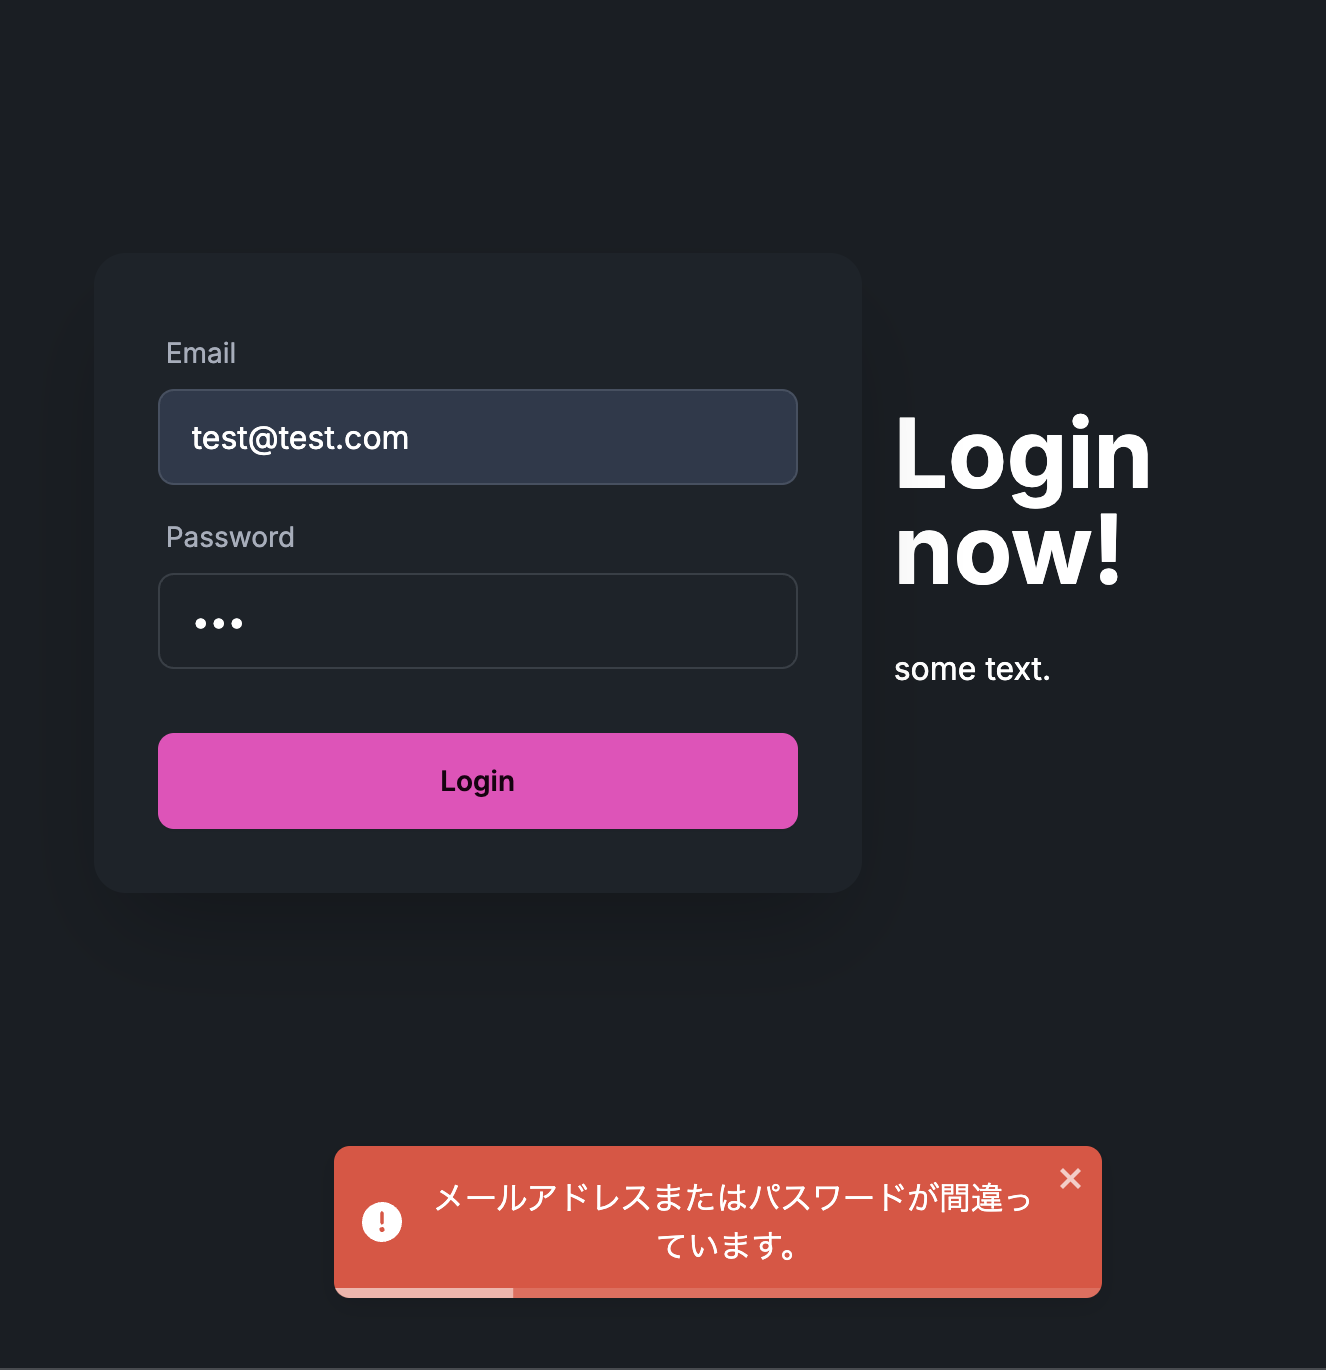
無事にエラーの時にメッセージが表示されるようになりました。
バリデーションのタイミングはonBlurとして、早い段階でメッセージで対応を促すようにしています。

今回はここまで!
さいごに
今回は触り部分のみで、機能を全然使使ってませんが、
もっと複雑なバリデーションだったりフォームを動的に作りたい場合など、
あらゆる場面で重宝しそうな機能がそろっていました。
参考