1. 目的
- 前回の記事「【初心者】YOLOv5を使ってみる #1 (AWS上でのインストール、物体検出確認)」で、まずはYOLOv5を動かしてみた。
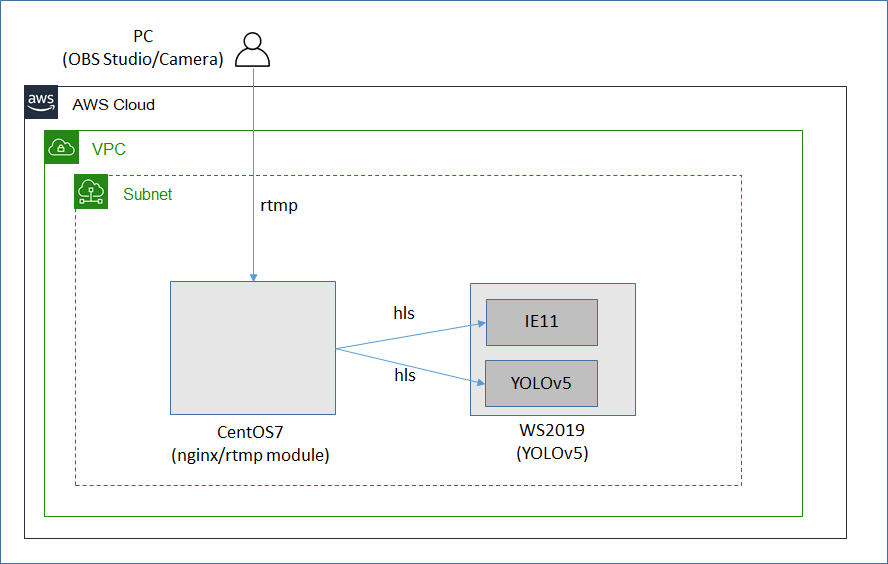
- 今回は自分の手元のPCのカメラの映像を、AWS上のYOLOv5に送信し、リアルタイムに物体検出できるようにする。
2. やったこと
- AWS上のYOLOv5サーバの隣に、中継サーバを構築する。
- PC(OBS Studio) -> RTMP -> 中継サーバ -> HLS -> YOLOv5 の流れで、手元のPCからの映像をYOLOv5にて分析させる。
3. 構成図
4. 実施手順
4.1 中継サーバの構築
-
PCの映像をそのままYOLOv5に送信することはできない。今回はnginxと、nginxでrtmpが扱えるようにする追加モジュールを使用し、中継サーバを構築する。PCからはrtmpで中継サーバに映像を送信し、中継サーバからブラウザやYOLOv5へはHLSで映像を配信する。
-
手順は以下を参照する。
- Nginx社ブログ「Enabling Video Streaming for Remote Learning with NGINX and NGINX Plus」
- Transonic社ブログ「[CentOS7.6][nginx][HLS]ライブストリーミングサーバ構築」
-
OSは今回はCentOS7を使用。
-
必要なパッケージをインストールする。
[centos@ip-10-0-0-124 ~]$ sudo yum update
[centos@ip-10-0-0-124 ~]$ sudo yum groupinstall "Development Tools"
[centos@ip-10-0-0-124 ~]$ sudo yum install git
[centos@ip-10-0-0-124 ~]$ sudo yum install pcre-devel zlib-devel openssl-devel
・nginx 及び nginx用のrtmpモジュールをインストールする。
[centos@ip-10-0-0-124 ~]$ git clone https://github.com/arut/nginx-rtmp-module.git
[centos@ip-10-0-0-124 ~]$ git clone https://github.com/nginx/nginx.git
[centos@ip-10-0-0-124 ~]$ cd nginx
[centos@ip-10-0-0-124 ~]$ ./auto/configure --add-module=../nginx-rtmp-module
[centos@ip-10-0-0-124 ~]$ make
[centos@ip-10-0-0-124 ~]$ sudo make install
- nginx.conf を編集し、rtmpの受信、及びHLSの配信を行うように設定する。今回は「[CentOS7.6][nginx][HLS]ライブストリーミングサーバ構築」の記事内のnginx.confをベースとして使わせて頂いた。
- 同記事内では、"hls_playlist_length"の値が1sだったが、本環境ではそれだと安定しなかったため30sに変更した。
- 各パラメータの解説は公式のGitHubレポジトリの「Directives」にあるが、内容の深堀りはできていない。
/usr/local/nginx/conf/nginx.conf
# user  nobody;
worker_processes  auto;

# error_log  logs/error.log;
# error_log  logs/error.log  notice;
error_log  logs/error.log  info;

# pid        logs/nginx.pid;

events {
    worker_connections  1024;
}

rtmp_auto_push on;
rtmp {
    server {
          listen 1935;
          access_log logs/rtmp_access.log ;
          chunk_size 4096;

          application live1 {
                 live on;
                  wait_video on;
                  hls on;
                  hls_cleanup on;
                  hls_path /usr/local/nginx/html/hls;

                  hls_fragment 500ms;
                  hls_playlist_length 30s;
                  hls_type live;
                  hls_nested on;
          }
    }

}

http {
    include       mime.types;
    default_type  application/octet-stream;

    #log_format  main  '$remote_addr - $remote_user [$time_local] "$request" '
    #                  '$status $body_bytes_sent "$http_referer" '
    #                  '"$http_user_agent" "$http_x_forwarded_for"';

    #access_log  logs/access.log  main;

    sendfile        on;
    #tcp_nopush     on;

    #keepalive_timeout  0;
    keepalive_timeout  65;

    #gzip  on;

    server {
        listen       80;
        server_name  localhost;

        location /hls {
            types {
                   application/vnd.apple.mpegurl m3u8;
            }
            root   html;
            index  index.html index.htm;
        }

        location /dash {
            types {
                   application/vnd.apple.mpegurl mpd;
            }
            root   html;
            index  index.html index.htm;
        }
    }
}
- nginx をバックグラウンドで起動する。
sudo /usr/local/nginx/sbin/nginx &
4.2 映像送信(OBS Studio)
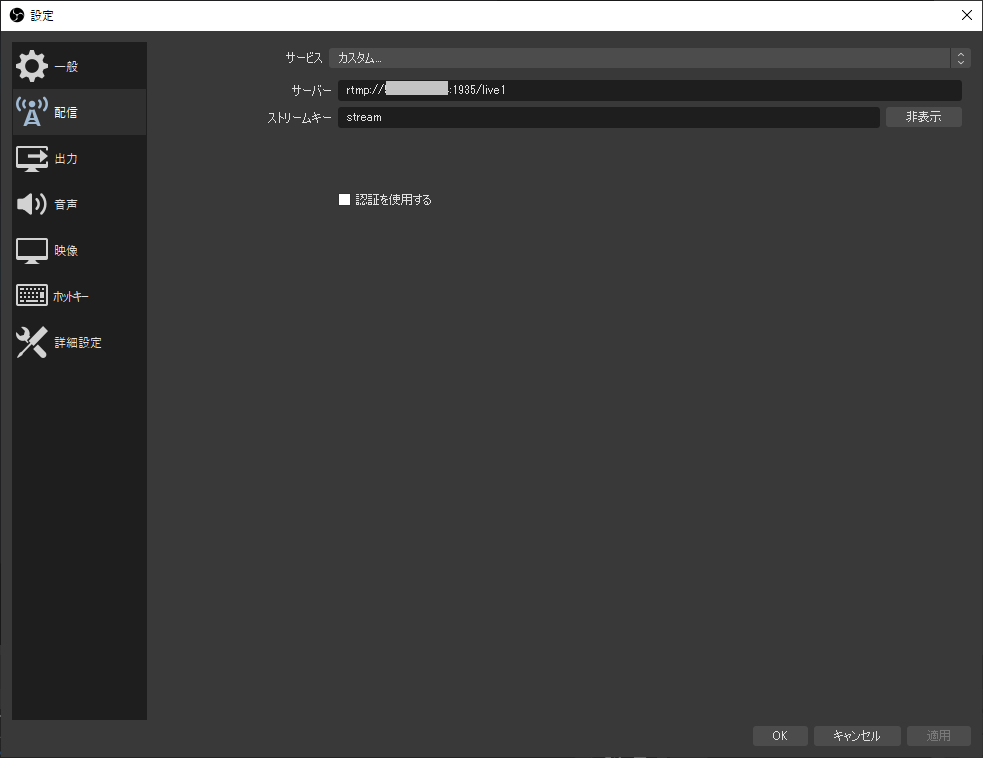
- 上記で構築した中継サーバに向けてrtmpで映像の送信を行う。
- OBS Studioの「設定」- 「配信」で、配信先を以下のように設定する。
- サーバー: rtmp://[中継サーバのグローバルIP]:1935/live1
- ストリームキー: stream
- 「live1」の値は自由に設定可能だが、nginx.conf の 「application」で設定した値と一致させる必要がある。
- 「stream」の値は自由に設定可能。この値は後で受信を行う際に必要になる(URLの一部になるため)。
- OBS Studio から映像を送信すると、中継サーバ内に映像のファイルが生成される。
[root@ip-10-0-0-124 stream]# pwd
/usr/local/nginx/html/hls/stream
[root@ip-10-0-0-124 stream]# ls
0.ts  1.ts  2.ts  3.ts  4.ts  5.ts  6.ts  index.m3u8
- また、送信完了後にはログも出力される。
[root@ip-10-0-0-124 logs]# pwd
/usr/local/nginx/logs
[root@ip-10-0-0-124 logs]# more rtmp_access.log
x.x.x.x [25/Aug/2021:07:10:50 +0000] PUBLISH "live1" "stream" "" - 66766223 529 "" "FMLE/3.0 (compatible; FMSc/1.0)" (3m 21s)
4.3 映像受信(IE)
- 中継サーバと同一Subnetに存在するインスタンス(Windows Server 2019)で、HLSで映像を受信する。
- ブラウザ(IE) で再生できるよう、中継サーバ側にhtmlファイルを用意する。今回は「[CentOS7.6][nginx][HLS]ライブストリーミングサーバ構築」の記事内のhtmlファイルをベースとして使わせて頂いた。
- 「player.setSrc」のところのIPアドレスは、今回は同一Subnet内でのアクセスになるため、中継サーバの実IP(プライベートIP)を設定する。
/usr/local/nginx/html/play.html
<!DOCTYPE html>
<html>
<head>
 <meta charset="utf-8">
 <title>MediaElement</title>
 <!-- MediaElement style -->
 <link rel="stylesheet" href="https://cdnjs.cloudflare.com/ajax/libs/mediaelemen
t/4.2.9/mediaelementplayer.css" />
</head>
<body>
 <!-- MediaElement -->
 <script src="https://cdnjs.cloudflare.com/ajax/libs/mediaelement/4.2.9/mediaele
ment-and-player.js"></script>
 <video id="player" />


</body>
<script type="text/javascript">
     var player = new MediaElementPlayer('player', {
       success: function(mediaElement, originalNode) {
         console.log("Player initialised");
       }
     });
     player.setSrc("http://10.0.0.124/hls/stream/index.m3u8");
</script>
</html>
- ブラウザ(IE)で、上記のURL(http://10.0.0.124/play.html) を開くことで、映像を再生することが可能。
4.4 映像受信/物体検出(YOLOv5)
- 中継サーバと同一Subnetに存在するインスタンス(Windows Server 2019)にインストール済のYOLOv5で、中継サーバからHLSで映像を受信し物体検出を行う。
C:\Users\Administrator\yolov5>python detect.py --source "http://10.0.0.124/hls/stream/index.m3u8"
- リアルタイムではないが、映像を継続的に処理し物体検出を行うことが可能。
4.5 簡易的な遅延の確認
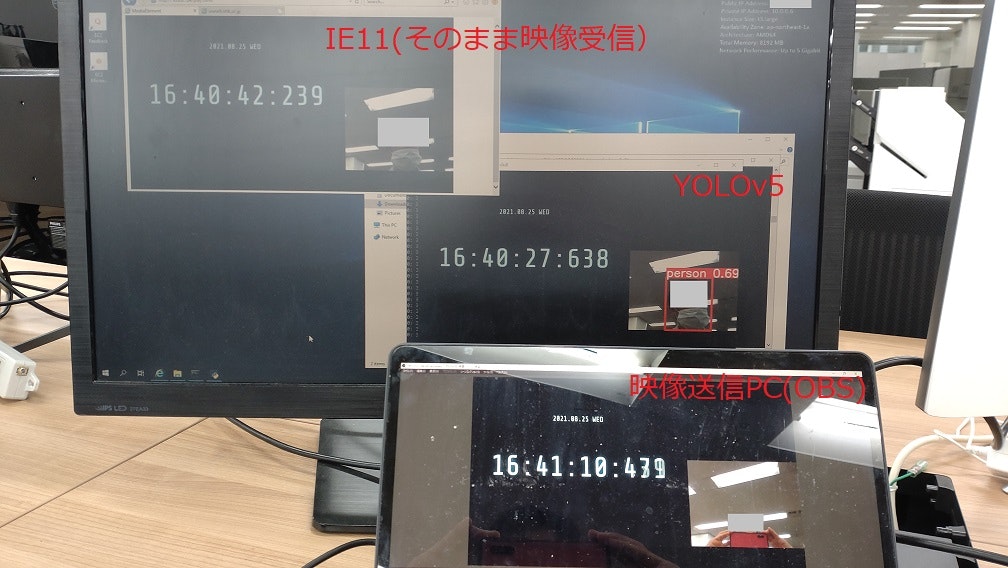
- OBS Studio では、カメラ(自分の顔)と、デジタル時計を並べて配信する。職場のインターネット(wifi)経由で、AWS東京リージョンの中継サーバへ映像を送信する。
- 並行して、Windows Server 2019のインスタンスにRDPし、IEで映像を中継サーバ経由でそのまま受信した画面と、YOLOv5で物体検出を行っている画面を並べて表示する。YOLOv5ではきちんと自分の顔が「person」として検知される。
- 配信しているリアルの時刻が16:41:10、IEでそのまま受信/再生している時刻が16:40:42、YOLOv5が物体検出した結果を表示している時刻が16:40:27となり、IEは約28秒遅れ、YOLOv5は約43秒遅れとなっている。中継サーバをチューニングしたり、YOLOv5のモデルを変えたりしたら速くなるのかもしれない。
5. 所感
- 手元の映像を使用して物体検出を行うことができた。引き続き様々なトピック(他のモデルの利用など)にチャレンジしてみたい。