1. 目的
- AWSのデータベース関連サービスの復習をしている。ElastiCacheを使ったことがなかったため、AWS公式のハンズオンを実施することで少し理解を深める。
2. やったこと
- AWS公式ハンズオン「Amazon ElastiCache for Redis を使い、MySQL データベースのパフォーマンスを向上させる」を一通り実施する。
- ハンズオンをなぞるだけでは今一つ動作が見えないため、Redis内のデータ保存状態を確認するなど、少し追加の動作確認を行う。
3. Amazon ElastiCache とは(自分の理解)
- インメモリDBであるMemcachedとRedisをAWSがマネージドサービスとして提供しているもの。
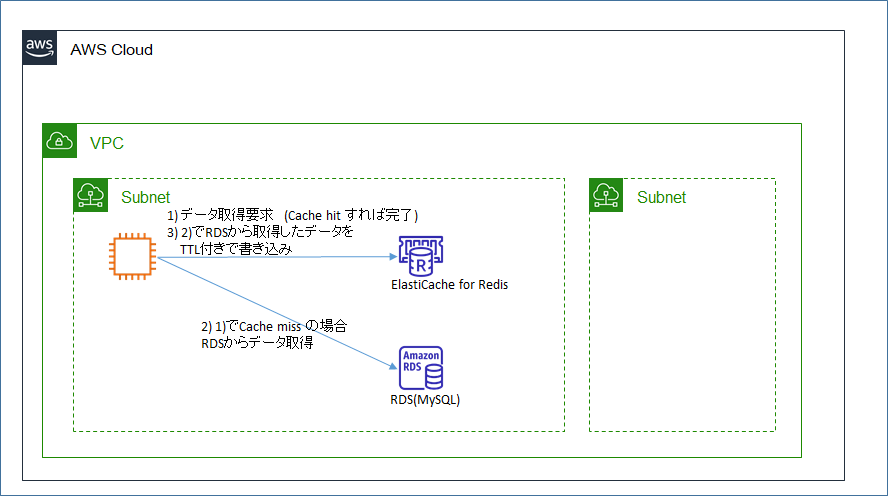
4. 構成図
5. 実機確認手順
- AWS公式ハンズオン「Amazon ElastiCache for Redis を使い、MySQL データベースのパフォーマンスを向上させる」をそのまま実施するが、疑問に思った点を追加で確認する。
- 公式ハンズオン手順に記載されていない、追加作業を行った部分を中心に以下に記録する。
5.1 作業用インスタンスの準備
- サブネットが2つあるVPCを用意する。(RDS、ElastiCacheのデプロイには2つサブネットが必要)
- 作業用EC2インスタンス(Amazon Linux 2)を起動し、ハンズオンの「前提条件」通りに必要資材をインストールする。
$ sudo yum install git -y
$ sudo yum install mysql -y
$ sudo yum install python3 -y
$ pip3 install --user virtualenv
$ git clone https://github.com/aws-samples/amazon-elasticache-samples/
$ cd amazon-elasticache-samples/database-caching
$ virtualenv venv
$ source ./venv/bin/activate
$ pip3 install -r requirements.txt
- 後の動作確認にRedis接続用クライアント(redis-cli)を使いたいため、追加で入れておく。
[ec2-user@ip-10-0-1-50 ~]$ sudo amazon-linux-extras install redis4.0
5.2 ElastiCache for Redisの作成
- ハンズオン手順「ステップ 1: Redis クラスターを作成する」の通りにRedisクラスターを作成する。
- 作成時に必要なVPC、サブネットなどはあらかじめ用意したものを利用する。
5.3 RDSデータベースの作成とデータの入力
- ハンズオン手順「ステップ 2: MySQL データベースを作成する」の通りにRDSデータベースを作成する。
- ハンズオン手順「ステップ 3: MySQL データベースに入力する」の通りにデータを入力する。
- 結果としてテーブル「planet」に以下のデータが入力される。(Plutoがないのが気になるがそのままにしておく。)
MySQL [tutorial]> select * from planet;
+----+---------+
| id | name    |
+----+---------+
|  1 | Mercury |
|  2 | Venus   |
|  3 | Earth   |
|  4 | Mars    |
|  5 | Jupiter |
|  6 | Saturn  |
|  7 | Uranus  |
|  8 | Neptune |
+----+---------+
8 rows in set (0.00 sec)
5.4 ElastiCache + RDS の動作確認
5.4.1 動作確認手順
-
ハンズオン手順「ステップ 4: キャッシュとベストプラクティス」に従い動作確認を行う。
-
ステップ4で急に少し手順が分かりづらくなるが、ハンズオンで用意されている資材「example.py」を連続して実行することで以下の動作確認が可能。
- スクリプトの初回実行時、「select * from planet」などをまずElastiCache(Redis)に問い合わせする。キャッシュヒットしないので、RDS(MySQL)にアクセスしてデータを取得し、その内容をElastiCache(Redis)にも書き込む。
- スクリプトの2回目の実行時、キャッシュヒットするので、ElastiCache(Redis)からそのまま結果が得られる。
-
「example.py」だけだと動作が分かりづらいため、少しスクリプトの内容を追加して 「myexample.py」とした。
- 実行時にキャッシュヒットしたのかどうかの表示(print文)を追加
- 実行に要した時間の計算を追加
- コメントを追加
myexample.py
import os
import json

import redis
import pymysql
import datetime

class DB:
    def __init__(self, **params):
        params.setdefault("charset", "utf8mb4")
        params.setdefault("cursorclass", pymysql.cursors.DictCursor)

        self.mysql = pymysql.connect(**params)

    def query(self, sql):
        with self.mysql.cursor() as cursor:
            cursor.execute(sql)
            return cursor.fetchall()

    def record(self, sql, values):
        with self.mysql.cursor() as cursor:
            cursor.execute(sql, values)
            return cursor.fetchone()

# Time to live for cached data
### TTLの指定は秒単位
TTL = 60

# Read the Redis credentials from the REDIS_URL environment variable.
REDIS_URL = os.environ.get('REDIS_URL')

# Read the DB credentials from the DB_* environment variables.
DB_HOST = os.environ.get('DB_HOST')
DB_USER = os.environ.get('DB_USER')
DB_PASS = os.environ.get('DB_PASS')
DB_NAME = os.environ.get('DB_NAME')

# Initialize the database
Database = DB(host=DB_HOST, user=DB_USER, password=DB_PASS, db=DB_NAME)

# Initialize the cache
Cache = redis.Redis.from_url(REDIS_URL)

def fetch(sql):
    """Retrieve records from the cache, or else from the database."""
    ### まずRedisにアクセスし、値があればその値を返す。なければRDSからデータを取得し、
    ### RedisにTTL付きで書き込む。

    res = Cache.get(sql)

    if res:
        print("Cache Hit")
        return json.loads(res)

    res = Database.query(sql)

    ### setexはTTL付きでデータをstring型でsetする
    Cache.setex(sql, TTL, json.dumps(res))
    print("Cache Write")
    return res

def planet(id):
    """Retrieve a record from the cache, or else from the database."""
    key = f"planet:{id}"
    res = Cache.hgetall(key)

    if res:
        print("Cache Hit")
        return res

    sql = "SELECT `id`, `name` FROM `planet` WHERE `id`=%s"
    res = Database.record(sql, (id,))

    if res:
    ### hmsetはデータをhash型でsetする
        Cache.hmset(key, res)
        Cache.expire(key, TTL)
        print("Cache Write")
    return res

# Display the result of some queries

dt_now = datetime.datetime.now()
print("start:",dt_now)
print(fetch("SELECT * FROM planet"))
print(planet(1))
dt_now = datetime.datetime.now()
print("end:",dt_now)
5.4.2 動作確認結果(スクリプトの実行)
- 上記で作成したスクリプト「myexample.py」を2回連続して実行する。
# 初回
(venv) [ec2-user@ip-10-0-1-50 database-caching]$ python3 myexample.py
start: 2021-05-05 07:12:28.771716
Cache Write
[{'id': 1, 'name': 'Mercury'}, {'id': 2, 'name': 'Venus'}, {'id': 3, 'name': 'Earth'}, {'id': 4, 'name': 'Mars'}, {'id': 5, 'name': 'Jupiter'}, {'id': 6, 'name': 'Saturn'}, {'id': 7, 'name': 'Uranus'}, {'id': 8, 'name': 'Neptune'}]
Cache Write
{'id': 1, 'name': 'Mercury'}
end: 2021-05-05 07:12:28.792133
# 2回目
(venv) [ec2-user@ip-10-0-1-50 database-caching]$ python3 myexample.py
start: 2021-05-05 07:12:46.273983
Cache Hit
[{'id': 1, 'name': 'Mercury'}, {'id': 2, 'name': 'Venus'}, {'id': 3, 'name': 'Earth'}, {'id': 4, 'name': 'Mars'}, {'id': 5, 'name': 'Jupiter'}, {'id': 6, 'name': 'Saturn'}, {'id': 7, 'name': 'Uranus'}, {'id': 8, 'name': 'Neptune'}]
Cache Hit
{b'id': b'1', b'name': b'Mercury'}
end: 2021-05-05 07:12:46.284483
-
実行内容は以下の通り。
- fetch("SELECT * FROM planet") は、「select * from planet」 を実行し、キャッシュヒットすればその値を取得、キャッシュミスした場合はRDSでSELECT文を実行し、結果をSTRING型でElastiCache(Redis)に保存する。
- planet(1)は、ID=1のレコードを検索する。キャッシュヒットすればその値を取得し、キャッシュミスした場合はRDS(MySQL)にSELECT文を実行し、結果をhash型でElastiCache(Redis)に保存する。
- これらの2つの命令の実行の前後に日時を取得し、2つの命令の所要時間を取得する。
-
結果は以下の通り。
- 初回実行時は、ElastiCache(Redis)にデータが存在しないため、キャッシュミスとなり、RDS(MySQL)へのクエリ及びElastiCache(Redis)への書き込みが発生する。
- 2回目実行時には、ElastiCache(Redis)にキャッシュが存在するため、そのまま結果が得られる。
- 1回目の実行時間(キャッシュミス)が0.02秒、2回目の実行時間(キャッシュヒット)が0.01秒となり、キャッシュがあったほうが速くはなっている。
5.4.3 動作確認結果(ElastiCache(Redis)側の確認)
- 上記のスクリプトの実行時、ElastiCache(Redis)側はどうなっているのかを併せて確認する。
- ElastiCache(Redis)には、EC2インスタンスにインストールした redis-cli を用いて接続する。
[ec2-user@ip-10-0-1-50 ~]$ redis-cli -h [Redisエンドポイント]:6379
- スクリプト初回実行前の、データが載っていない時は以下の状態となる。
mksamba-qiita-redis-001.xxxxx.xxxx.xxxxx.cache.amazonaws.com:6379> keys *
(empty list or set)

mksamba-qiita-redis-001.xxxxx.xxxx.xxxxx.cache.amazonaws.com:6379> type "SELECT * FROM planet"
none

mksamba-qiita-redis-001.xxxxx.xxxx.xxxxx.cache.amazonaws.com:6379> type "planet:1"
none
- スクリプト初回実行後の、データが載っている時は以下の状態となる。
mksamba-qiita-redis-001.xxxxx.xxxx.xxxxx.cache.amazonaws.com:6379> keys *
1) "planet:1"
2) "SELECT * FROM planet"

mksamba-qiita-redis-001.xxxxx.xxxx.xxxxx.cache.amazonaws.com:6379> type "SELECT * FROM planet"
string

mksamba-qiita-redis-001.xxxxx.xxxx.xxxxx.cache.amazonaws.com:6379> type "planet:1"
hash

mksamba-qiita-redis-001.xxxxx.xxxx.xxxxx.cache.amazonaws.com:6379> get "SELECT * FROM planet"
"[{\"id\": 1, \"name\": \"Mercury\"}, {\"id\": 2, \"name\": \"Venus\"}, {\"id\": 3, \"name\": \"Earth\"}, {\"id\": 4, \"name\": \"Mars\"}, {\"id\": 5, \"name\": \"Jupiter\"}, {\"id\": 6, \"name\": \"Saturn\"}, {\"id\": 7, \"name\": \"Uranus\"}, {\"id\": 8, \"name\": \"Neptune\"}]"

mksamba-qiita-redis-001.xxxxx.xxxx.xxxxx.cache.amazonaws.com:6379> hgetall "planet:1"
1) "id"
2) "1"
3) "name"
4) "Mercury"
- スクリプトによって実行された2つの命令(fetch("SELECT * FROM planet"), planet(1))の結果がそれぞれstring型とhash型で保存されていることが確認できる。なお、今回はTTL=60にしているので、60秒間でこれらのデータは自動消去される。
- 「keys *」は登録されているKey一覧を取得する。「type」は、Keyの種別を取得する。「get」はstring型の値の取得、「hgetall」はhash型の値の取得を行う。
5. 参考サイト
- 「Redis に保存されてる値を見ようと思った時に覚えておきたい redis コマンド」
- Redisのデータの中身を見たくて操作方法を探していたが、このサイトがコマンドの一覧として使いやすかった。
- 「あと2時間でElastiCacheのメモリが枯渇!そのときあなたは何をしますか?」
- ElastiCache+RDSのユースケースを探していたら出てきた、Akatsuki社のゲームインフラのトラブルシューティングの記事。これくらいのことができるように頑張っていきたい。