前提
- Next(v12.3.1)
- TypeScript(v4.8.4)
- Firebase(v9.11.0)
リポジトリ:https://github.com/mk-0A0/firebase-example
1. Nextの環境構築
Nextのインストール(TypeScript)
コマンド実行後にアプリケーション名を聞かれるので、リポジトリ名を入力します。
yarn create next-app --typescript
動作確認
Nextの環境が立ち上がったらOKです。
yarn dev
2. Firebaseの設定
プロジェクトの作成
こちらのページから「使ってみる」>「プロジェクトを追加」と進み、案内に沿ってプロジェクトを作成します。
Firebaseの追加
作成されたプロジェクトにアクセスし、開始するアプリに「ウェブ」を選択します。

アプリのニックネームを入力してアプリを追加するとFirebase SDKのインストール手順が表示されるので、手順に沿って進めます。(今回ホスティングはしません。)
yarn add firebase
firebaseConfig内の情報はルート直下に.envファイルを作成して切り出します。
変数名の先頭にNEXT_PUBLIC_を付けないと認識されないようなのでお気をつけ下さい🙄
NEXT_PUBLIC_API_KEY="***",
NEXT_PUBLIC_AUTH_DOMAIN="***",
NEXT_PUBLIC_PROJECT_ID="***",
NEXT_PUBLIC_STORAGE_BUCKET="***",
NEXT_PUBLIC_MESSAGING_SENDER_ID="***",
NEXT_PUBLIC_APP_ID="***"
私はfirebaseConfigをfirebaseConfig.tsに切り出したので、最終行のappをexportして_app.tsxでimportしています。
_app.tsxに記述する場合はexportする必要はないので、お好みのやり方でやってください!
// Import the functions you need from the SDKs you need
import { initializeApp } from "firebase/app";
// TODO: Add SDKs for Firebase products that you want to use
// https://firebase.google.com/docs/web/setup#available-libraries

// Your web app's Firebase configuration
const firebaseConfig = {
  apiKey: process.env.NEXT_PUBLIC_API_KEY,
  authDomain: process.env.NEXT_PUBLIC_AUTH_DOMAIN,
  projectId: process.env.NEXT_PUBLIC_PROJECT_ID,
  storageBucket: process.env.NEXT_PUBLIC_STORAGE_BUCKET,
  messagingSenderId: process.env.NEXT_PUBLIC_MESSAGING_SENDER_ID,
  appId: process.env.NEXT_PUBLIC_APP_ID
};

// Initialize Firebase
const app = initializeApp(firebaseConfig); // ファイルを切り出さない場合
export const app = () => initializeApp(firebaseConfig); // ファイルを切り出す場合
import type { AppProps } from 'next/app'
+ import {app} from "../lib/firebaseConfig"

+ app() // firebaseConfigをファイルに切り出していない場合は不要

function MyApp({ Component, pageProps }: AppProps) {
  return <Component {...pageProps} />
}

export default MyApp
利用するログイン方法の選択
今回はメールアドレスとパスワードによるログイン機能を実装するので。「Authentication」>「ログイン方法を設定」と進み、「メール/パスワード」を選択します。(メールリンクはなしで保存します。)
3. ユーザー登録の実装
新規登録画面の作成
私はChakraUIを使っていますが、お好みの方法でUIを作成してください!
メールアドレスとパスワードの入力が出来れば大丈夫です。

登録の実装
公式:https://firebase.google.com/docs/auth/web/password-auth?hl=ja
「新規登録」ボタンを押したら実行したいので、buttonのonClicikに渡す関数onCreateUserを定義します。
ユーザー登録はサーバーとの通信であることと、後に出てくるcreateUserWithEmailAndPassword関数がPromise型なので非同期関数を使っています。
公式はthenを使っていますが、私はasyncを使って書きました。
ここは好みなので、お好きな方法で実装して大丈夫です!
const onCreateUser = async () => {
  try {
    // onCreateUserで実行する処理
  } catch (e) {
    // tryで例外が発生した時の処理
  }
}

<Button onClick={() => onCreateUser()}>新規登録</Button>
先程少し触れましたが、ユーザーの登録にはcreateUserWithEmailAndPassword関数を使用します。
createUserWithEmailAndPassword関数はauth, email, passwordを渡すことでユーザーの登録ができます。
authにはgetAuthでAuthのインスタンスを入れ、email, passwordにはuseStateで定義したemail, passwordを入れます。
この関数はonCreateUserで実行したいので、tryの中に記述します。
+ const [email, setEmail] = useState('')
+ const [password, setPassword] = useState('')

const onCreateUser = async () => {
  try {
+   const auth = getAuth()
+   await createUserWithEmailAndPassword(auth, email, password)
  } catch (e) {
    // tryで例外が発生した時の処理
  }
}
例外処理も記述しましょう!
catchで受けとたe(error)にFirebaseErrorが存在する場合、logでeの内容を表示します。
+ import {FirebaseError} from "@firebase/app";

const [email, setEmail] = useState('')
const [password, setPassword] = useState('')

const onCreateUser = async () => {
  try {
    const auth = getAuth()
    await createUserWithEmailAndPassword(auth, email, password)
  } catch (e) {
+   if (e instanceof FirebaseError) {
+     console.log('error', e)
+   }
  }
}
入力された値をFirebaseに送信するために、Inputのvalueにemail, passwordを指定します。
onChange内でeventを受け取り、event.target.valueをuseStateのset関数にセットします。
<Input value={email} onChange={(event) => setEmail(event.target.value)} type={'email'}/>
<Input value={password} onChange={(event) => setPassword(event.target.value)} type={'password'}/>
onCreateUserの実行時(ボタンを押した時)に入力されたemail, passwordをlogで確認できるようにします。
デバッグするための記述なので、書かなくても大丈夫です🙆
const onCreateUser = async () => {
+ console.log(email, password)
  try {
    // 省略
  } catch (e) {
    // 省略
  }
}
ユーザー登録の実装はこれで完了です🎉
いざ、実行
メールアドレス/パスワードを入力して「新規登録」ボタンをクリックします。
consoleに入力したメールアドレス/パスワードが表示されていれば、onCreateUserは動いていそうですね。
Firebase上で確認してみましょう。
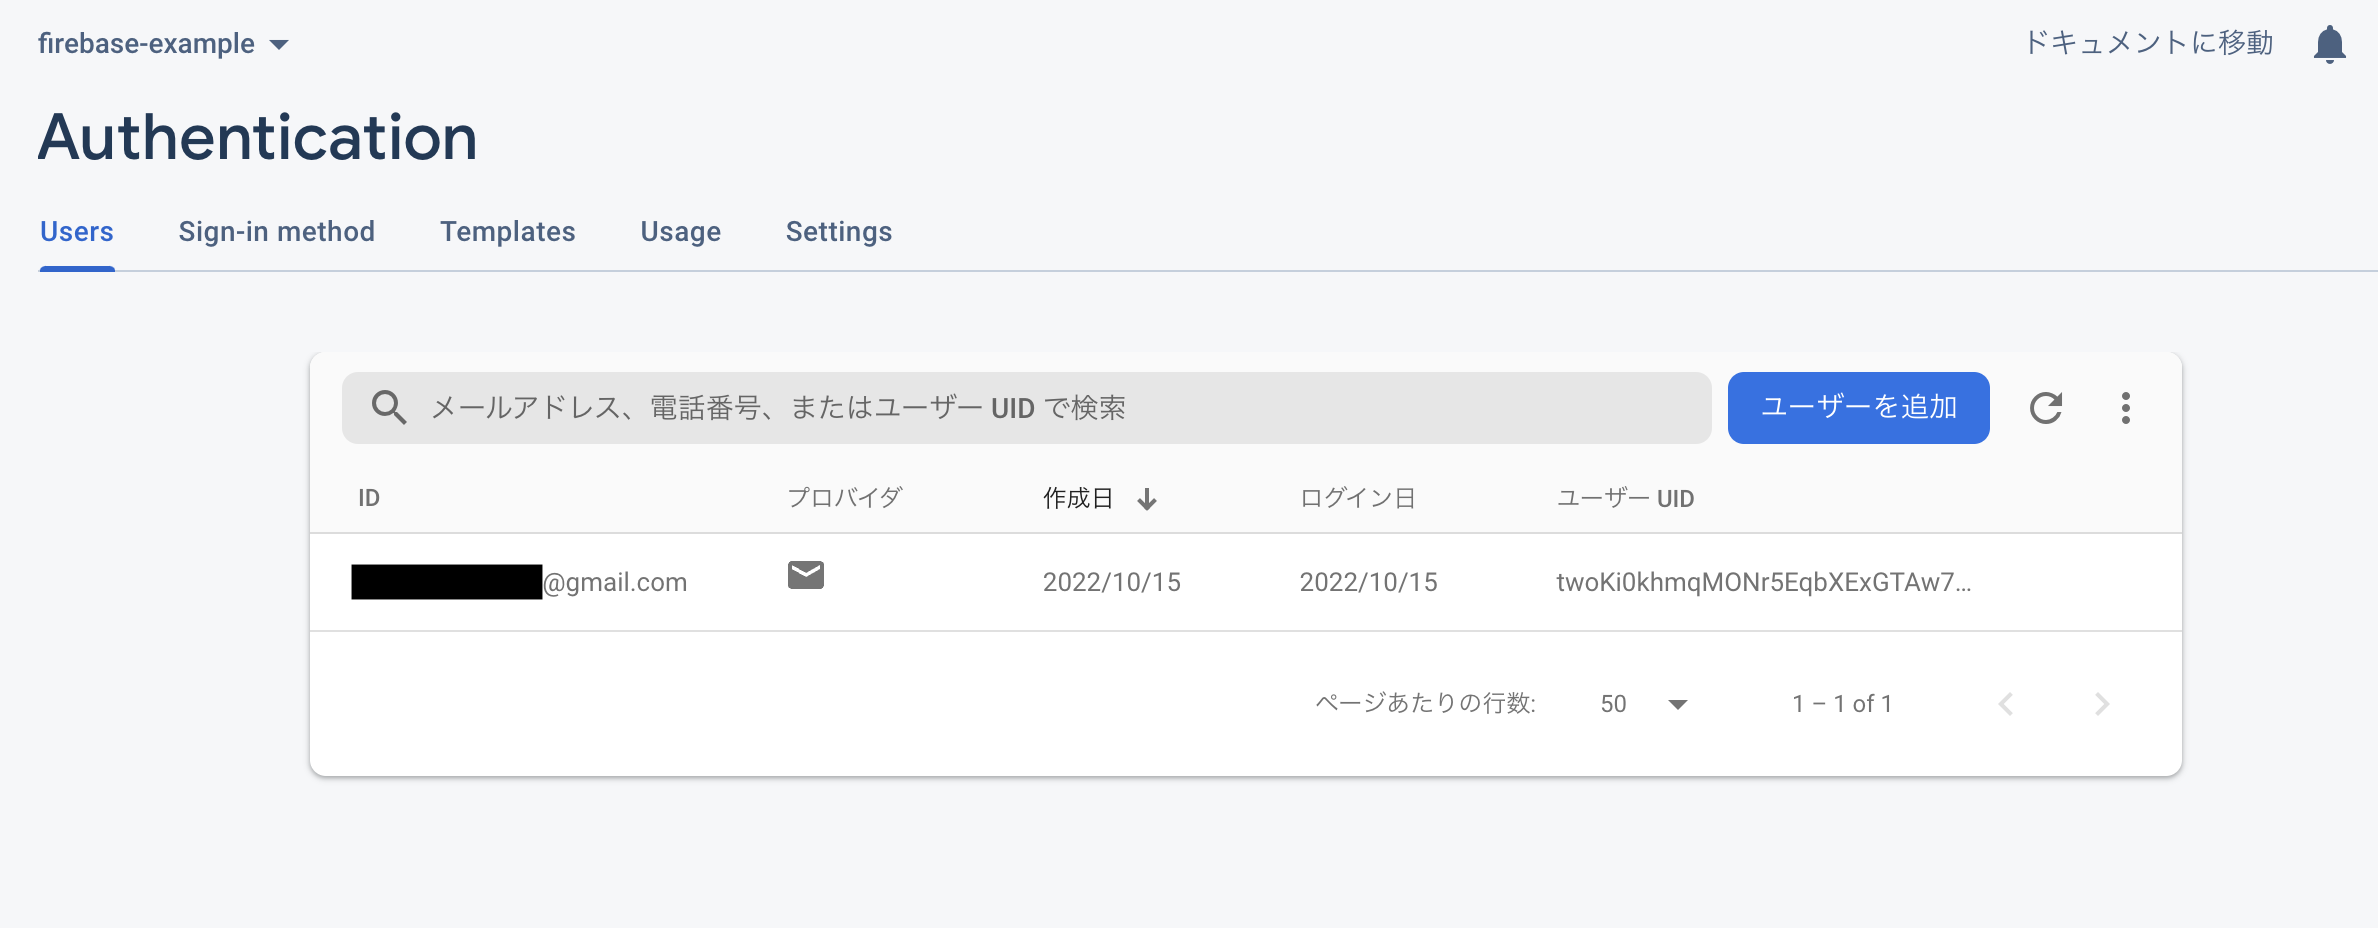
「Authentication」にアクセスし、自分の入力したデータでユーザーが登録されていれば成功です!

4. メール確認の実装
公式:https://firebase.google.com/docs/auth/web/password-auth?hl=ja#create_a_password-based_account
入力さたメールアドレス宛に確認メールを送信する機能を実装します!
確認メールの送信にはsendEmailVerification関数を使用します。
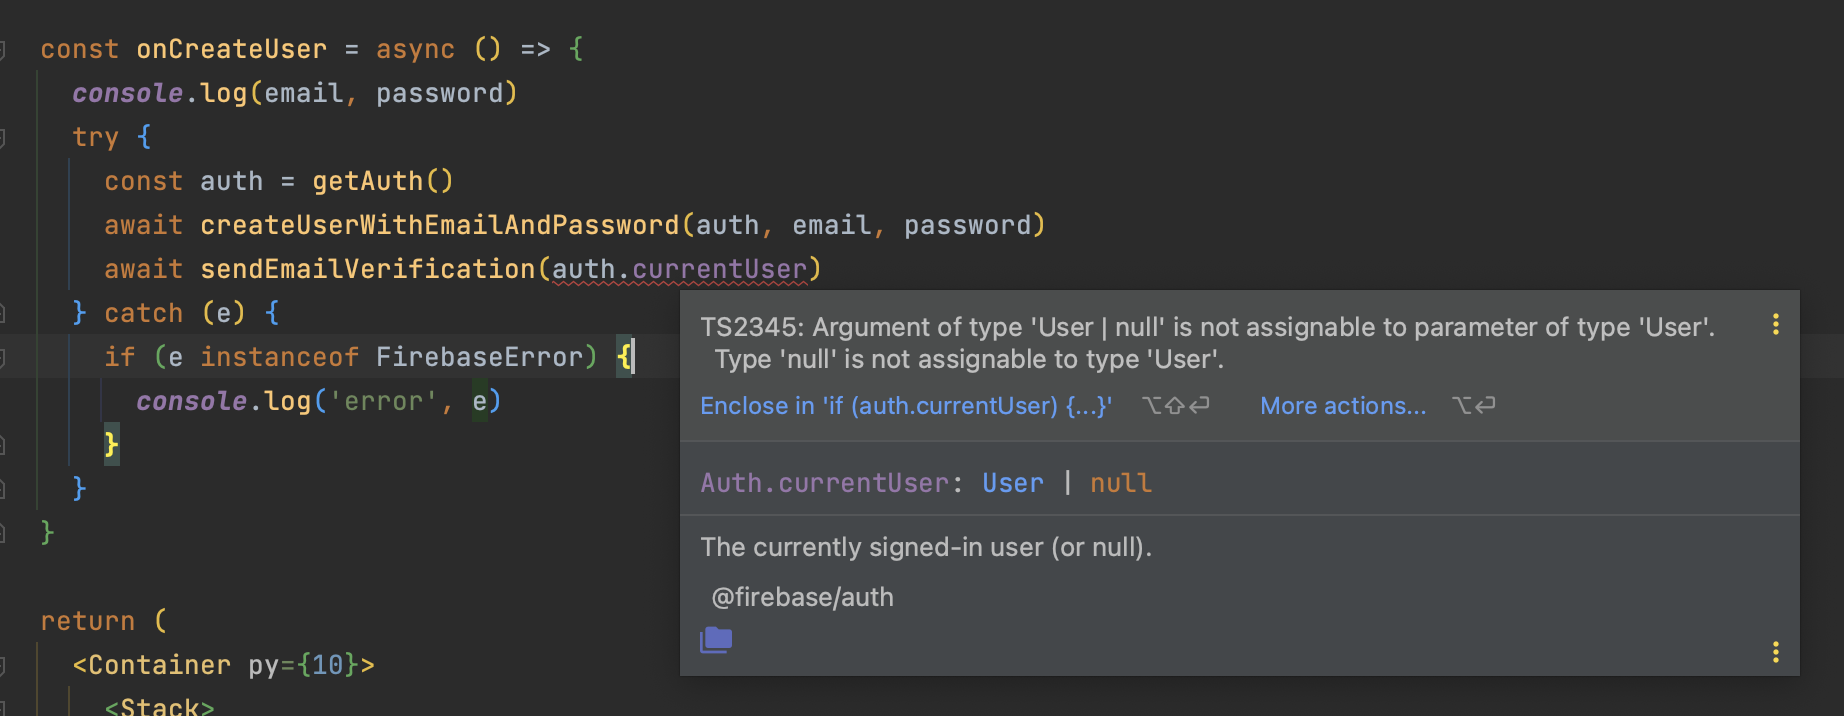
sendEmailVerification関数にはuserを渡す必要があるのですが、公式通りsendEmailVerification(auth.currentUser)とすると「userはnullの可能性がある」と怒られてしまいます。

なので、今回はcreateUserWithEmailAndPasswordから取得できるuserを使いたいと思います。
const onCreateUser = async () => {
  console.log(email, password)
  try {
    const auth = getAuth()
-   await createUserWithEmailAndPassword(auth, email, password)
+   const {user} = await createUserWithEmailAndPassword(auth, email, password)
+   await sendEmailVerification(user)
  } catch (e) {
    // 省略
  }
}
これでもう一度ユーザー登録を実行し、入力したメールアドレス宛にメールが届けばOKです!
ちなみにメールの内容は「Authentication」>「Template」から変更できるので、お好きな内容にカスタマイズしてください。
5. ログイン機能の実装
ログイン画面の作成
pagesディレクトリにsignin.tsxを作成し、ログインフォームも同時に作成しておきます。
/signinにアクセスし、表示されていればOKです!

ログイン機能の実装
ますはユーザー登録と同じように「ログイン」ボタンを押した時に実行するonSignin関数を定義します。
ユーザー登録と処理が同じ部分はこの時点で記述してしまいます。
import {useState} from "react";

export const signin = () => {
  const [email, setEmail] = useState('')
  const [password, setPassword] = useState('')

  const onSignin = async () => {
    console.log(email, password)
    try {
      // onSigninで実行する処理
      const auth = getAuth()
    } catch (e) {
      if (e instanceof FirebaseError) {
        console.log(e)
      }
    }
  }

  return (
    <Container py={10}>
      <Heading>ログイン</Heading>
      <Spacer h={10}/>
      <Stack>
        <FormControl>
          <FormLabel>メールアドレス</FormLabel>
          <Input value={email} onChange={(e) => setEmail(e.target.value)} type={'email'}/>
        </FormControl>
        <FormControl>
          <FormLabel>パスワード</FormLabel>
          <Input value={password} onChange={(e) => setPassword(e.target.value)} type={'password'}/>
        </FormControl>
        <Button onClick={() => onSignin()}>ログイン</Button>
      </Stack>
    </Container>
  )
}

export default signin
ログインにはsignInWithEmailAndPassword関数を使用し、ユーザー登録と同様にauth, email, passwordを渡します。
const onSignin = async () => {
  console.log(email, password)
  try {
    const auth = getAuth()
+   await signInWithEmailAndPassword(auth, email, password)
  } catch (e) {
    // 省略
  }
}
このままだとちゃんとログインできたかが分かりづらいので、logを出すなどしてお好きにデバッグしてください!
const onSignin = async () => {
  console.log(email, password)
  try {
    const auth = getAuth()
    await signInWithEmailAndPassword(auth, email, password)
+   console.log('ログインしたよ')
  } catch (e) {
    // 省略
  }
}
実行してみてlogが確認できれば実装完了です🎉
6. ログアウト機能の実装
マイページ画面の作成
pagesディレクトリにmypage.tsxを作成し、ログアウトボタンを配置します。
/mypageにアクセスし、表示されていればOKです!

ログアウト機能の実装
公式:https://firebase.google.com/docs/auth/web/password-auth?hl=ja#next_steps
「ログアウト」ボタンを押した時に実行するonLogout関数を定義します。
ユーザー登録・ログインと処理が同じ部分はこの時点で記述してしまいます。
export const mypage = () => {
  const onLogout = async () => {
    console.log('click')
    try {
      // onLogoutで実行する処理
      const auth = getAuth()
    } catch (e) {
      if (e instanceof FirebaseError) {
        console.log(e)
      }
    }
  }

  return (
    <Container py={10}>
      <Heading>マイページ</Heading>
      <Spacer h={10}/>
      <Button onClick={() => onLogout()}>ログアウト</Button>
    </Container>
  )
}
ログアウトするにはsignOut関数を使用し、authを渡します。
const onLogout = async () => {
  console.log('click')
  try {
    const auth = getAuth()
+   await signOut(auth)
  } catch (e) {
    if (e instanceof FirebaseError) {
      console.log(e)
    }
  }
}
このままだとちゃんとログインできたかが分かりづらいので、logを出すなどしてお好きにデバッグしてください!
const onLogout = async () => {
  console.log('click')
  try {
    const auth = getAuth()
    await signOut(auth)
+   console.log('ログアウトしたよ')
  } catch (e) {
    // 省略
  }
}
実行してみてlogが確認できれば実装完了です🎉
おまけ1. ログイン・ログアウト後のページ遷移
現状だとログインしても特に何も起こらない状態になっています。
なので、URLに型を付与するpathpidaを使ってログイン後はマイページに遷移させたいと思います!
基本的にGitHubのREADME通りに進めれば大丈夫です。
pathpidaのインストール
nextとpathpidaを並列で動かすためにnpm-run-allも一緒にインストールするみたいですね🤔
yarn add pathpida npm-run-all --dev
package.jsonにscriptを追記します。
READMEからそのままコピペ。
{
  "scripts": {
    "dev": "run-p dev:*",
    "dev:next": "next dev",
    "dev:path": "pathpida --ignorePath .gitignore --watch",
    "build": "pathpida --ignorePath .gitignore && next build"
  }
}
実行してみましょう!
yarn dev
/lib/$path.tsが生成されていれば成功です!
ページ遷移の実装
ページ遷移にはnext/routerのpushを使用します。
pathpidaの使い方はpagesPath.ルートから見た遷移先までのpath.$url()となります。
最後の$url()を忘れないようお気をつけください!
+ import {pagesPath} from "../lib/$path";
+ import {useRouter} from "next/router";

export const signin = () => {
+ const {push} = useRouter()

  const onSignin = async () => {
    console.log(email, password)
    try {
      const auth = getAuth()
      await signInWithEmailAndPassword(auth, email, password)
+     await push(pagesPath.mypage.$url())
    } catch (e) {
      // 省略
    }
  }
}
ログイン後にページ遷移ができれば完璧です🎉
同じ要領でログアウト後のページ遷移も実装します。
+ import {pagesPath} from "../lib/$path";
+ import {useRouter} from "next/router";

export const mypage = () => {
+ const {push} = useRouter()

  const onLogout = async () => {
    console.log(email, password)
    try {
      const auth = getAuth()
      await signOut(auth)
+     await push(pagesPath.$url())
    } catch (e) {
      // 省略
    }
  }
}
まとめ
初めてFirebaseを触ったのですが、思ったより簡単に導入できて驚きました。
他のログイン方法も試してみたいです😌