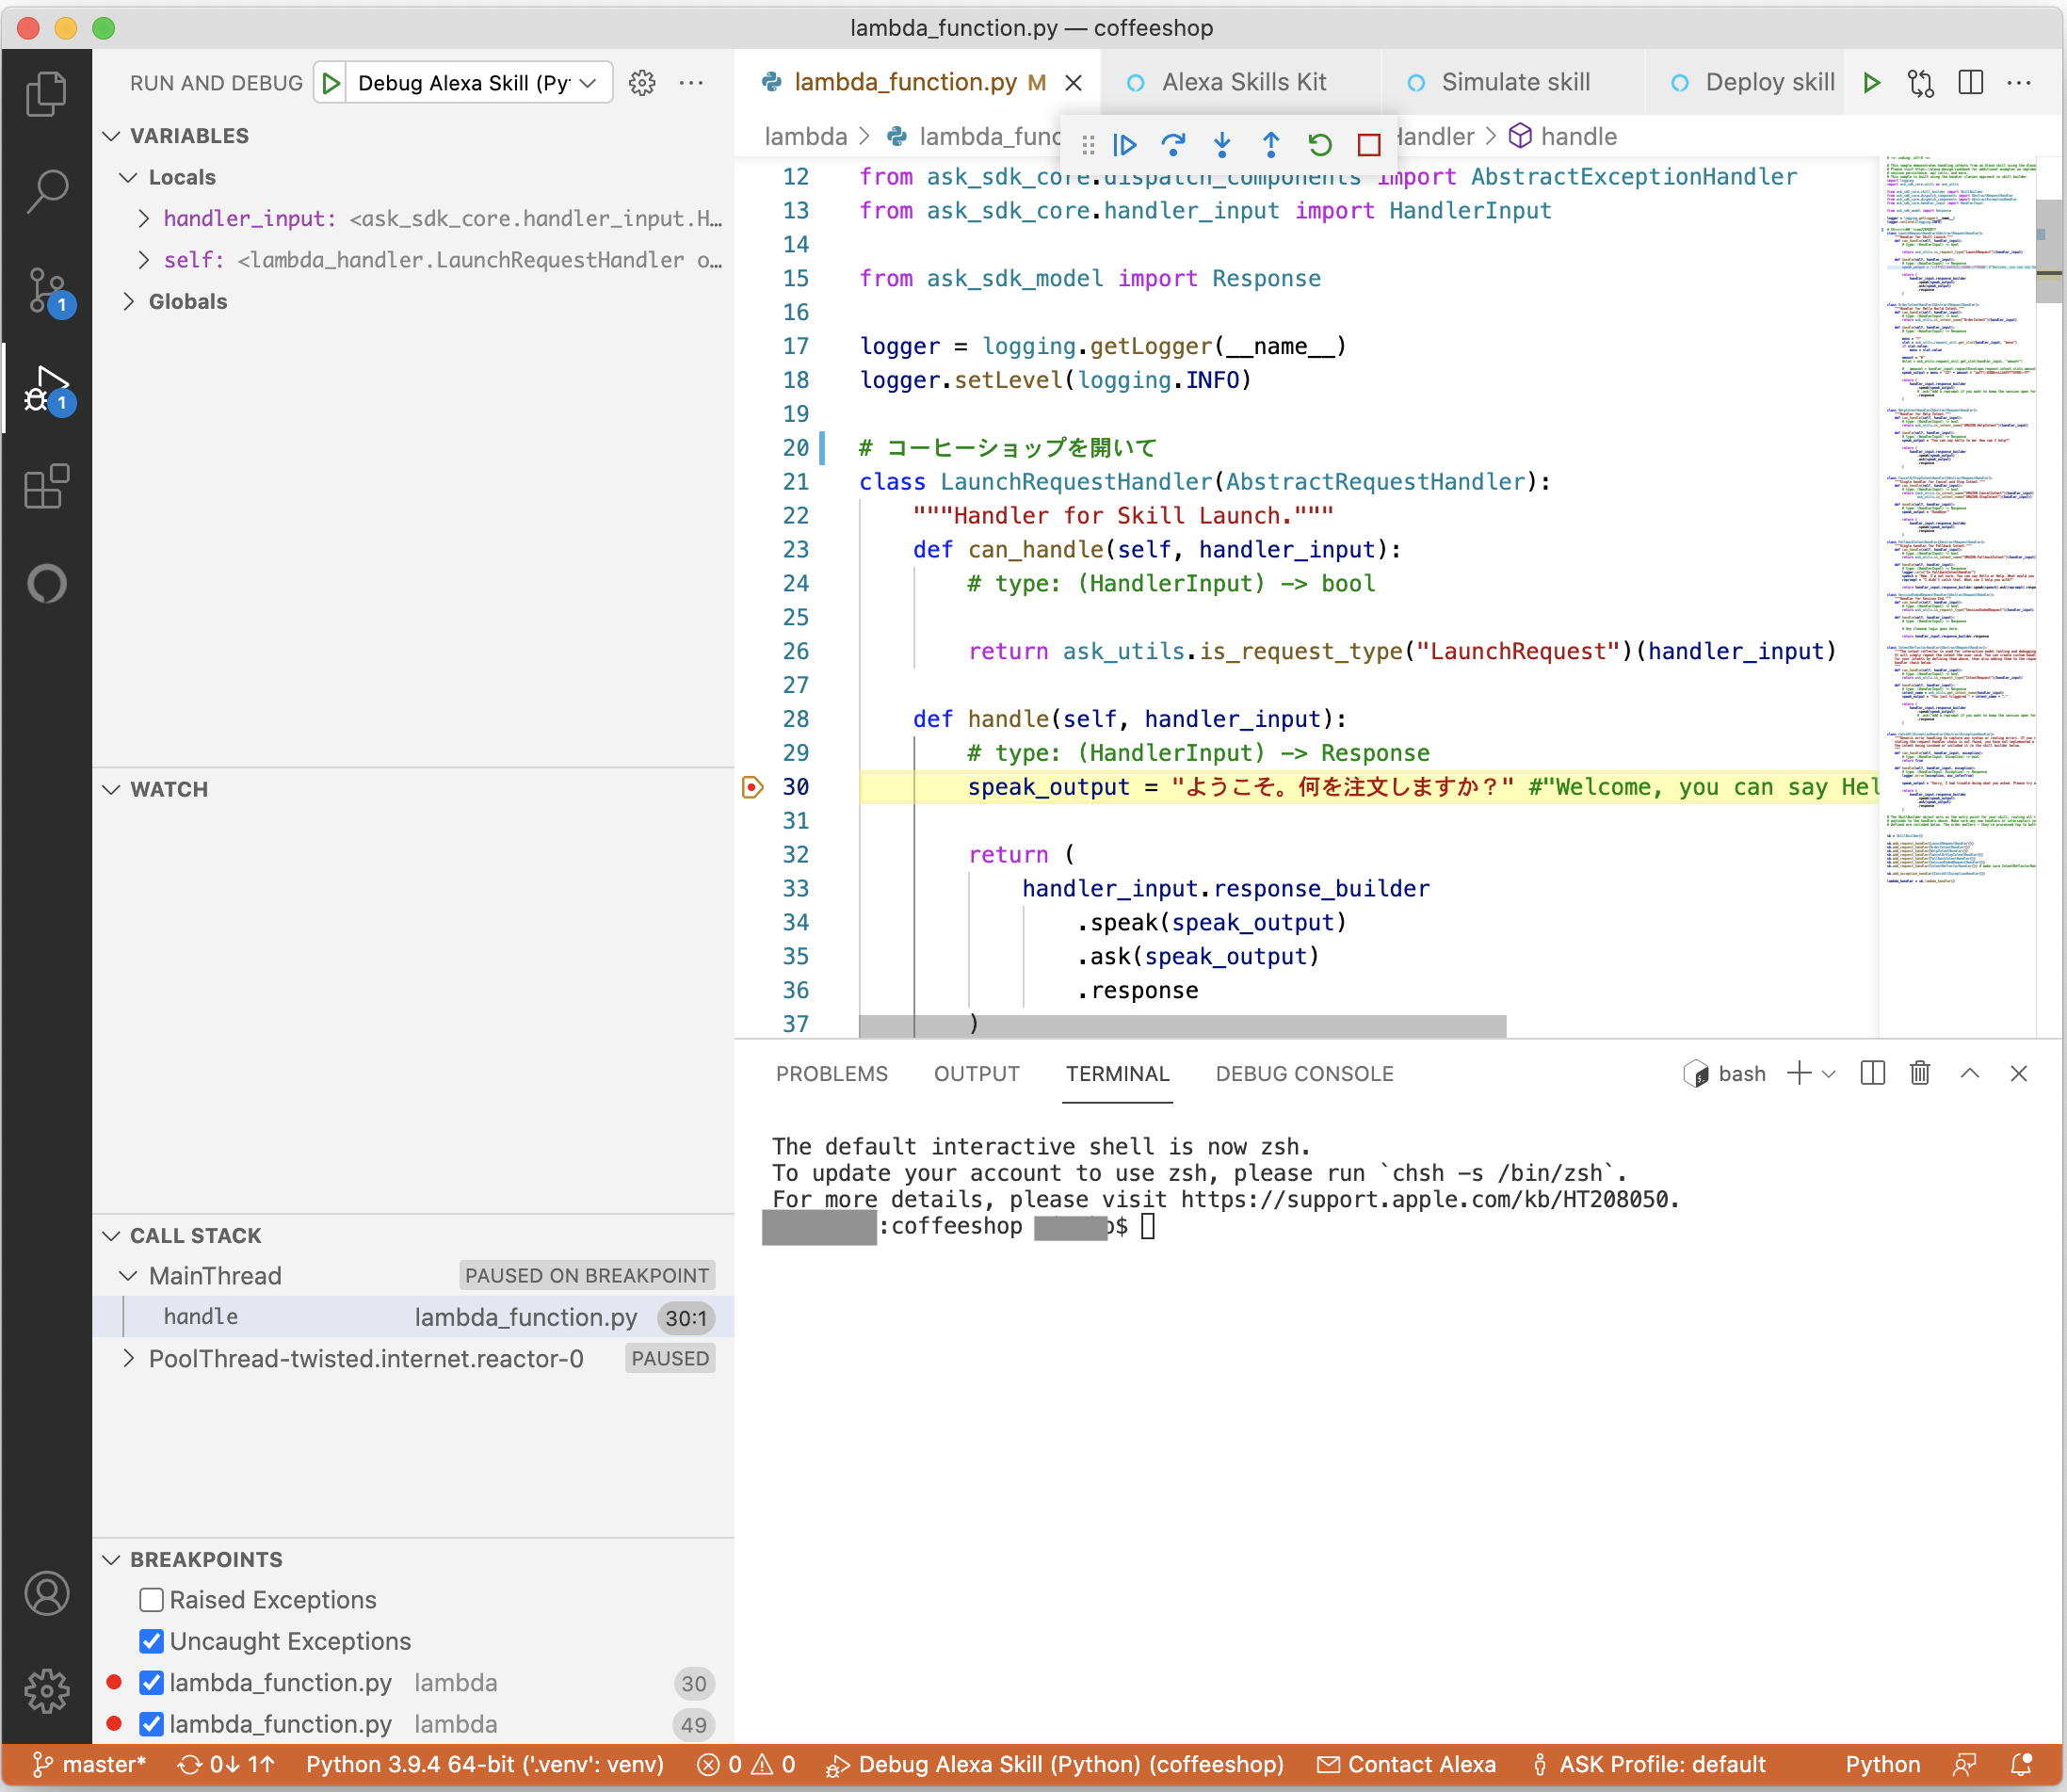
本家サイトを参考に、alexaのスキルをvisual studio code(以下vscode)でデバッグ実行するまで環境構築していきます。(言語はpythonです)
下図のようにブレークポイントで止めて、ステップ実行などができます。

環境
- OS mac OS 10.15.7(Catalina)
- visual studio code 1.59.1
- python 3.9.4 (homebrewからインストール)
- ASK Toolkit Extension 2.8.0
1. Extensionのインストール
vscode自体のインストールは割愛します。
vscodeを立ち上げ、メニューCode > Preferences > ExtensionsからExtentionのインストールができます。
Pythonとask(alexa skill kit) toolkitをインストールします。
Extensionのインストールが終わると、アクティビティバー(左端の黒いバー)にalexaの丸いアイコンが出てきます。
それをクリックすると、ログインしてとか出てきますので、指示に従ってください。
2. スキルをダウンロードする
vscodeで一からスキルを作ることもできるようですが、ここでは既存のスキルをダウンロードしてみます。
alexaのチュートリアル(第2回、第3回)で作ったスキルを使用します。(バックエンドはalexa-hosted(python)を選びます)
ダウンロード先のフォルダを作ります。ここではcoffeeshopとします。
アクティビティバーからalexaを選び、download and edit skill又はimport existing skillをクリックします。

一覧からスキルを選ぶとダウンロード先を聞かれるので先程作ったcoffeeshopフォルダを指定します。
これで、フォルダにlambda_function.pyなどがダウンロードされます。
3. venv仮想環境を構築する
現状スキルをダウンロード出来ましたが、ask_sdk_coreのimportでエラーが出ている状態です。
ライブラリを追加すればいいのですが、alexa関連のライブラリはこのプロジェクトでしか使わないので、全体的なpython環境に追加するのもよくありません。そこでvenvを使ってプロジェクトローカルなpython環境を作ってそこにライブラリを追加する事にします。
venvはpythonに含まれている仮想環境構築ツールなので、すぐに使うことができます。
仮想環境フォルダ名はなんでもいいのですが、ここでは**.venv**とします。
ターミナル(bash)から、以下のように実行します。
$ cd coffeeshop/
$ python -m venv .venv
$ source .venv/bin/activate
$ pip install --upgrade pip
$ pip install ask_sdk_core
$ pip install ask_sdk_local_debug
上記により、coffeeshop/.venv/binにあるpythonが使われるようになり、coffeeshop/.venv/lib/python3.9/site-packages/にライブラリが追加されます。
ask_sdk_coreはlambda_function.pyが参照しているライブラリ、ask_sdk_local_debugはデバッグに必要なライブラリです。
.gitignoreファイルに.venvを入れておきます。
ask-resources.json
.ask
.vscode
.venv
lambda/node_modules
4. vscodeから仮想環境を使うように設定する
先程作った仮想環境を、vscodeで使うように設定します。
メニューCode > Preferences > Settingsで設定画面が開きます。
検索エリアにpython: interpretと入力し、Workplaceのpython Default interpreter pathに**.venv/bin/python**と入力します。

もしくは、settings.jsonに以下のように記述します。
{
    "python.defaultInterpreterPath": ".venv/bin/python"
}
正しく設定できると、画面下部のステータスバーに.venvのpythonが使われてますよ という表示になりますので、確認してください。
もし違っている場合はその部分をクリックすると どのpythonを使うかの選択画面になりますので、設定してください。
またlambda_function.pyを開いて右上の緑色の実行ボタンをクリックするとファイルが単独で実行されますが、下部のterminal(python)でプロンプトに(.venv)がついている事を確認してください。
また実行してエラーが起きていないことも確認してください。単独実行なので何も起きませんが…
5. デバッグ設定
最初にダミーのデバッグ設定を作ります。
メニューRun > Add Configuration… > python > python file debug the currently active python fileで一般的なpythonデバッグ設定を追加します。
これは最終的には消していいのかもしれませんが試してません。
次にメニュー**Run > Add Configuration… > ASK: Alexa Skills Debugger(Python)**でalexaのデバッグ設定を追加します。
launch.jsonを編集してargsのregionをFEにします。(日本の場合)
最終的にlaunch.jsonか以下のようになります。
{
    "version": "0.2.0",
    "configurations": [

        {
            "name": "Debug Alexa Skill (Python)",
            "type": "python",
            "request": "launch",
            "program": "${command:ask.debugAdapterPath}",
            "python": "${command:python.interpreterPath}",
            "args": [
                "--accessToken",
                "${command:ask.accessToken}",
                "--skillId",
                "${command:ask.skillIdFromWorkspace}",
                "--skillHandler",
                "lambda_handler",
                "--skillFilePath",
                "${workspaceFolder}/lambda/lambda_function.py",
                "--region",
                "FE"
            ],
            "console": "internalConsole",
            "cwd": "${workspaceFolder}/lambda"
        },
        {
            "name": "Python: Current File",
            "type": "python",
            "request": "launch",
            "program": "${file}",
            "console": "integratedTerminal"
        }
    ]
}
6. デバッグ実行
まずはサーバー側を実行します。
アクティビティバーでデバッグをクリックして左上でDebug alexa skillを選んで左上の緑色の実行ボタンをクリックします。(一番最初の画像のようになります)
次はクライアント側です。
アクティビティバーからalexaをクリックして、コーヒーショップ > Test skill > Open Simulatorでalexaコンソールのテストと同じような画面になります。
ここで「コーヒーショップを開いて」など入力します。
ブレークポイントを設定していればそこで止まるのでデバッグできます。

7. アップロード
テストが終わったらvscodeからアップロードできます。
アクティビティバーからsource controlをクリックして、変更したファイルのstage、commitします。
アクティビティバーからalexaをクリックしてdeploy skillを選べば、デプロイできます。
まとめ
初めてqiitaに投稿してみましたが、いかがでしょうか。
alexaコンソールでコードをいじるよりは随分ラクになっていると思います。
ただ仕方ないのかもしれませんが、simulatorのレスポンスは遅いです。
さらに、aplを使うようになると、vscodeのsimulatorだとボタンのクリックなどができないので、テスト用のclientはalexa developer consoleの方が使いやすいです。
何か間違いがありましたらお知らせください。
おまけ
コーヒーショップのチュートリアルのpython版コードはこんな感じかなというのを置いておきます。
省略部分はヒナ型から変更していない部分です。
...
# コーヒーショップを開いて
class LaunchRequestHandler(AbstractRequestHandler):
    """Handler for Skill Launch."""
    def can_handle(self, handler_input):
        # type: (HandlerInput) -> bool

        return ask_utils.is_request_type("LaunchRequest")(handler_input)

    def handle(self, handler_input):
        # type: (HandlerInput) -> Response
        speak_output = "ようこそ。何を注文しますか?" #"Welcome, you can say Hello or Help. Which would you like to try?"

        return (
            handler_input.response_builder
                .speak(speak_output)
                .ask(speak_output)
                .response
        )

# コーヒー一杯お願い
class OrderIntentHandler(AbstractRequestHandler):
    """Handler for Hello World Intent."""
    def can_handle(self, handler_input):
        # type: (HandlerInput) -> bool
        return ask_utils.is_intent_name("OrderIntent")(handler_input)

    def handle(self, handler_input):
        # type: (HandlerInput) -> Response

        menu = ""
        slot = ask_utils.request_util.get_slot(handler_input, "menu")
        if slot and slot.value:
            menu = slot.value

        amount = "1"
        slot = ask_utils.request_util.get_slot(handler_input, "amount")
        if slot and slot.value :
            amount = slot.value

        #   amaount = handler_input.requestEnvelope.request.intent.slots.amount.value
        speak_output = menu + "を" + amount + "杯、ご注文ありがとうございます"

        return (
            handler_input.response_builder
                .speak(speak_output)
                # .ask("add a reprompt if you want to keep the session open for the user to respond")
                .response
        )
...
sb = SkillBuilder()

sb.add_request_handler(LaunchRequestHandler())
sb.add_request_handler(OrderIntentHandler())
sb.add_request_handler(HelpIntentHandler())
sb.add_request_handler(CancelOrStopIntentHandler())
sb.add_request_handler(FallbackIntentHandler())
sb.add_request_handler(SessionEndedRequestHandler())
sb.add_request_handler(IntentReflectorHandler()) # make sure IntentReflectorHandler is last so it doesn't override your custom intent handlers

sb.add_exception_handler(CatchAllExceptionHandler())

lambda_handler = sb.lambda_handler()
関連記事
DynamoDBを使う場合も投稿したのでよかったら参考にどうぞ