最近Object Detectionもエクスポートできるようになりました。
De:Code 2018が開催された時期にAzure Custom Vision Serviceで提供されている「Classification」「Object Detection」のうち「Classification」はONNXをはじめいくつかも形式にエクスポートしてオフライン推論が可能になっていました。そしてつい先日あたりから「Object Detection」もエクスポートできます。
Custom Visionの物体検知機能は画像をアップロードして簡単にカスタムでき、かつそれをエクスポートしてオフライン推論できるとなると活用の幅も広がり魅力的です。
今回はHoloLensでCustom Visionをオフライン推論で実行するためのサンプルを作成したので良ければ参考にしてオフライン推論を試してください。
実はHoloLensで行う場合はかなり楽でした。
Mixed RealityについてはAcademy: code, tutorials, and lessonsというMicrosoftでもいくつかのサンプルを提供しておりその中にAzure関連のものもあり、Custom VisionのObject Detectionも提供されています。このサンプルはCustom Visionをオンラインで利用するサンプルなのですがこれを改良しONNX版に修正したものが今回のものになります。
MR and Azure 310: Object detection
今回の環境
今回はHoloLensを利用しています。Windows MLについてはOSバージョン 1809版で行っています。OSバージョン 1803版では実装方法が少し異なる場合があります。
- HoloLens
- 日本語版 OSバージョン:1809
- 開発環境
- Windows 10(OSバージョン1809)
- OSバージョンが1809でない場合はWindows 10 SDK 10.0.17763.0を導入すれば開発は可能
- Microsoft Visual Studio Enterprise 2017 15.9.4
- エディションはCommunity Editionでも可能
- Unity 2017.4.17f1
- Windows 10(OSバージョン1809)
手順
手順は以下の通りです。基本的にはAcademyの手順になります。違うのは以下の2点です。
- Custom VisionからONNXのエクスポートを実行する
- Academy 310の修正
- オンラインで通信しているロジックをオフラインで処理するように修正
今回は上記2点部分の修正箇所のみを紹介します。
Custom VisionからONNXのエクスポートを実行する
まずはObject Detection用のONNXファイルを一式エクスポートします。
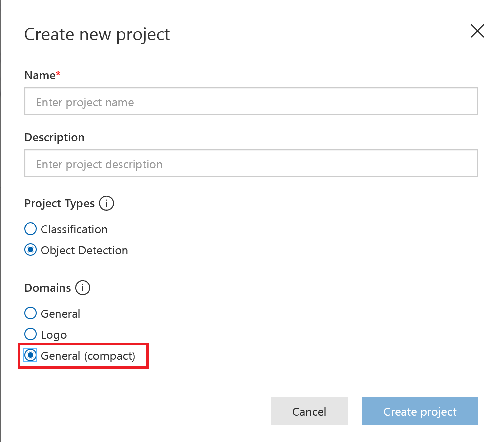
モデルの作成まではMR And Azure 310 - Ovject Detection:Chapter 1 - The Custom Vision Portalに従ってモデルを作成しますが、「Domains」はGeneral(Compact)を選択します。
エクスポートは「Peformance」タブの中の「Export」を選択ことでダウンロードできます。
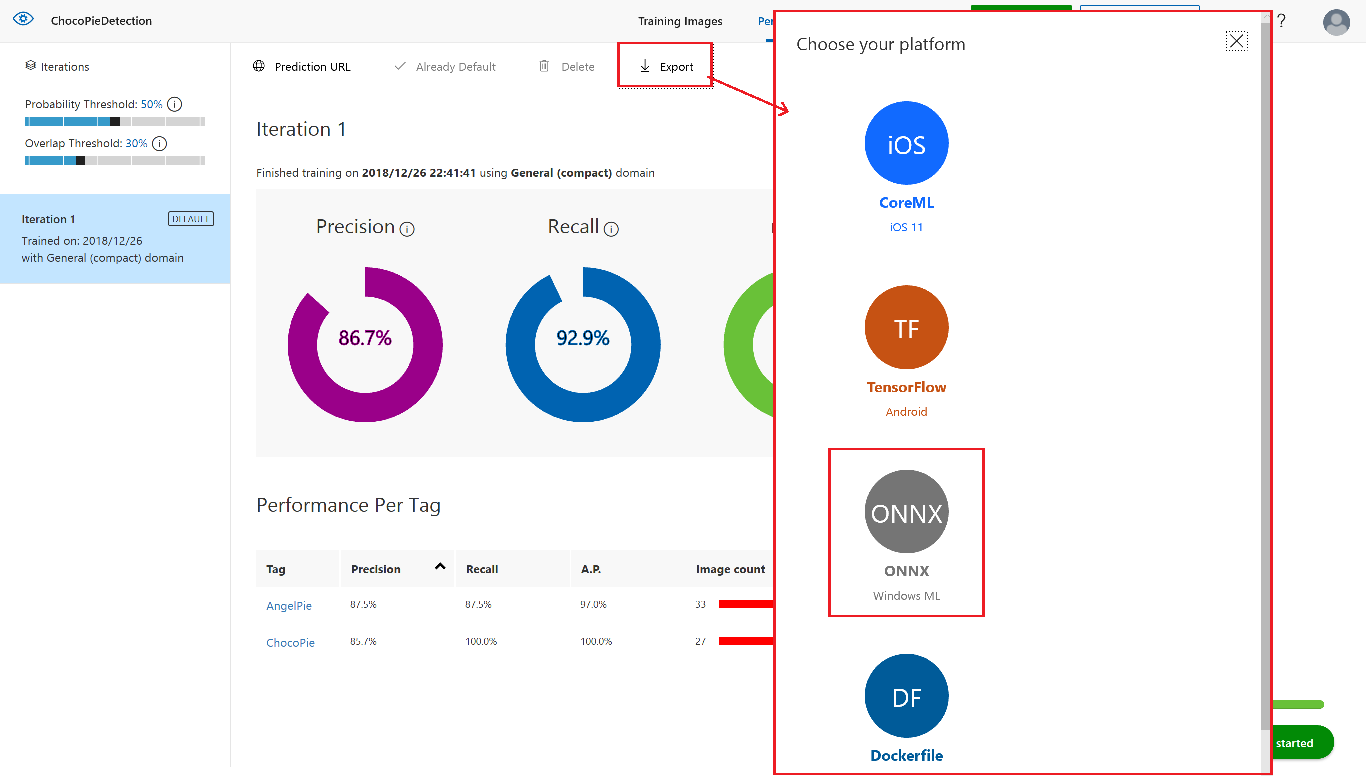
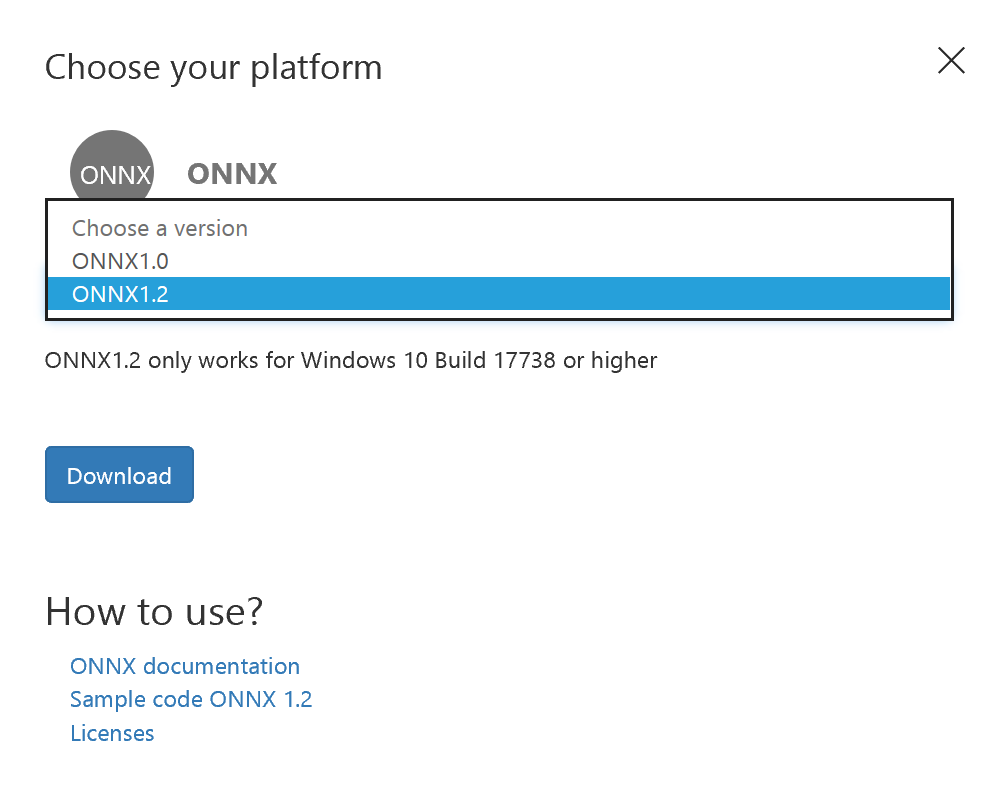
「Export」をクリックするとONNXのダウンロードダイアログが表示されます。生成できるバージョンは2つあります。
OSバージョン1809ではONNX1.2の方を利用します。ONNX1.2を選択しダウンロードを押すとZipファイルがダウンロードされます。
展開すると以下のように色々なファイルが生成されます。
:.
|   model.onnx  -> ONNXファイル
|   labels.txt  -> Object Detectionで登録したラベル一覧
|
+---python -> Python用補助ファイル
|       cntk_predict.py
|       object_detection.py
|
\---CSharp -> C#用補助ファイル
        ObjectDetection.cs
補助ファイルはObject Detectionの結果を取り出しやすくするために追加されています。
Custom Visionもモデル構造としてはYoloベースらしく入力が「画像」、出力が「TensorFloat」になります
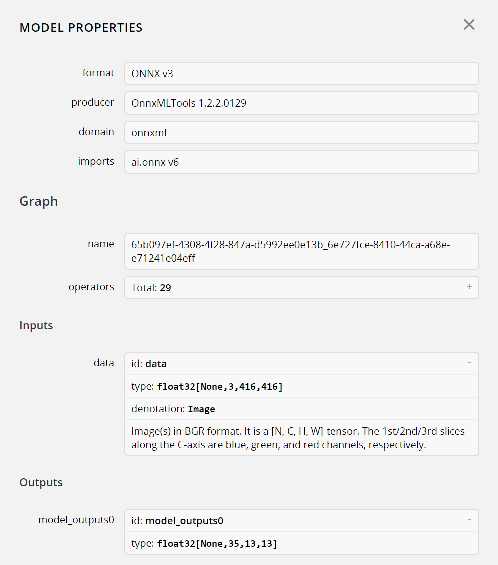
このため普通に扱おうとすると出力のFloat配列を解析して検知した物体と検出範囲を出す必要があるのですがこれを補助するために追加でコードが生成されている形になります。
ですのでこのコードをベースにして修正をかけていきます。
Academy 310の修正
Academy 310に従って一通りオンライン版で作成したコードを書き換えていきます。
まずは、Unityでプロジェクトを開いた状態で、「OjbectDetection.cs」をScrpitフォルダに格納します。
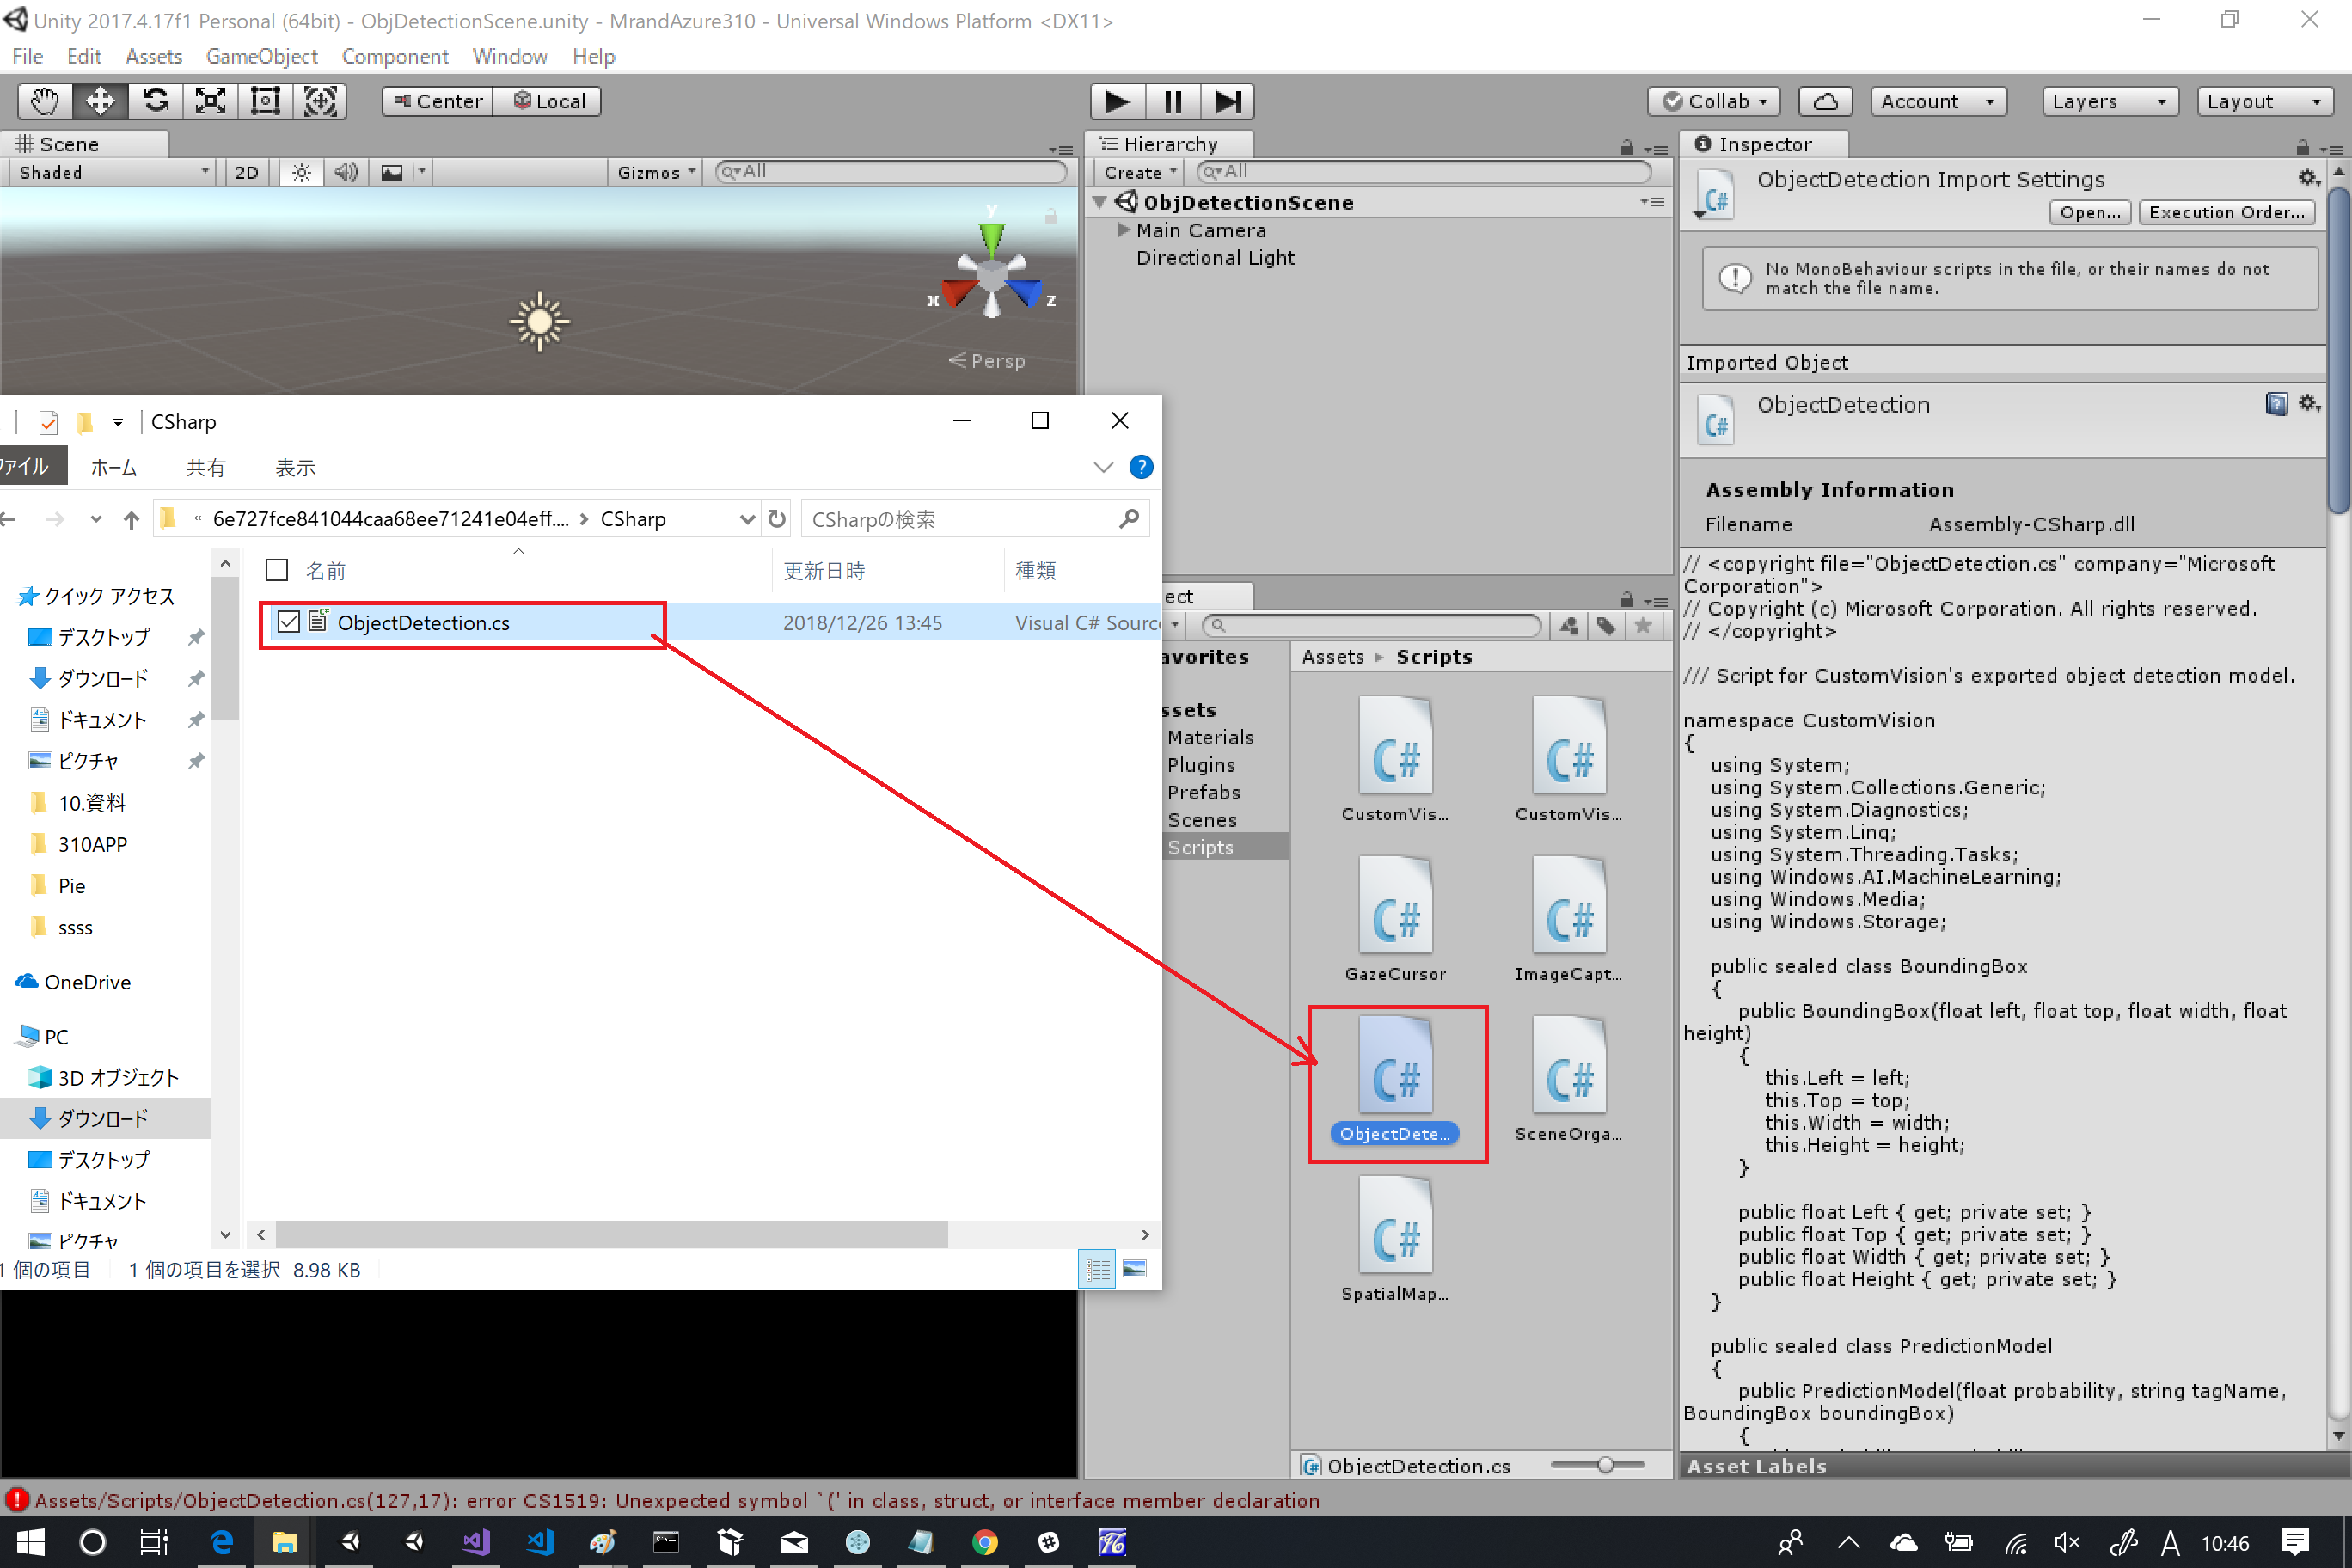
すると色々とエラーがでるので直していきます。
OcjectDetection.csの修正
エラーの主な原因はUWP向けのライブラリをつかっているため、
この部分をUnity上で無害化しておきます。ObjectDetection.csをUnityからエディターで開きエラーの出ている個所を「#if UNITY_UWP~#endif」で無効化しておきます。無害化した結果以下のようになります。
// <copyright file="ObjectDetection.cs" company="Microsoft Corporation">
// Copyright (c) Microsoft Corporation. All rights reserved.
// </copyright>

/// Script for CustomVision's exported object detection model.

namespace CustomVision
{
    using System;
    using System.Collections.Generic;
    using System.Diagnostics;
    using System.Linq;
    using System.Threading.Tasks;
# if UNITY_UWP
    using Windows.AI.MachineLearning;
    using Windows.Media;
    using Windows.Storage;
# endif
    public sealed class BoundingBox
    {
        public BoundingBox(float left, float top, float width, float height)
        {
            this.Left = left;
            this.Top = top;
            this.Width = width;
            this.Height = height;
        }

        public float Left { get; private set; }
        public float Top { get; private set; }
        public float Width { get; private set; }
        public float Height { get; private set; }
    }

    public sealed class PredictionModel
    {
        public PredictionModel(float probability, string tagName, BoundingBox boundingBox)
        {
            this.Probability = probability;
            this.TagName = tagName;
            this.BoundingBox = boundingBox;
        }

        public float Probability { get; private set; }
        public string TagName { get; private set; }
        public BoundingBox BoundingBox { get; private set; }
    }

    public class ObjectDetection
    {
        private static readonly float[] Anchors = new float[] { 0.573f, 0.677f, 1.87f, 2.06f, 3.34f, 5.47f, 7.88f, 3.53f, 9.77f, 9.17f };

        private readonly IList<string> labels;
        private readonly int maxDetections;
        private readonly float probabilityThreshold;
        private readonly float iouThreshold;

# if UNITY_UWP
        private LearningModel model;
        private LearningModelSession session;
# endif
        public ObjectDetection(IList<string> labels, int maxDetections = 20, float probabilityThreshold = 0.1f, float iouThreshold = 0.45f)
        {
            this.labels = labels;
            this.maxDetections = maxDetections;
            this.probabilityThreshold = probabilityThreshold;
            this.iouThreshold = iouThreshold;
        }


# if UNITY_UWP
        /// <summary>
        /// Initialize
        /// </summary>
        /// <param name="file">The ONNX file</param>
        public async Task Init(StorageFile file)
        {
            this.model = await LearningModel.LoadFromStorageFileAsync(file);
            this.session = new LearningModelSession(this.model);

            Debug.Assert(this.model.InputFeatures.Count == 1, "The number of input must be 1");
            Debug.Assert(this.model.OutputFeatures.Count == 1, "The number of output must be 1");

        }

        /// <summary>
        /// Detect objects from the given image.
        /// The input image must be 416x416.
        /// </summary>
        public async Task<IList<PredictionModel>> PredictImageAsync(VideoFrame image)
        {
            var imageFeature = ImageFeatureValue.CreateFromVideoFrame(image);
            var bindings = new LearningModelBinding(this.session);
            bindings.Bind("data", imageFeature);
            var result = await this.session.EvaluateAsync(bindings, "");
            return Postprocess(result.Outputs["model_outputs0"] as TensorFloat);
        }

        private static float Logistic(float x)
        {
            if (x > 0)
            {
                return (float)(1 / (1 + Math.Exp(-x)));
            }
            else
            {
                var e = Math.Exp(x);
                return (float)(e / (1 + e));
            }
        }
# endif
        /// <summary>
        /// Calculate Intersection over Union (IOU) for the given 2 bounding boxes.
        /// </summary>
        private static float CalculateIOU(BoundingBox box0, BoundingBox box1)
        {
            var x1 = Math.Max(box0.Left, box1.Left);
            var y1 = Math.Max(box0.Top, box1.Top);
            var x2 = Math.Min(box0.Left + box0.Width, box1.Left + box1.Width);
            var y2 = Math.Min(box0.Top + box0.Height, box1.Top + box1.Height);
            var w = Math.Max(0, x2 - x1);
            var h = Math.Max(0, y2 - y1);

            return w * h / ((box0.Width * box0.Height) + (box1.Width * box1.Height) - (w * h));
        }

# if UNITY_UWP
        /// <summary>
        /// Extract bounding boxes and their probabilities from the prediction output.
        /// </summary>
        private (IList<BoundingBox>, IList<float[]>) ExtractBoxes(TensorFloat predictionOutput, float[] anchors)
        {
            var shape = predictionOutput.Shape;
            Debug.Assert(shape.Count == 4, "The model output has unexpected shape");
            Debug.Assert(shape[0] == 1, "The batch size must be 1");

            IReadOnlyList<float> outputs = predictionOutput.GetAsVectorView();

            var numAnchor = anchors.Length / 2;
            var channels = shape[1];
            var height = shape[2];
            var width = shape[3];

            Debug.Assert(channels % numAnchor == 0);
            var numClass = (channels / numAnchor) - 5;

            Debug.Assert(numClass == this.labels.Count);

            var boxes = new List<BoundingBox>();
            var probs = new List<float[]>();
            for (int gridY = 0; gridY < height; gridY++)
            {
                for (int gridX = 0; gridX < width; gridX++)
                {
                    int offset = 0;
                    int stride = (int)(height * width);
                    int baseOffset = gridX + gridY * (int)width;

                    for (int i = 0; i < numAnchor; i++)
                    {
                        var x = (Logistic(outputs[baseOffset + (offset++ * stride)]) + gridX) / width;
                        var y = (Logistic(outputs[baseOffset + (offset++ * stride)]) + gridY) / height;
                        var w = (float)Math.Exp(outputs[baseOffset + (offset++ * stride)]) * anchors[i * 2] / width;
                        var h = (float)Math.Exp(outputs[baseOffset + (offset++ * stride)]) * anchors[i * 2 + 1] / height;

                        x = x - (w / 2);
                        y = y - (h / 2);

                        var objectness = Logistic(outputs[baseOffset + (offset++ * stride)]);

                        var classProbabilities = new float[numClass];
                        for (int j = 0; j < numClass; j++)
                        {
                            classProbabilities[j] = outputs[baseOffset + (offset++ * stride)];
                        }
                        var max = classProbabilities.Max();
                        for (int j = 0; j < numClass; j++)
                        {
                            classProbabilities[j] = (float)Math.Exp(classProbabilities[j] - max);
                        }
                        var sum = classProbabilities.Sum();
                        for (int j=0; j<numClass;j++)
                        {
                            classProbabilities[j] *= objectness / sum;
                        }

                        if (classProbabilities.Max() > this.probabilityThreshold)
                        {
                            boxes.Add(new BoundingBox(x, y, w, h));
                            probs.Add(classProbabilities);
                        }
                    }
                    Debug.Assert(offset == channels);
                }
            }

            Debug.Assert(boxes.Count == probs.Count);
            return (boxes, probs);
        }
# endif
        /// <summary>
        /// Remove overlapping predictions and return top-n predictions.
        /// </summary>
        private IList<PredictionModel> SuppressNonMaximum(IList<BoundingBox> boxes, IList<float[]> probs)
        {
            var predictions = new List<PredictionModel>();
            var maxProbs = probs.Select(x => x.Max()).ToArray();

            while (predictions.Count < this.maxDetections)
            {
                var max = maxProbs.Max();
                if (max < this.probabilityThreshold)
                {
                    break;
                }
                var index = Array.IndexOf(maxProbs, max);
                var maxClass = Array.IndexOf(probs[index], max);

                predictions.Add(new PredictionModel(max, this.labels[maxClass], boxes[index]));

                for (int i = 0; i < boxes.Count; i++)
                {
                    if (CalculateIOU(boxes[index], boxes[i]) > this.iouThreshold)
                    {
                        probs[i][maxClass] = 0;
                        maxProbs[i] = probs[i].Max();
                    }
                }
            }

            return predictions;
        }

# if UNITY_UWP
        private IList<PredictionModel> Postprocess(TensorFloat predictionOutputs)
        {
            var (boxes, probs) = this.ExtractBoxes(predictionOutputs, ObjectDetection.Anchors);
            return this.SuppressNonMaximum(boxes, probs);
        }
# endif
    }
}
CustomVisionAnalyser.csの修正
CustomVisionAnalyserはAirTap時にオンラインでCustom Vision Serviceにアクセスするようになっています。
これを先ほど追加したObjectDetection経由で処理するように修正します。
不要な個所の削除
まずはオンライン系で利用しているコードを削除します。
最初にプロパティとして以下の部分を削除します。
    /// <summary>
    /// Insert your prediction key here
    /// </summary>
    private string predictionKey = "XXXXXXXXXXXXXXXXXXXXXXXXXXX";

    /// <summary>
    /// Insert your prediction endpoint here
    /// </summary>
    private string predictionEndpoint = "https://southcentralus.api.cognitive.microsoft.com/customvision/v2.0/Prediction/65b097ef-4308-4f28-847a-d5992ee0e13b/image";
次にAnalyseLastImageCapturedメソッドを削除します。
/// <summary>
/// Call the Computer Vision Service to submit the image.
/// </summary>
public IEnumerator AnalyseLastImageCaptured(string imagePath)
{
    Debug.Log("Analyzing...");

    WWWForm webForm = new WWWForm();

    using (UnityWebRequest unityWebRequest = UnityWebRequest.Post(predictionEndpoint, webForm))
    {

        // Gets a byte array out of the saved image
        imageBytes = GetImageAsByteArray(imagePath);

        unityWebRequest.SetRequestHeader("Content-Type", "application/octet-stream");
        unityWebRequest.SetRequestHeader("Prediction-Key", predictionKey);

        // The upload handler will help uploading the byte array with the request
        unityWebRequest.uploadHandler = new UploadHandlerRaw(imageBytes);
        unityWebRequest.uploadHandler.contentType = "application/octet-stream";

        // The download handler will help receiving the analysis from Azure
        unityWebRequest.downloadHandler = new DownloadHandlerBuffer();

        // Send the request
        yield return unityWebRequest.SendWebRequest();

        string jsonResponse = unityWebRequest.downloadHandler.text;

        Debug.Log("response: " + jsonResponse);

        // Create a texture. Texture size does not matter, since
        // LoadImage will replace with the incoming image size.
        Texture2D tex = new Texture2D(1, 1);
        tex.LoadImage(imageBytes);
        SceneOrganiser.Instance.quadRenderer.material.SetTexture("_MainTex", tex);

        // The response will be in JSON format, therefore it needs to be deserialized
        AnalysisRootObject analysisRootObject = new AnalysisRootObject();
        analysisRootObject = JsonConvert.DeserializeObject<AnalysisRootObject>(jsonResponse);

        SceneOrganiser.Instance.FinaliseLabel(analysisRootObject);
    }
}
あとは削除したオンライン版の処理に対応するONNXでの推論用のメソッドを追加します。
public async Task AnalyseONNX(string imagePath)
{
# if UNITY_UWP
    try
    {
        if (!IsReady) return;
        Debug.Log("Analyzing...");

        SoftwareBitmap softwareBitmap = null;

        using (var stream = new InMemoryRandomAccessStream())
        using (var memStream = new InMemoryRandomAccessStream())
        {
            imageBytes = GetImageAsByteArray(imagePath);

            await stream.WriteAsync(imageBytes.AsBuffer());
            stream.Seek(0);
            var decoder = await BitmapDecoder.CreateAsync(stream);

            //コメント部分はなくてもいいらしい(入力が416x416画像のため縮尺を変更するロジック
            //BitmapEncoder encoder = await BitmapEncoder.CreateForTranscodingAsync(memStream, decoder);
            //encoder.BitmapTransform.ScaledWidth = 416;
            //encoder.BitmapTransform.ScaledHeight = 416;

            //await encoder.FlushAsync();
            //memStream.Seek(0);
            //var decorder = await BitmapDecoder.CreateAsync(memStream);

            softwareBitmap =
                await decoder.GetSoftwareBitmapAsync(BitmapPixelFormat.Bgra8, BitmapAlphaMode.Straight);
        }

        _predictionModels =
            await _objectDetection.PredictImageAsync(VideoFrame.CreateWithSoftwareBitmap(softwareBitmap));
    }
    finally
    {
        // Stop the analysis process
        ImageCapture.Instance.ResetImageCapture();
    }
# endif
}
ONNXで処理するために必要な実装の追加
次にONNXを使って行う処理を実装します。初めにONNXモデルのロードを処理する部分を作ります。これはStartメソッドを以下のように実装して対応します。ポイントになるのはObjectDetectionのコンストラクタで指定するラベルの並び順は「labels.txt」の順にしておきます。ONNX内部ではタグ名で管理されているわけではないのでこの順序を間違うと正しい結果が返ってきません。
// Use this for initialization
void Start ()
{
# if UNITY_UWP
    Task.Run(async () =>
    {
        var modelFile = await
            StorageFile.GetFileFromApplicationUriAsync(
                new Uri("ms-appx:///Assets/LearningModel.onnx"));
        _objectDetection = new ObjectDetection(new List<string>(new[] { "AngelPie", "ChocoPie" }), 20, .3f, .45f);
        await _objectDetection.Init(modelFile);

        IsReady = true;
    });
# endif
}
次にUpdateメソッドを修正します。ONNXでの推論についてはTaskクラスやAsync/Awaitなどの非同期処理を使います。このため、描画等のUnityのオブジェクトを操作は別スレッドで実装できないのでUpdateメソッドに推論結果がある場合は描画するロジックを組み込みます。
public bool IsReady = false;

// Update is called once per frame
void Update () {

    if (IsReady && _predictionModels != null)
    {
        // Create a texture. Texture size does not matter, since
        // LoadImage will replace with the incoming image size.
        Texture2D tex = new Texture2D(1, 1);
        tex.LoadImage(imageBytes);
        SceneOrganiser.Instance.quadRenderer.material.SetTexture("_MainTex", tex);

        SceneOrganiser.Instance.FinaliseLabel(_predictionModels);
        _predictionModels = null;
    }
}
最後にImageCapture.OnStoppedPhotoModeメソッドのタップ後に画像を読み込んで推論する部分を修正します。ImageCapture.OnStoppedPhotoModeメソッドを以下のように修正しオンラインの代わりにオフライン推論されるように修正を実施します。
/// <summary>
/// The camera photo mode has stopped after the capture.
/// Begin the image analysis process.
/// </summary>
void OnStoppedPhotoMode(PhotoCapture.PhotoCaptureResult result)
{
    Debug.LogFormat("Stopped Photo Mode");

    // Dispose from the object in memory and request the image analysis
    photoCaptureObject.Dispose();
    photoCaptureObject = null;

    // Call the image analysis
    Task.Run(() => CustomVisionAnalyser.Instance.AnalyseONNX(filePath));
}
あとはHoloLens用にビルドを行います。Unityのビルド時には「Unity C# Projects」をチェックしてビルドしてください。
Visual Studioでの修正
Visual Studioを開き、ターゲットを「ReleaseまたはDebug」「X86」に変更したあと、Nugetの設定を行います。
「Assembly-CSharp」プロジェクトのNuget管理を開き以下のライブラリをインポートします。
メインのUWPプロジェクトについては、Assetフォルダ内にONNXを「LearningModel.onnx」にリネームしてコピーします。コピー後該当ファイルをプロジェクトに含め、ビルドアクションを「コンテンツ」に変更します。同時にLearningModel.csは自動生成されますが特に対応は不要です(ONNXエクスポート時のObjectDetection.csがその処理を兼ねているため)
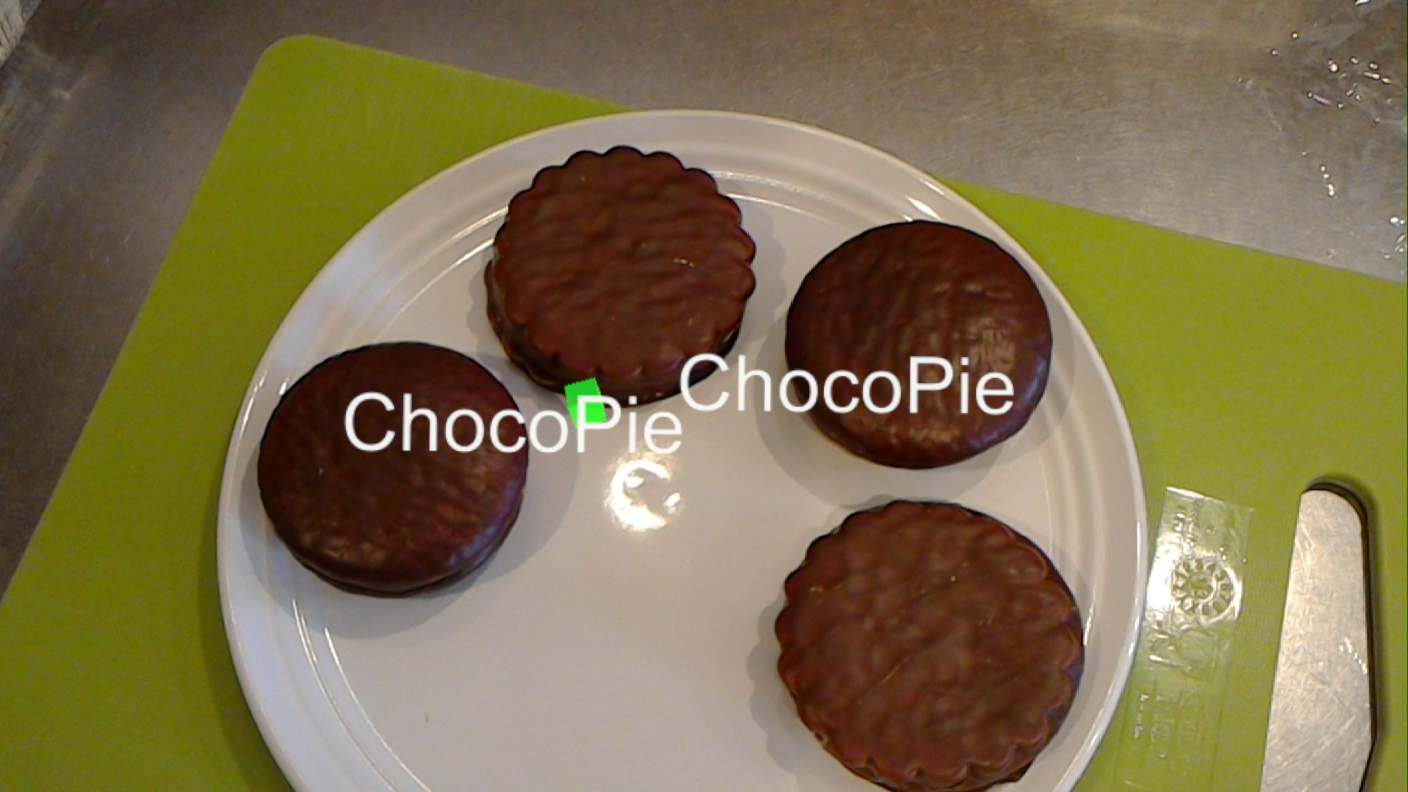
あとはいつも通りHoloLensにデプロイし実行するとタップで撮影&物体検知が動きます。
※エンゼルパイが出なかった。。。
まとめ
Custom VisionのObject Detectionがオフラインで使えるのはかなり大きいと思います。
- 物体検知したいものをカスタマイズすることができること
- オフラインによりレスポンスよく処理ができること
ただ、「Classification」に比べるとモデルでの処理が複雑なようでそこそこ推論に時間がかかってます。あまりリアルタイムで利用するのは難しいのかもしれないです。