UNETの構造を理解したくて
複数のHoloLensで体験を共有する場合はSharingという機能があります。先人たちがいろいろ解説してくれているので改めて詳細説明は不要かと。
Mixed Reality Toolkit - Unity にはこのSharingに関して以下の2つがあります。
- 専用のサーバを立ててシェアリングを実現する(MRTKのライブラリ)
- UNETを利用したシェアリング(MRTKのサンプル)
自分があまりネットワークを介したこの手のシステムを理解していないので勉強がてらアプリを作ることにしました。
概要
アプリ自体はUnityのUNETのチュートリアルMultiplayer Networkingをそのままゲームにしていく形でやっていこうかと思います。今のところ以下の流れの予定です。
- MRTKのサンプルの位置合わせをvuforiaに置き換えて精度をあげる(今回はここ)
- MRTKのサンプルをもとにマルチプレイを実現する
- Spatial Mappingを使って敵を現実世界で動かす
- 少しゲーム要素を加える
(参考)UNETがどの程度使えるのか
試した結果、一応ゲームっぽくはなりましたが概念が難しいです。同じコードが複数の環境で動くためそこに合わせてコードをかき分ける必要があるんですね。そのあたりの理解に苦しんでました。おそらく業務でUNETはないなというのが何となくのイメージです。業務でとなると他のフレームワークか自前なんでしょうね。
とはいえ、ゲームとしてみたらいちいちサーバ立てなくてもいいので気軽に使えるという点は素敵ではあります。
まずは位置合わせから
HoloLensで同一空間でのシェアリングの肝はこの位置合わせにかかってます。
まずはこの位置合わせについて動作確認を行うところから始めたいと思います。
なぜ位置合わせが必要かについては色々なサイトで解説されているので一読をお勧めします。
ようするに、アプリ起動位置がそのHoloLensの原点(0,0,0)と向き(0,0,0)になるため位置合わせをしていないと同じ位置に物体が見えないという話です。
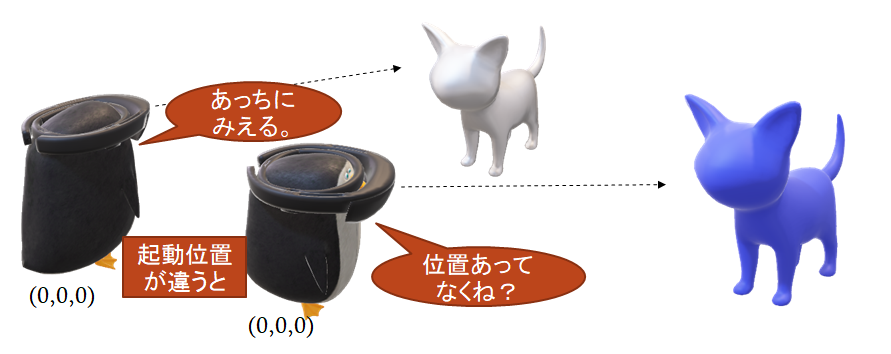
このためMRTKのシェアリング機能にはこの位置合わせを行うためのしくみも組み込まれています(アンカーを共有して位置を合わせる)
そのままでは成功率が低い
実はこのシェアリング色々を苦労します。MRTKに含まれるシェアリングの機能は位置合わせが正しく完了しないと次に進めない仕様になっています。
この位置合わせが恐ろしいほどうまくいかないです。
原因は位置合わせのために使用する「アンカー」の設置を行う処理にあります。これがかなりの確率で失敗します。
アンカーは3次元の空間のある場所に設置されるオブジェクトでこのオブジェクトからの相対値を利用することで座標系を合わせます。
このため各HoloLensから見た時にこのアンカーが3次元内の「同じ位置、同じ向き」に配置しないといけません。このためMRTKのサンプルでは以下の処理を行っています。
- アプリを起動する
- 最初に起動したHoloLensは起動後Spatial Mappingで空間のマッピングを行う。
- 空間マッピング上の特徴点が多い領域を選定しアンカーの座標を確定する。
- 確定した座標位置でアンカーを固定する。
- 固定したアンカーをシリアライズ(=他のHoloLensに送信するためにバイナリに変換)する。
- 後から接続したHoloLensは最初にアプリを起動したHoloLensから設置済みのアンカー情報をダウンロードする。
- ダウンロードした情報を復元する。この時Spatial Mappingによりダウンロードしたアンカーの位置と「同じ特徴点」を持つ場所を特定しアンカーを設置する。
- 設置に成功するとアプリケーションが実行される。
失敗するのは上記手順の3と7が一致しないことが多いことがあります。
Spatial MappingはHoloLensのセンサー情報を用いて空間マッピングを行いますが、マッピングが状態が各HoloLensで全く同じ形にはならないため特徴点が一致せずアンカーの設置に失敗するという事態が発生します。
この仕組みで正しく動作するかは、シェアリングを体験する部屋や空間に大きく左右されます。空間マッピングがきれいにとれる空間では成功率は高いと思います。
成功率を高めるアイデア=ARマーカー
位置合わせで実現すべきことは、各HoloLensで3次元空間の同じ位置にアンカーオブジェクトを設置することです。そこでARマーカーというアイデアが出てきました。
アプローチ的には以下の記事が非常に参考になります。
ARマーカーを使えば3次元空間の決まった位置にマーカを設置すれば3Dオブジェクトを表示することができます。この3Dオブジェクトをアンカーとして利用することで各HoloLensのアンカーの位置を揃えることが可能です。
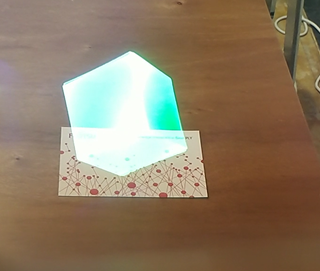
例えば、この場合マーカーが机の上に設置されています。ARマーカーなのでカメラでマーカーを見ると3Dオブジェクトが浮き上がります。
マーカー自体を動かさなければ、HoloLensは現実空間のどの位置で起動して原点位置や向きが異なっている可能性はありますが、マーカーの位置と向きは現実空間上では同じ場所になります(各HoloLens内の座標で見た場合は原点位置などが異なるため一致しない)。
このオブジェクトはマーカーを認識しているときだけ表示します。よってアンカーとなるオブジェクトに対して表示されたオブジェクトの座標、回転の情報を設定することで、位置合わせを実現します。
ARマーカを用いたバージョンのMRTKのサンプル「UNETSharingWithUNET」を作る
MTRKにはUNETを使ったサンプルアプリがあります。ただし、UNETの仕組みの関係で文字通りサンプルコードになるためExamplesの資産に含まれています。UNETSharingWithUNETについての動作は以下のまとめていますので、参考にしてください。
Mixed Reality Toolkit - Unity で始めるUNET ~ SharingWithUNETの仕組み
このサンプルを少しもじってARマーカで位置合わせした版のサンプルに作り変えてみようと思います。
流れは以下の通りです。
- Vuforiaのセットアップ
- vuforiaのマーカー登録とエクスポート
- UnityでARマーカーの設定を行う with MTRK
- MRTK-Examplesの「UNETSharingWithUNET」導入と改修
- ARマーカーで表示されたオブジェクトの座標を用いてアンカーを設置する
- Capabilityの設定
開発環境
今回の開発環境は以下の通りです(そろそろ更新しようかな)
- Windows 10 Pro Spring 2018 Update
- Unity 2017.2.1p2
- HoloToolkit-Unity-2017.4.0.0.unitypackage
- HoloToolkit-Unity-Examples-2017.2.1.4.unitypackage
- vuforia 6.5.25
1. Vuforiaのセットアップ
ARマーカーについてはUnityのバンドルされているvuforiaを利用します。
最近のUnityのバージョンではインストール時に追加する形式に代わっています。
Unity Editor上ではvuforiaの機能を使う際に自動的に必要なライブラリがセットされるようになっています。
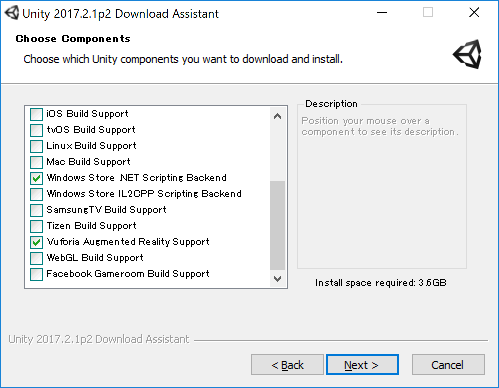
vuforiaの導入については、インストール済みの場合は再度インストーラを起動し追加する機能の一覧から「Vuforia Augmented Reality Support」を選択してください。
2. vuforiaのマーカー登録とエクスポート
次にvuforiaを利用するための「a.ライセンスキーの登録」,「b.ARマーカーに使用するイメージの登録」,「c.unitypackageのエクスポート」の順で作業を行います。
まずはvuforia Developer Portalのサイトにアクセスし、アカウントを作成します(作成済みの人はログイン)
a.ライセンスキーの登録
ライセンスキーは「Develop」-「License Manager」から行えます。
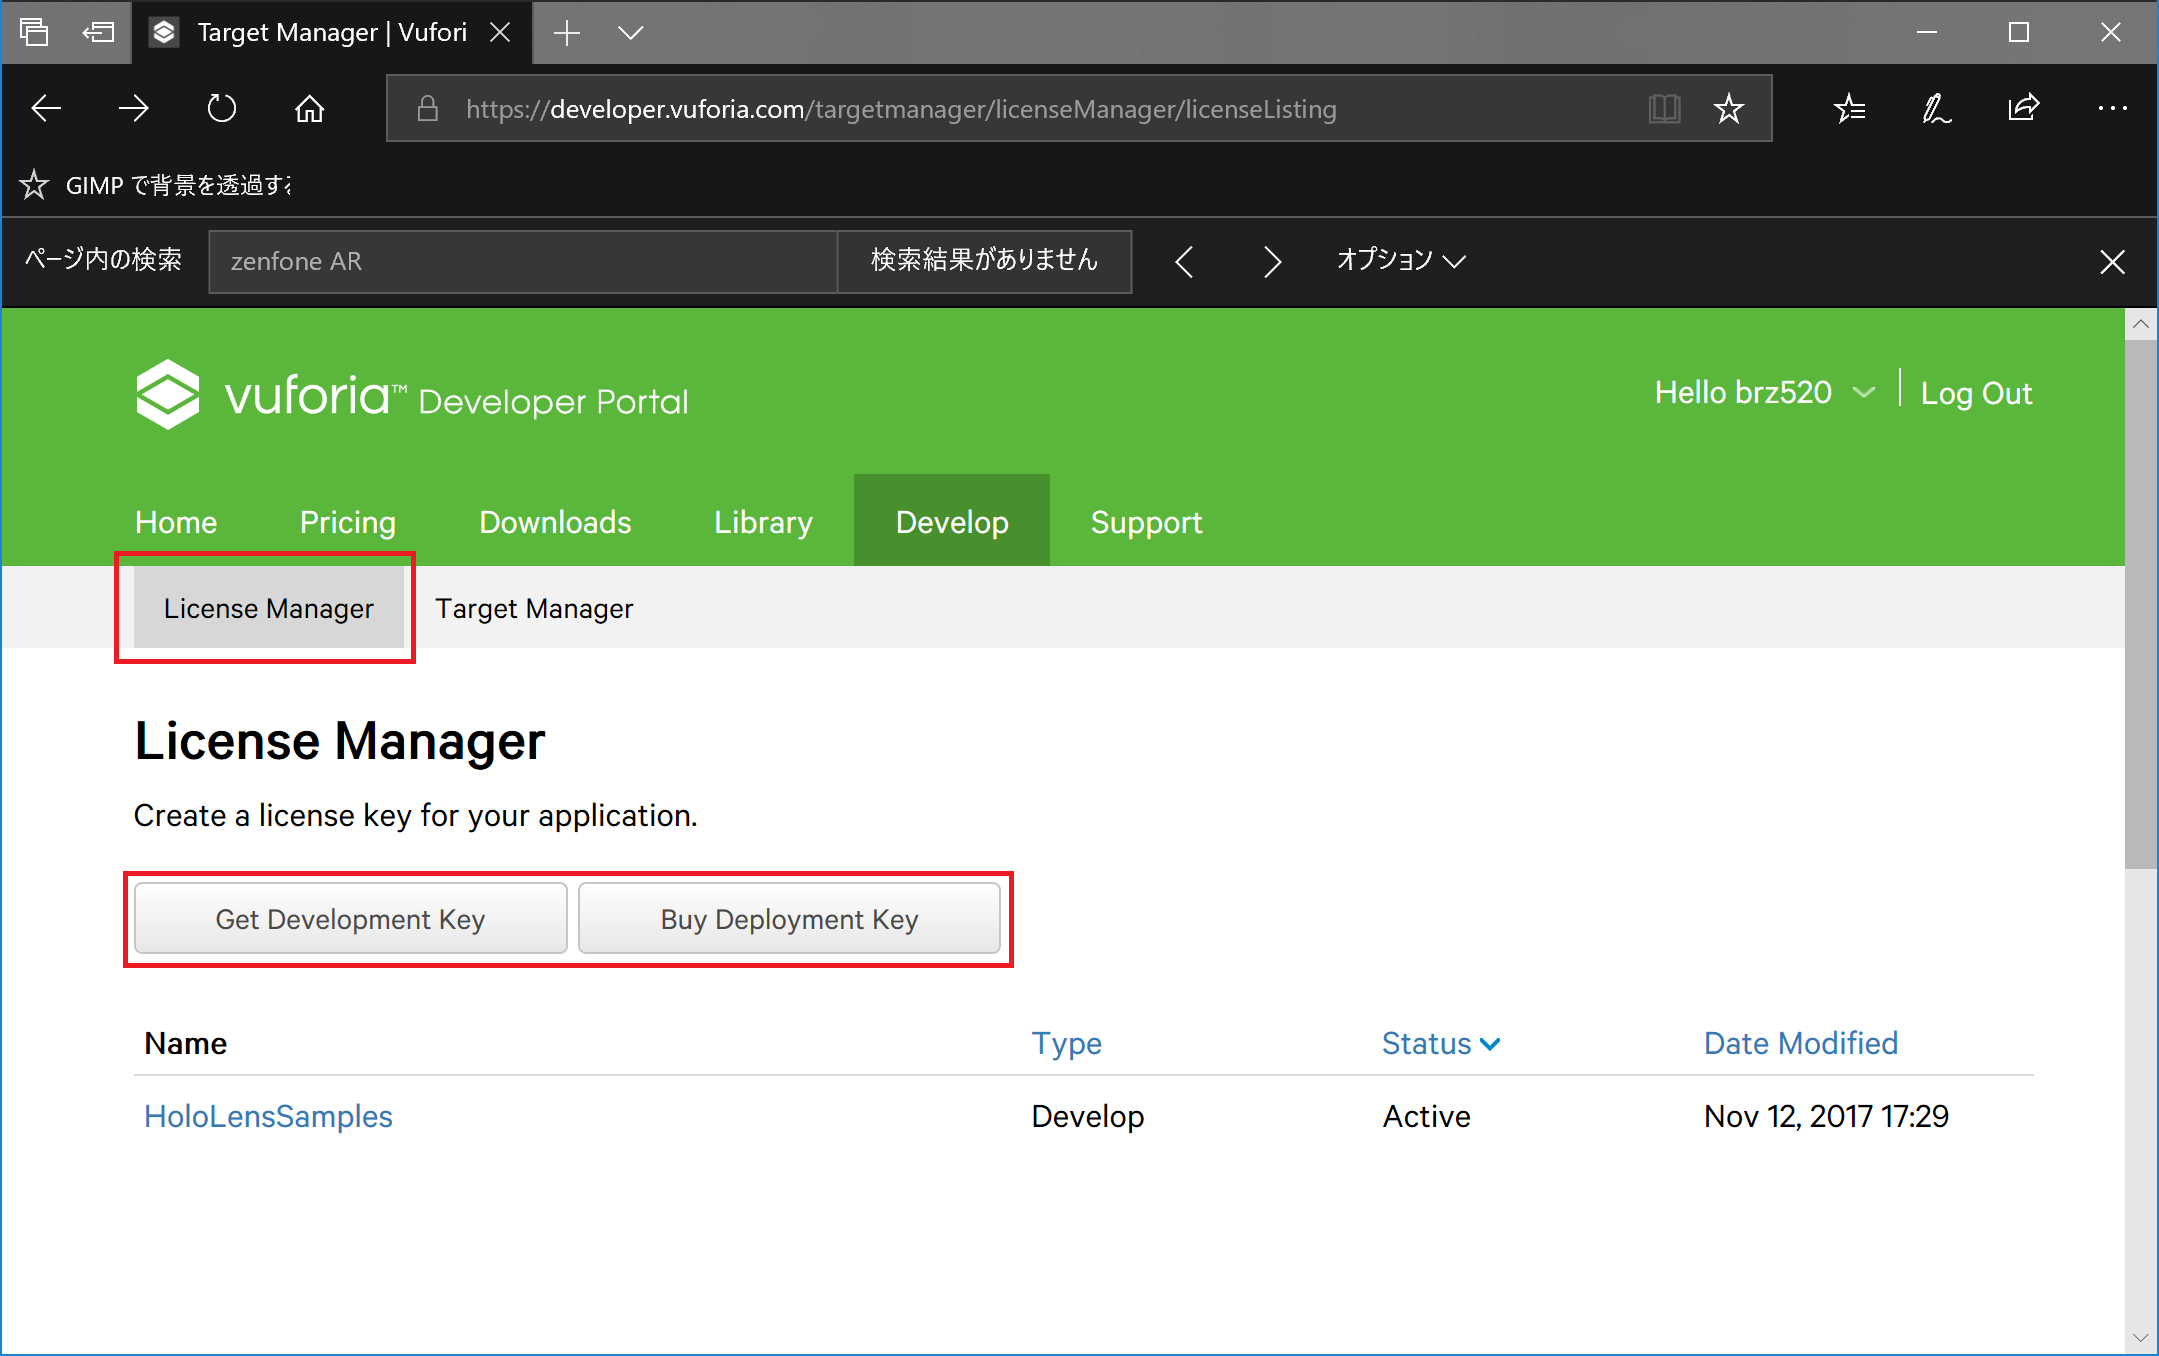
有償/無償ありますが、どちらかで登録を行ってください。
登録すると、追加した情報が下段のリストに追加されます。
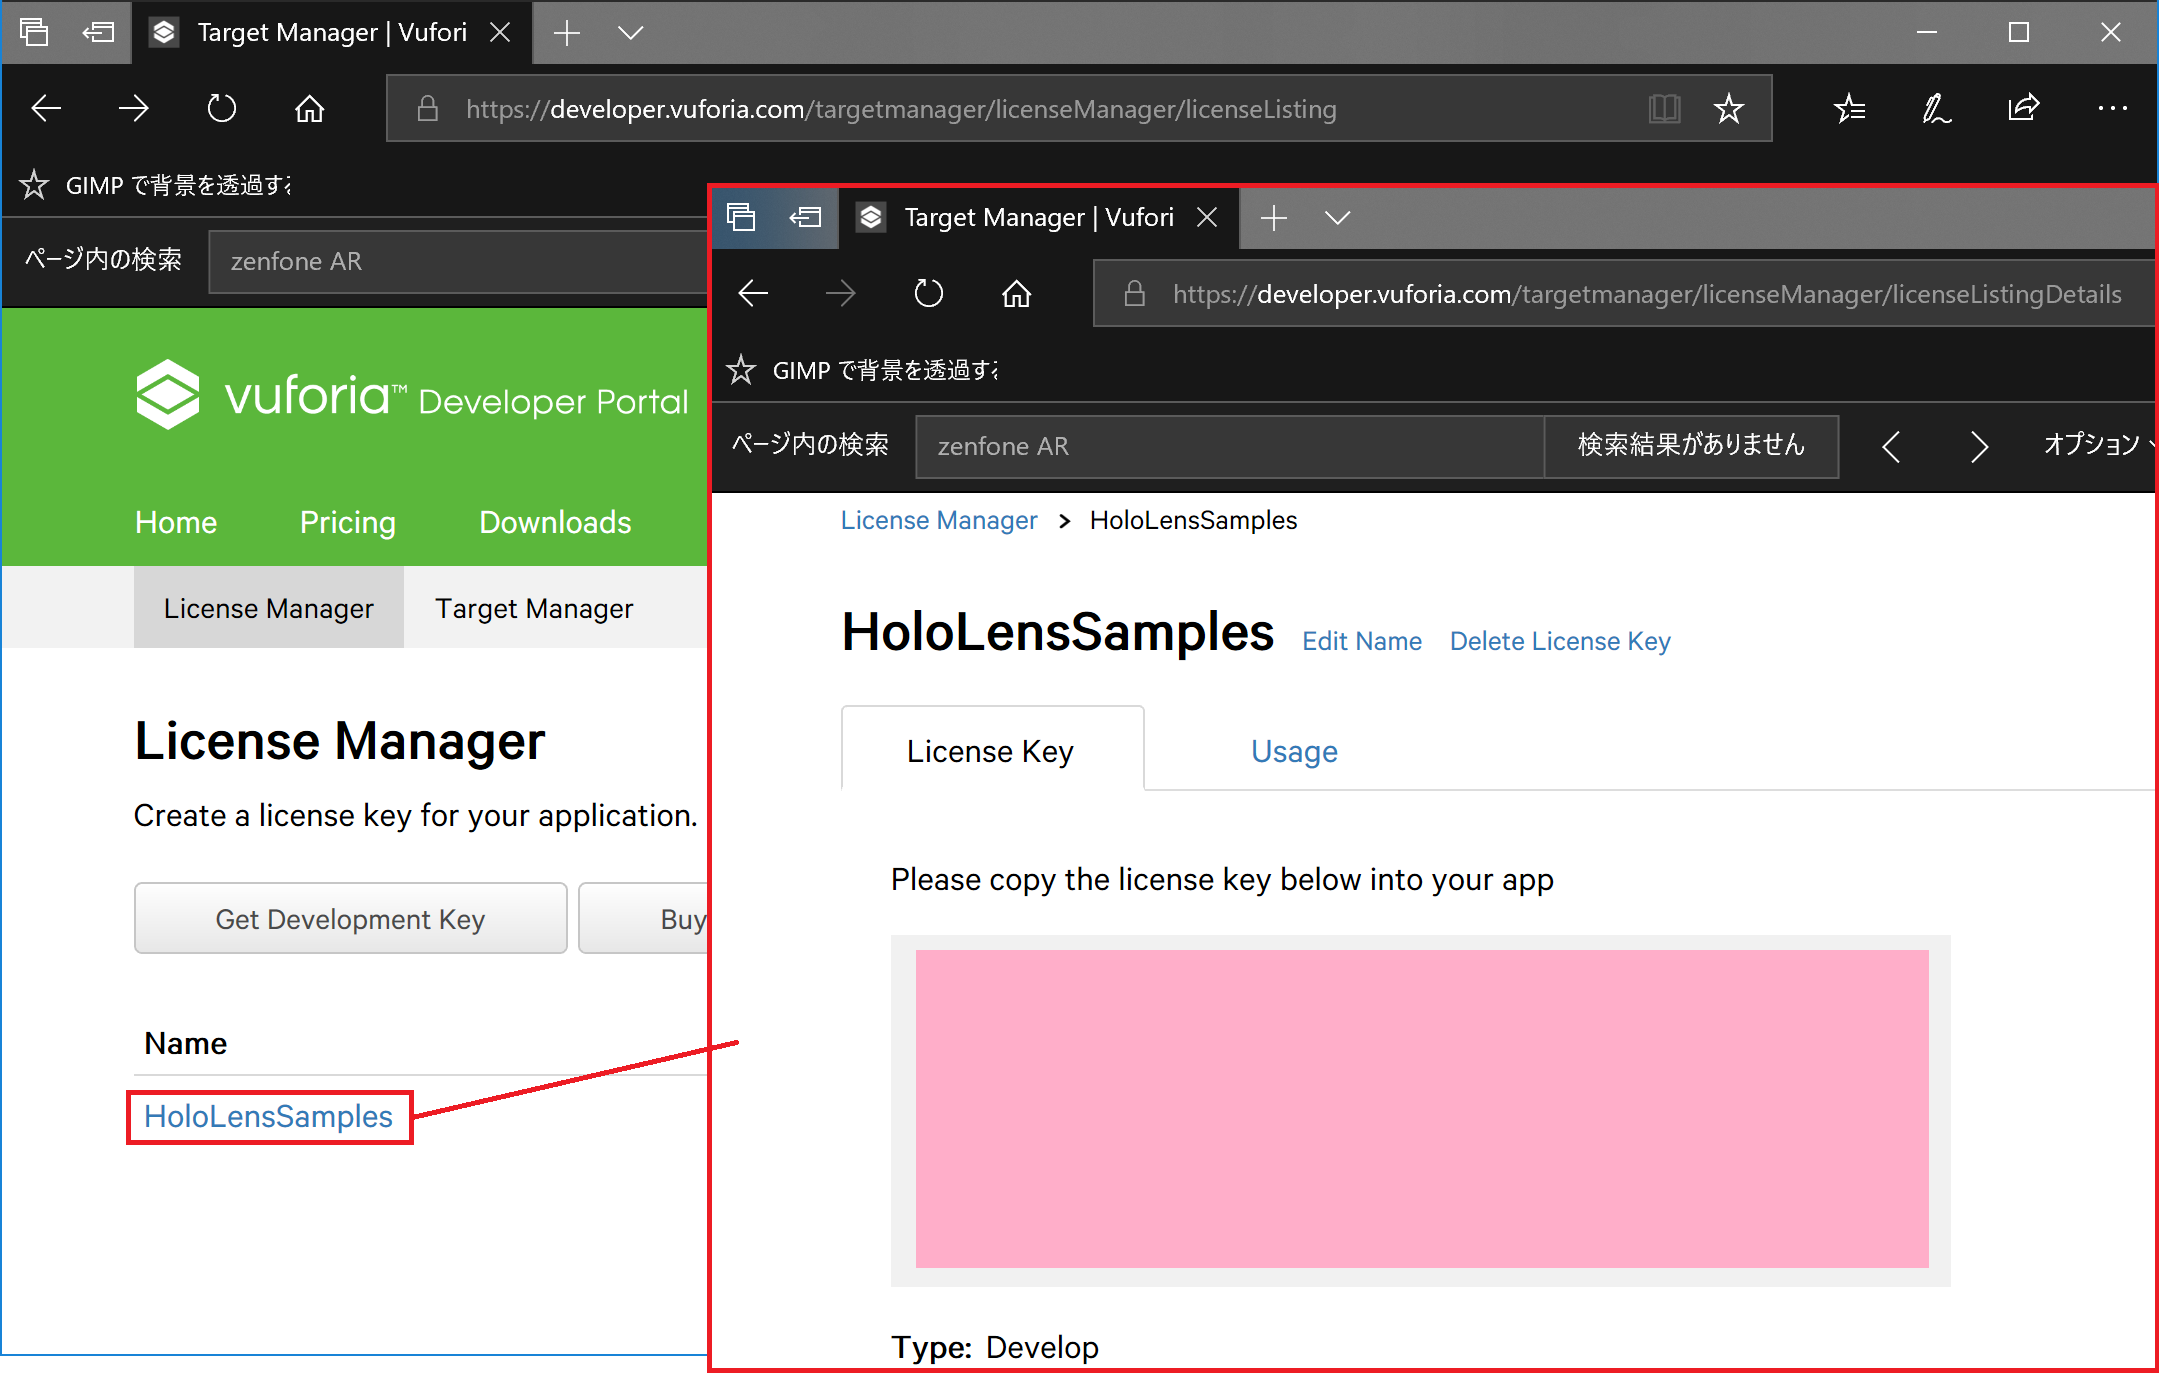
リンクをクリックすることでライセンスキーの情報を見ることができます。ライセンスキーは後で必要になるのでサイトは開いたままにしておきます。
b.ARマーカーに使用するイメージの登録
次のARマーカーに使用する何か画像を用意します。
ARマーカーの登録については「Develop」-「Target Manager」を選択し、「Add Database」ボタンを押してAPマーカーを登録するデータベースを生成します。
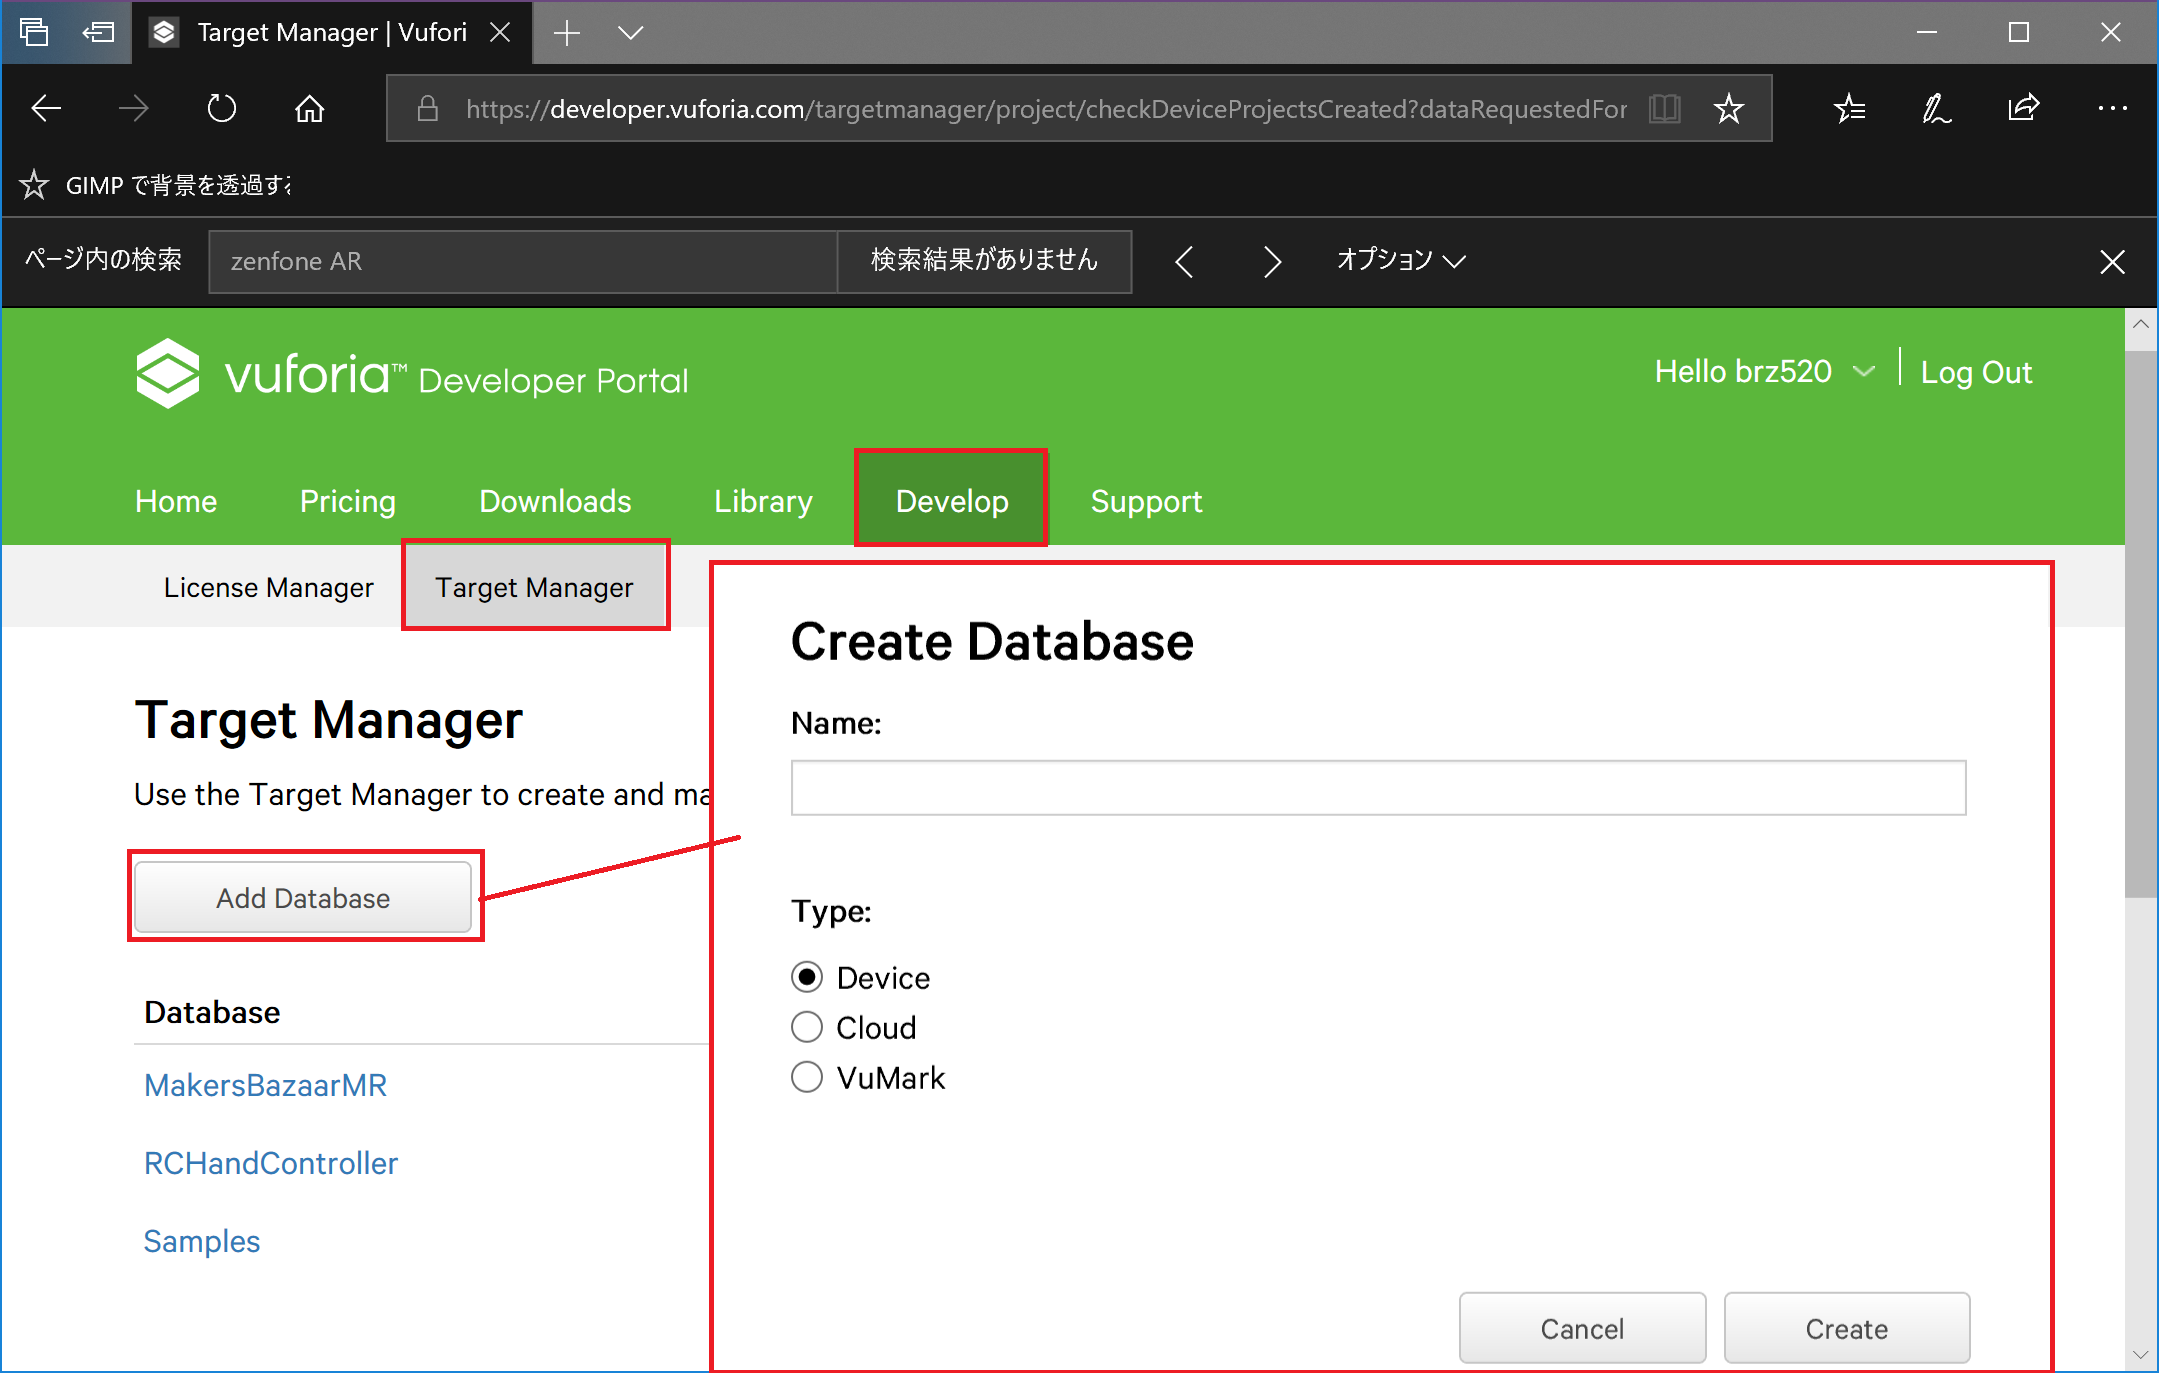
データベースの名前は任意ですが、TypeはここではDeviceにします。Deviceに設定した場合、マーカーの画像を静的にアプリケーションに組込むことができます。これによって余計なネットワーク通信の発生を抑えることができます。
作成したデータベースのリンクを選択するとマーカの登録を行うことができます。
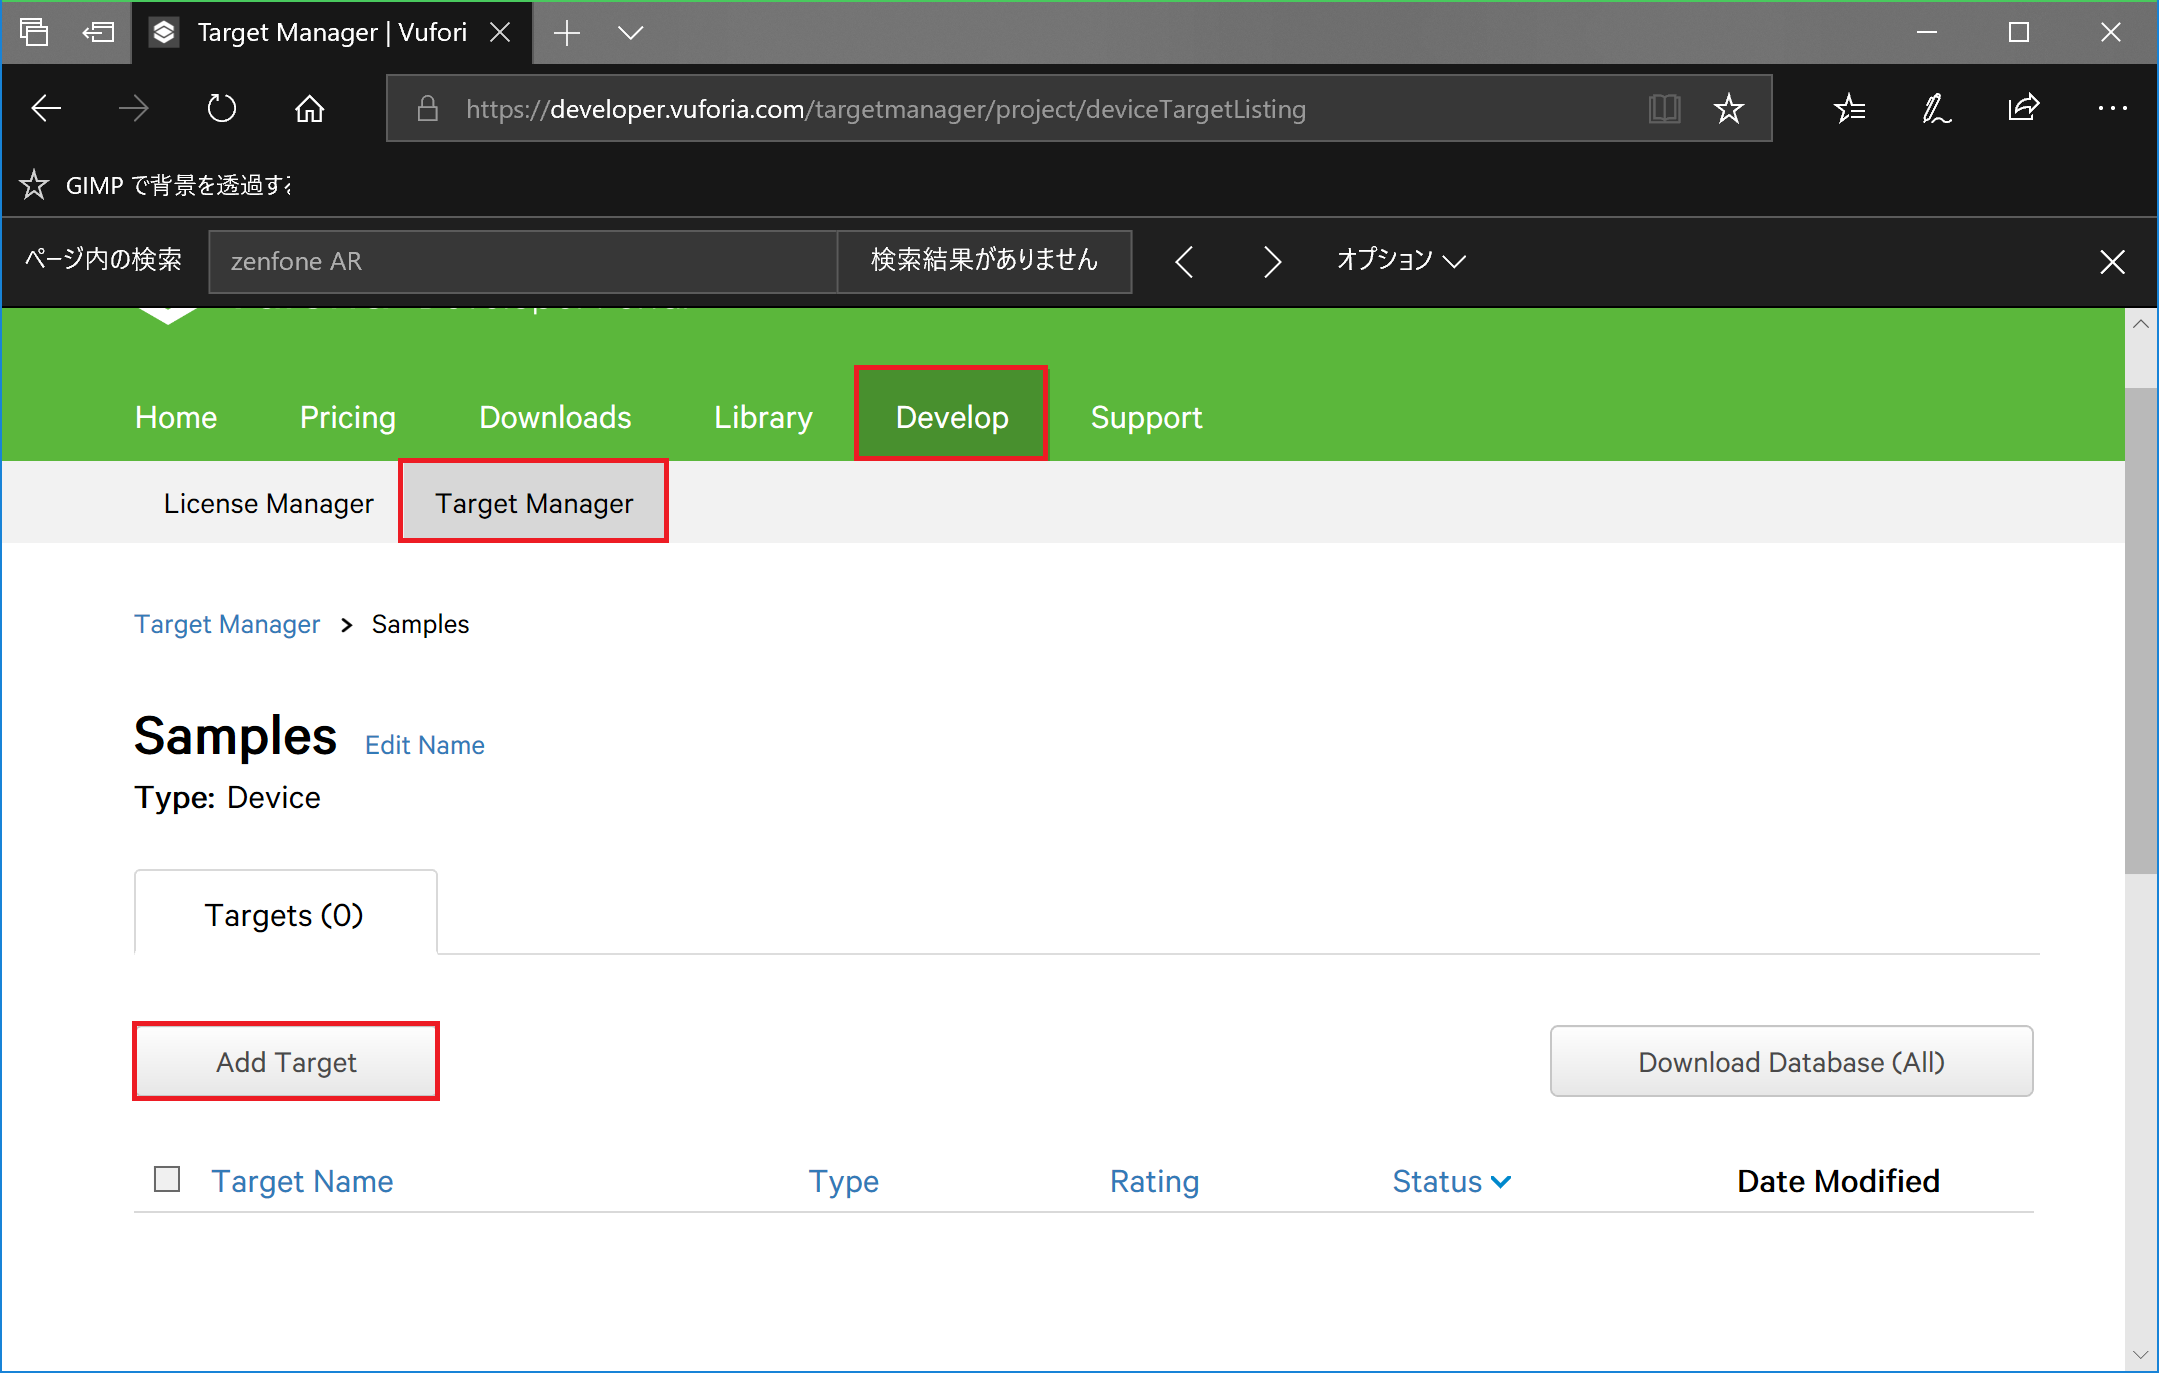
「Add Target」を押すと以下のようにマーカーの画像登録フォームが表示されます。今回はシンプルに「Simgle Image」を利用します。
特に画像については制限はありません。できるだけ特徴点の多いもので向きがわかるものが望ましいです。
注意点としてはWidthの設定です。この設定はメートル単位で実際のマーカーの大きさに合わせておく必要があります。この値があっていない場合は3Dオブジェクトの縮尺が合わないので注意してください。今回は、コミュニティの絵を使わせてもらいました。
施工するとこのように追加されたマーカーが登録されます。Ratingはマーカーの認識しやすさで評価されています。今回のシェアリングで使用する場合、どの向きから見ているかが重要になるので、できるだけ無理の判別が正確にできるようにRatingは高い方がいいと思います。
c.unitypackageのエクスポート
登録が完了したら、UnityでARマーカーのを利用するために登録した画像のデータをダウンロードします。
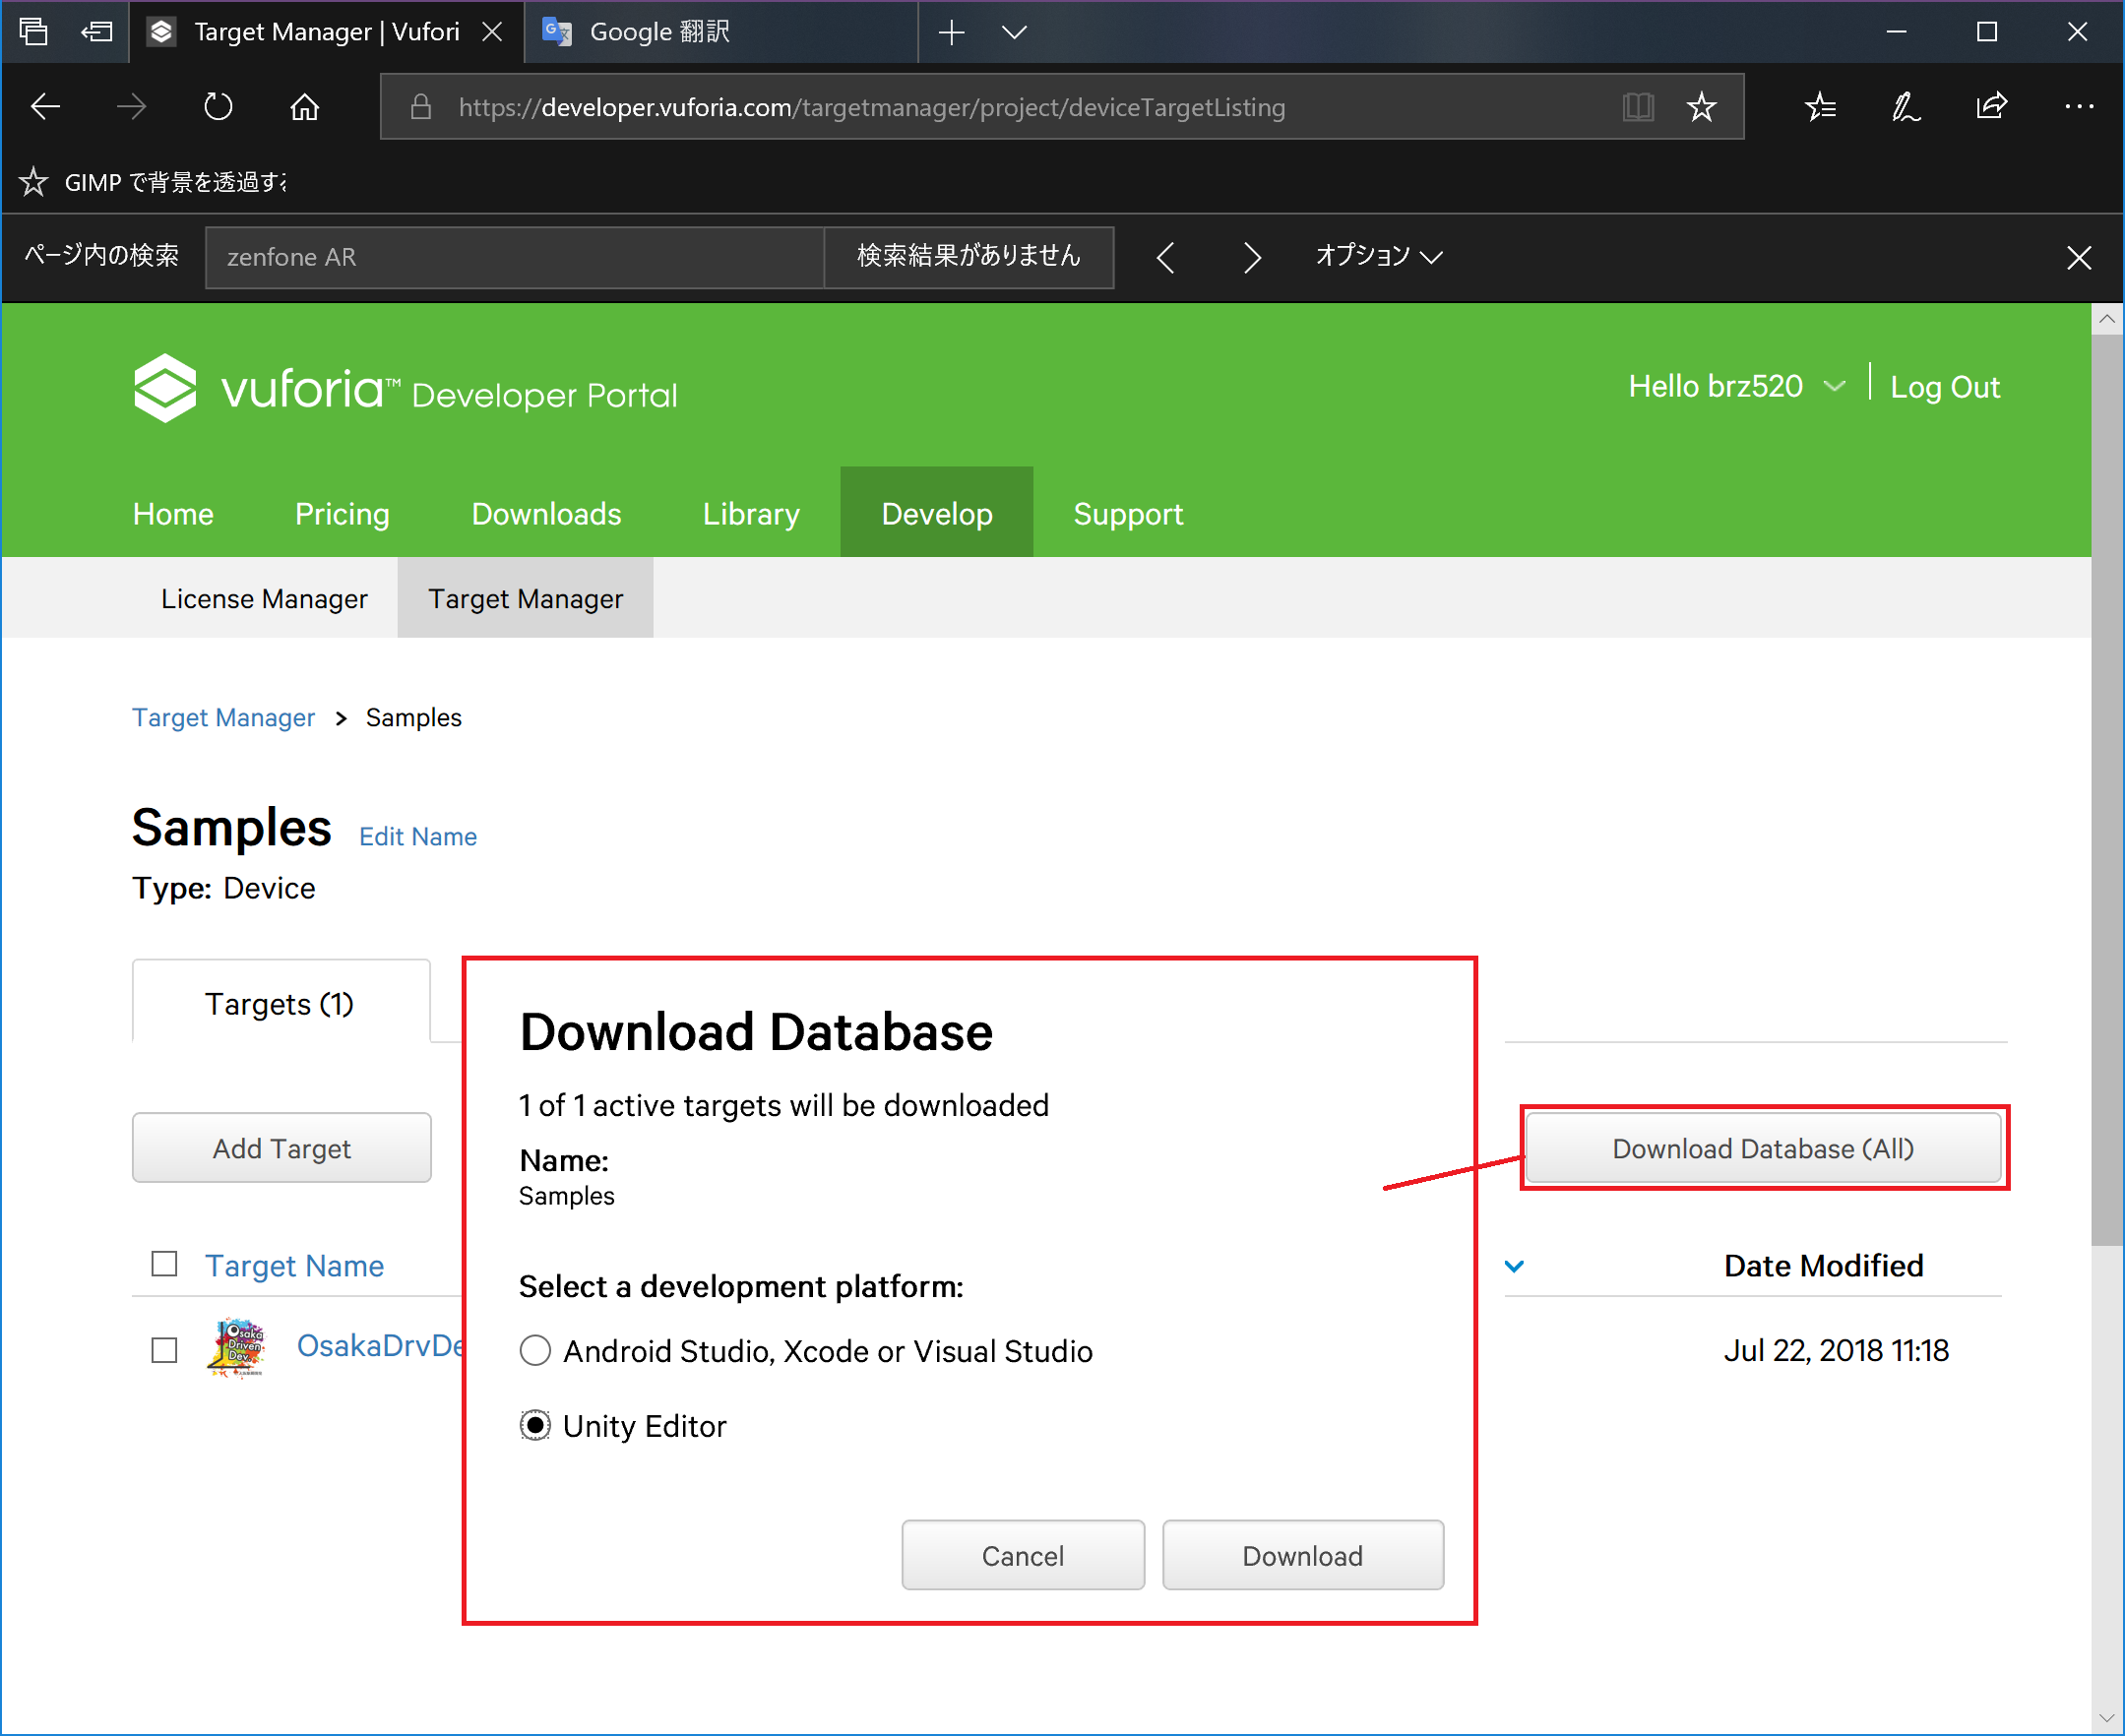
プラットフォームをUnity Editorに変更してDownloadを選択するとunitypackage形式でダウンロードが可能です。
ここまででARマーカの準備は完了です。次はUnity情報でHoloLensのアプリの検証を実施します。
3. UnityでARマーカーの設定を行う with MTRK
まずはARマーカーをHoloLensで見るとオブジェクトが表示される機能を実装します。今回はMRTKを使う前提にしていますので、カメラ周りの設定を少しいじる必要があります。
[a. MRTKの導入と設定](#### a.MRTKの導入と設定)
[b. Vuforiaの設定](#### b. Vuforiaの設定)
[c. vuforiaのモジュールをインポートする](#### c. vuforiaのモジュールをインポートする)
[d. Mixed Reality Cameraコンポーネントにvuforiaの機能を付ける](#### d. Mixed Reality Cameraコンポーネントにvuforiaの機能を付ける)
[e. マーカー上に表示するオブジェクトの設定](#### e. マーカー上に表示するオブジェクトの設定)
a.MRTKの導入と設定
まずはUnityで新しいプロジェクトを作成し、Mixed Reality Toolkit - unityをインポートします。
インポートするとメニューに「Mixed Reality Toolkit」が表示されるので、「Mixed Reality Toolkit」-「Configure」-「Apply Mixed Reality Project Settings」を選択し表示ダイアログの以下のチェックが入っていることを確認しApplyをクリックします。
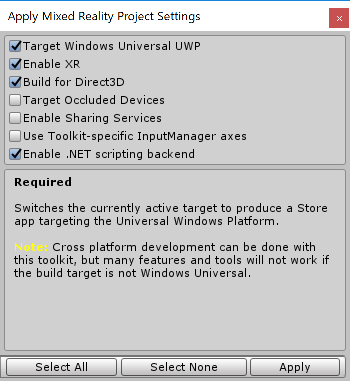
次に「Mixed Reality Toolkit」-「Configure」-「Apply Mixed Reality Scene Settings」を選択し表示されるダイアログのすべてにチェックが入っている状態でApplyをクリックします。
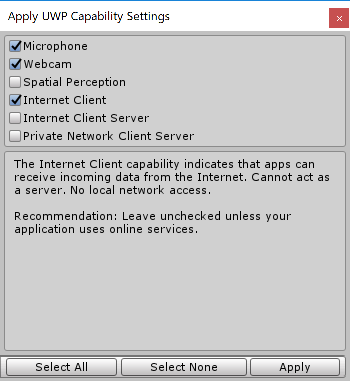
最後にUWPの機能の有効化の設定を行います。
「Mixed Reality Toolkit」-「Configure」-「Apply UWP Capabillity Settings」を選択し、ダイアログから以下の3つを設定します。設定が終わればApplyをクリックします。
- 「Microphone」「Webcam」(マーカー認識にカメラデバイスを利用するため)
- 「Internet Client」(Vuforiaのライセンスチェックのため)
これで基本的なMRTKのいつもの設定は完了です。
b.Vuforiaの設定
Vuforiaの有効化
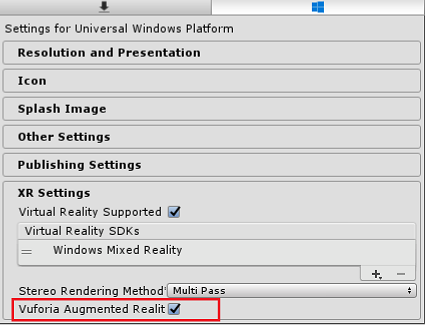
次にVuforiaの設定に移ります。Vuforiaの機能を有効化するために「Edit」-「Project Settings」-「Player」を選択します。Inspectorタブの中の「XR Settings」を展開し「Vuforia Augumented Reality Supported」にチェックを入れます。チェックを入れると「Hierarchy」に「Resources\VuforiaConfiguration」が追加されます。
最後に、サイトからダウンロードしたマーカー情報の入ったunitypackageをインポートします。
Vurofiaの設定
次にVuforiaで先ほど取り込んだマーカーの情報を使えるように設定を行います。
「Hierarchy」から「Resources\VuforiaConfiguration」を選択しInspectorタブにVuforiaの設定情報を表示します。
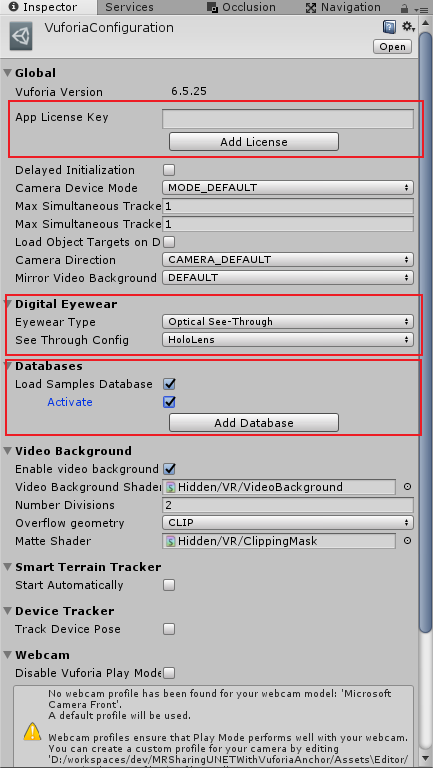
設定個所は以下の3つです。
- App License Key
サイトで登録したVuforiaのライセンスキーをコピー&ペーストします。 - Digital Eyewear
今回はHoloLensで利用するため「Eyewear Type」を「Optical See-Through」、「See Through Config」を「HoloLens」にします。 - Databases
Vuforiaのサイトからダウンロードしたデータベースにチェックを入れActivateにチェックを入れます。
ここまでできたらいったんシーンを保存します。
c.vuforiaのモジュールをインポートする
Vuforiaを利用するためには専用のモジュールが必要になりますので、Projectにインポートします。「Project」タブを選択しポップアップメニューより「Vuforia」-「Image」を選択しマーカー用のオブジェクトを作成します。この際初回については以下のようにVuforiaのモジュールのインポートするようにダイアログが表示されるのでImportボタンを押して追加を行ってください。
d.Mixed Reality Cameraコンポーネントにvuforiaの機能を付ける
次にARマーカーを使う準備を行います。マーカーを利用するにはVuforiaの機能を利用します。通常は「AR Camera」という部品がVuforiaにはありここでカメラ関連の制御を行っているのですが、MRTKでは「Mixed Reality Camera」というHoloLensやWinMRに特化した部品があるのでこれらを結合する必要があります。
先ほどまでの手順でProjectタブの中に「Mixed Reality Camera Parent」が設定されています。この中の「Mixed Reality Camera」を選択し次の2つのコンポーネントを追加します。これでARマーカーを処理するためのVuforiaの機能を組み込むことができます。
- Default Initialization Error Handler
- Vuforia Behaviour
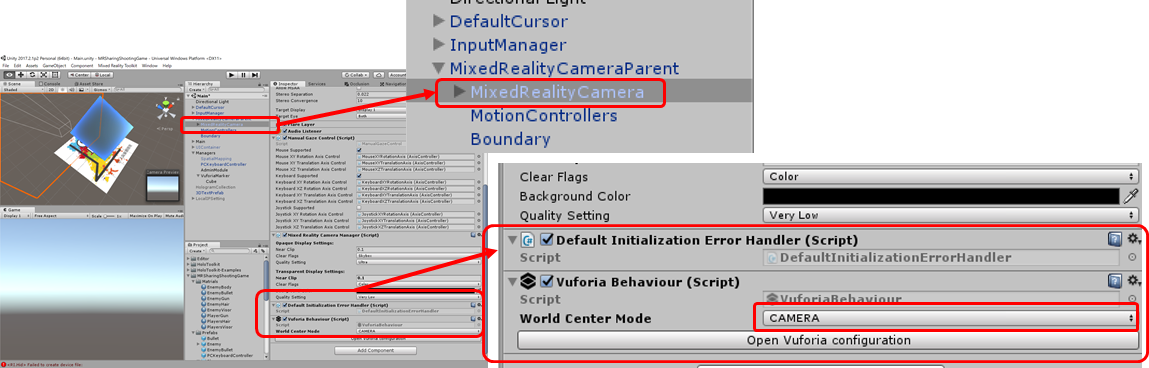
合わせて「Vuforia Behaviour」のプロパティにある「World Center Mode」を「Camera」にします。HoloLensはカメラの位置=中心なので。
また、「Vuforia Behaviour」は不要なときは無効化しておきます。vuforiaは内部ではカメラでの撮影を行っているため、有効にしたままだと、HoloLensでカメラが使えません(スクリーンショットや動画)。マーカー認識の間だけ有効化するのがアプリとして利用しやすい形式になると思います。
e.マーカー上に表示するオブジェクトの設定
マーカーをカメラが認識した際に3Dオブジェクトを表示する部分を作成します。先ほどの手順で「ImageTarget」がProjectタブにあると思いますので、これを選択します。
Inspectorタブの中に「Image Target Behaviour」があるので、以下の設定を行ってください。この設定を行うことで、先ほど登録したマーカーが認識されるとこのTargetImageの子のオブジェクトが表示されるようになります。
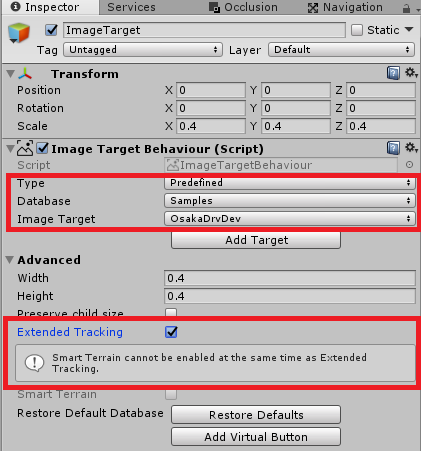
| パラメータ | 設定値 |
|---|---|
| Type | Predefined |
| Database | サイトで設定したマーカーのデータベース |
| Image Target | サイトで設定したマーカー |
| Extended Tracking | チェックを入れることでマーカーの認識が途中で失敗してもある程度オブジェクトを表示した状態を維持してくれます。 |
最後にImageTargetの子にCubeなどのオブジェクトを追加します。
以上で、HoloLens上でVuforiaをつかってAR機能を利用することができます。
一度保存を行い、HoloLensへデプロイして動作を確認してください。
3. MRTK-Examplesの「UNETSharingWithUNET」導入と改修
ここからが本題です。先ほどのマーカーを出力できたので、マーカーが表示されたらアンカーを設置、UNETを起動という流れで実装を行います。
ただし、SharingWithUNETのサンプルは先に説明したアンカーを共有仕組みを自動的にする機能が組み込まれています。そこで、この機能を除去するなど少しサンプルの見直しを実施する必要があります。
なお、UNET使いの方は無理してMRTKのサンプルを使う必要はないです。
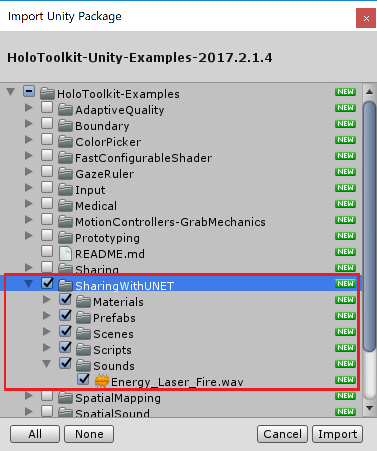
a.MRTK-Examplesのインポート
インポートについては以下のSharingWithUNETの部品の実を取り込みます。それ以外のものは今回は使用しません。
b.SharingWithUNETを導入する。
次にMRTKのサンプルをベースに先ほどのARマーカーのサンプルを修正します。
まずはNetwork Manager周りの導入を行います。
- [Hierarchy]タブを選択し、空のGameObjectを作成し名前を[UNetSharingStage]とする。
- [UNetSharingStage]を選択し、[Inspector]-[Add Component]で[Network Manager]、[Network Discovery With Anchors]を追加する。
- [Network Manager]のポート番号を変更する(任意)
- [Network Manager]-[Spawn Info]-[Player Prefab]に[HoloToolkit-Examples/SharingWithUNET/Prefabs/Player.prefab]をセットする。
- [Network Manager]-[Spawn Info]-[Registered Spawnable Prefabs]の[+]をクリックし[HoloToolkit-Examples/SharingWithUNET/Prefabs/NetBullet.prefab]をセットする。
- [Network Discovery With Anchors]-[Show GUI]のチェックを外す

次にUNETの接続先を簡単に設定できるGUI部品を追加します。
「HoloToolkit-Examples/SharingWithUNET/Prefabs/UIContainer.prefab」を[Hierarchy]タグにドラッグ&ドロップして追加します。
その後UIContainerは非表示にします。
最後にアンカーのルートとなるオブジェクトを追加します。
- [Hierarchy]タブを選択し、空のGameObjectを作成し名前を[HologramCollection]とする。
- [HologramCollection]を選択し、[Inspector]-[Add Component]で[Shared Collection]を追加する。
以上で、MRTKのサンプルで必要な部品の設定は完了です。
次にアンカーに必要な制御に関する修正を実施します。
c.Network Discovery With Anchorsの修正
「Network Discovery With Anchors」コンポーネントはSpatial Mappingを使ってアンカーの位置合わせをするための機能が含まれているのでこれを除去します。
- プロジェクトから「HoloToolkit-Examples/SharingWithUNET/scripts/NetworkDiscoveryWithAnchors.cs」をエディターで開く。
- InvokeCreateAnchorメソッド(326行目付近)を削除する。
- StartHostingメソッド内の309~314行目(InvokeCreateAnchorをInvokeで呼び出す実装)を削除する。
- JoinSessionメソッド内の266~271行目を削除する。
- InitAsServerメソッド内の222~227行目を削除する。
- CheckComponentsメソッド内の109~115行目を削除する。
全て削除した状態のコードは以下のようになります。
// Copyright (c) Microsoft Corporation. All rights reserved.
// Licensed under the MIT License. See LICENSE in the project root for license information.

using System;
using System.Collections;
using System.Collections.Generic;
using UnityEngine;
using UnityEngine.Networking;

# if !UNITY_EDITOR && UNITY_WSA
using Windows.Networking;
using Windows.Networking.Connectivity;
# endif

namespace HoloToolkit.Unity.SharingWithUNET
{
    /// <summary>
    /// Inherits from UNet's NetworkDiscovery script.
    /// Adds automatic anchor management on discovery.
    /// If the script detects that it should be the server then
    /// the script starts the anchor creation and export process.
    /// If the script detects that it should be a client then the
    /// script kicks off the anchor ingestion process.
    /// </summary>
    public class NetworkDiscoveryWithAnchors : NetworkDiscovery
    {
        /// <summary>
        /// Enables the Singleton pattern for this script.
        /// </summary>
        private static NetworkDiscoveryWithAnchors _Instance;
        public static NetworkDiscoveryWithAnchors Instance
        {
            get
            {
                NetworkDiscoveryWithAnchors[] objects = FindObjectsOfType<NetworkDiscoveryWithAnchors>();
                if (objects.Length != 1)
                {
                    Debug.LogFormat("Expected exactly 1 {0} but found {1}", typeof(NetworkDiscoveryWithAnchors).ToString(), objects.Length);
                }
                else
                {
                    _Instance = objects[0];
                }
                return _Instance;
            }
        }

        /// <summary>
        /// Class to track discovered session information.
        /// </summary>
        public class SessionInfo
        {
            public string SessionName;
            public string SessionIp;
        }

        /// <summary>
        /// Tracks if we are currently connected to a session.
        /// </summary>
        public bool Connected
        {
            get
            {
                // We are connected if we are the server or if we aren't running discovery
                return (isServer || !running);
            }
        }

        /// <summary>
        /// Event raised when the list of sessions changes.
        /// </summary>
        public event EventHandler<EventArgs> SessionListChanged;

        /// <summary>
        /// Keeps track of current remote sessions.
        /// </summary>
        [HideInInspector]
        public Dictionary<string, SessionInfo> remoteSessions = new Dictionary<string, SessionInfo>();

        /// <summary>
        /// Event raised when connected or disconnected.
        /// </summary>
        public event EventHandler<EventArgs> ConnectionStatusChanged;

        /// <summary>
        /// Controls how often a broadcast should be sent to clients
        /// looking to join our session.
        /// </summary>
        public int BroadcastInterval = 1000;

        /// <summary>
        /// Keeps track of the IP address of the system that sent the
        /// broadcast.  We will use this IP address to connect and
        /// download anchor data.
        /// </summary>
        public string ServerIp { get; private set; }

        /// <summary>
        /// Keeps track of the local IP address.
        /// </summary>
        public string LocalIp { get; set; }

        /// <summary>
        /// Sanity checks that our scene has everything we need to proceed.
        /// </summary>
        /// <returns>true if we have what we need, false otherwise.</returns>
        private bool CheckComponents()
        {

            if (NetworkManager.singleton == null)
            {
                Debug.Log("Need a NetworkManager in the scene");
                return false;
            }

            return true;
        }

        private void Awake()
        {
# if !UNITY_EDITOR && UNITY_WSA
            // Find our local IP
            foreach (HostName hostName in NetworkInformation.GetHostNames())
            {
                if (hostName.DisplayName.Split(".".ToCharArray()).Length == 4)
                {
                    Debug.Log("Local IP " + hostName.DisplayName);
                    LocalIp = hostName.DisplayName;
                    break;
                }
            }
# else
            LocalIp = "editor" + UnityEngine.Random.Range(0, 999999).ToString(); ;
# endif
        }

        private void Start()
        {
            // Initializes NetworkDiscovery.
            Initialize();

            if (!CheckComponents())
            {
                Debug.Log("Invalid configuration detected. Network Discovery disabled.");
                Destroy(this);
                return;
            }

            broadcastInterval = BroadcastInterval;
            // Add our computer name to the broadcast data for use in the session name.
            broadcastData = GetLocalComputerName() + '\0';

            // Start listening for broadcasts.
            StartAsClient();
        }

        /// <summary>
        /// Gets the local computer name if it can.
        /// </summary>
        /// <returns></returns>
        private string GetLocalComputerName()
        {
# if !UNITY_EDITOR && UNITY_WSA
            foreach (HostName hostName in NetworkInformation.GetHostNames())
            {
                if (hostName.Type == HostNameType.DomainName)
                {

                    Debug.Log("My name is " + hostName.DisplayName);
                    return hostName.DisplayName;
                }
            }
            return "NotSureWhatMyNameIs";
# else
            return System.Environment.ExpandEnvironmentVariables("%ComputerName%");
# endif
        }

        /// <summary>
        /// If we haven't received a broadcast by the time this gets called
        /// we will start broadcasting and start creating an anchor.
        /// </summary>
        private void MaybeInitAsServer()
        {
            StartCoroutine(InitAsServer());
        }

        private IEnumerator InitAsServer()
        {
            Debug.Log("Acting as host");
# if !UNITY_EDITOR && UNITY_WSA
            NetworkManager.singleton.serverBindToIP = true;
            NetworkManager.singleton.serverBindAddress = LocalIp;
# endif

            // StopBroadcast will also 'StopListening'
            StopBroadcast();

            // Work-around when building to the HoloLens with "Compile with .NET Native tool chain".
            // Need a frame of delay after StopBroadcast() otherwise clients won't connect.
            yield return null;

            // Starting as a 'host' makes us both a client and a server.
            // There are nuances to this in UNet's sync system, so do make sure
            // to test behavior of your networked objects on both a host and a client
            // device.
            NetworkManager.singleton.StartHost();

            // Work-around when building to the HoloLens with "Compile with .NET Native tool chain".
            // Need a frame of delay between StartHost() and StartAsServer() otherwise clients won't connect.
            yield return null;

            // Start broadcasting for other clients.
            StartAsServer();

        }

        /// <summary>
        /// Called by UnityEngine when a broadcast is received.
        /// </summary>
        /// <param name="fromAddress">When the broadcast came from</param>
        /// <param name="data">The data in the broad cast. Not currently used, but could
        /// be used for differentiating rooms or similar.</param>
        public override void OnReceivedBroadcast(string fromAddress, string data)
        {
            ServerIp = fromAddress.Substring(fromAddress.LastIndexOf(':') + 1);
            SessionInfo sessionInfo;
            if (remoteSessions.TryGetValue(ServerIp, out sessionInfo) == false)
            {
                Debug.Log("new session: " + fromAddress);
                Debug.Log(data);
                remoteSessions.Add(ServerIp, new SessionInfo() { SessionIp = ServerIp, SessionName = data });
                SignalSessionListEvent();
            }
        }


        /// <summary>
        /// Call to stop listening for sessions.
        /// </summary>
        public void StopListening()
        {
            StopBroadcast();
            remoteSessions.Clear();
        }

        /// <summary>
        /// Call to start listening for sessions.
        /// </summary>
        public void StartListening()
        {
            StopListening();
            StartAsClient();
        }

        /// <summary>
        /// Call to join a session
        /// </summary>
        /// <param name="session">Information about the session to join</param>
        public void JoinSession(SessionInfo session)
        {
            StopListening();
            // We have to parse the server IP to make the string friendly to the windows APIs.
            ServerIp = session.SessionIp;
            NetworkManager.singleton.networkAddress = ServerIp;

            // And join the networked experience as a client.
            NetworkManager.singleton.StartClient();
            SignalConnectionStatusEvent();
        }

        /// <summary>
        /// Call to create a session
        /// </summary>
        /// <param name="SessionName">The name of the session if a name can't be calculated</param>
        public void StartHosting(string SessionName)
        {
            StopListening();

# if !UNITY_EDITOR && UNITY_WSA
            NetworkManager.singleton.serverBindToIP = true;
            NetworkManager.singleton.serverBindAddress = LocalIp;
# endif
            // Starting as a 'host' makes us both a client and a server.
            // There are nuances to this in UNet's sync system, so do make sure
            // to test behavior of your networked objects on both a host and a client
            // device.
            NetworkManager.singleton.StartHost();
            // Start broadcasting for other clients.
            StartAsServer();

            SignalSessionListEvent();
            SignalConnectionStatusEvent();
        }


        /// <summary>
        /// Called when sessions have been added or removed
        /// </summary>
        void SignalSessionListEvent()
        {
            EventHandler<EventArgs> sessionListChanged = SessionListChanged;
            if (sessionListChanged != null)
            {
                sessionListChanged(this, EventArgs.Empty);
            }
        }

        /// <summary>
        /// Called when we have joined or left a session.
        /// </summary>
        void SignalConnectionStatusEvent()
        {
            EventHandler<EventArgs> connectionEvent = this.ConnectionStatusChanged;
            if (connectionEvent != null)
            {
                connectionEvent(this, EventArgs.Empty);
            }
        }
    }
}
d.PlayerControllerの修正
PlayerControllerではアンカーの同期制御のためにUnetAnchorManagerクラスを利用していますのでこの処理を除去します。
- Updateメソッド内の247~257行目を除去する(anchorManagerに関する実装)
- Startメソッド内の223行目(AnchorEstablishedChanged(AnchorEstablished);)を除去する
- Awakeメソッド内の200行目(anchorManager = UNetAnchorManager.Instance;)を除去する
- AnchorEstablishedChangedメソッドを除去する(95~105行目)
- CmdSendAnchorEstablishedメソッドを除去する(77~93行目)
- AnchorEstablishedプロパティを除去する(71~75行目)
- anchorManagerフィールドを削除する。
全て削除した状態のコードは以下のようになります。
// Copyright (c) Microsoft Corporation. All rights reserved.
// Licensed under the MIT License. See LICENSE in the project root for license information.

using UnityEngine;
using UnityEngine.Networking;
using HoloToolkit.Unity.InputModule;

namespace HoloToolkit.Unity.SharingWithUNET
{
    /// <summary>
    /// Controls player behavior (local and remote).
    /// </summary>
    [NetworkSettings(sendInterval = 0.033f)]
    public class PlayerController : NetworkBehaviour, IInputClickHandler
    {
        private static PlayerController _Instance = null;
        /// <summary>
        /// Instance of the PlayerController that represents the local player.
        /// </summary>
        public static PlayerController Instance
        {
            get
            {
                return _Instance;
            }
        }

        /// <summary>
        /// The game object that represents the 'bullet' for
        /// this player. Must exist in the spawnable prefabs on the
        /// NetworkManager.
        /// </summary>
        public GameObject bullet;

        public bool CanShareAnchors;

        /// <summary>
        /// The transform of the shared world anchor.
        /// </summary>
        private Transform sharedWorldAnchorTransform;

        /// <summary>
        /// The position relative to the shared world anchor.
        /// </summary>
        [SyncVar]
        private Vector3 localPosition;

        /// <summary>
        /// The rotation relative to the shared world anchor.
        /// </summary>
        [SyncVar]
        private Quaternion localRotation;

        /// <summary>
        /// Sets the localPosition and localRotation on clients.
        /// </summary>
        /// <param name="postion">the localPosition to set</param>
        /// <param name="rotation">the localRotation to set</param>
        [Command(channel = 1)]
        public void CmdTransform(Vector3 postion, Quaternion rotation)
        {
            localPosition = postion;
            localRotation = rotation;
        }

        /// <summary>
        /// Tracks the player name.
        /// </summary>
        [SyncVar(hook = "PlayerNameChanged")]
        string PlayerName;

        /// <summary>
        /// Called to set the player name
        /// </summary>
        /// <param name="playerName">The name to update to</param>
        [Command]
        private void CmdSetPlayerName(string playerName)
        {
            PlayerName = playerName;
        }

        /// <summary>
        /// Called when the player name changes.
        /// </summary>
        /// <param name="update">the updated name</param>
        void PlayerNameChanged(string update)
        {
            Debug.LogFormat("Player name changing from {0} to {1}", PlayerName, update);
            PlayerName = update;
            // Special case for spectator view
            if (PlayerName.ToLower() == "spectatorviewpc")
            {
                gameObject.SetActive(false);
            }
        }

# pragma warning disable 0414
        /// <summary>
        /// Keeps track of the player's IP address
        /// </summary>
        [SyncVar(hook = "PlayerIpChanged")]
        string PlayerIp;
# pragma warning restore 0414

        /// <summary>
        /// Called to set the IP address
        /// </summary>
        /// <param name="playerIp"></param>
        [Command]
        private void CmdSetPlayerIp(string playerIp)
        {
            PlayerIp = playerIp;
        }

        /// <summary>
        /// Called when the player IP address changes
        /// </summary>
        /// <param name="update">The updated IP address</param>
        void PlayerIpChanged(string update)
        {
            PlayerIp = update;
        }

        /// <summary>
        /// Tracks if the player can share spatial anchors
        /// </summary>
        [SyncVar(hook = "SharesAnchorsChanged")]
        public bool SharesSpatialAnchors;

        /// <summary>
        /// Called to update if the player can share spatial anchors.
        /// </summary>
        /// <param name="canShareAnchors">True if the device can share spatial anchors.</param>
        [Command]
        private void CmdSetCanShareAnchors(bool canShareAnchors)
        {
            Debug.Log("CMDSetCanShare " + canShareAnchors);
            SharesSpatialAnchors = canShareAnchors;
        }

        /// <summary>
        /// Called when the ability to share spatial anchors changes
        /// </summary>
        /// <param name="update">True if the device can share spatial anchors.</param>
        void SharesAnchorsChanged(bool update)
        {
            SharesSpatialAnchors = update;
            Debug.LogFormat("{0} {1} share", PlayerName, SharesSpatialAnchors ? "does" : "does not");
        }

        /// <summary>
        /// Script that handles finding, creating, and joining sessions.
        /// </summary>
        private NetworkDiscoveryWithAnchors networkDiscovery;

        void Awake()
        {
            networkDiscovery = NetworkDiscoveryWithAnchors.Instance;
        }

        private void Start()
        {
            if (SharedCollection.Instance == null)
            {
                Debug.LogError("This script required a SharedCollection script attached to a GameObject in the scene");
                Destroy(this);
                return;
            }

            if (isLocalPlayer)
            {
                // If we are the local player then we want to have airtaps
                // sent to this object so that projectiles can be spawned.
                InputManager.Instance.AddGlobalListener(gameObject);
                InitializeLocalPlayer();
            }
            else
            {
                Debug.Log("remote player");
                GetComponentInChildren<MeshRenderer>().material.color = Color.red;
                GetComponentInChildren<MeshRenderer>().enabled = true;

                SharesAnchorsChanged(SharesSpatialAnchors);
            }

            sharedWorldAnchorTransform = SharedCollection.Instance.gameObject.transform;
            transform.SetParent(sharedWorldAnchorTransform);
        }

        private void Update()
        {
            // If we aren't the local player, we just need to make sure that the position of this object is set properly
            // so that we properly render their avatar in our world.
            if (!isLocalPlayer && string.IsNullOrEmpty(PlayerName) == false)
            {
                transform.localPosition = Vector3.Lerp(transform.localPosition, localPosition, 0.3f);
                transform.localRotation = localRotation;
                return;
            }

            if (!isLocalPlayer)
            {
                return;
            }


            // if we are the remote player then we need to update our worldPosition and then set our
            // local (to the shared world anchor) position for other clients to update our position in their world.
            transform.position = CameraCache.Main.transform.position;
            transform.rotation = CameraCache.Main.transform.rotation;

            // For UNET we use a command to signal the host to update our local position
            // and rotation
            CmdTransform(transform.localPosition, transform.localRotation);
        }

        /// <summary>
        /// Sets up all of the local player information
        /// </summary>
        private void InitializeLocalPlayer()
        {
            if (isLocalPlayer)
            {
                Debug.Log("Setting instance for local player ");
                _Instance = this;
                Debug.LogFormat("Set local player name {0} IP {1}", networkDiscovery.broadcastData, networkDiscovery.LocalIp);
                CmdSetPlayerName(networkDiscovery.broadcastData);
                CmdSetPlayerIp(networkDiscovery.LocalIp);
# if UNITY_WSA
# if UNITY_2017_2_OR_NEWER
                CanShareAnchors = !UnityEngine.XR.WSA.HolographicSettings.IsDisplayOpaque;
# else
                CanShareAnchors = !Application.isEditor && UnityEngine.VR.VRDevice.isPresent;
# endif
# endif
                Debug.LogFormat("local player {0} share anchors ", (CanShareAnchors ? "does not" : "does"));
                CmdSetCanShareAnchors(CanShareAnchors);
            }
        }

        private void OnDestroy()
        {
            if (isLocalPlayer)
            {
                InputManager.Instance.RemoveGlobalListener(gameObject);
            }
        }

        /// <summary>
        /// Called when the local player starts.  In general the side effect should not be noticed
        /// as the players' avatar is always rendered on top of their head.
        /// </summary>
        public override void OnStartLocalPlayer()
        {
            GetComponentInChildren<MeshRenderer>().material.color = Color.blue;
            GetComponentInChildren<MeshRenderer>().enabled = true;
        }

        /// <summary>
        /// Called on the host when a bullet needs to be added.
        /// This will 'spawn' the bullet on all clients, including the
        /// client on the host.
        /// </summary>
        [Command]
        void CmdFire()
        {
            Vector3 bulletDir = transform.forward;
            Vector3 bulletPos = transform.position + bulletDir * 1.5f;

            // The bullet needs to be transformed relative to the shared anchor.
            GameObject nextBullet = (GameObject)Instantiate(bullet);
            nextBullet.transform.position= sharedWorldAnchorTransform.InverseTransformPoint(bulletPos);
            nextBullet.transform.rotation = Quaternion.FromToRotation(nextBullet.transform.forward,sharedWorldAnchorTransform.InverseTransformDirection(transform.forward));
            nextBullet.GetComponentInChildren<Rigidbody>().velocity = nextBullet.transform.forward * 1.0f;
            NetworkServer.Spawn(nextBullet);

            // Clean up the bullet in 8 seconds.
            Destroy(nextBullet, 8.0f);
        }

        public void OnInputClicked(InputClickedEventData eventData)
        {
            if (isLocalPlayer)
            {
                CmdFire();
            }
        }

        [Command]
        private void CmdSendSharedTransform(GameObject target, Vector3 pos, Quaternion rot)
        {
            UNetSharedHologram ush = target.GetComponent<UNetSharedHologram>();
            ush.CmdTransform(pos, rot);
        }

        /// <summary>
        /// For sending transforms for holograms which do not frequently change.
        /// </summary>
        /// <param name="target">The shared hologram</param>
        /// <param name="pos">position relative to the shared anchor</param>
        /// <param name="rot">rotation relative to the shared anchor</param>
        public void SendSharedTransform(GameObject target, Vector3 pos, Quaternion rot)
        {
            if (isLocalPlayer)
            {
                CmdSendSharedTransform(target, pos, rot);
            }
        }
    }
}
e.UNETAnchorManagerとSharedAnchorDebugTextおよびResetAnchorButtonの削除
最後に不要になったUNETAnchorManager.csとSharedAnchorDebugText.cs、UNETAnchorManagerとSharedAnchorDebugTextおよびResetAnchorButtonの削除.csを除去します。
f.UIContainerの修正
UIContainerに含まれる部品の一部を変更します。UIContainerではサーバとなったマシンのリストを表示することができますが、端末のタイミングによってリストの更新がうまくいかない場合があるため、強制的に表示させるために以下のUpdateメソッドを「ScrollingSessionListUIController.cs」に追加します。
private void Update()
{
    sessionList = networkDiscovery.remoteSessions;
    SessionIndex = Mathf.Min(SessionIndex, sessionList.Count);
    // this will force a recalculation of the buttons.
    ScrollSessions(SessionIndex);
}
以上でSharingWithUNETの中からAnchor制御に関する部分を除去しました。
あと、追加で弾の撃ちだす際のロジックを見直します。デフォルトのままでは撃ちだす角度がずれるため正しい向きになるように見直しを行います。
[Command]
void CmdFire()
{
    Vector3 bulletDir = transform.forward;
    Vector3 bulletPos = transform.position + bulletDir * 1.5f;

    // The bullet needs to be transformed relative to the shared anchor.
    GameObject nextBullet = (GameObject)Instantiate(bullet);
    nextBullet.transform.position= sharedWorldAnchorTransform.InverseTransformPoint(bulletPos);
    // アンカー配下のカメラの正面方向に弾を向ける
    nextBullet.transform.rotation = Quaternion.FromToRotation(nextBullet.transform.forward,sharedWorldAnchorTransform.InverseTransformDirection(transform.forward));
    nextBullet.GetComponentInChildren<Rigidbody>().velocity = nextBullet.transform.forward * 1.0f;
    NetworkServer.Spawn(nextBullet);

    // Clean up the bullet in 8 seconds.
    Destroy(nextBullet, 8.0f);
}
以上でPlayerControllerの修正は完了です。
サイドのARマーカを認識後、エアタップでアンカーの設定を行い、UNETを利用したサンプルを動くようにするための実装を追加します。
5.ARマーカーで表示されたオブジェクトの座標を用いてアンカーを設置する
最後に位置合わせに必要なアンカーの設定についてのロジックを追加します。
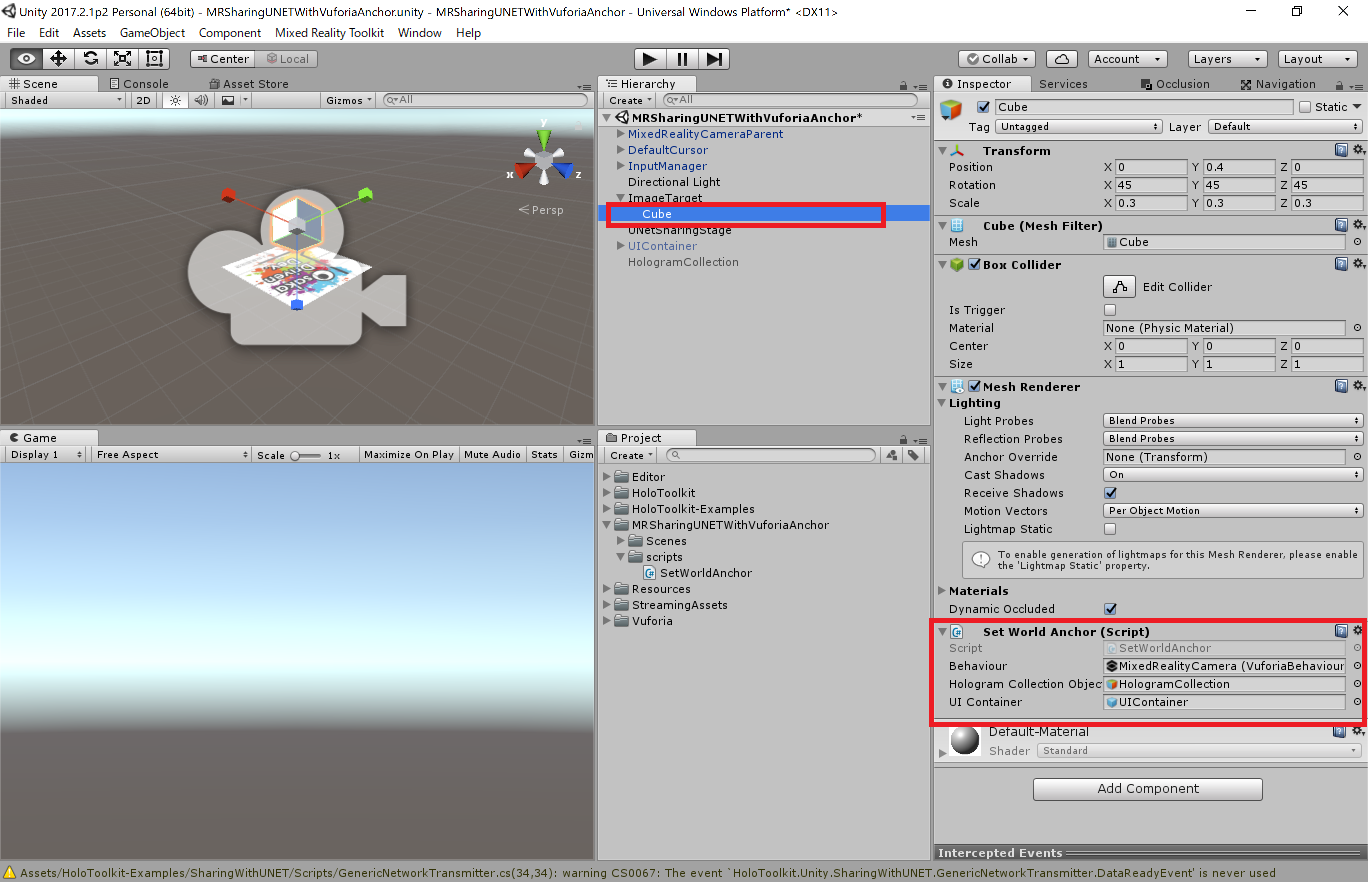
- [Project]タブで新しいC#スクリプトを[SetWorldAnchor]で作成する。
- 先ほど3の手順で追加したマーカーの子要素のオブジェクトに[SetWorldAnchor]を追加する
- [SetWorldAnchor]にエアタップ時に以下の処理を追加する
・マーカーの子オブジェクトから[HologramCollection]に座標とY軸の角度のみコピーする
・[Mixed Reality Camera]のコンポーネント[Vuforia Behaviour]を無効化する
・UIContainerを有効化する - [Hierarchy]に戻り2で設定したオブジェクトを選択する
- [Inspector]タブの[SetWorldAnchorコンポーネントのプロパティを設定する。
・[Behaviour]プロパティに[Mixed Reality Camera]をドラッグ&ドロップ
・[Hologram Collection Object]プロパティに[Hologram Collection]をドラッグ&ドロップ
・[UI Container]プロパティに[UIContainer]をドラッグ&ドロップ
3. [SetWorldAnchor]にエアタップ時に以下の処理を追加する
実装するコードは以下の通りです。
// Copyright(c) 2018 Takahiro Miyaura
// Released under the MIT license
// http://opensource.org/licenses/mit-license.php

using HoloToolkit.Unity;
using HoloToolkit.Unity.InputModule;
using UnityEngine;
using Vuforia;

public class SetWorldAnchor : MonoBehaviour, IInputClickHandler
{
    public VuforiaBehaviour Behaviour;
    public GameObject HologramCollectionObject;

    public GameObject UIContainer;

    public void OnInputClicked(InputClickedEventData eventData)
    {
        //オブジェクトの有効化
        UIContainer.SetActive(true);

        //Vuforiaの機能を無効化
        Behaviour.enabled = false;

        //ARマーカの座標系の情報を取得
        var markerRotation = transform.rotation.eulerAngles;
        var markerPosition = transform.position;

        // 基準点の座標系としてマーカーの認識地点に設定する
        HologramCollectionObject.transform.position = markerPosition;
        HologramCollectionObject.transform.Rotate(new Vector3(0f, markerRotation.y, 0f));
        // 基準点を有効化する
        HologramCollectionObject.SetActive(true);

        // アンカーを設置する。
        WorldAnchorManager.Instance.AttachAnchor(HologramCollectionObject, "HologramCollection");
    }
}
5. [Inspector]タブの[SetWorldAnchorコンポーネントのプロパティを設定する。
設定後の[SetWorldAnchor]の状態は以下の通りです。
6. Capabilityの設定
最後にUWPで利用するCapabilityの設定を行います。「Mixed Reality Toolkit」-「Configure」-「Apply UWP Capability Settings」で設定できます。ですが、少し問題があります。こちらで設定する場合は、[Select All]で設定してください。
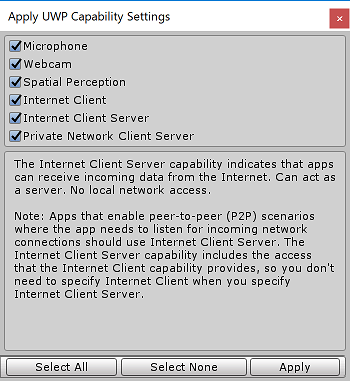
Vuforia を利用する場合は「Internet Client」のチェックがないとビルド時にエラーになります。UNETの場合は「Internet Client Server」をチェックします。
「Internet Client Server」は「Internet Client」を包含しているので、後者をチェックしていれば、前者は不要です。が、なぜかビルド時に「Internet Client」のチェックがないとVuforiaがエラーを出します。
ですのでメニューから[Edit]-[Project Settings]-[Player]の順に選択し[Inpector]タブにPlayerの設定を表示します。次に[Inspector]タブ内の[Publishing Settings]内の[Capabilities]内の以下の項目にチェックを入れます。
- InternetClient
- InternetClientServer
- PrivateNetworkClientServer
- WebCam
- Microphone
ここまでくれば完成です。HoloLensにデプロイしアプリケーションを起動してください。
動かし方
手順は以下のようになります。
- アプリケーションを起動するとマーカを認識できる状態になっています。
- マーカをのぞき込み認識させ3Dオブジェクトを表示させます。
- 表示したマーカーをエアタップします
- ほかのHoloLensでアプリを開始している場合、リストにHoloLensのホスト名が表示されます。
- 一覧にない場合はStartをエアタップしてアプリを開始します。
- 一覧に表示がある場合は選択しJOINを行います。
- うまくいくと、HoloLensの位置にCubeが表示されます。
- エアタップすると正面方向に弾が出ます。
なお、時々Startを押したHoloLensが他のHoloLensで見えないことがあります。よくある可能性として考えられる原因は以下のものがあります。うまくいかなかったときは確認してみてください。
- 同一LAN上に接続していない
UNETは基本的に同一のネットワーク上のマシン同士でつなぐ機能なので接続するLANを確認して合わせてください。 - LANのセキュリティの関係でUNET用のポートに制限がかかっている。
例えば自前ではない施設の無線LAN環境ではよくあるのですが、UNETで使いたいポートが解放されておらずファイアーウォールで制限されているパターンです。同一LAN内で構成してうまくいかない場合は別途制限のないネットワークを構成するなどしてください。
まとめ
今回はMRTKのサンプルを流用してARマーカーを利用した位置合わせでシェアリングを実現する部分を構築しました。ARマーカーでの位置合わせは安定度が非常に高いため是非活用してみてください。
次回以降これをベースにUnityのUNETのチュートリアルMultiplayer Networkingをそれっぽく仕込むかもしれません。