はじめに
ESP32ではじめようIoT開発ハンズオンでkafkaを利用するので、少し発展させてLineに通知する所を組んでみる。
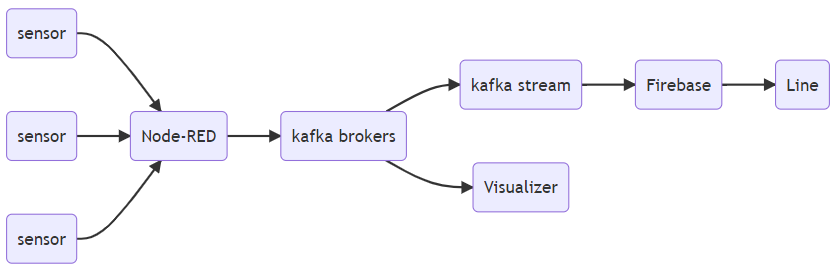
ここでいうところのkafka stream -> Firebase -> Line
開発環境
- windows 10
- Software
- node.js: 16.13.1(12.0以降であれば問題ないハズ)
結果
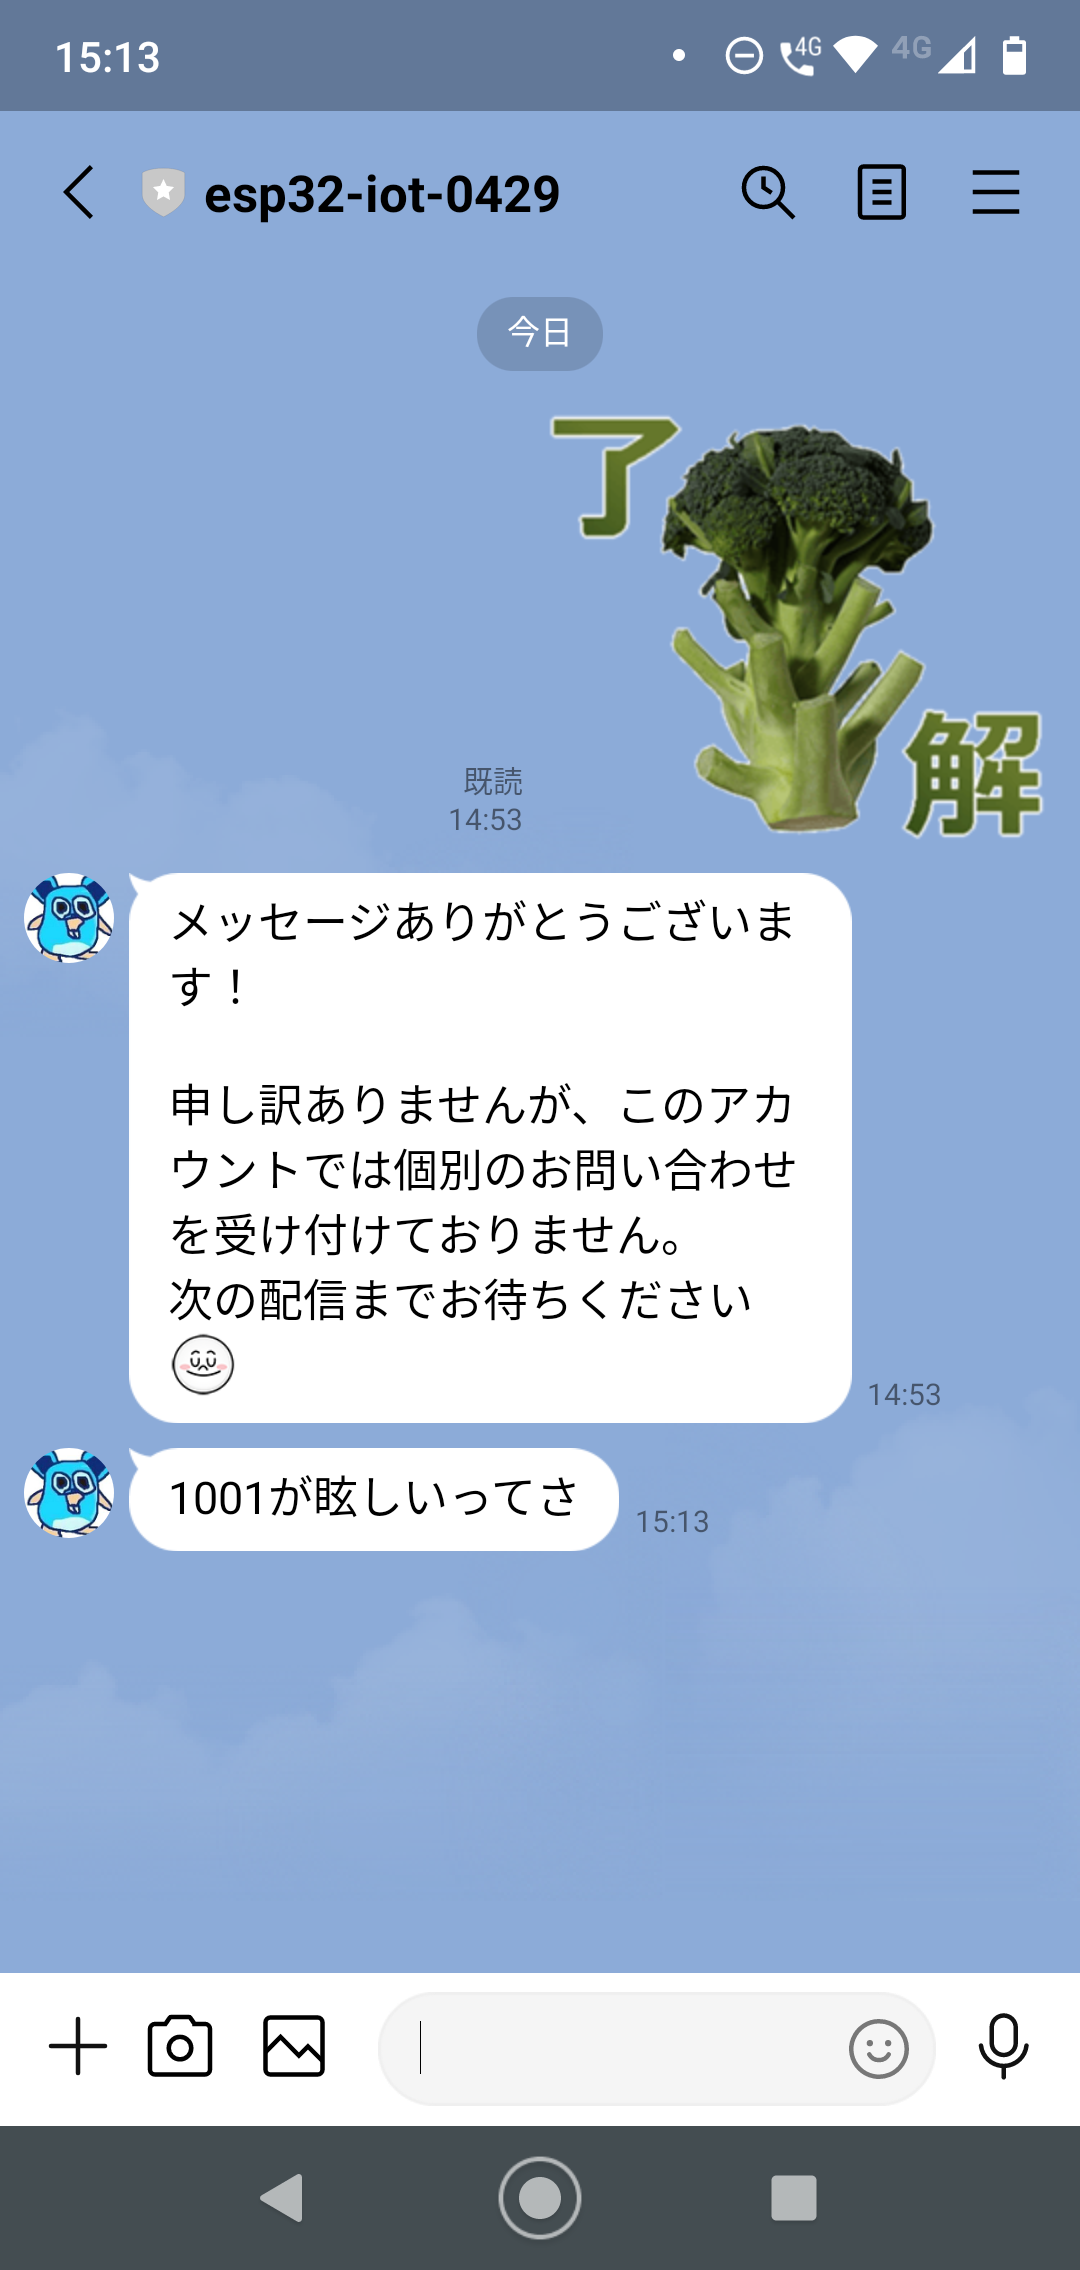 kafkaからの通知に成功
Line Messaging API側
やることは
- Firebase Functions & Firestoreアプリを作成する
- Line Developers ConsoleからMessaging APIのchannelを作る
- Firebase FunctionsとLine Messaging APIを連動させる
- 自身の端末から認証する
Firebase Functions & Firestoreアプリを作成する
Firebase consoleから新規プロジェクトを作成する
- プロジェクト名: esp32-iot-notificator
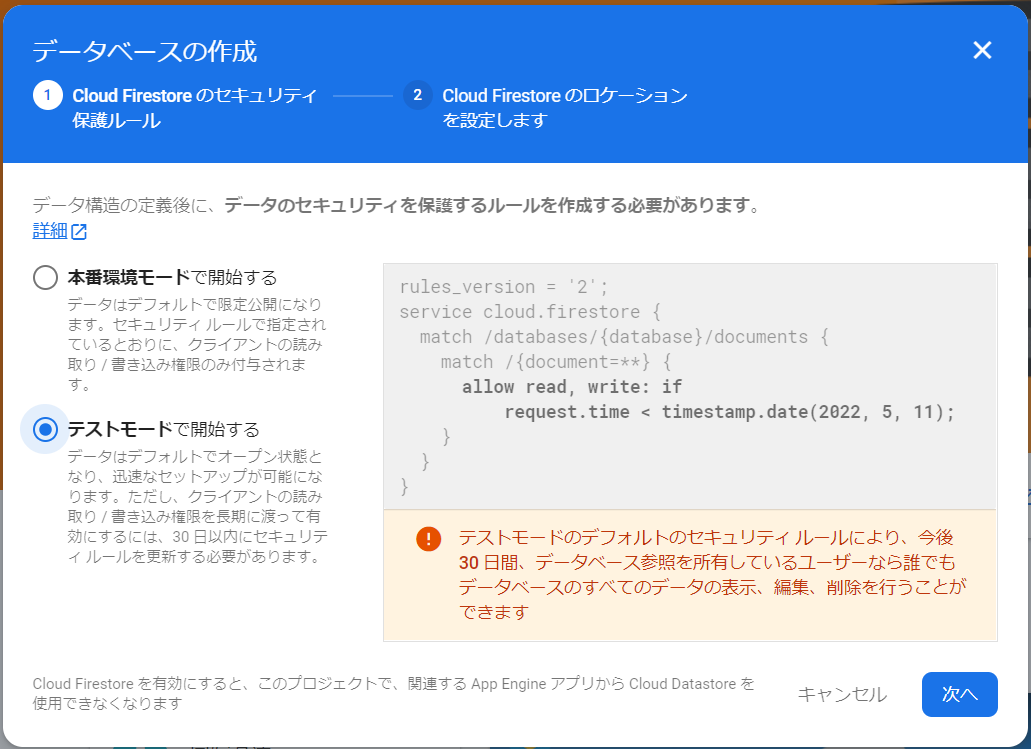
プロジェクトが出来たらFirestore Databaseを作成する
Databaseが作成出来たらコレクションの要素を作成しておく。コレクション名はline-notificate-users。

続いてfunctionsの設定。利用するには従量制への変更が必要なので勇気を出して切り替える。

早速プロジェクトをローカルで作成してゆく
firebase login --no-localhost --interactive
firebase init
下記にチェックを付ける
- firestore
- functions
ひとまずfunctions/src/index.tsを修正して
import * as functions from "firebase-functions";

export const callback = functions.https.onRequest((request, response) => {
  functions.logger.info("response", request.body);
  response.status(200).send("callback");
});
デプロイ
firebase deploy
firebaseの画面でcallbackが登録されていればOK。

Line Developers ConsoleからMessaging APIのchannelを作る
まずは、LINEのMessaging APIを用いて能動的通知をする方法で紹介されている通りにチャンネルを作る。

あふれ出る名前の適当さ加減
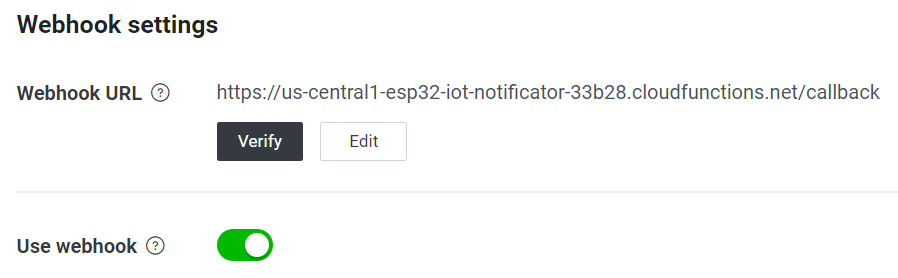
Webhook URLに先ほどfunctionに登録されたcallbackのURLを設定する。ここで設定したコールバックはLineユーザーがアプリを登録しりchannelにメッセージを送った際などに呼ばれる。
Firebase FunctionsとLine Messaging APIを連動させる
まずはやる事を整理する

なので、下記タイミングで発動するfunctionsを組む必要がある
- ユーザーがchannelを友達承認した
- メッセージを能動的に打つ
ユーザーがchanngelを友達承認したorメッセージを送った
今回はメッセージを受け取ったら自動的に登録するようにする。因みにメッセージを受け取った際にcallbackが受け取るリクエストは下記の様になっている(2022/04/11現在)
{
    "events":[
        {
            "message":{
                "id":"15899930248440",
                "type":"text",
                "text":"おい"
            },
            "source":{
                "type":"user",
                "userId":"<lineユーザーのID>"
            },
            "type":"message",
            "replyToken":"<返信などで必要となるトークン>",
            "timestamp":1649672154163,
            "mode":"active"
        }
    ],
    "destination":"<channelのユーザーID>"
}
ここで取得しなければならないのはevents[].source.userId。因みにこのuserIdはLineのプロフィールに表示されるIDではない。メッセージの送受信で必要となる別のID。
callbackで受け取ってFirestoreに格納する
import * as functions from "firebase-functions";
import * as admin from "firebase-admin";

admin.initializeApp();
const db = admin.firestore();
db.settings({
  ignoreUndefinedProperties: true,
});

export const callback = functions.https.onRequest((request, response) => {
  const userId = request.body.events[0].source.userId;
  db.collection("line-notificate-users").doc(userId).set({})
      .then(() => {
        response.status(200).send("Complete");
      })
      .catch((error) => {
        response.status(500).send(error);
      });
});
メッセージを能動的に打つ
メッセージを打つ部分はkafkaから呼ばれる想定。firestoreにため込まれたユーザに対してメッセージを打つ。
まずは必要なパッケージをpackage.jsonのdependenciesに追加する。
"axios": "^0.26.1"
軽くインストール
npm install
index.tsにfunctionを追加
import * as functions from "firebase-functions";
import * as admin from "firebase-admin";
import axios, {AxiosInstance} from "axios";

admin.initializeApp();
const db = admin.firestore();
db.settings({
  ignoreUndefinedProperties: true,
});

const lineToken = "<line messaging apiのトークン>";
const lineEndpoint = "https://api.line.me/v2/bot/message/push";

export const notificate = functions.https.onRequest((request, response) => {
  functions.logger.info("request.body.message", request.body.message);
  const message = request.body.message;
  db.collection("line-notificate-users").get()
      .then((snapshot) => {
        snapshot.forEach((doc) => {
          const userId = doc.id;
          const data = {
            to: userId,
            messages: [
              {
                type: "text",
                text: message,
              },
            ],
          };
          const apiClient: AxiosInstance = axios.create({
            headers: {
              "Content-type": "application/json",
              "Authorization": "Bearer " + lineToken,
            },
          });
          return apiClient.post(lineEndpoint, JSON.stringify(data))
              .then((data) => {
                console.log(data);
                functions.logger.info("send succeed");
                response.status(200).send("complete");
              })
              .catch((error) => {
                functions.logger.error("send failure", error);
                response.status(500).send(error);
              });
        });
      })
      .catch((error) => {
        functions.logger.error("snapshot failure", error);
        response.status(500).send(error);
      });
});
自身の端末から認証する
Line Developer Consoleのchannel -> Messagee APIにあるQRコードを自身のLineから読み込ませて友達になる。

スタンプなりなんなりを送るとデフォルトのメッセージが返ってくる。
下記コマンドでメッセージを送ってみる
curl -v -X POST https://us-central1-esp32-iot-notificator-42297.cloudfunctions.net/notificate \
-H 'Content-Type: application/json' \
-d '{ "message": "hello bun bun youtu" }'
Lineに通知が来ることを確認する

Kafka Stream側アプリを組む
イベントでは照度と水分を計測するので、今回はStreamingで照度が急激に上がった際を検出して通知を出す。
- Brokerクラスタの構築は割愛
さっそくTopologyを定義する。流れとしては
- handson0429-summaryのトピックを読み取り
- jsonパース
- key単位に異常を検知する(DeviceMetricAbnormalDetector)
- 異常検知したらfirebaseを叩く
class AbnormalDetectTopology {
  private static final Logger log = LoggerFactory.getLogger(AbnormalDetectTopology.class);

  public static Topology build() {
    StreamsBuilder builder = new StreamsBuilder();
    Consumed<String, String> consumerOption = Consumed.with(Serdes.String(), Serdes.String());
    KStream<String, String> events = builder.stream("handson0429-summary", consumerOption);

    events
        .filter((key, value) -> value != null)
        .filter((key, value) -> !value.equals(""))
        .mapValues(value -> DeviceMetric.parse(value))
        .filter((key, value) -> !value.getDeviceId().equals(""))
        .map((key, value) -> KeyValue.pair(value.getDeviceId(), value))
        .groupByKey(Grouped.with(Serdes.String(), JsonSerdes.DeviceMetric()))
        .aggregate(
            () -> new DeviceMetricAbnormalDetector(),
            (key, value, detector) -> {
              detector.detect(value.getMoist(), value.getLight());
              return detector;
            },
            Materialized.as("metric-abnormal-detector")
                .with(Serdes.String(), JsonSerdes.DeviceMetricAbnormalDetector()))
        .filter((key, value) -> value.abnormal)
        .toStream()
        .foreach(
            (key, value) -> {
              try {
                var client = HttpClient.newHttpClient();
                var json = "{ \"message\" : \"" + key + "が眩しいってさ\" }";
                var req =
                    HttpRequest.newBuilder()
                        .uri( URI.create( System.getenv("NOTIFICATE_ENDPOINT")))
                        .header("Content-Type", "application/json")
                        .POST(BodyPublishers.ofString(json))
                        .build();
                var res = client.send(req, HttpResponse.BodyHandlers.ofString());
                System.out.println(res.body());
              } catch (Exception e) {
                System.out.println(e.toString());
              }
            });

    return builder.build();
  }
}
DeviceMetricAbnormalDetectorはこんな感じ
public class DeviceMetricAbnormalDetector {
  public Long moist = 0L;
  public Long light = 0L;
  public Boolean abnormal = false;

  public DeviceMetricAbnormalDetector() {}

  public void detect(Long newMoist, Long newLight) {
    if ((newLight - light) > 1000L) {
      abnormal = true;
    } else {
      abnormal = false;
    }
    light = newLight;
    moist = newMoist;
  }

  @Override
  public String toString() {
    return "{"
        + "moist='"
        + moist
        + "'"
        + ", light='"
        + light
        + "'"
        + ", abnormal='"
        + abnormal
        + "'"
        + "}";
  }
}
AppからTopologyを指定する
class App {
  public static void main(String[] args) {
    Topology topology = AbnormalDetectTopology.build();

    Properties props = new Properties();
    props.put(StreamsConfig.APPLICATION_ID_CONFIG, "device-metric-summarizer");
    props.put(
        StreamsConfig.BOOTSTRAP_SERVERS_CONFIG,
        "kafka-broker-001:9092,kafka-broker-002:9092,kafka-broker-003:9092");
    props.put(StreamsConfig.CACHE_MAX_BYTES_BUFFERING_CONFIG, 0);
    props.put(StreamsConfig.DEFAULT_KEY_SERDE_CLASS_CONFIG, Serdes.String().getClass());
    props.put(StreamsConfig.DEFAULT_VALUE_SERDE_CLASS_CONFIG, Serdes.String().getClass());
    props.put(ConsumerConfig.AUTO_OFFSET_RESET_CONFIG, "latest");
    props.put(StreamsConfig.STATE_DIR_CONFIG, "state-store");
    props.put(StreamsConfig.COMMIT_INTERVAL_MS_CONFIG, 10 * 1000);
    props.put(
        StreamsConfig.DEFAULT_TIMESTAMP_EXTRACTOR_CLASS_CONFIG, WallclockTimestampExtractor.class);

    System.out.println(topology.describe());
    KafkaStreams streams = new KafkaStreams(topology, props);
    Runtime.getRuntime().addShutdownHook(new Thread(streams::close));
    streams.cleanUp();
    streams.start();
  }
}
残りはイベントまでにアップします。
ダミーデータを流して通知が来ることを確認する
スクリプトを組んで叩いてみる
#!/bin/bash

message='{"deviceId":"1001","moist":0 ,"light":0}'
./bin/kafka-console-producer.sh \
    --topic handson0429-summary \
    --property key.separator=, \
    --property parse.key=true \
    --bootstrap-server localhost:9092 << EOF
1001,${message}
EOF


message='{"deviceId":"1001","moist":1001,"light":1001}'
./bin/kafka-console-producer.sh \
    --topic handson0429-summary \
    --property key.separator=, \
    --property parse.key=true \
    --bootstrap-server localhost:9092 << EOF
1001,${message}
EOF
結果
ふりかえり
ハンズオンではGrafanaつかった可視化までやるけど、時間が余れば通知まで実施する。
通知まで組み込むとIoT感がぐっと上がるってことが分かった。受動最高。

調子に乗って飛ばし過ぎた