はじめに
- 仕事で
getUserMedia()で取得した映像を保存する必要があったので調べてみた。
ゴール
開発環境
- OS: macOS Mojave 10.14.4
- ブラウザ: Google Chrome 73.0.3683.103
- エディター: Visual Studio Code 1.33.0
- ローカルサーバー: Live Server(VSCode拡張機能)
対応ブラウザ
getUserMedia/Stream API

MediaRecorder API
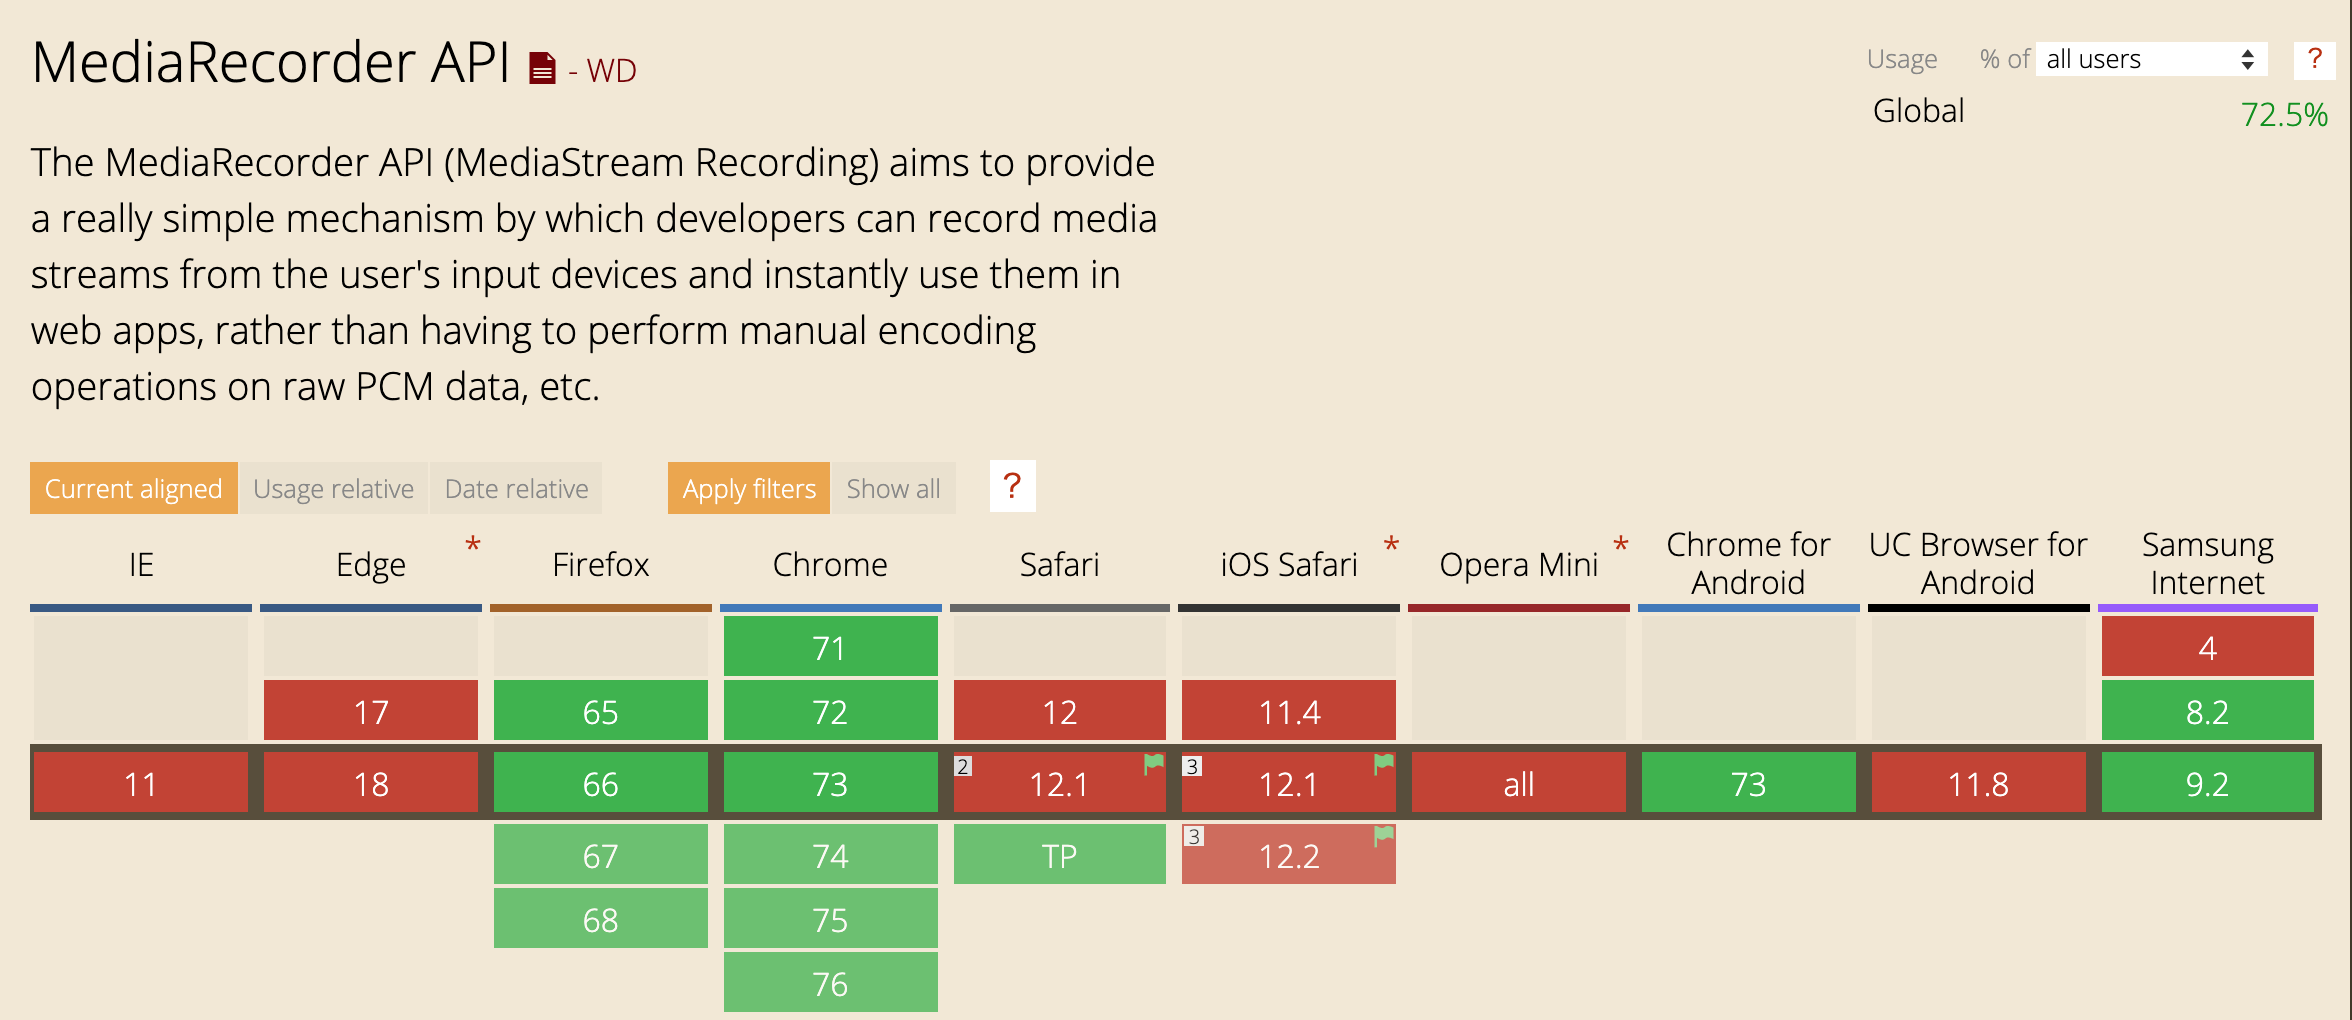
Blob URLs

手順
-
getUserMedia()でカメラの映像を取得する。 -
MediaRecorder().start()で取得したカメラの映像を録画する。 - File APIの
Blob()に録画データを格納する。 -
window.URL.createObjectURL()でダウンロードリンクを作成する。
ソース
javascript
index.js
/*
 *  Copyright (c) 2015 The WebRTC project authors. All Rights Reserved.
 *
 *  Use of this source code is governed by a BSD-style license
 *  that can be found in the LICENSE file in the root of the source
 *  tree.
 */

"use strict";

const localVideo = document.getElementById("local");
const recordedVideo = document.getElementById("recorded");
const startBtn = document.getElementById("start");
const recordBtn = document.getElementById("record");
const playBtn = document.getElementById("play");
const downloadBtn = document.getElementById("download");
let mediaRecorder;
let recordedBlobs;

function getLocalMediaStream(mediaStream) {
  recordBtn.disabled = false;
  const localStream = mediaStream;
  localVideo.srcObject = mediaStream;
  window.stream = mediaStream;
}

function handleLocalMediaStreamError(error) {
  console.log(`navigator.getUserMedia error: ${error}`);
}

function handleDataAvailable(event) {
  if (event.data && event.data.size > 0) {
    recordedBlobs.push(event.data);
  }
}

function startRecording() {
  recordedBlobs = [];
  const options = { mimeType: "video/webm;codecs=vp9" };

  try {
    mediaRecorder = new MediaRecorder(window.stream, options);
  } catch (error) {
    console.log(`Exception while creating MediaRecorder: ${error}`);
    return;
  }

  console.log("Created MediaRecorder", mediaRecorder);
  recordBtn.textContent = "録画停止";
  playBtn.disabled = true;
  downloadBtn.disabled = true;

  mediaRecorder.onstop = event => {
    console.log("Recorder stopped: ", event);
  };

  mediaRecorder.ondataavailable = handleDataAvailable;
  mediaRecorder.start(10);
  console.log("MediaRecorder started", mediaRecorder);
}

function stopRecording() {
  mediaRecorder.stop();
  console.log("Recorded media.");
}

startBtn.addEventListener("click", () => {
  const constraints = {
    video: {
      width: 1280,
      height: 720
    }
  };

  navigator.mediaDevices
    .getUserMedia(constraints)
    .then(getLocalMediaStream)
    .catch(handleLocalMediaStreamError);
});

recordBtn.addEventListener("click", () => {
  if (recordBtn.textContent === "録画開始") {
    startRecording();
  } else {
    stopRecording();
    recordBtn.textContent = "録画開始";
    playBtn.disabled = false;
    downloadBtn.disabled = false;
  }
});

playBtn.addEventListener("click", () => {
  const superBuffer = new Blob(recordedBlobs, { type: "video/webm" });
  recordedVideo.src = null;
  recordedVideo.srcObject = null;
  recordedVideo.src = window.URL.createObjectURL(superBuffer);
  recordedVideo.controls = true;
  recordedVideo.play();
});

downloadBtn.addEventListener("click", () => {
  const blob = new Blob(recordedBlobs, { type: "video/webm" });
  const url = window.URL.createObjectURL(blob);
  const a = document.createElement("a");
  a.style.display = "none";
  a.href = url;
  a.download = "rec.webm";
  document.body.appendChild(a);
  a.click();
  setTimeout(() => {
    document.body.removeChild(a);
    window.URL.revokeObjectURL(url);
  }, 100);
});
説明
1. getUserMedia()でカメラの映像を取得する。
javascript/index.js
"use strict";

const localVideo = document.getElementById("local");
const recordedVideo = document.getElementById("recorded");
const startBtn = document.getElementById("start");
const recordBtn = document.getElementById("record");
const playBtn = document.getElementById("play");
const downloadBtn = document.getElementById("download");
let mediaRecorder;
let recordedBlobs;
- 各要素を定義する。
javascript/index.js
function getLocalMediaStream(mediaStream) {
  recordBtn.disabled = false;
  const localStream = mediaStream;
  localVideo.srcObject = mediaStream;
  window.stream = mediaStream;
}

function handleLocalMediaStreamError(error) {
  console.log(`navigator.getUserMedia error: ${error}`);
}
- カメラの映像を取得する
getLocalMediaStream()を作成する。- 「録画開始」ボタンを有効にする。
-
getLocalMediaStream()で取得した映像をhtml側のvideo要素に設定する。 - 録画用として取得した映像を
window.streamに設定する。
- カメラの映像の取得に失敗したとき用に
handleLocalMediaStreamError()を作成する。- エラー処理。
javascript/index.js
startBtn.addEventListener("click", () => {
  const constraints = {
    video: {
      width: 1280,
      height: 720
    }
  };

  navigator.mediaDevices
    .getUserMedia(constraints)
    .then(getLocalMediaStream)
    .catch(handleLocalMediaStreamError);
});
- 「映像を取得する」ボタンをクリックしたときの処理を作成する。
-
constraintsでカメラの解像度を設定する。 -
getUserMedia()でカメラの映像を取得する。 - 映像の取得に成功したら、
getLocalMediaStreamを実行する。 - 映像の取得に失敗したら、
handleLocalMediaStreamErrorを実行する。
-
2. MediaRecorder().start()で取得したカメラの映像を録画する。
javascript/index.js
function startRecording() {
  recordedBlobs = [];
  const options = { mimeType: "video/webm;codecs=vp9" };

  try {
    mediaRecorder = new MediaRecorder(window.stream, options);
  } catch (error) {
    console.log(`Exception while creating MediaRecorder: ${error}`);
    return;
  }

  console.log("Created MediaRecorder", mediaRecorder);
  recordBtn.textContent = "録画停止";
  playBtn.disabled = true;
  downloadBtn.disabled = true;

  mediaRecorder.onstop = event => {
    console.log("Recorder stopped: ", event);
  };

  mediaRecorder.ondataavailable = handleDataAvailable;
  mediaRecorder.start(10);
  console.log("MediaRecorder started", mediaRecorder);
}

function stopRecording() {
  mediaRecorder.stop();
  console.log("Recorded media.");
}
- 映像を録画する処理を作成する。
-
MediaRecorder()のoptionを設定する。- videoのコンテナはwebmを設定。
- 再生互換性のためにmp4がよかったけど、
MediaRecorder()が対応していない。 - codecはみんな大好きVP9。実運用を考えるならVP8でいいかも。
個人的にh264は極力使いたくない。
- 再生互換性のためにmp4がよかったけど、
- videoのコンテナはwebmを設定。
-
MediaRecorder()に取得したmediaStreamを設定する。 - 「録画開始」ボタンを「録画停止」ボタンに変更する。
- 「再生」ボタンと「ダウンロード」ボタンを有効にする。
-
Blobsに格納した映像をmediaRecorder.ondataavailableで扱えるようにする。 -
mediaRecorder.start(10)で映像を10ミリ秒に1回Blobsに格納する。
-
- 映像の録画を停止する処理を作成する。
-
mediaRecorder.stop()を実行して、録画を停止する。
-
javascript/index.js
function handleDataAvailable(event) {
  if (event.data && event.data.size > 0) {
    recordedBlobs.push(event.data);
  }
}
-
Blobsに映像を格納する。
javascript/index.js
recordBtn.addEventListener("click", () => {
  if (recordBtn.textContent === "録画開始") {
    startRecording();
  } else {
    stopRecording();
    recordBtn.textContent = "録画開始";
    playBtn.disabled = false;
    downloadBtn.disabled = false;
  }
});
- 「録画開始/録画停止」ボタンをクリックしたときの処理を作成する。
- 録画ボタンのテキストに応じて録画の「開始/停止」を実行する。
(文字列で判断するイケてない処理!) - 「再生」ボタンと「ダウンロード」ボタンを有効にする。
- 録画ボタンのテキストに応じて録画の「開始/停止」を実行する。
3. File APIのBlob()に録画データを格納する。
javascript/index.js
playBtn.addEventListener("click", () => {
  const superBuffer = new Blob(recordedBlobs, { type: "video/webm" });
  recordedVideo.src = null;
  recordedVideo.srcObject = null;
  recordedVideo.src = window.URL.createObjectURL(superBuffer);
  recordedVideo.controls = true;
  recordedVideo.play();
});
*「再生」ボタンをクリックしたときの処理を作成する。
* Blobオブジェクトを作成する。typeはvideo/webmで設定する。
* html側のvideo要素に録画した映像を設定する。
* 録画した映像を再生処理を実行する。
4. window.URL.createObjectURL()でダウンロードリンクを作成する。
javascript/index.js
downloadBtn.addEventListener("click", () => {
  const blob = new Blob(recordedBlobs, { type: "video/webm" });
  const url = window.URL.createObjectURL(blob);
  const a = document.createElement("a");
  a.style.display = "none";
  a.href = url;
  a.download = "rec.webm";
  document.body.appendChild(a);
  a.click();
  setTimeout(() => {
    document.body.removeChild(a);
    window.URL.revokeObjectURL(url);
  }, 100);
});
- 「ダウンロード」ボタンをクリックしたときの処理を作成する。
-
Blobオブジェクトを作成する。typeはvideo/webmで設定する。 -
window.URL.createObjectURL()でダウンロードリンクを作成する。 -
aタグを作成して、html側に追加する。
-
- 上記処理はhtml側の
aタグにdownload属性を追加してもOK.
html
js/index.html
<!DOCTYPE html>
<!--
 *  Copyright (c) 2015 The WebRTC project authors. All Rights Reserved.
 *
 *  Use of this source code is governed by a BSD-style license
 *  that can be found in the LICENSE file in the root of the source
 *  tree.
-->
<html lang="jp">
<head>
  <meta charset="UTF-8">
  <meta name="viewport" content="width=device-width, initial-scale=1.0">
  <meta http-equiv="X-UA-Compatible" content="ie=edge">
  <title>WebRTC - MediaStream Recording</title>
  <link rel="stylesheet" href="style.css">
</head>
<body>
  <div id="container">

    <h1>WebRTC - MediaStream Recording</h1>

    <video id="local" playsinline autoplay muted></video>
    <video id="recorded" playsinline loop></video>

    <div>
      <button id="start">映像を取得する</button>
      <button id="record" disabled>録画開始</button>
      <button id="play" disabled>再生</button>
      <button id="download" disabled>ダウンロード</button>
    </div>

  <!-- include adapter for srcObject shim -->
  <script src="https://webrtc.github.io/adapter/adapter-latest.js"></script>
  <script src="./index.js" async></script>

  </div>
</body>
</html>
- ブラウザの互換性を吸収してくれる
adapter.jsライブラリを読み込む。
CSS
css/style.css
video {
  background:#222;
  vertical-align: top;
  --width: 25vw;
  width: var(--width);
  height: calc(var(--width) * 0.5625);
}
-
video要素のstyleを設定。
さいごに
- File APIを初めて触ったけど、とっても便利。
- CSSで変数が使えることに驚いた。
- 間違いや、もっといい書き方があればご教示いただけるとうれしいです:)