しぇあぽいんとさんと仲良くなるために、Windows では一番慣れている PowerShell を使って SharePoint Online へアクセスしてカスタムリストを作成してみたメモ。
CSOM (クライアント側オブジェクト モデル) を使って、カスタムリストを作成してみます。
環境
- Windows 10 Pro 64bit
- PowerShell 5.1
事前準備
SharePoint Online 用の SDK がインストールされていない時はインストールします。
- SharePoint Online Client Components SDK のダウンロードとインストール
https://www.microsoft.com/en-us/download/details.aspx?id=42038)
※64 bit と 32 bit を間違わないように
SharePoint Online へのログイン
ユーザーが miyamiya@example.com、SharePoint Online の URL を https://<tenant>.sharepoint.com/sites/example と仮定したサンプルコード。
[System.Reflection.Assembly]::LoadWithPartialName("Microsoft.SharePoint.Client") | Out-Null
[System.Reflection.Assembly]::LoadWithPartialName("Microsoft.SharePoint.Client.Runtime") | Out-Null

# 取得する SharePoint Online の URL
$url = 'https://<tenant>.sharepoint.com/sites/example'

# ユーザー名
$user = 'miyamiya@example.com';

# パスワード
$secure = Read-Host -Prompt "Enter the password for ${user}(Office365)" -AsSecureString;

# SharePoint Online 認証情報
$credentials = New-Object Microsoft.SharePoint.Client.SharePointOnlineCredentials($user, $secure);

# SharePoint Client Context インスタンスを生成
$ctx = New-Object Microsoft.SharePoint.Client.ClientContext($url)
$ctx.Credentials = $credentials
ここまではいつものおまじない的なコード。
ログインして SharePoint Client Context のインスタンスを作成しています。
作成するリストのプロパティを指定
ここでは、作成時にカスタムリストを指定し、Web アドレスを https://<tenant>.sharepoint.com/sites/example/Lists/newList とすることとします。
$listInfo = New-Object Microsoft.SharePoint.Client.ListCreationInformation
$listInfo.TemplateType = 100
$listInfo.Title = 'newList'
最初に $listInfo として ListCreationInformation クラスのインスタンスを作成します。
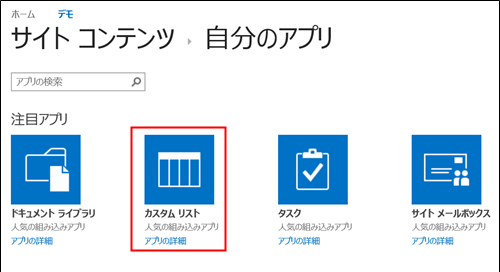
次に TemplateType の 100 はカスタムリストを指定しています。
ブラウザで操作した時でいうと赤枠のところです。
Title は半角で設定します。日本語のタイトルは別で指定しますので、ここでは URL として使いたい名前を指定します。
デフォルトで作成される Lists 下にリストを作成したくないのなら、 Url プロパティでディレクトリを指定することも可能です。
# Lists の下に newList を作成する例
$listInfo.Url = "Lists/newList"

# example 直下に newList を作成する例
$listInfo.Url = "newList"
リストの作成
$list = $ctx.Web.Lists.Add($listInfo)
$list.Title = "新しいリスト"
$list.Update()
$ctx.ExecuteQuery()
最初にコンテキストに ListCreationInformation を追加して、返り値の SPList を $list に格納します。
次に Title で新しく作るリストのタイトルを日本語で指定しています。
最後に SPList を Update して、コンテキストを ExecuteQuery で反映させます。
考察
これで日本語タイトルを使うカスタムリストの作成で、一番単純な作成は完了です。
SourceID を指定しないと OpenXML SDK を使ってなんやかんやする時に問題が起きるよ!という話も見ましたが、ちょっと状況が想像できなかったので頭の片隅に置いておくことにします...
次は、その他の設定を PowerShell からやってみようかな。