はじめに
こんにちは。
テニスのラリーを3Dシミュレーションするツールを実装することをモチベーションに、
Kivy Languageで3Dのテニスコートを描くスクリプトをご紹介します。
申し訳ありませんが、ここではKivy Languageの環境設定の仕方は割愛させていただきますm(_ _)m
https://github.com/kpiorno/kivy3dgui
↑こちらに掲載されているコードを大いに参考にさせていただきました。ありがとうございますm(_ _)m
https://github.com/miyabb/share_tennis_court.git
↑実装で扱うディレクトリはこちらに載せてあります。
マウスでぐりぐり動かせるテニスコートを描く
ディレクトリ構造
上記の参考にしたサイトをforkし、構造はほぼ変えずに使っています。
今回紹介するKivy Languageの3Dモデルでは、描きたいオブジェクト(ここではテニスコート)をメッシュという概念を使って設計しています。.objファイル(3Dモデルデータフォーマット)はそのメッシュのリストを記載しているものです。
Tennis/
    ┠ tennis_court.py  #実行するスクリプト
    ┃
    ┠ data/
    ┃    ┠ imgs/  #オブジェクトにコーティングするイメージ画像
    ┃    ┗ obj/   #各オブジェクトのメッシュリスト
    ┃
    ┗ kivy3dgui/  #kivyで3Dを描くためのパッケージ
出力イメージ
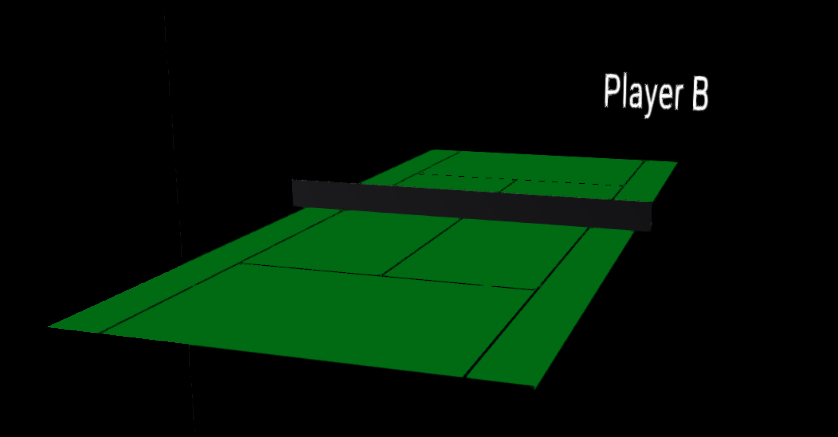
メインスクリプトを実行すると、以下の画像のようなテニスコートをマウスでぐりぐり動かせるものが出力されることが、今回のゴールです。
アプリケーション設計
実行するスクリプト(tennis_court.py)の解釈です。
mainで走らせるアプリケーションクラス Tennis3dAppの中身について見ていきます。
build関数はアプリケーションに表示するオブジェクトの配置や機能を定義する関数です。
この部分では、マウスで視点を動かす機能を付与する際の、カメラの向きや位置情報の初期値(ここでいうユーザからの視点)を設定しています。後に出てくるon_touch_move関数で使われるものです。
class Tennis3dApp(App):

    def build(self):
        #カメラ(視点の向き)
        self.move_camera = True
        self.cam_distance = 10
        self.super = []

        init_dist = []
        rad = 70.0
        azimuth = 0 #0 to 2PI
        polar = 90 #0 to PI

        self.m_sx = 0

        x = rad * math.cos(azimuth) * math.sin(polar)
        y = rad * math.sin(azimuth) * math.sin(polar)
        z = rad * math.cos(polar)

        self.rad = rad
        self.azimuth = azimuth
        self.polar = polar
その後に続くlayout3d_strには何やらながーいstringが格納されていますが、ここにはウィンドウ内の空間に設置するオブジェクト(テニスコートの面、ネット、ボール等)の色や配置などの情報が全て書かれています。
Layout3Dが空間全体のレイアウト、その下にあるNodeたちがその空間の中に配置するオブジェクトを表します。今回描いたNodeのオブジェクトは上から順に
- 手前の壁(Player A)
- 奥の壁(Player B)
- ボール
- ネット
- テニスコートの面
- テニスコートのライン
となっています。
        self.layout3d_str = '''
                    #:kivy 1.0
                    #: import Layout3D kivy3dgui.layout3d
                    #: import Animation kivy.animation.Animation

                    Layout3D:  #空間の情報。この下は光と影の調節
                        id: board3d
                        #look_at: [0, 0, 10, 0, 0, -20, 0, 1, 0]
                        canvas_size: (1920, 1080)
                        light_position: [-24.5, 150, 100]
                        post_processing: True

                        shadow_threshold: 0.3
                        post_processing: True

                        Node:  #手前の壁
                            id: front
                            rotate: (0, 0, 1, 0)     #回転
                            scale: (1.0, 1.2, 0.8)   #サイズの増減
                            translate: (0, 0, -80)   #移動する向きと大きさ
                            min_light_intensity: 1.0
                            receive_shadows: True
                            meshes: ("./data/obj/2dbox.obj",)
                            Button:
                                id: bottom_floor
                                text: "Player B"
                                font_size: 50
                                background_normal: ''
                                background_color: 0.000 , 0.000 , 0.000, 1.000


                             #######以下省略######
                        '''
Nodeオブジェクトで主にいじることの多い属性について、こちらでの解説と日本語での解釈をまとめます。
| Attribute | Description | 解釈 |
|---|---|---|
| rotate | Angle and x, y, z axis of the rotation matrix | 回転角度と回転軸 (θ, x, y, z) |
| scale | x, y, z of scaling matrix | スケールの増減 (x, y, z) |
| translate | x, y, z of translation matrix | 移動距離と方向(重心を動かす。Defaultは(0, 0, 0)) (x, y, z) |
| meshes | List of meshes (obj only) | 形状を定めるobjファイル |
build関数の続きです。
        layout3d = Builder.load_string(dedent(self.layout3d_str)) #①
        layout3d.bind(on_touch_move = self.on_touch_move) #②
        self.layout3d = layout3d

        instance = GridLayout(cols=2)  #③
        instance.add_widget(self.layout3d)
        self.instance = instance

        return self.instance
①では先ほど定義した layout3d(空間のレイアウト)をBuilderでロードし、
②では、マウスで視点を動かす機能をbindで付加しています。
③instanceは最終的にアプリケーションクラスが返すインスタンスとなります。
その後にある関数2つ(get_camera_posとon_touch_move)はマウスでぐりぐり動かすためのおまじない関数で、参考元を全くいじらずに使ってます。
最後にmainでクラスを呼び出して終わりです。
最後に
Kivyを使ってテニスコートを描くコードを紹介しました。
私自身Kivyの初心者で理解が行き届いていないところもありますが、ほとんど参考元に掲載されているもので描くことができたので、こちらも参考にしていただければと思います。
もっと説明がほしいところ、解釈の仕方が間違っているところ、ありましたらコメントいただきたいですm(_ _)m
参考
