これは、Angular の公式ドキュメントの Component Interaction の章を意訳したものです。翻訳に自信は無いです。所々抜けモレ等あるかと思いますが、あしからずご了承を。
バージョン 4.2.6 のドキュメントをベースにしています。
Component Interaction
このクックブックには、2つ以上のコンポーネントがデータを共有する一般的なコンポーネント間でコミュニケーションを行うシナリオのレシピが含まれています。
入力バインディングで親から子へデータを渡す
HeroChildComponent には2つの入力プロパティがあり、通常は @Input デコレーションで装飾されています。
component-interaction/src/app/hero-child.component.ts
import { Component, Input } from '@angular/core';

import { Hero } from './hero';

@Component({
  selector: 'hero-child',
  template: `
    <h3>{{hero.name}} says:</h3>
    <p>I, {{hero.name}}, am at your service, {{masterName}}.</p>
  `
})
export class HeroChildComponent {
  @Input() hero: Hero;
  @Input('master') masterName: string;
}
2番目の@Inputは、子コンポーネントのプロパティ名masterNameを 'master'のエイリアスにします。
HeroParentComponent は、子のヒーロープロパティに子のマスターエイリアスにそのマスター文字列プロパティを結合し、各反復のヒーローインスタンス、*ngForリピータ内の子 HeroChildComponent を入れ子にします。
component-interaction/src/app/hero-parent.component.ts
import { Component } from '@angular/core';

import { HEROES } from './hero';

@Component({
  selector: 'hero-parent',
  template: `
    <h2>{{master}} controls {{heroes.length}} heroes</h2>
    <hero-child *ngFor="let hero of heroes"
      [hero]="hero"
      [master]="master">
    </hero-child>
  `
})
export class HeroParentComponent {
  heroes = HEROES;
  master = 'Master';
}
実行中のアプリケーションは3つのヒーローを表示します:

テストしよう
E2Eテストでは、すべての子がインスタンス化され、期待どおりに表示されました。
component-interaction/e2e-spec.ts
// ...
let _heroNames = ['Mr. IQ', 'Magneta', 'Bombasto'];
let _masterName = 'Master';

it('should pass properties to children properly', function () {
  let parent = element.all(by.tagName('hero-parent')).get(0);
  let heroes = parent.all(by.tagName('hero-child'));

  for (let i = 0; i < _heroNames.length; i++) {
    let childTitle = heroes.get(i).element(by.tagName('h3')).getText();
    let childDetail = heroes.get(i).element(by.tagName('p')).getText();
    expect(childTitle).toEqual(_heroNames[i] + ' says:');
    expect(childDetail).toContain(_masterName);
  }
});
// ...
セッターで入力プロパティの変更を受け取る
入力プロパティーを使用して、親からの値を代入して処理します。
子の NameChildComponent の名前入力プロパティーの設定子は、名前から空白を切り取り、空の値をデフォルトのテキストに置き換えます。
component-interaction/src/app/name-child.component.ts
import { Component, Input } from '@angular/core';

@Component({
  selector: 'name-child',
  template: '<h3>"{{name}}"</h3>'
})
export class NameChildComponent {
  private _name = '';

  @Input()
  set name(name: string) {
    this._name = (name && name.trim()) || '<no name set>';
  }

  get name(): string { return this._name; }
}
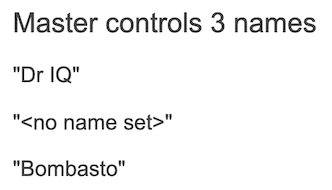
すべてのスペースを含む名前を含む名前のバリエーションを示すNameParentComponent は次のとおりです。
component-interaction/src/app/name-parent.component.ts
import { Component } from '@angular/core';

@Component({
  selector: 'name-parent',
  template: `
  <h2>Master controls {{names.length}} names</h2>
  <name-child *ngFor="let name of names" [name]="name"></name-child>
  `
})
export class NameParentComponent {
  // Displays 'Mr. IQ', '<no name set>', 'Bombasto'
  names = ['Mr. IQ', '   ', '  Bombasto  '];
}
テストしよう
空で空でない名前を持つ入力プロパティーのE2Eテスト:
component-interaction/e2e-spec.ts
// ...
it('should display trimmed, non-empty names', function () {
  let _nonEmptyNameIndex = 0;
  let _nonEmptyName = '"Mr. IQ"';
  let parent = element.all(by.tagName('name-parent')).get(0);
  let hero = parent.all(by.tagName('name-child')).get(_nonEmptyNameIndex);

  let displayName = hero.element(by.tagName('h3')).getText();
  expect(displayName).toEqual(_nonEmptyName);
});

it('should replace empty name with default name', function () {
  let _emptyNameIndex = 1;
  let _defaultName = '"<no name set>"';
  let parent = element.all(by.tagName('name-parent')).get(0);
  let hero = parent.all(by.tagName('name-child')).get(_emptyNameIndex);

  let displayName = hero.element(by.tagName('h3')).getText();
  expect(displayName).toEqual(_defaultName);
});
// ...
ngOnChanges() で入力プロパティの変更を受けとる
OnChanges ライフサイクルフックインタフェースの ngOnChanges() メソッドを使用して、プロパティ値の入力の変更を検出して処理します。
相互作用する複数の入力プロパティーを見ているときに、プロパティー・セッターに対するこのアプローチを好むかもしれません。
LifeCycle Hooksの章でngOnChange()について学んでください。
この VersionChildComponent は、メジャーおよびマイナー入力プロパティの変更を検出し、これらの変更を報告するログメッセージを作成します。
component-interaction/src/app/version-child.component.ts
import { Component, Input, OnChanges, SimpleChange } from '@angular/core';

@Component({
  selector: 'version-child',
  template: `
    <h3>Version {{major}}.{{minor}}</h3>
    <h4>Change log:</h4>
    <ul>
      <li *ngFor="let change of changeLog">{{change}}</li>
    </ul>
  `
})
export class VersionChildComponent implements OnChanges {
  @Input() major: number;
  @Input() minor: number;
  changeLog: string[] = [];

  ngOnChanges(changes: {[propKey: string]: SimpleChange}) {
    let log: string[] = [];
    for (let propName in changes) {
      let changedProp = changes[propName];
      let to = JSON.stringify(changedProp.currentValue);
      if (changedProp.isFirstChange()) {
        log.push(`Initial value of ${propName} set to ${to}`);
      } else {
        let from = JSON.stringify(changedProp.previousValue);
        log.push(`${propName} changed from ${from} to ${to}`);
      }
    }
    this.changeLog.push(log.join(', '));
  }
}
VersionParentComponentは、マイナー値とメジャー値を提供し、それらを変更するメソッドにボタンをバインドします。
component-interaction/src/app/version-parent.component.ts
import { Component } from '@angular/core';

@Component({
  selector: 'version-parent',
  template: `
    <h2>Source code version</h2>
    <button (click)="newMinor()">New minor version</button>
    <button (click)="newMajor()">New major version</button>
    <version-child [major]="major" [minor]="minor"></version-child>
  `
})
export class VersionParentComponent {
  major = 1;
  minor = 23;

  newMinor() {
    this.minor++;
  }

  newMajor() {
    this.major++;
    this.minor = 0;
  }
}
ボタンプッシュシーケンスの出力は次のとおりです。

テストしよう
両方の入力プロパティが最初に設定され、そのボタンがクリックされると、期待される ngOnChanges の呼び出しと値がトリガーされることをテストします。
component-interaction/e2e-spec.ts
// ...
// Test must all execute in this exact order
it('should set expected initial values', function () {
  let actual = getActual();

  let initialLabel = 'Version 1.23';
  let initialLog = 'Initial value of major set to 1, Initial value of minor set to 23';

  expect(actual.label).toBe(initialLabel);
  expect(actual.count).toBe(1);
  expect(actual.logs.get(0).getText()).toBe(initialLog);
});

it('should set expected values after clicking \'Minor\' twice', function () {
  let repoTag = element(by.tagName('version-parent'));
  let newMinorButton = repoTag.all(by.tagName('button')).get(0);

  newMinorButton.click().then(function() {
    newMinorButton.click().then(function() {
      let actual = getActual();

      let labelAfter2Minor = 'Version 1.25';
      let logAfter2Minor = 'minor changed from 24 to 25';

      expect(actual.label).toBe(labelAfter2Minor);
      expect(actual.count).toBe(3);
      expect(actual.logs.get(2).getText()).toBe(logAfter2Minor);
    });
  });
});

it('should set expected values after clicking \'Major\' once', function () {
  let repoTag = element(by.tagName('version-parent'));
  let newMajorButton = repoTag.all(by.tagName('button')).get(1);

  newMajorButton.click().then(function() {
    let actual = getActual();

    let labelAfterMajor = 'Version 2.0';
    let logAfterMajor = 'major changed from 1 to 2, minor changed from 25 to 0';

    expect(actual.label).toBe(labelAfterMajor);
    expect(actual.count).toBe(4);
    expect(actual.logs.get(3).getText()).toBe(logAfterMajor);
  });
});

function getActual() {
  let versionTag = element(by.tagName('version-child'));
  let label = versionTag.element(by.tagName('h3')).getText();
  let ul = versionTag.element((by.tagName('ul')));
  let logs = ul.all(by.tagName('li'));

  return {
    label: label,
    logs: logs,
    count: logs.count()
  };
}
// ...
親が子のイベントを待ち受ける
子コンポーネントは、イベントが発生したときにイベントを発生させる EventEmitter プロパティを公開します。親はそのイベントプロパティにバインドし、それらのイベントに反応します。
子の EventEmitter プロパティは出力プロパティです。通常、この VoterComponent で見られる @Output デコレーションで装飾されています。
component-interaction/src/app/voter.component.ts
import { Component, EventEmitter, Input, Output } from '@angular/core';

@Component({
  selector: 'my-voter',
  template: `
    <h4>{{name}}</h4>
    <button (click)="vote(true)"  [disabled]="voted">Agree</button>
    <button (click)="vote(false)" [disabled]="voted">Disagree</button>
  `
})
export class VoterComponent {
  @Input()  name: string;
  @Output() onVoted = new EventEmitter<boolean>();
  voted = false;

  vote(agreed: boolean) {
    this.onVoted.emit(agreed);
    this.voted = true;
  }
}
ボタンをクリックすると、true または false の boolean payload が送出されます。
親 VoteTakerComponent は、子イベントpayload $event に応答してカウンタを更新する onVoted() というイベントハンドラをバインドします。
component-interaction/src/app/votetaker.component.ts
import { Component }      from '@angular/core';

@Component({
  selector: 'vote-taker',
  template: `
    <h2>Should mankind colonize the Universe?</h2>
    <h3>Agree: {{agreed}}, Disagree: {{disagreed}}</h3>
    <my-voter *ngFor="let voter of voters"
      [name]="voter"
      (onVoted)="onVoted($event)">
    </my-voter>
  `
})
export class VoteTakerComponent {
  agreed = 0;
  disagreed = 0;
  voters = ['Mr. IQ', 'Ms. Universe', 'Bombasto'];

  onVoted(agreed: boolean) {
    agreed ? this.agreed++ : this.disagreed++;
  }
}
フレームワークは $event で表されるイベント引数をハンドラメソッドに渡し、そのメソッドはそれを処理します。

テストしよう
Agree と Disagreeボタンをクリックすると、適切なカウンターが更新されることをテストします。
component-interaction/e2e-spec.ts
// ...
it('should not emit the event initially', function () {
  let voteLabel = element(by.tagName('vote-taker'))
    .element(by.tagName('h3')).getText();
  expect(voteLabel).toBe('Agree: 0, Disagree: 0');
});

it('should process Agree vote', function () {
  let agreeButton1 = element.all(by.tagName('my-voter')).get(0)
    .all(by.tagName('button')).get(0);
  agreeButton1.click().then(function() {
    let voteLabel = element(by.tagName('vote-taker'))
      .element(by.tagName('h3')).getText();
    expect(voteLabel).toBe('Agree: 1, Disagree: 0');
  });
});

it('should process Disagree vote', function () {
  let agreeButton1 = element.all(by.tagName('my-voter')).get(1)
    .all(by.tagName('button')).get(1);
  agreeButton1.click().then(function() {
    let voteLabel = element(by.tagName('vote-taker'))
      .element(by.tagName('h3')).getText();
    expect(voteLabel).toBe('Agree: 1, Disagree: 1');
  });
});
// ...
親はローカル変数を経由して子とやりとりする
親コンポーネントは、データバインディングを使用して子プロパティを読み込んだり、子メソッドを呼び出すことはできません。
次の例に示すように、子要素のテンプレート参照変数を作成し、その変数を親テンプレート内で参照することで、両方を行うことができます。
以下は CountdownTimerComponent の子であり、ゼロまで繰り返しカウントダウンしてロケットを起動します。時計を制御する開始と停止のメソッドを持っていて、自身のテンプレートにカウントダウンステータスメッセージを表示します。
component-interaction/src/app/countdown-timer.component.ts
import { Component, OnDestroy, OnInit } from '@angular/core';

@Component({
  selector: 'countdown-timer',
  template: '<p>{{message}}</p>'
})
export class CountdownTimerComponent implements OnInit, OnDestroy {

  intervalId = 0;
  message = '';
  seconds = 11;

  clearTimer() { clearInterval(this.intervalId); }

  ngOnInit()    { this.start(); }
  ngOnDestroy() { this.clearTimer(); }

  start() { this.countDown(); }
  stop()  {
    this.clearTimer();
    this.message = `Holding at T-${this.seconds} seconds`;
  }

  private countDown() {
    this.clearTimer();
    this.intervalId = window.setInterval(() => {
      this.seconds -= 1;
      if (this.seconds === 0) {
        this.message = 'Blast off!';
      } else {
        if (this.seconds < 0) { this.seconds = 10; } // reset
        this.message = `T-${this.seconds} seconds and counting`;
      }
    }, 1000);
  }
}
タイマーコンポーネントをホストする CountdownLocalVarParentComponent は次のとおりです。
component-interaction/src/app/countdown-parent.component.ts
import { Component }                from '@angular/core';
import { CountdownTimerComponent }  from './countdown-timer.component';

@Component({
  selector: 'countdown-parent-lv',
  template: `
  <h3>Countdown to Liftoff (via local variable)</h3>
  <button (click)="timer.start()">Start</button>
  <button (click)="timer.stop()">Stop</button>
  <div class="seconds">{{timer.seconds}}</div>
  <countdown-timer #timer></countdown-timer>
  `,
  styleUrls: ['demo.css']
})
export class CountdownLocalVarParentComponent { }
親コンポーネントは、子の開始および終了メソッドまたは秒プロパティにデータをバインドできません。
子コンポーネントを表す <countdown-timer> タグに、ローカル変数、#timer を配置できます。これにより、子コンポーネントへの参照と、親テンプレート内からそのプロパティまたはメソッドにアクセスすることができます。
この例では、親のボタンを子の start と stop につないで、インターポレーションを使用して子の seconds プロパティを表示します。

テストしよう
親テンプレートに表示される秒数が、子のステータスメッセージに表示された秒数と一致するかどうかをテストします。 停止ボタンをクリックすると、カウントダウンタイマーが一時停止することもテストします。
component-interaction/e2e-spec.ts
// ...
it('timer and parent seconds should match', function () {
  let parent = element(by.tagName(parentTag));
  let message = parent.element(by.tagName('countdown-timer')).getText();
  browser.sleep(10); // give `seconds` a chance to catchup with `message`
  let seconds = parent.element(by.className('seconds')).getText();
  expect(message).toContain(seconds);
});

it('should stop the countdown', function () {
  let parent = element(by.tagName(parentTag));
  let stopButton = parent.all(by.tagName('button')).get(1);

  stopButton.click().then(function() {
    let message = parent.element(by.tagName('countdown-timer')).getText();
    expect(message).toContain('Holding');
  });
});
// ...
親が @ViewChild() を呼び出す
ローカル変数のアプローチは簡単で簡単です。しかし、親子配線は親テンプレート内で完全に行われなければならないため、制限されています。親コンポーネント自体は子へのアクセス権を持ちません。
親コンポーネントクラスのインスタンスが子コンポーネント値を読み書きする必要がある場合、または子コンポーネントメソッドを呼び出す必要がある場合は、ローカル変数技法を使用できません。
親コンポーネントクラスでその種のアクセスが必要な場合は、子コンポーネントをViewChild として親に挿入します。
次の例は、このテクニックを同じカウントダウンタイマーの例で示しています。その外観や行動は変化しません。子の CountdownTimerComponent も同様です。
ローカル変数から ViewChild テクニックへの切り替えは、デモを目的としたものです。
これが親の CountdownViewChildParentComponent です:
component-interaction/src/app/countdown-parent.component.ts
import { AfterViewInit, ViewChild } from '@angular/core';
import { Component }                from '@angular/core';
import { CountdownTimerComponent }  from './countdown-timer.component';

@Component({
  selector: 'countdown-parent-vc',
  template: `
  <h3>Countdown to Liftoff (via ViewChild)</h3>
  <button (click)="start()">Start</button>
  <button (click)="stop()">Stop</button>
  <div class="seconds">{{ seconds() }}</div>
  <countdown-timer></countdown-timer>
  `,
  styleUrls: ['demo.css']
})
export class CountdownViewChildParentComponent implements AfterViewInit {

  @ViewChild(CountdownTimerComponent)
  private timerComponent: CountdownTimerComponent;

  seconds() { return 0; }

  ngAfterViewInit() {
    // Redefine `seconds()` to get from the `CountdownTimerComponent.seconds` ...
    // but wait a tick first to avoid one-time devMode
    // unidirectional-data-flow-violation error
    setTimeout(() => this.seconds = () => this.timerComponent.seconds, 0);
  }

  start() { this.timerComponent.start(); }
  stop() { this.timerComponent.stop(); }
}
親コンポーネントクラスに子ビューを取得するにはもう少し作業が必要です。
まず、ViewChild デコレータと AfterViewInit ライフサイクルフックへの参照をインポートする必要があります。
次に、子の CountdownTimerComponent を @ViewChild プロパティデコレーションを介して private timerComponent プロパティに挿入します。
#timer ローカル変数はコンポーネントのメタデータから削除されました。代わりに、ボタンを親コンポーネントの独自の開始および終了メソッドにバインドし、ティック秒を親コンポーネントの seconds メソッドの補間にします。
これらのメソッドは、注入されたタイマーコンポーネントに直接アクセスします。
ngAfterViewInit() ライフサイクルフックは重要なポイントです。
Timular コンポーネントは、Angularが親ビューを表示するまで使用できません。したがって、最初は 0 秒を表示します。
次に、Angularは ngAfterViewInit ライフサイクルフックを呼び出し、親ビューのカウントダウン秒の表示を更新するには遅すぎます。
Angularの単方向データフロールールは、同じサイクル内の親ビューの更新を防ぎます。アプリは1秒間待つ必要があります。
setTimeout() を使用して1回のティックを待ってから、timer コンポーネントから将来の値を取得するように seconds() メソッドを修正します。
テストしよう
前述のように[同じカウントダウンタイマーテスト](ガイド/コンポーネント相互作用#カウントダウンテスト)を使用してください。
親と子の間でサービスを経由してやりとりする
親コンポーネントとその子コンポーネントは、インタフェースがそのファミリ内で双方向通信を可能にするサービスを共有します。
サービスインスタンスのスコープは、親コンポーネントとその子です。このコンポーネントサブツリー外のコンポーネントは、サービスまたはその通信にアクセスできません。
この MissionService は、MissionControlComponent を複数のAstronautComponent の子コンポーネントに接続します。
component-interaction/src/app/mission.service.ts
import { Injectable } from '@angular/core';
import { Subject }    from 'rxjs/Subject';

@Injectable()
export class MissionService {

  // Observable string sources
  private missionAnnouncedSource = new Subject<string>();
  private missionConfirmedSource = new Subject<string>();

  // Observable string streams
  missionAnnounced$ = this.missionAnnouncedSource.asObservable();
  missionConfirmed$ = this.missionConfirmedSource.asObservable();

  // Service message commands
  announceMission(mission: string) {
    this.missionAnnouncedSource.next(mission);
  }

  confirmMission(astronaut: string) {
    this.missionConfirmedSource.next(astronaut);
  }
}
MissionControlComponent は、子(プロバイダのメタデータ配列を介して)と共有するサービスのインスタンスを提供し、そのインスタンスをコンストラクタを通して自身に送ります。
component-interaction/src/app/missioncontrol.component.ts
import { Component }          from '@angular/core';

import { MissionService }     from './mission.service';

@Component({
  selector: 'mission-control',
  template: `
    <h2>Mission Control</h2>
    <button (click)="announce()">Announce mission</button>
    <my-astronaut *ngFor="let astronaut of astronauts"
      [astronaut]="astronaut">
    </my-astronaut>
    <h3>History</h3>
    <ul>
      <li *ngFor="let event of history">{{event}}</li>
    </ul>
  `,
  providers: [MissionService]
})
export class MissionControlComponent {
  astronauts = ['Lovell', 'Swigert', 'Haise'];
  history: string[] = [];
  missions = ['Fly to the moon!',
              'Fly to mars!',
              'Fly to Vegas!'];
  nextMission = 0;

  constructor(private missionService: MissionService) {
    missionService.missionConfirmed$.subscribe(
      astronaut => {
        this.history.push(`${astronaut} confirmed the mission`);
      });
  }

  announce() {
    let mission = this.missions[this.nextMission++];
    this.missionService.announceMission(mission);
    this.history.push(`Mission "${mission}" announced`);
    if (this.nextMission >= this.missions.length) { this.nextMission = 0; }
  }
}
また、AstronautComponent はコンストラクタにサービスを挿入します。各AstronautComponent は MissionControlComponent の子であるため、親のサービスインスタンスを受け取ります。
component-interaction/src/app/astronaut.component.ts
import { Component, Input, OnDestroy } from '@angular/core';

import { MissionService } from './mission.service';
import { Subscription }   from 'rxjs/Subscription';

@Component({
  selector: 'my-astronaut',
  template: `
    <p>
      {{astronaut}}: <strong>{{mission}}</strong>
      <button
        (click)="confirm()"
        [disabled]="!announced || confirmed">
        Confirm
      </button>
    </p>
  `
})
export class AstronautComponent implements OnDestroy {
  @Input() astronaut: string;
  mission = '<no mission announced>';
  confirmed = false;
  announced = false;
  subscription: Subscription;

  constructor(private missionService: MissionService) {
    this.subscription = missionService.missionAnnounced$.subscribe(
      mission => {
        this.mission = mission;
        this.announced = true;
        this.confirmed = false;
    });
  }

  confirm() {
    this.confirmed = true;
    this.missionService.confirmMission(this.astronaut);
  }

  ngOnDestroy() {
    // prevent memory leak when component destroyed
    this.subscription.unsubscribe();
  }
}
このサンプルは、AstronautComponent が破棄されたときにサブスクリプションとunsubscribe() を取得することに注意してください。
AstronautComponent のライフタイムはアプリ自体のライフタイムと同じなので、このアプリには実際のリスクはありません。ただ、もっと複雑なアプリケーションになると、これが常に正しいアプローチとは限りません。このガードを
MissionControlComponentに追加しないのは、親としてMissionServiceのライフタイムを制御するためです。
ヒストリーログは、メッセージが親 MissionControlComponent と AstronautComponent の子の間で両方向に移動し、サービスによって容易になることを示します。

テストしよう
親 MissionControlComponent と AstronautComponent 子の両方のボタンをクリックして、履歴が期待を満たしていることを確認します。
component-interaction/e2e-spec.ts
// ...
it('should announce a mission', function () {
  let missionControl = element(by.tagName('mission-control'));
  let announceButton = missionControl.all(by.tagName('button')).get(0);
  announceButton.click().then(function () {
    let history = missionControl.all(by.tagName('li'));
    expect(history.count()).toBe(1);
    expect(history.get(0).getText()).toMatch(/Mission.* announced/);
  });
});

it('should confirm the mission by Lovell', function () {
  testConfirmMission(1, 2, 'Lovell');
});

it('should confirm the mission by Haise', function () {
  testConfirmMission(3, 3, 'Haise');
});

it('should confirm the mission by Swigert', function () {
  testConfirmMission(2, 4, 'Swigert');
});

function testConfirmMission(buttonIndex: number, expectedLogCount: number, astronaut: string) {
  let _confirmedLog = ' confirmed the mission';
  let missionControl = element(by.tagName('mission-control'));
  let confirmButton = missionControl.all(by.tagName('button')).get(buttonIndex);
  confirmButton.click().then(function () {
    let history = missionControl.all(by.tagName('li'));
    expect(history.count()).toBe(expectedLogCount);
    expect(history.get(expectedLogCount - 1).getText()).toBe(astronaut + _confirmedLog);
  });
}
// ...