はじめに
特定の地点にて、固定されていないカメラで撮影した写真の中から特定のものが写っている箇所を抽出したいという相談があり、「簡単にできますよ〜」って言ったのに、意外と手こずったし、時間もかかりそうだということがわかり「どうしよう😅」と思って試行錯誤していたら、それなりの時間でそれなりの結果を得ることができたので、手順をまとめてみます。
概要
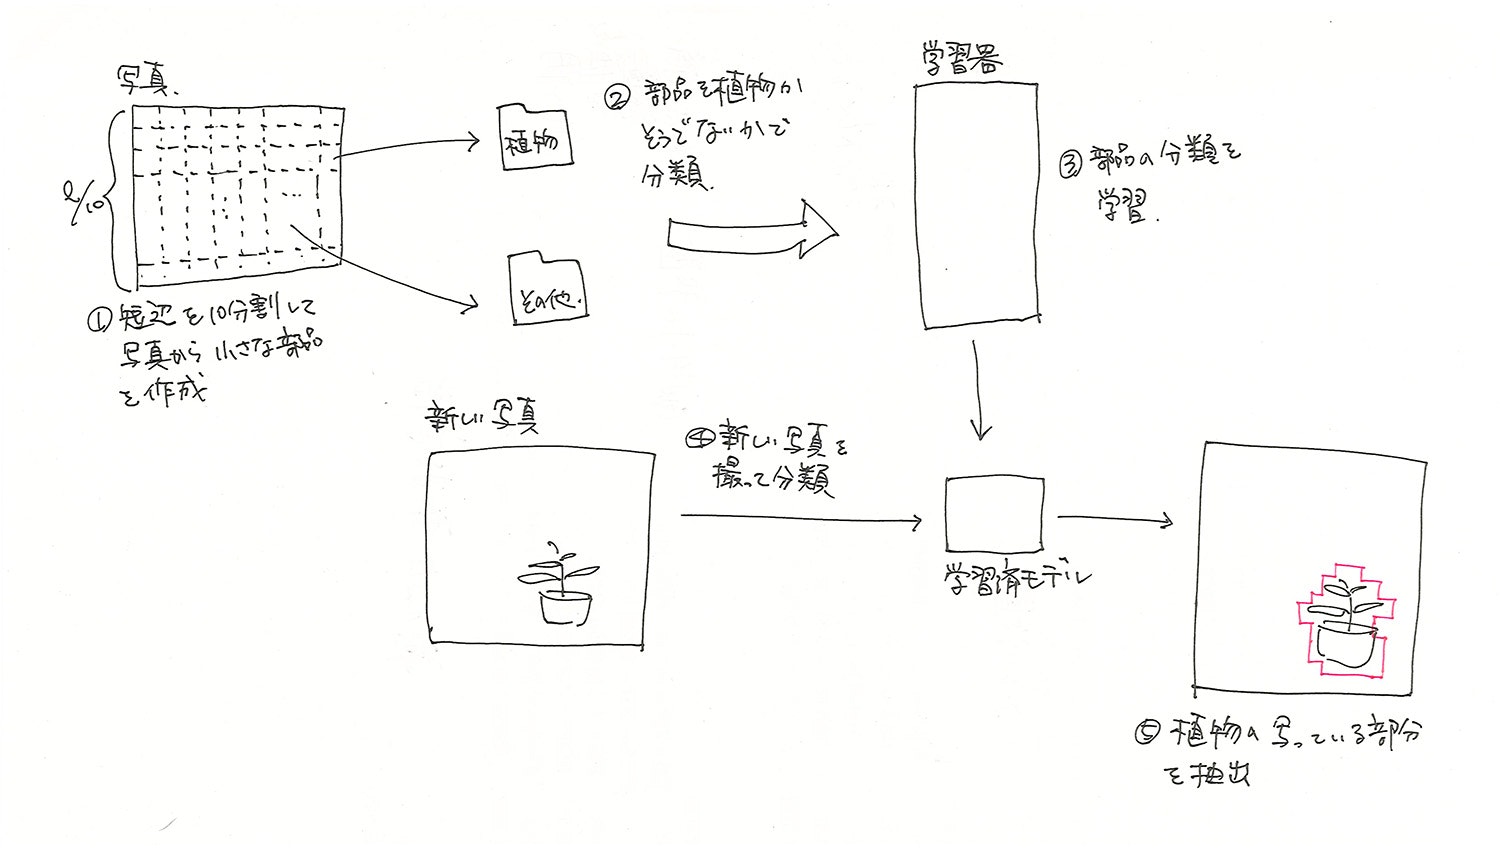
抽出する内容がそれほどシビアな条件でなかったことから、以下のような手順を想定していました。
写真
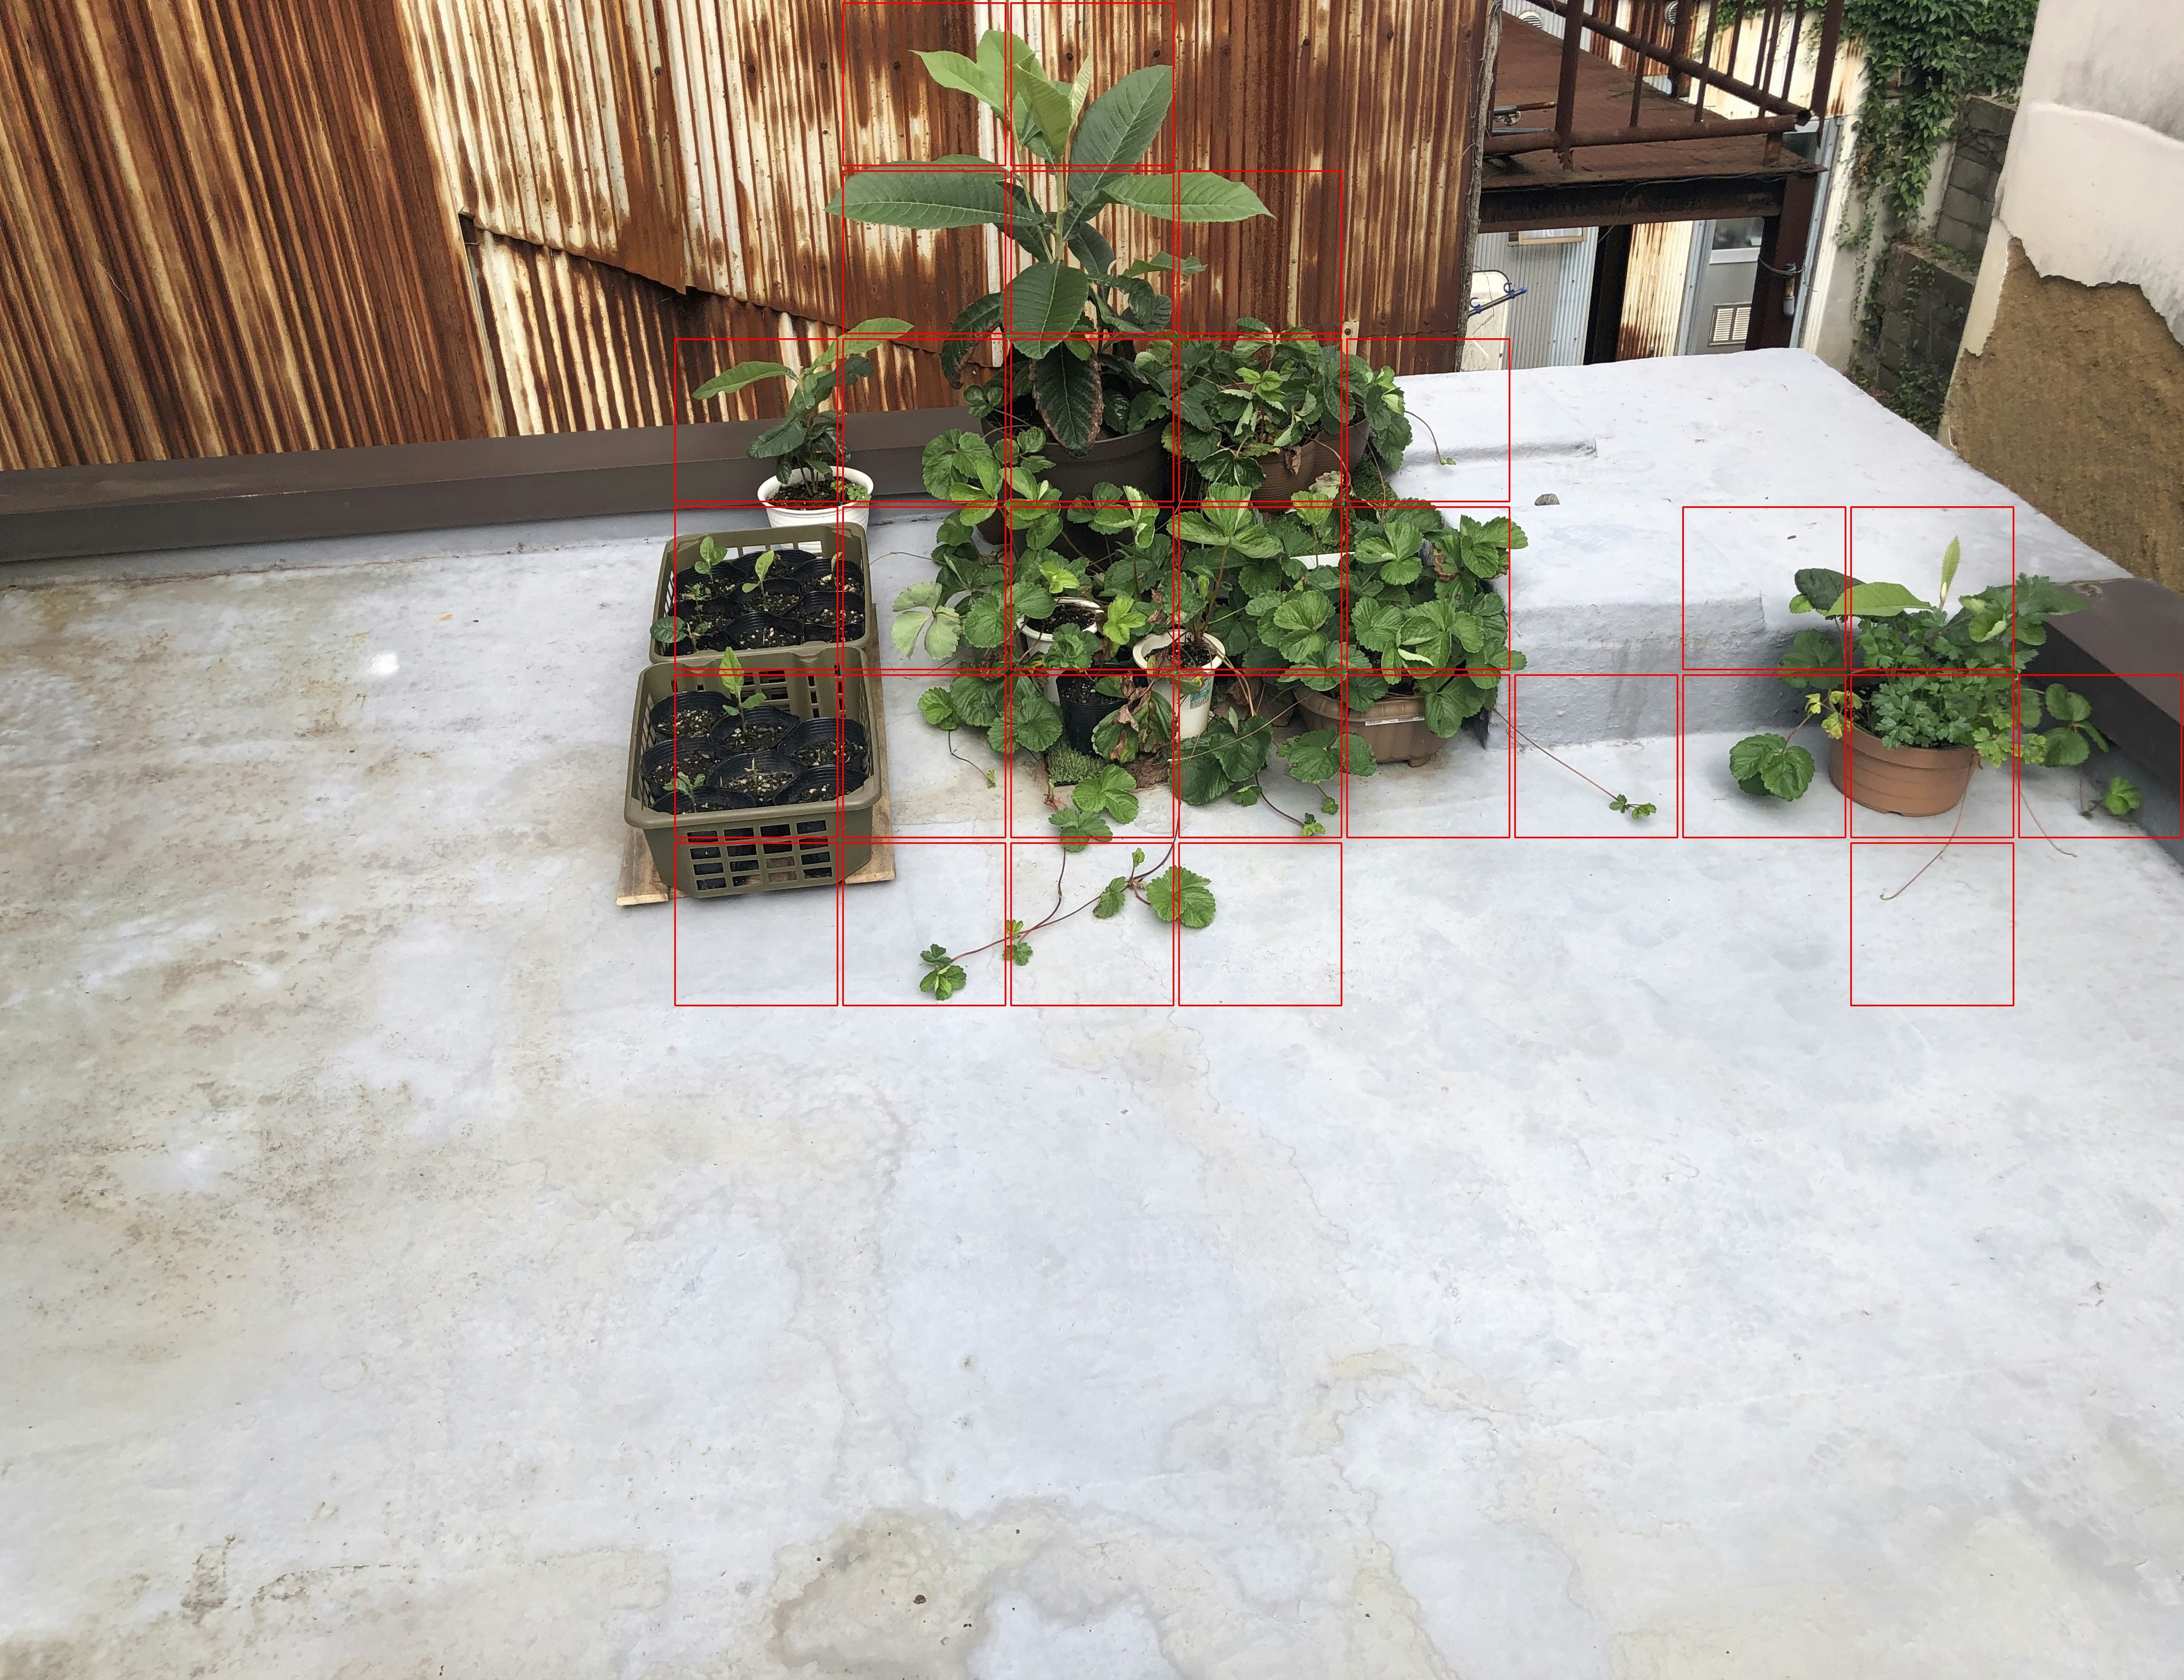
今回使用したのは以下のような写真。
これに以下のようなマーキングを自動で施す。
画像の裁断と分類
以下のコードを用いて、一つの写真を裁断して部品にします。
from glob import glob
import cv2

# 元画像・分割画像の保存先を設定
dir_imgs = "imgs"
dir_sliced = "sliced"

# ファイル一覧の取得
files = glob(dir_imgs + "/*")
files.sort()

for file in files:

    # 元画像の読込
    img = cv2.imread(file)
    h, w, c = img.shape

    # ファイル名、高さ、幅、色
    print(file, h, w, c)

    # 分割サイズを取得
    size = h if h < w else w
    size = int(size / 10)
    print(size)

    i = 0

    while size * (i +1) < h:
        j = 0
        while size * (j + 1) < w:

            # 分割と保存
            img_x = img[size*i:size*(i+1), size*j:size*(j+1)]
            f_new = "{}/{}-{:02}-{:02}.jpg".format(dir_sliced, file.split("/")[-1].split(".")[0], i, j)
            cv2.imwrite(f_new, img_x)

            j += 1

        i += 1
実行するとslicedというフォルダに分割された部品が保存され、一枚あたり120個程度の以下のような部品が作成されます。
これを「01_植物」「99_その他」というフォルダに仕分けをします。
学習
以下のコードを実行してファイルを読み込み、学習させます。
なお、分割した画像において植物以外が圧倒的に多くなってしまったことから、読込画像の最大数を1500枚としています。
from glob import glob
import random

X = []
y = []

dirs = ["9*/*.jpg", "0*/*.jpg"]

i = 0
# 読込数の最大値を1500に指定
min = 1500

# 学習用画像の一覧を取得
for d in dirs:
    files = glob(d)
    files = random.sample(files, min if len(files) > min else len(files))

    for f in files:
        X.append(f)
        y.append(i)

    i += 1

import pandas as pd
import cv2
import numpy as np

# ファイル情報とラベルをデータフレームに入力
df = pd.DataFrame({"X" : X, "y" : y})

X = []
y = []

cnt = 0

# ファイル読込
for idx in df.index:

    f = df.loc[idx, "X"]
    l = df.loc[idx, "y"]

    print("\r{:05} : [{}] {}".format(cnt, l, f), end="")
    i += 1

    # 画像読込
    img_org = cv2.imread(f)
    img = cv2.resize(img_org, (100, 100))
    img = cv2.cvtColor(img, cv2.COLOR_BGR2RGB)

    X.append(img)
    y.append(l)

    cnt += 1

print()

# 学習用データに変換
X = np.array(X)
X = X / 255

from sklearn import model_selection

test_size = 0.2

# 学習用、検証用、テスト用に分割
X_train, X_test, y_train, y_test = model_selection.train_test_split(X, y, test_size=test_size, random_state=42)
X_valid, X_test, y_valid, y_test = model_selection.train_test_split(X_test, y_test, test_size=.5, random_state=42)

from keras.utils.np_utils import to_categorical

# カテゴリカルデータに変換
y_train = to_categorical(y_train)
y_valid = to_categorical(y_valid)
y_test = to_categorical(y_test)

from keras.layers import Activation, Conv2D, Dense, Flatten, MaxPooling2D, Dropout
from keras.models import Sequential

# 学習モデル(CNN)の作成
input_shape = X[0].shape

model = Sequential()

model.add(Conv2D(
    input_shape=input_shape, filters=64, kernel_size=(5, 5),
    strides=(1, 1), padding="same", activation='relu'))

model.add(MaxPooling2D(pool_size=(4, 4)))

model.add(Conv2D(
    filters=32, kernel_size=(5, 5),
    strides=(1, 1), padding="same", activation='relu'))

model.add(Conv2D(
    filters=32, kernel_size=(5, 5),
    strides=(1, 1), padding="same", activation='relu'))

model.add(MaxPooling2D(pool_size=(2, 2)))

model.add(Conv2D(
    filters=16, kernel_size=(5, 5),
    strides=(1, 1), padding="same", activation='relu'))

model.add(MaxPooling2D(pool_size=(2, 2)))

model.add(Flatten())
model.add(Dense(1024, activation='sigmoid'))
model.add(Dense(2048, activation='sigmoid'))

model.add(Dense(len(y_train[0]), activation='softmax'))

# モデルをコンパイル
model.compile(optimizer='rmsprop', loss='categorical_crossentropy', metrics=['accuracy'])

# 学習
history = model.fit(
    X_train, y_train, batch_size=25, epochs=60,
    verbose=1, shuffle=True,
    validation_data=(X_valid, y_valid))

import matplotlib.pyplot as plt

# 汎化制度の評価・表示
score = model.evaluate(X_test, y_test, batch_size=32, verbose=0)
print('validation loss:{0[0]}\nvalidation accuracy:{0[1]}'.format(score))

#acc, val_accのプロット
plt.plot(history.history["accuracy"], label="acc", ls="-", marker="o")
plt.plot(history.history["val_accuracy"], label="val_acc", ls="-", marker="x")
plt.ylabel("accuracy")
plt.xlabel("epoch")
plt.legend(loc="best")
plt.show()

#loss, val_lossのプロット
plt.plot(history.history["loss"], label="loss", ls="-", marker="o")
plt.plot(history.history["val_loss"], label="val_loss", ls="-", marker="x")
plt.ylabel("loss")
plt.xlabel("epoch")
plt.legend(loc="best")
plt.show()
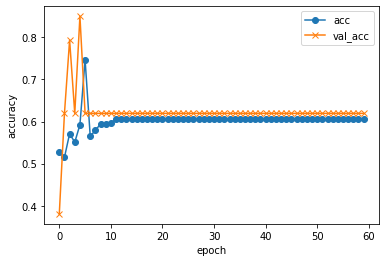
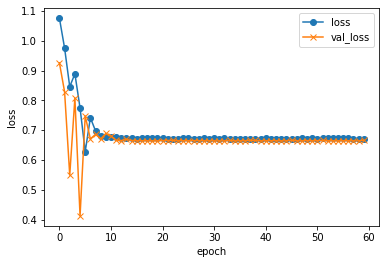
実行結果...
validation loss:0.6690251344611288
validation accuracy:0.6153846383094788
...たぶん全然学習できてない気がする。
はい、失敗!
