
↑リアルタイムでテロップっぽく話してる内容を表示して、関連画像もパッと表示します。
文字もfadeinしているのですが伝わらないですね...
見た目整えるところまでいけなかったのでこんな感じ!
..まだまだダサい!
CSSフレームワーク適当にいれて、iframeでslideの上に表示して...はっ!!
なにはともあれ!解説に入ります。
どうも!mixです!
今日の内容
今日は話してる内容をリアルタイムでテロップ出したり、バラエティみたいに突然画像を表示するアプリを作ります!
当日の今日、作りながら書いています!!
つまり...ちょーっと時間ないのでちゃんとは作りません!
が機能は全部つけますよっ!!
意外と面白いアプリになりました!!(←今ここ)
ポイント
- Google Cloud Speech APIを使います。
- 言語はフロントも作るのでNode.jsにします。
(nodeってqiita書く時しか使わないな...) - 説明をわかりやすくするため簡単かつ最小になる構成で
できるだけ工夫せず稚拙に書きます。 - 急いで作ったのでとーっても作りが甘いですm(_ _)m
お遊びコードなのでmac前提で説明もざっくりしています。
詳しく知りたい方向けではありませんので悪しからず...
今日やってみるアプリの構成
音声入力をリアルタイムに解釈して色々表示します。
大枠は以下です。
- 音声入力はサーバで行い、Google Cloud Speech APIを利用する
- サーバから一方的に通信するため(だけ)にsocket.ioを使う
- 取得した文字はsocket.ioで随時テキストとしてクライアントに渡す
- と同時に、形態素解析して適当に名詞を抽出→画像URLを取得してsocket.ioで渡す
- テキストはライブラリを使ってそれっぽく表示
- 画像はそのままimgタグで表示
こういうふざけた構成で書けるのいいですよね。
はじめelectronで作ろうと思ったのですが、
解説どこからすれば??全部は長すぎる...
ということで諦めました。
GCPにアカウントを作ろう!
これは...ポチポチするだけで終わってしまったので省略します。
もし要望あれば最新版でキャプチャ取りながら書きますね。
まずは環境設定!!
nodebrewのインストール
久々なのでここから..!!
curl -L git.io/nodebrew | perl - setup
echo 'export PATH=$HOME/.nodebrew/current/bin:$PATH' >> ~/.profile
source ~/.profile
nodejsのインストール
nodebrew install-binary stable
バイナリがおすすめです。
※普通にやるとコンパイル時間長いです...!!
v8.9.3でした。
使えるようにしましょう。
nodebrew use v8.9.3
もしかしてエラーでました??
奇遇ですね!!じゃあ
rm ~/.nodebrew/node/.DS_Store
nodebrew use v8.9.3
どうでしょう?
上手くいきましたね!念のため...
node -v
npm -v
OKですね!
アプリの雛形を用意しよう
mkdir presentation-helper
cd presentation-helper
npm init
色々聞かれますが全部EnterでOKです。
ちゃんとしないと気がすまない人は設定して下さいね。
※全部Enterだとinstallの度怒られますがいいんです!今日は全力で無視します!笑
まず、直下にindex.jsを作ります。
touch index.js
なんでも良いのでnode.jsの本家サンプル通り書いてみましょう。、
const http = require('http');

const hostname = '127.0.0.1';
const port = 3000;

const server = http.createServer((req, res) => {
  res.statusCode = 200;
  res.setHeader('Content-Type', 'text/plain');
  res.end('Hello World\n');
});

server.listen(port, hostname, () => {
  console.log(`Server running at http://${hostname}:${port}/`);
});
一旦接続してみましょう。
http://localhost:3000/

味気ないですね。承知です。
Google Speech APIを使ってみよう!
**
設定作業や細かい仕様は長くなるので省きます。
これももしニーズあれば書きますね...
**
nodejs版のサンプルはここにあります。
(...実装に関してはドキュメントを信じず
ここかライブラリのコードだけを見ましょう..!!)
https://github.com/googleapis/nodejs-speech/tree/master/samples
cloud shellでも確認できますので色々遊んで見て下さい。
*projectを有効化してというのを言われます。 必要に応じて改造して動かすと良いかもしれません。
ちなみに!同期音声認識でもっと手軽に試したい人!きっと「音源データとかないよ!」ってなると思うのでここにあるサンプルを使いましょう!!
アプリに戻ります。
まず必要なライブラリをインストールします。
npm i @google-cloud/speech -S
npm i node-record-lpcm16 -S
ドキュメント通りkeyfile.json作っておきます...!!
touch touch keyfile.json
*中身はドキュメント見て下さい。
さて、次はindex.jsでsocket.ioを使えるようにします。
サーバーから一方的に1回送るだけの処理を作ってみます。
npm i socket.io -S
const http = require('http');
const fs = require('fs');

const hostname = '127.0.0.1';
const port = 3000;

const server = http.createServer((req, res) => {
  fs.readFile('./index.html', 'utf-8' , (err, data) => {
      if (err) {
        res.writeHead(404, {'Content-Type': 'text/plain'});
        res.write('not found!');
        return res.end();
      }
      res.writeHead(200, {'Content-Type': 'text/html'});
      res.write(data);
      res.end();
  })
});

server.listen(port, hostname, () => {
  console.log(`Server running at http://${hostname}:${port}/`);
});

const io = require('socket.io').listen(server);
io.on('connection', (_socket) => {
  telop(io);
});
const telop = (io) => {
  io.emit('streaming', 'hogehoge');
}
ここでindex.htmlを作りましょう。
※今回はテンプレートエンジンも使いませんが適宜使って下さい。
※jsも説明のためにあえて外出ししませんが適宜外出しして、適宜サーバと共通化しましょう。
<html lang="ja">
<head>
    <meta charset="UTF-8">
    <title>Speech decorator</title>
</head>
<body>
    <h1>sample</h1>
    <script src="/socket.io/socket.io.js"></script>
    <script>
      var socket = io();
      socket.on('streaming', function(msg){
        console.log(msg);
      });
    </script>
</body>
</html>
ここで再度起動し直してアクセスします。
再起動嫌いであればwatchなど準備すると良いかもしれません。
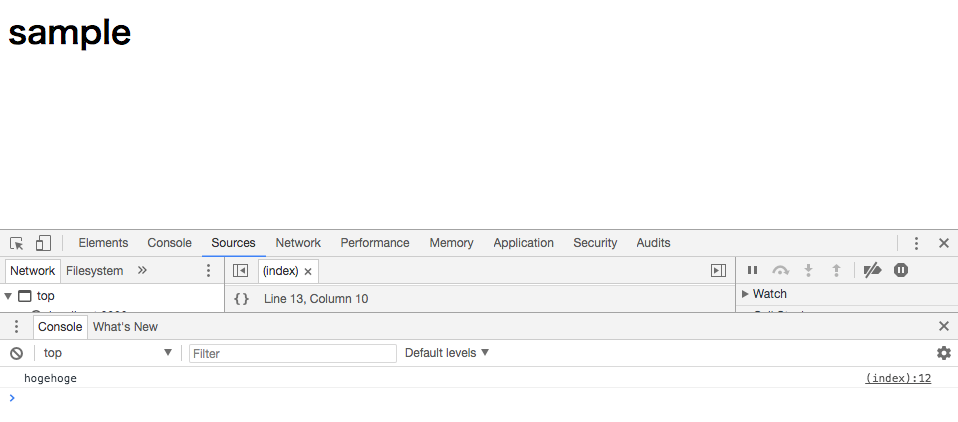
hogehoge通信が届いているようですね。
telopを拡張してストリーミングで音声認識させてみましょう。
説明のためとはいえコードをこんなにだらっと書いて良心が...痛まない!これは遊び(笑)
const telop = (io) => {
  const record = require('node-record-lpcm16');
  const speech = require('@google-cloud/speech');
  const util = require('util');

  const projectId = '**ここは適宜自分の環境のもので置き換えて下さい**';
  var speechClient = new speech.SpeechClient({
    projectId: projectId,
    keyFilename: './keyfile.json'
  });
  const config = {
    encoding: 'LINEAR16',
    sampleRateHertz: 16000,
    languageCode: 'ja-JP',
  };
  const request = {
    config: config,
    singleUtterance: false,
    interimResults: false
  };

  const recognizeStream = speechClient.streamingRecognize(request)
    .on('error', console.error)
    .on('data', (data) => {
      console.log(util.inspect(data,false,null));
      if (data.results.length === 0) {
        return;
      }
      const words = data.results[0].alternatives[0].transcript
      process.stdout.write(
        (data.results[0] && data.results[0].alternatives[0])
          ? `${words}\n`
          : `\n\nReached transcription time limit, press Ctrl+C\n`);
      io.emit('streaming', data.results[0].alternatives[0].transcript);
      telop(io);
    });

  const sampleRateHertz = 16000;
  record
    .start({
      sampleRateHertz: sampleRateHertz,
      thresholdStart: 0.2,
      thresholdEnd: 0.1,
      verbose: true,
      recordProgram: 'rec',
      silence: '0.5'
    })
    .on('error', console.error)
    .pipe(recognizeStream)
    .on('end', () => telop(io));

  setTimeout(function () {
    record.stop()
  }, 60000);

  console.log('Listening, press Ctrl+C to stop.');
}
立ち上げ直して
http://localhost:3000/
に接続し、何か喋ってみましょう。
動きましたね!!(ここのキャプチャけしちゃった...汗)
表示を少し工夫してみよう!
表示文字をテロップっぽくしたいので、
textillate.jsを使ってみます。
githubのサンプルを参考に使ってみます。
適当にcloneして...
git clone git@github.com:jschr/textillate.git
適当に使ってみます。
そのためにjsやcssにアクセスできるようにしないとですね。
ちょっと拡張します。
const http = require('http');
const fs = require('fs');

const hostname = '127.0.0.1';
const port = 3000;

const path = require('path');
const mime = {
  ".html": "text/html",
  ".css":  "text/css",
  ".js": "text/javascript"
};

const server = http.createServer((req, res) => {
  var filePath;
  if (req.url == '/') {
    filePath = '/index.html';
  } else {
    filePath = req.url;
  }
  const fullPath = __dirname + filePath;

  fs.readFile(fullPath, 'utf-8' , (err, data) => {
      if (err) {
        res.writeHead(404, {'Content-Type': 'text/plain'});
        res.write('not found!');
        return res.end();
      }
      res.writeHead(200, {'Content-Type': mime[path.extname(fullPath)] || "text/plain"});
      res.write(data);
      res.end();
  })
});
index.htmlも書き換えましょう。
<html lang="ja">
<head>
    <meta charset="UTF-8">
    <title>Speech decorator</title>
</head>
<body>
    <p class="lead"></p>
    <script src="/socket.io/socket.io.js"></script>
    <script src="https://code.jquery.com/jquery-1.11.1.js"></script>
    <script type="text/javascript" src="/textillate/jquery.textillate.js"></script>
    <script type="text/javascript" src="/textillate/assets/jquery.lettering.js"></script>
    <link rel="stylesheet" type="text/css" href="/textillate/assets/animate.css"></link>
    <script>
      var socket = io();
      socket.on('streaming', function(msg){
        $('.lead').text(msg);
        $('.lead').textillate({loop: true,
          in: {effect: 'fadeIn',delayScale: 1.5},
          out: {effect: 'fadeOut',delayScale: 1.5},
        });
      });
    </script>
</body>
</html>
これで話した内容がfadein -> fadeoutするようになりました。
画像のために形態素解析しよう!
では画像を取得するための準備をしましょう。
日本語を形態素解析して名詞だけ取得→画像検索としたいので、まずは名詞だけ取得します。
有名なmecabくんにnode用のライブラリがあるみたいです。
mecab-async
これを使いましょう。
npm i mecab-async -S
宣言して、名詞だけ取得します。
const mecab = new (new require('mecab-async'))();
mecab.parse(words, function(err, result) {
    if (err) return;
    const specialWord = result.filter(el => {
          return (el[1] === '名詞' && (el[2] === '一般' || el[2] === '固有名詞'));
        }).map(el => el[0])[0];
    io.emit('specialWord', specialWord);
  });
名詞の中で1つ目のワードspecialWordとして配信するようにしました。
ランダムとか使っても良いですね。
画像を検索表示してみよう!
google image apiなど正規のサービスを使うべきですが、GCPの設定はお腹一杯なので地道に取る方針でいきましょう。
今回は遊びのサンプルなので、スクレイピングで取りますが、アプリ作る際に安易に行ってはいけません。
利用規約とかちゃんと見なきゃらしいです!
(かく言う私もそういうの見ていません、すみません。)
npm i cheerio-httpcli -S
const URL = require('url');
const client = require('cheerio-httpcli');
const imageSearchURL = "https://search.yahoo.co.jp/image/search";
...

  mecab.parse(words, function(err, result) {
    if (err) return;
    const specialWord = result.filter(el => {
      return (el[1] === '名詞' && el[2] === '一般');
    }).map(el => el[0])[0];

    const params = { ei: 'UTF-8', p: specialWord}

    client.fetch(imageSearchURL, params, (err, $, res) => {
        if (err) { console.log("error"); return; }
        $("img").each(function(idx) {
            io.emit('linkUrl', $(this).attr('src'));
            return false;
        });
    });
  });
あとはクライアントで表示してみましょう。
<html lang="ja">
<head>
    <meta charset="UTF-8">
    <title>Speech decorator</title>
</head>
<body>
    <p class="lead"></p>
    <img id="image"></img>
    <script src="/socket.io/socket.io.js"></script>
    <script src="https://code.jquery.com/jquery-1.11.1.js"></script>
    <script type="text/javascript" src="/textillate/jquery.textillate.js"></script>
    <script type="text/javascript" src="/textillate/assets/jquery.lettering.js"></script>
    <link rel="stylesheet" type="text/css" href="/textillate/assets/animate.css"></link>
    <script>
      var socket = io();
      socket.on('streaming', function(msg){
        $('.lead').text(msg);
        $('.lead').textillate({loop: true,
          in: {effect: 'fadeIn',delayScale: 1.5},
          out: {effect: 'fadeOut',delayScale: 1.5},
        });
      });
      socket.on('linkUrl', function(url){
        $('#image').attr('src', url);
      });
    </script>
</body>
</html>
ちょっと喋ってみます。
↓アプリです。文字もfadeinしますね。
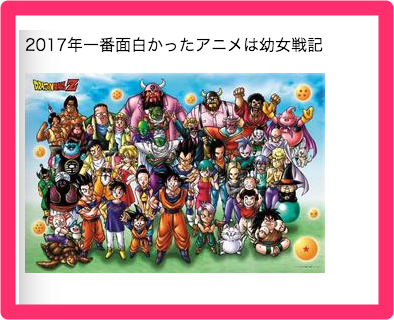
画像は「アニメ」でヒットしたのでしょう。
言っている内容と違います...
機能は完成です!!
後は見た目!!
さーてここからbootstrapにしよかな?それともpure??
さすがに飽きてきたから別のにしますか?
→じゃあImpress.js!!と思っていましたが...もう時間ですね。
楽しい時間はあっと言う間...
どうでしたでしょうか?
かなり単純かつはちゃめちゃな最小構成で機能をつけてみましたが、簡単に音声認識で遊べることは確実に伝わったかと思います★
色々カスタマイズして自分なりのリアルタイムテロップ&画像表示アプリを作って下さい!
めりくりまで、あと....5日!!
しーゆー!