概要
Visual Studio 2019でWebカメラの映像をキャプチャする方法を説明
新しいバージョンであるOpenCvSharp4環境でのキャプチャ画像保存の情報が少なかったので共有
環境
windows10
Visual Studio 2019
実装
まずVisual Studio 2019(以下VS)を公式サイトからインストール
OpenCvSharpライブラリはNuGetからインストールするので今は放置
プロジェクトの作成
1.VSを起動し,新しいプロジェクトの作成を選択
2.Windows フォーム アプリケーション(.NET Framework)を選択
3.プロジェクト名と保存場所を適当に入力しプロジェクトを作成
パッケージのインストール
1.VSのプロジェクトタブからNuGetパッケージの管理を選択
2.参照タブの検索ボックスにopencvsharp4と入力
3.OpenCvSharp4.Windowsをインストール(今回使用したバージョンは「4.1.1.20191017」)
4.インストール済みタブからOpenCvSharp4.Windowsがインストールされていることを確認
下準備
1.Form1.cs[デザイン]タブに移動し,画面左(表示されていない場合,「表示」タブ→「ツールボックス」)にある「ツールボックス」→「コモン コントロール」→「PictureBox」をForm1上にD&D
一つ戻り,「コンポーネント」→「BackgroundWorker」も同様にD&D
2.Form1ウィンドウのプロパティから下図のイベントタブを選択
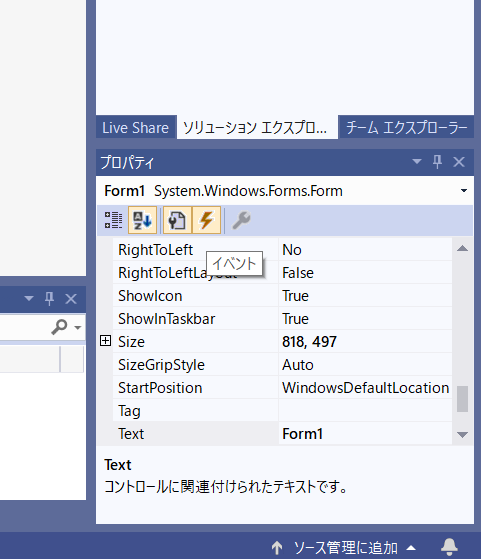
FormClosingイベントを追加し,同様にBackgroundWorkerに「DoWork」と「ProgressChanged」イベントを追加する
3.BackgroundWorkerのプロパティタブで下図のように「WorkerReportsProgress」「WorkerSupportsCancellation」の2つをfalseからtrueに変更する

映像をPictureBoxに出力する
コードは以下
using System;
using System.Collections.Generic;
using System.ComponentModel;
using System.Data;
using System.Drawing;
using System.Linq;
using System.Text;
using System.Threading.Tasks;
using System.Windows.Forms;
using OpenCvSharp;

namespace WindowsFormsApp1
{
    public partial class Form1 : Form
    {
        int WIDTH = 640;
        int HEIGHT = 480;
        Mat frame;
        VideoCapture capture;
        Bitmap bmp;
        Graphics graphic;
        public Form1()
        {
            InitializeComponent();
            //カメラ画像取得用のVideoCapture作成
            capture = new VideoCapture(0);
            if (!capture.IsOpened())
            {
                MessageBox.Show("camera was not found!");
                this.Close();
            }
            capture.FrameWidth = WIDTH;
            capture.FrameHeight = HEIGHT;

            //取得先のMat作成
            frame = new Mat(HEIGHT, WIDTH, MatType.CV_8UC3);

            //表示用のBitmap作成
            bmp = new Bitmap(frame.Cols, frame.Rows, (int)frame.Step(), System.Drawing.Imaging.PixelFormat.Format24bppRgb, frame.Data);

            //PictureBoxを出力サイズに合わせる
            pictureBox1.Width = frame.Cols;
            pictureBox1.Height = frame.Rows;

            //描画用のGraphics作成
            graphic = pictureBox1.CreateGraphics();

            //画像取得スレッド開始
            backgroundWorker1.RunWorkerAsync();
        }

        private void backgroundWorker1_ProgressChanged(object sender, ProgressChangedEventArgs e)
        {
            //描画
            graphic.DrawImage(bmp, 0, 0, frame.Cols, frame.Rows);
        }

        private void backgroundWorker1_DoWork(object sender, DoWorkEventArgs e)
        {
            BackgroundWorker bw = (BackgroundWorker)sender;

            while (!backgroundWorker1.CancellationPending)
            {
                //画像取得
                capture.Grab();
                OpenCvSharp.Internal.NativeMethods.videoio_VideoCapture_operatorRightShift_Mat(capture.CvPtr, frame.CvPtr);
                bw.ReportProgress(0);
            }
        }

        private void Form1_FormClosing(object sender, FormClosingEventArgs e)
        {
            //スレッドの終了を待機
            backgroundWorker1.CancelAsync();
            while (backgroundWorker1.IsBusy)
                Application.DoEvents();
        }
    }
}
実行すると,PictureBoxにWebカメラの映像が出力される
映像のキャプチャ
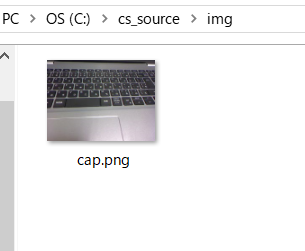
1.キャプチャ画像の保存先ファイルを設定
今回はC:\cs_source\img\を作成し,そこに保存することにする
2.「ツールボックス」→「コモン コントロール」→「Button」をForm1ウィンドウの適当な場所にD&D

2.ボタンをダブルクリックして,クリックイベントを追加
3.クリックイベントに以下のコードを書き加える
private void button1_Click(object sender, EventArgs e)
        {
            frame.SaveImage(@"C:\cs_source\img\cap.png");
            using (Mat cap = new Mat(@"C:\cs_source\img\cap.png"))
            {
                //保存されたキャプチャ画像の出力
                Cv2.ImShow("test1", frame);
            }
        }
実行結果
C:\cs_source\img\への出力結果のスクリーンショット
参考URL
カメラ映像をPictureBoxに出力する
http://blog.livedoor.jp/user5/archives/46255389.html