基本寄せ集めなんですが、備忘としてメモします。
やることは大きくわけて3つです。
- Adobe Illustratorでパスを作る
- Adobe IllustratorのパスをUIBezierPathとして読み込む
- CAKeyframeAnimationを使ってUIBezierPathをanimationさせる
Adobe Illustratorでパスを作る
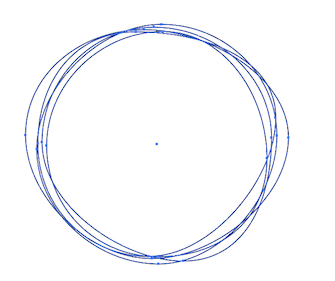
僕はいびつな円が好きなので、今回はそれを描いてみます。
イラストレータのパスポイントをランダムで移動したり追加する。アイテムを等間隔で縮小スケールしていくスクリプト
このapple scriptが超便利です(DLしてきたファイルは日本語になってますが、英語にしないと使えませんでした)。これでただの円をいびつな円にしていきます。調子にのって6つくらい描いちゃいます。
Adobe IllustratorのパスをUIBezierPathとして読み込む
Adobe Illustrator Scripting 1: IllustratorのパスをiOSで使う を使わせていただきました。ありがとうございます。ただ吐き出されるコードがObjcだったのでSwiftに変更し、多少使いやすいように加筆しました: Swift version
注意点としては、
- スクリプトを走らせる前に、目的のアートボードを選択しないと意図しないサイズで書き出されてしまうので注意
- UIBezierPathは縦横比をアートボードの縦横サイズで縮小/拡大するようになっています
- パスは1つづつ書き出すのが無難です(一応複数パスを選択しても出力されるようです)
-
path.moveToPoint()ごとに1つのパスのまとまりになっています
使い方としては、
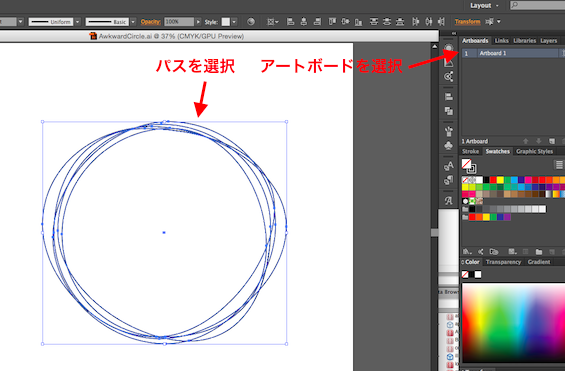
- 前準備としてillustratorとExetndScript Toolkitを起動
- illustratorでパスとアートボードを選択(下記スクショ参照)
- illustratorのメニューで File > Scripts > Other Scripts... から
pathExport.jsを選択して実行(もしくは後述のExtendScript Toolkitでスクリプトを保存してFile > Scripts配下に常備することも可能) - ExetndScript ToolkitのJavascript ConsoleにSwiftコードが吐き出されるのでそのままコピペ
超簡単!
UIBezierPathをanimationさせる
今回は、CAShapeLayerを、illustratorで作成したpathで切り抜いて、そのpathをanimationさせます。
流れとしては、
- CAKeyframeAnimationのインスタンスを作り
- 1フレーム毎ののpathの動きとトランジション値、durationなどを設定
- CAShapeLayerのpathプロパティに初回pathをセットし
- CAShapeLayerに
func addAnimation(anim: CAAnimation!, forKey key: String!)を使ってanimationをセットする
って感じです。
    class func awkwardCircle(rect:CGRect, delegate :AnyObject?, color:UIColor, pathSeries:[Int]) -> CAShapeLayer {

        let originalSize = CGSizeMake(2048, 2048)   // Artboard size in pixels on Adobe Illustrator
        let wRatio = rect.size.width / originalSize.width
        let hRatio = rect.size.height / originalSize.height
        let scale = CGAffineTransformMakeScale(wRatio, hRatio)

        let anim = CAKeyframeAnimation(keyPath: "path")

        var animPaths = [CGPathRef]()
        var timingFuncs = [CAMediaTimingFunction]()
        for i in 0..<pathSeries.count {
            animPaths.append(CAShapeLayer.circlePath(pathSeries[i], scale: scale))
            timingFuncs.append(CAMediaTimingFunction(name: kCAMediaTimingFunctionEaseInEaseOut))
        }
        animPaths.append(CAShapeLayer.circlePath(pathSeries[0], scale: scale))  // back to starting shape

        anim.values = animPaths
        anim.timingFunctions = timingFuncs
        anim.fillMode = kCAFillModeForwards
        anim.removedOnCompletion = false
        anim.duration = 10
        if let del: AnyObject = delegate {
            anim.delegate = del
        }

        let targetLayer = CAShapeLayer()
        targetLayer.frame = rect
        targetLayer.lineWidth = 0
        targetLayer.strokeColor = nil
        targetLayer.fillColor = color.CGColor
        targetLayer.path = animPaths[0]
        targetLayer.fillRule = kCAFillRuleEvenOdd
        targetLayer.addAnimation(anim, forKey: __FUNCTION__)

        return targetLayer
    }
このCAKeyframeAnimationがかなり優秀のようで、今回のvaluesを使う場合は、フレームごとの表示時間(keytimes)、速度調整(timingFunctions)、補完方法(calculationMode)が設定できるようです。
他にも、様々なモード切り替えでanimationさせることができるようです。
モードごとの特徴に関しては、下記スライドが非常に参考になります。
CAKeyframeAnimation
http://www.slideshare.net/nakiwo/cakeyframeanimation-25415214
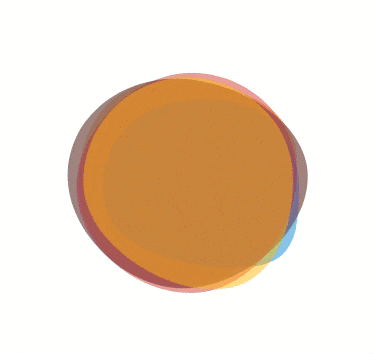
とりあえずできあがったもの
ソース:
https://github.com/mitolog/BezierPathAnimationSample
(初心者にありがちなuser.nameの設定ミスでコミッタが混在してますがスルーで...)
 ]
]
この手の記事は結構あるのですが、今回はillustratorからpathをswiftで読み込んで使う流れを書き留めておきたかったのでとりあえず書きました。