はじめに
STM32 Nucleo Boardでブートローダを作るでブートローダを作成しました。
これは、ホストPCからメインプログラムをSTM32のRAMに転送して起動しています。
RAM上のコードは電源を切れば、消えます。
開発中は何度も修正を行うのでこの方式がいいですが、独立した運用はできません。
現在の私はSTM32 Nucleo Boardでフラッシュにデータを保存するで書いた通り、内蔵フラッシュが使えるようになっています。
そこで、RAMからフラッシュへのコード保存とフラッシュからRAMへのコード展開を追加します。
開発ターゲット
STM32F303K8
作るもの
ブートローダです。
作るブートローダの機能
__New__の機能を追加します。
・ホストPCからRAMへメインプログラムを転送する
・RAM上のメインプログラムをダンプする
・RAM上のメインプログラムにジャンプする
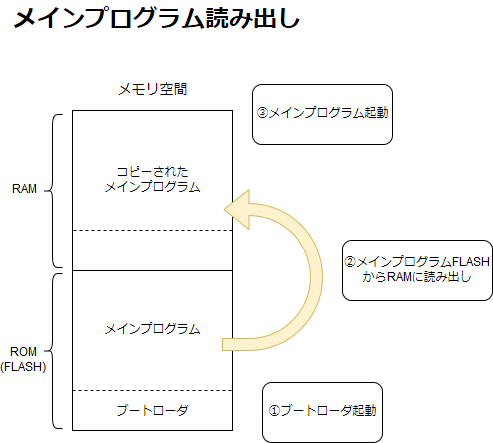
・フラッシュからRAMへメインプログラムを読み出す ←New
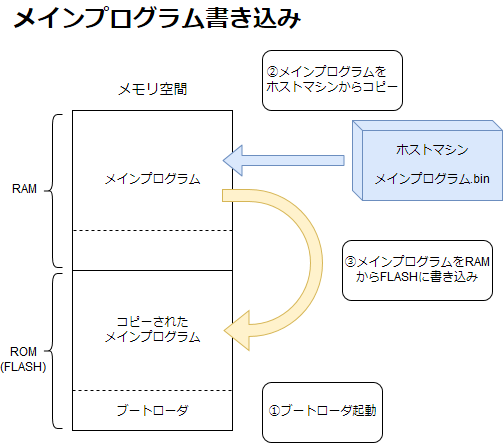
・RAMからフラッシュへメインプログラムを書き込む ←New
完成イメージ
作る
メモリ構成を考える
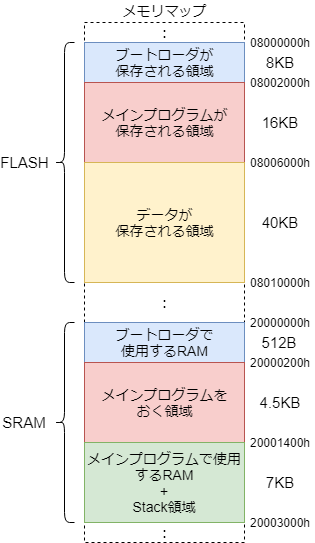
今回、メモリ構成は下記のようにしました。
フラッシュをコード保存とデータ保存(予定)との領域に分けています。

リンカスクリプトを作る
設計したメモリ構成を実現するために、リンカスクリプトを書きます。
ブートローダのリンカスクリプト
全体はこちら。
MEMORY
{
    RAM_BOOT (xrw)  : ORIGIN = 0x20000000, LENGTH = 0x00000200 /* 512B */
    RAM_VECTOR (rw) : ORIGIN = 0x20000200, LENGTH = 0x00000200 /* 512B */
    RAM_CODE (xrw) 	: ORIGIN = 0x20000400, LENGTH = 0x00001000 /* 4KB */
    RAM_WORK (rw)  	: ORIGIN = 0x20001400, LENGTH = 0x00001C00 /* 7KB */
    CCMRAM (rw)     : ORIGIN = 0x10000000, LENGTH = 0x00001000 /* 4KB */
    FLASH_BOOT (xr) : ORIGIN = 0x08000000, LENGTH = 0x00002000 /* 8KB */
    FLASH_CODE (rw) : ORIGIN = 0x08002000, LENGTH = 0x00004000 /* 16KB */ <-コードを保存する領域
    FLASH_DATA (rw) : ORIGIN = 0x08006000, LENGTH = 0x0000A000 /* 40KB */ <-データを保存する領域
}

_app_vector = ORIGIN(RAM_VECTOR);
_flash_code = ORIGIN(FLASH_CODE);
_main_code_size = LENGTH(RAM_VECTOR) + LENGTH(RAM_CODE) + LENGTH(RAM_WORK) - (_Min_Heap_Size + _Min_Stack_Size);
_main_code = ORIGIN(RAM_CODE);

_flash_addr = ORIGIN(FLASH_CODE);
_flash_size = LENGTH(FLASH_CODE) + LENGTH(FLASH_DATA);
_flash_addr、_flash_sizeはflashドライバでアドレス範囲の判定に使用しています。
ブートローダの書き換えを防ぐため、FLASH_CODEのアドレス以降をフラッシュ領域とします。
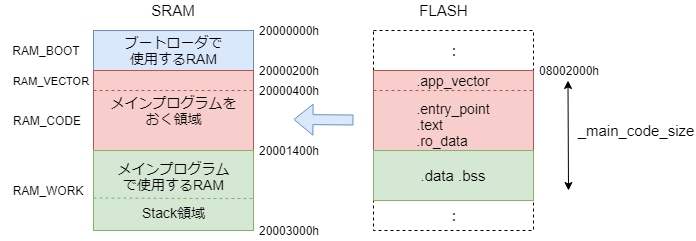
_main_code_sizeはロード時のバイナリサイズとして使用します。
これはRAM_VECTOR/RAM_CODE/RAM_WORKの合計からスタックとヒープのサイズを引いた値です。
メインプログラムのリンカスクリプト
メインプログラムについてもメモリ構成はブートローダと同じにします。
全体はこちら。
/* Specify the memory areas */
MEMORY
{
    RAM_BOOT (xrw)  : ORIGIN = 0x20000000, LENGTH = 0x00000200 /* 512B */
    RAM_VECTOR (rw) : ORIGIN = 0x20000200, LENGTH = 0x00000200 /* 512B */
    RAM_CODE (xr) 	: ORIGIN = 0x20000400, LENGTH = 0x00001000 /* 4KB */
    RAM_WORK (rw)  	: ORIGIN = 0x20001400, LENGTH = 0x00001C00 /* 7KB */
    CCMRAM (rw)     : ORIGIN = 0x10000000, LENGTH = 0x00001000 /* 4KB */
    FLASH_BOOT (xr) : ORIGIN = 0x08000000, LENGTH = 0x00002000 /* 8KB */
    FLASH_CODE (rw) : ORIGIN = 0x08002000, LENGTH = 0x00004000 /* 16KB */
    FLASH_DATA (rw) : ORIGIN = 0x08006000, LENGTH = 0x0000A000 /* 40KB */
}

_flash_addr = ORIGIN(FLASH_DATA);
_flash_size = LENGTH(FLASH_DATA);
メインプログラムでも_flash_addr、_flash_sizeはflashドライバでアドレス範囲の判定に使用しています。
ブートローダとコードの書き換えを防ぐため、FLASH_DATAのアドレス以降をフラッシュ領域とします。
各セクションはRAM_VECTOR/RAM_CODE/RAM_WORKに配置されるようにします。
ヒープスタック領域はRAM確保のために定義しており、バイナリには含まれません。
そのため、ブートローダで定義している_main_code_sizeよりサイズは大きくなりません。
ロード
バイナリにすると最初のロード領域がベースアドレスとして使用されます。
領域間の相対位置は変わらないため、RAM_VECTOR(0x20000200)からバイナリをロードすればOKのはずです。

プログラムを作る
ブートローダ
ソースコードはこちら。
以下がブートローダの処理です。
// form Linker Script
extern void _main_code();
extern int  _flash_code;
extern int  _main_code_size;

// コードの消去
// コードサイズからPage数を計算して消去する
static int erase_code(void)
{
    uint8_t* flash_addr = (uint8_t*)&_flash_code;
    uint32_t page_num_code = (uint32_t)&_main_code_size / FLASH_PAGE_SIZE_BYTE + 1;

    printf("Code Area Address: 0x%X\n", flash_addr);
    printf("Page num of Code Area: %u\n", page_num_code);

    for(uint32_t i=0; i < page_num_code; i++){
        if(FlashPageErase(flash_addr) != FLASH_RESULT_OK){
            printf("erase error occured!!\n");
            return -1;
        }

        flash_addr += FLASH_PAGE_SIZE_BYTE;
    }

    return 0;
}

// コードの書き込み
// コードを事前に消去し、RAM上のバイナリを書き込む
static int write_code(char* buf, long size)
{
    long i;

    if(size < 0){
        printf("no data.\n");
        return -1;
    }

    uint16_t* flash_addr    = (uint16_t*)&_flash_code;
    uint16_t* data_addr     = (uint16_t*)buf;

    FlashInit();

    if(erase_code() != 0){
        return -1;
    }

    for(i=0; i<size; i++){
        if(FlashWrite(flash_addr, *data_addr) != FLASH_RESULT_OK){
            printf("write error occured!!\n");
            return -1;
        }

        flash_addr++;
        data_addr++;
    }

    return 0;
}

// コードの展開
// FLASH_CODE領域から_main_code_size分読み出してRAMにコピー
static void load_code(char *buf)
{
    uint8_t* flash_addr = (uint8_t*)&_flash_code;
    uint32_t main_code_size = (uint32_t)&_main_code_size;

    for(uint32_t i=0; i<main_code_size; i++){
        *buf = FlashRead(flash_addr);
        buf++;
        flash_addr++;
    }
}

// Main -----------------------------------------------------------------------
int main(void)
{
    static char buf[16];
    static long size = -1;
    static unsigned char *loadbuf = NULL;
    extern int _app_vector; // from Linker Script

    __disable_irq(); // disable interrupt

    UsartInit();

    printf("zloader started.\n");

    while(1){
        printf("zload> ");
        gets(buf);

        if(!strcmp(buf, "loadx")){
            loadbuf = (char*)(&_app_vector);
            size = XmodemRecv(loadbuf);
            wait();
            if(size < 0){
                printf("\nXMODEM receive error!\n");
            }else{
                printf("\nXMODEM receive succeeded.\n");
            }
        }else if(!strcmp(buf, "loadf")){ // <-コマンド追加
            loadbuf = (char*)(&_app_vector);
            load_code(loadbuf);
        }else if(!strcmp(buf, "dump")){
            printf("size: %d\n", size);
            dump(loadbuf, size);
        }else if(!strcmp(buf, "write")){ // <-コマンド追加
            int write_result = write_code(loadbuf, size);
            if(write_result != 0){
                printf("\nWrite Code error!\n");
            }else{
                printf("\nWrite Code is succeeded.\n");
            }
        }else if(!strcmp(buf, "run")){
            _main_code();
        }else{
            printf("unknown.\n");
        }
    }

    return 0;
}
フラッシュへのメインプログラムの書き込み処理と読み出し処理を作成しました。
それに対応するブートローダのコマンドとして書き込みをwrite、読み出しをloadfとして追加しました。
リンカスクリプトで定義したアドレスはexternして使用します。
メインプログラム
ソースコードはこちら。
mainプログラムは前の開発のままです。とりあえず起動することを確認します。
int main(void)
    __attribute__ ((section (".entry_point")));
int main(void){

    printf("main boot succeed!\n");

    SysTick_Config(SystemCoreClock/10); // 1/10秒(=100ms)ごとにSysTick割り込み
    NVIC_SetPriority(SVCall_IRQn, 0x80);    // SVCの優先度は中ほど
    NVIC_SetPriority(SysTick_IRQn, 0xc0);   // SysTickの優先度はSVCより低く
    NVIC_SetPriority(PendSV_IRQn, 0xff);    // PendSVの優先度を最低にしておく

    __enable_irq(); // enable interrupt

    RtosInit();
    RtosThreadCreate((rtos_func_t)flash, "flash", 0, 0x100, 0, NULL);

    /* OSの動作開始 */
    RtosStart();

    /* ここには戻ってこない */
    return 0;
}
テスト
ブートローダを焼きこんで電源を入れます。
loadxでメインプログラムのバイナリをRAM転送します。

loadfでフラッシュのバイナリを読み出してRAMに転送し、run!!

メインプログラムが起動!!
おわりに
これで目標としていたブートローダを作ることができました。
STM32ではフラッシュ上のコードを実行することができるため、RAMに展開する必要はあまりないです。
しかし、RAMのほうが速いため、速度が求められる場合は有効だと思います。


