随時更新中
JetsonNanoのROS(melodic)をインストールする。
参考にしたページ
https://www.stereolabs.com/blog/ros-and-nvidia-jetson-nano/
$ sudo sh -c 'echo "deb http://packages.ros.org/ros/ubuntu $(lsb_release -sc) main" > /etc/apt/sources.list.d/ros-latest.list'
$ sudo apt-key adv --keyserver 'hkp://keyserver.ubuntu.com:80' --recv-key C1CF6E31E6BADE8868B172B4F42ED6FBAB17C654
$ sudo apt update
$ sudo apt install ros-melodic-desktop
$ sudo rosdep init
$ rosdep update
$ echo "source /opt/ros/melodic/setup.bash" >> ~/.bashrc
$ . .bashrc
$ sudo apt-get install cmake python-catkin-pkg python-empy python-nose python-setuptools libgtest-dev python-rosinstall python-rosinstall-generator python-wstool build-essential git
Intel RealSense SDKをインストールする。
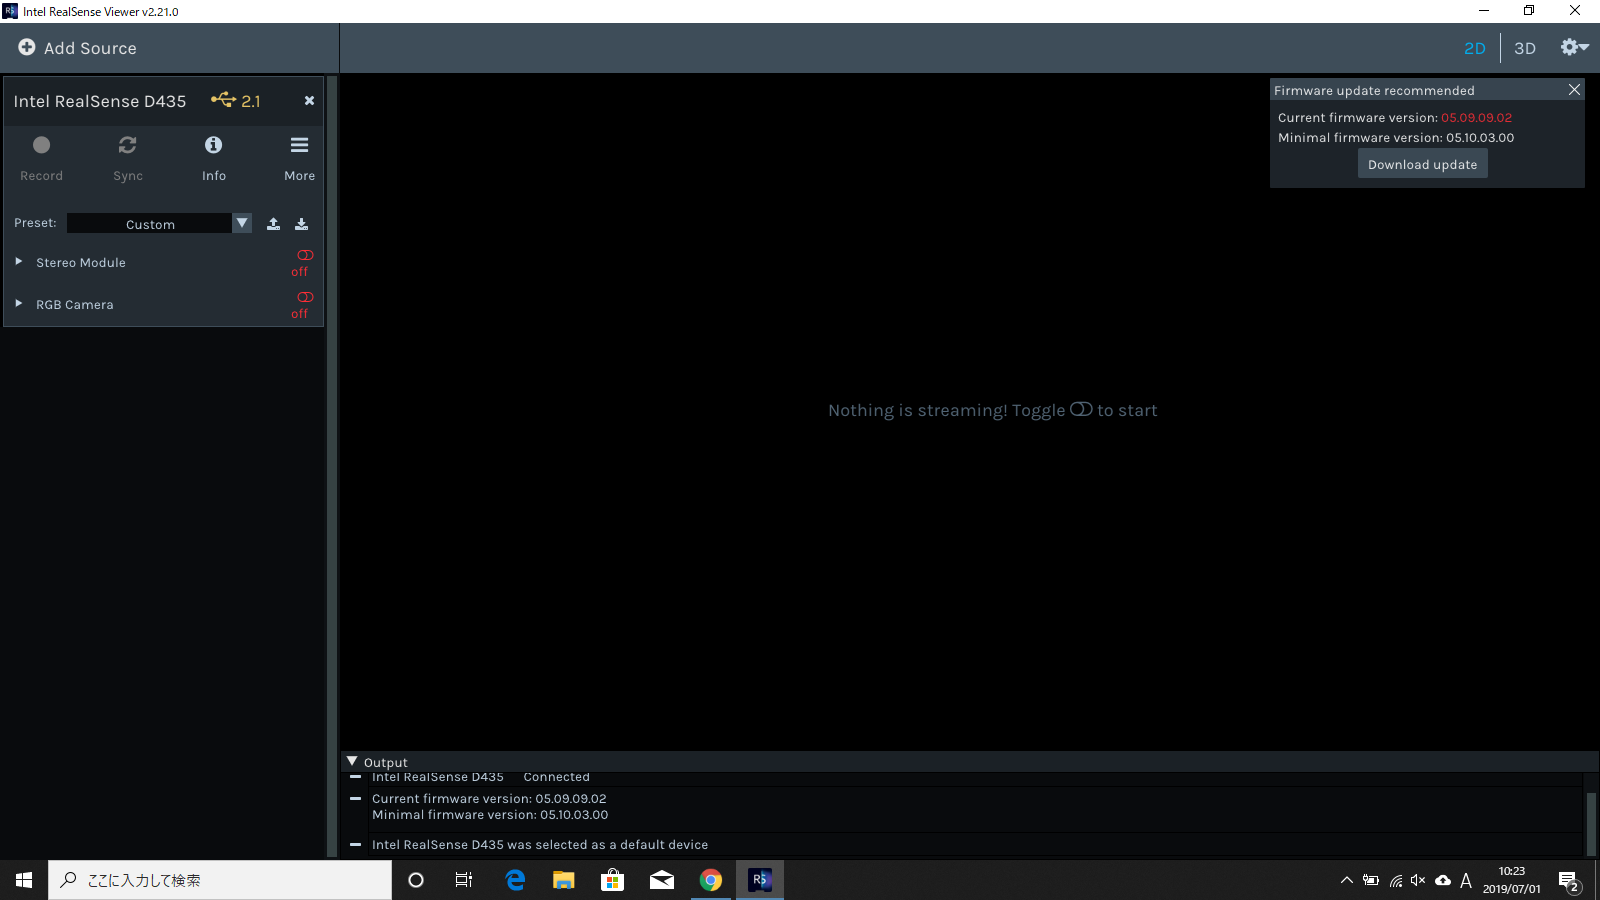
D435はしばらく使ってなかたので、ファームウェアのバージョンを確認する。
SDKでバージョンを確認する。
https://www.intelrealsense.com/developers/#firmware
現在のバージョンが05.09.09.02
Intel® RealSense™ SDK 2.0(buid2.24.0)を使うには
05.11.06.250以降のバージョンが必要なので、ファームウェアのアップデートを行う。
ここから最新版のファームウェアをダウンロードする。
https://downloadcenter.intel.com/download/28870/Latest-Firmware-for-Intel-RealSense-D400-Product-Family?v=t
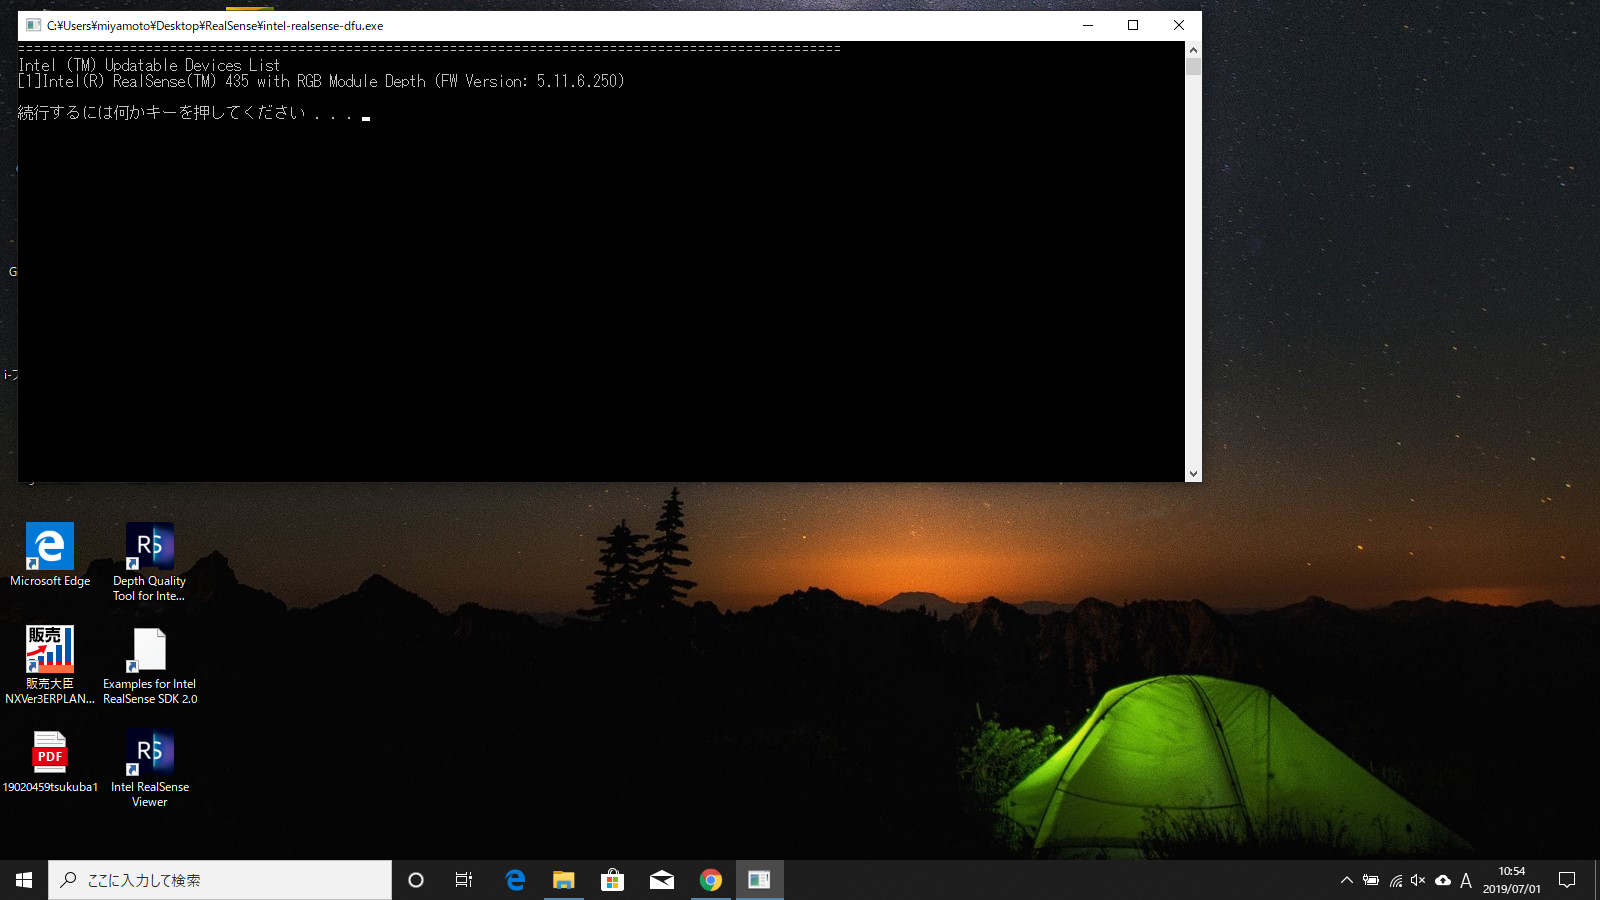
How to install
Ubuntuのrealsense-viewerでもファームウェアのアップデートができる。
今回はWindows用のツールを使ってアップデートする。
Windows*: To install the firmware using Windows, download and run the latest Windows* Device Firmware Update tool.
Linux*: To install the firmware using Linux, follow the instructions in the Linux* Firmware Update User Guide.
アップデート完了
cmakeの最新版をインストールする。
cmake version 3.8+が必要なので最新版をインストールする。
ここからソースコードをダウンロードする。
https://cmake.org/download/
$ wget https://cmake.org/files/v3.12/cmake-3.18.1.tar.gz
$ tar xfvz cmake-3.18.1.tar.gz
$ cd cmake-3.18.1
$ ./bootstrap
$ make -j4
$ sudo make install
$ cmake --version
  CMake Error: Could not find CMAKE_ROOT !!!
$ sudo apt purge cmake
$ cmake --version
  cmake version 3.18.1
SDKをNonoにインストールする。
詳細はここ
https://github.com/IntelRealSense/librealsense/blob/master/doc/installation.md
$ sudo apt update
$ git clone https://github.com/IntelRealSense/librealsense.git
$ sudo apt-get install git libssl-dev libusb-1.0-0-dev pkg-config libgtk-3-dev
$ sudo apt-get install libglfw3-dev libgl1-mesa-dev libglu1-mesa-dev
$ cd librealsense
$ cd librealsense
$ git checkout v2.37.0
$ mkdir build
$ cd build
$ cmake ../ -DBUILD_EXAMPLES=true -DBUILD_GRAPHICAL_EXAMPLES=true
$ sudo make uninstall
$ make clean
$ make
$ sudo make install
opencv appsをインストールする。
$ mkdir -p ~/cv_catkin_ws/src
$ cd ~/cv_catkin_ws/src
$ catkin_init_workspace
$ git clone https://github.com/ros-perception/opencv_apps.git
$ cd ..
$ catkin_make
  face_recognition_nodelet.cpp:71:10: fatal error: opencv2/face.hpp: No such
  file or directory
  #include <opencv2/face.hpp>
kineticではすんなりビルドできたがmelodicではエラーが出た。
opencv2/face.hppが見つからないらしい。
顔認識機能は拡張モジュールなので別途インストールの必要がらしい。
ubuntu16.04 + kineticでは拡張モジュールをインストールしなくてもビルドできた。
今回はopencv_apps/src/CMaketext.txtを編集してface_recognitionをビルド対象から外す。
27行目をコメントアウトする。
#opencv_apps_add_nodelet(face_recognition src/nodelet/face_recognition_nodelet.cpp)
Face Recognition is an extra module and not included as standard with OpenCV.
The repo for all the extra modules can be found here: https://github.com/itseez/opencv_contrib
You can rebuild OpenCV and include it along with any other extra modules you need, instructions are given in the readme.
情報ソースはここ
https://stackoverflow.com/questions/31290267/cannot-open-source-file-opencv2-face-hpp/31291399
$ roscore
  ... logging to /home/miyamoto/.ros/log/621f78a0-9e27-11e9-9e11-c6954653291d/roslaunch-nano-9310.log
  Checking log directory for disk usage. This may take awhile.
  Press Ctrl-C to interrupt
  Done checking log file disk usage. Usage is <1GB.
  started roslaunch server http://nano:45013/
  ros_comm version 1.14.3


  SUMMARY
  ========

  PARAMETERS
   * /rosdistro: melodic
   * /rosversion: 1.14.3

 NODES

 auto-starting new master
 process[master]: started with pid [9321]
 ROS_MASTER_URI=http://nano:11311/

 setting /run_id to 621f78a0-9e27-11e9-9e11-c6954653291d
 process[rosout-1]: started with pid [9332]
 started core service [/rosout]

# 別のターミナルをオープンする。
#まずは普通のUSBカメラでテスト
$ rosparam set /usb_cam/pixel_format yuyv
$ rosrun usb_cam usb_cam_node
$ roslaunch opencv_apps face_detection.launch image:=/usb_cam/image_raw
Realsense ROS
https://github.com/jetsonhacksnano/installLibrealsenseこれを使って
realsense SDKをインストールした場合はバージョンが2.24になるので
v2.2.4以降のROS wrapperを使うとビルドエラーになるのでv2.2.3をビルドする。
$ cd ~/catkin_ws/src
$ git clone -b 2.2.3 https://github.com/IntelRealSense/realsense-ros.git
$ cd ~/catkin_ws
$ catkin_make  -DCATKIN_ENABLE_TESTING=False -DCMAKE_BUILD_TYPE=Release
$ source devel/setup.bash
2.2.4以降のバージョンをビルドする場合
$ cd ~/catkin_ws/src
$ git clone https://github.com/IntelRealSense/realsense-ros.git
$ cd realsense-ros/
$ git checkout `git tag | sort -V | grep -P "^\d+\.\d+\.\d+" | tail -1`
$ cd ..
$ git clone https://github.com/pal-robotics/ddynamic_reconfigure.git
$ catkin_init_workspace
$ cd ..
$ catkin_make  -DCATKIN_ENABLE_TESTING=False -DCMAKE_BUILD_TYPE=Release
$ source devel/setup.bash
v2.2.3のROS Wrapperだと99-realsense-libusb.rulesをコピーしなくてもデバイスをオープンできたが最新版のwrapperだとroot権限がないとデバイスをオープンできない
$ cp librealsense/config/99-realsense-libusb.rules /etc/udev/rules.d/
$ sudo shutdown -r now
複数台のRealsenseを接続する場合
https://www.intelrealsense.com/how-to-multiple-camera-setup-with-ros/
https://github.com/IntelRealSense/realsense-ros/wiki/Showcase-of-using-2-cameras
D435とT265を同時に接続する。
D435
$ roslaunch realsense2_camera rs_camera.launch serial_no:=750612070793
T265
$ roslaunch realsense2_camera rs_t265.launch serial_no:=908412111149 camera:=camera_t265
D435のtopicが/camera/にパブリッシュされる。
T265のtopicが/camera_t265/にパブリッシュされる。
depthイメージから距離を計算する。
# include <</span>ros/ros.h>
# include <</span>image_transport/image_transport.h>
# include <</span>cv_bridge/cv_bridge.h>
# include <</span>sensor_msgs/image_encodings.h>
# include <</span>iostream>
# include <</span>depth_image_proc/depth_conversions.h>
# include <</span>depth_image_proc/depth_traits.h>

void chatterCallback(const sensor_msgs::Image::ConstPtr& msg)
{


    //cv_bridge::toCvCopy (depth_msg, sensor_msgs::image_encodings::TYPE_32FC1)
    cv_bridge::CvImagePtr Dest = cv_bridge::toCvCopy(msg);
    ROS_INFO("Width: %i", msg->width);
    ROS_INFO("Height: %i", msg->height);
    ROS_INFO("Value: %f", Dest->image.at(msg->width/2,msg->height/2));
}

int main(int argc, char **argv)
{
    ros::init(argc, argv, "distance");
    ros::NodeHandle n;
    ros::AsyncSpinner spinner(1);
    spinner.start();
    ros::Subscriber sub = n.subscribe("camera/depth/image_raw", 100, chatterCallback);
    ros::Duration(100).sleep()
    return 0;
}
ビルド時にエラーが出た。
fatal error: depth_image_proc/depth_conversions.h: No such file ordirectory
これはdepth_image_procをインストールして解決
$ sudo apt install ros-melodic-image-pipeline
error: no matching function for call to ‘cv::Mat::at(unsigned int, unsigned int)’ ROS_INFO("Value: %f", Dest->image.at(msg->width/2, msg->height/2));
float型にcastすることで解決
ROS_INFO("Value: %f", Dest->image.<float>at(msg->width/2, msg->height/2))
undefined reference to `cv_bridge::toCvCopy
これはCMakeList.txtのfind_packageにcv_bridgeを追加することで解決
ビルドはできてプログラムも動いたが、距離が0のまま。
色々調べた結果、depth imageのフォーマットを32FC1に変換しないとだめらしい。
とりあえずこのスクリプトをかましてみる。 これもダメ
https://github.com/tim-fan/realsense_spencer_adaptor
ROSパブリッシュサンプル
D435i
D435iを使用するにはKernelパッチが必要。
パッチを当てないとD435iを認識しない。
そこでパッチを実行したところ、「ボードが間違ってるよ!」って言われた。
NVIDIA Jetson Nano Developerのイメージを使っているはずなんだけど??
$ cd && git clone https://github.com/jetsonhacksnano/installLibrealsense
$ cd ~/installLibrealsense
$ ./patchUbuntu.sh
 Getting L4T Version
 Jetson BSP Version:  L4T R32.1.0
 Jetson_L4T=32.1.0
 ==== Jetson Board Mismatch! =============
 Currently this script works for the NVIDIA Jetson Nano Developer Kit.
 This processor appears to be a jetson-nano, which does not have a corresponding script

 Exiting
とりあえず、最新版のNVIDIA Jetson Nano DeveloperのイメージをダウンロードしてSDカードを作る。
JetsonHackのRealSenseのページにswapの設定も載っていたので念の為、実行しておく。
git clone https://github.com/jetsonhacksnano/installSwapfile
cd installSwapfile
$ ./installSwapfile.sh
$ cd ..
librealsenseのインストール
github からソースを持ってきてビルドしてうまく動いていいたんだけど
それとlibrealsenseもこの方法でインストールしないとダメなのかな?
installLibrealsense.shの中をみたらgit cloneしてソースからビルドしてた。
$ git clone https://github.com/jetsonhacksnano/installLibrealsense
$ cd installLibrealsense
$ ./installLibrealsense.sh
Kernelパッチ
$ ./patchUbuntu.sh
最新のSDカードイメージにしたら(jetson-nano-sd-r32.2-2019-07-16.zip)カーネルパッチが実行できた。
PCL
PCLを使って障害物回避する方法を考える
enable_pointcloud:=trueでPCLがパブリックれれるようになる。
$ roslaunch realsense2_camera rs_aligned_depth.launch enable_pointcloud:=true
ubuntu PCでrvizを起動しGloabl Option -> Fixed Frameをcamera_depth_frameに変更する。
addボタンでPointCloud2を追加し、Topicに/camera/depth/pointsを設定する。
x 前後軸
y 左右軸
z 上下軸