はじめに
こんにちは。田中みそと申します。
私はopnizというM5Stack系デバイスをobnizっぽくJavaScript/TypeScriptで制御できるオープンソースIoTフレームワークを作っているのですが、リリース時にArduinoライブラリ検証のため毎回Arduino IDEをまっさらにしてインストールから検証するということを繰り返しています。
この苦行をなんとかしたく思いついたのがArduino CLIを使っての自動化でした。
Arduino CLI
リリースはもう3年ほど前となり現在の最新バージョンはv0.20.2です。
リリース当時から比べるとそこそこアップデートもあり、特にリリース当時は実装もなくIssueでも実装しないよ!と言われていたシリアルモニタも、2021/11/23にリリースされたv0.20.0にて実装されました。
本記事では2021年12月現在のM5Stackデバイスへのスケッチアップロード方法を説明しようと思います。
インストール
$ brew update
$ brew install arduino-cli
shスクリプトからのインストールであればWindows環境でもGit Bash等のCLIから実行できます。
curl -fsSL https://raw.githubusercontent.com/arduino/arduino-cli/master/install.sh | sh
私はWindows環境ですがScoopからインストールしました。
$ scoop update
$ scoop search arduino-cli
$ scoop install arduino-cli
もちろん各OS向けの実行ファイルも直接ダウンロードできます。
設定ファイル初期化
以下のコマンドでarduino-cli.yamlという設定ファイルが生成されます。
生成パスはデフォルトではmacOS / Linuxだと~/.arduino15/arduino-cli.yaml、
Windowsだと%USERPROFILE%\AppData\Local\Arduino15\arduino-cli.yamlです。
arduino-cli config init
ESP32用ボードマネージャ追加
Arduino IDEだと設定画面から行うESP32用ボードマネージャの追加です。
以下のコマンドで先ほど生成した設定ファイルに追加します。
arduino-cli config add board_manager.additional_urls https://dl.espressif.com/dl/package_esp32_index.json
ESP32ボードパッケージのインストール
続いてESP32ボードパッケージをインストールします。
まずは以下のコマンドでESP32ボードパッケージが見つかることを確認します。
$ arduino-cli core update-index
$ arduino-cli core search esp32

ID          Version Name
esp32:esp32 1.0.6   esp32
以下のコマンドでインストールします。
installコマンドの最後のオプションは上記のsearchコマンドで出力されたIDの値になります。
最後にlistコマンドを実行して正常にインストールされていることを確認します。
$ arduino-cli core install esp32:esp32
$ arduino-cli core list

ID          Installed Latest Name
esp32:esp32 1.0.6     1.0.6  esp32
ライブラリのインストール
続いてライブラリのインストールです。
今回は以降M5ATOMのケースで説明していきます。
まずは以下のコマンドでライブラリが見つかるかチェックしてみます。
$ arduino-cli lib update-index
$ arduino-cli lib search M5Atom

Updating index: library_index.json.gz downloaded
Updating index: library_index.json.sig downloaded
Name: "M5Atom"
  Author: M5Stack
  Maintainer: M5Stack
  Sentence: Library for M5Atom Core development kit
  Paragraph: See more on http://M5Stack.com
  Website: https://github.com/m5stack/M5Atom
  Category: Device Control
  Architecture: esp32
  Types: Contributed
  Versions: [0.0.1, 0.0.2, 0.0.3, 0.0.5, 0.0.7]
  Provides includes: M5Atom.h
  Dependencies: FastLED, UNIT_ENV, Adafruit MCP4725, Adafruit TCS34725, Adafruit NeoPixel, MAX30100lib, MFRC522_I2C, M5GFX, M5_BM8563, M5_ADS1100, M5_ADS1115, M5_FPC1020A, HX711 Arduino Library, PCA9554, TinyGPSPlus, Adafruit SGP30 Sensor, FFT, TFTTerminal, ClosedCube TCA9548A, Ethernet2, ESP8266Audio, M5_EzData, ArduinoJson, PubSubClient
Name: "M5Unified"
  Author: M5Stack
  Maintainer: M5Stack
  Sentence: Library for M5Stack/Core2/Tough, M5StickC/C-Plus, M5CoreInk, M5Paper, M5ATOM
  Paragraph: M5Stack, M5Stack Core2, M5Stack CoreInk, M5StickC, M5StickC-Plus, M5Paper, M5Tough, M5ATOM, M5Station, See more on http://M5Stack.com
  Website: https://github.com/m5stack/M5Unified.git
  Category: Display
  Architecture: esp32
  Types: Contributed
  Versions: [0.0.1, 0.0.3]
  Provides includes: M5Unified.h
  Dependencies: M5GFX
続いてライブラリをインストールします。
ボードパッケージのインストールと同様にinstallコマンド→listコマンドでインストール確認します。
$ arduino-cli lib install M5Atom@0.0.3 FastLED
$ arduino-cli lib list

Name                    Installed Available Location              Description
FastLED                 3.4.0     -         LIBRARY_LOCATION_USER -
M5Atom                  0.0.3     0.0.7     LIBRARY_LOCATION_USER Library for M5Atom Core development kit
M5Atomライブラリを
M5Atom@0.0.3とバージョン指定してインストールしています。
このバージョン以上だと依存ライブラリのTinyGPSPlusでnot availableとなり、個別にTinyGPSPlusをインストールしても解消されないためv0.0.3で固定しました。
たしかArduino IDEでも同じ感じだったような…
スケッチファイルの生成
空のsetupとloopだけの.inoファイルが生成されます。
$ arduino-cli sketch new M5AtomExample
Sketch created in: M5AtomExample
このあとのコンパイル/アップロードのためにM5ATOMのLチカサンプルで上書きましょう。
curlコマンドでGitHubにあるサンプルソースを取得し、上記のコマンドで生成した.inoファイルを上書きます。
curl -fsSLk https://raw.githubusercontent.com/m5stack/M5Atom/master/examples/Basics/LEDSet/LEDSet.ino > M5AtomExample/M5AtomExample.ino
コンパイル
以下のコマンドでコンパイルします。
--fqbn esp32:esp32:m5stack-atomというオプションがボードの指定となります。
前半部のesp32:esp32が先ほどボードインストールした際のIDとなり、最後のm5stack-atomが具体的なボード名となります。
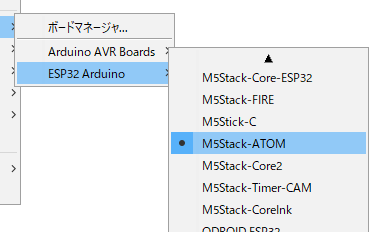
このボード名はArduino IDEで「ツール」→「ボード」と選択するときに表示されるボード名と同じ文字列です。
そして最後のオプションにコンパイルしたい.inoファイルが格納されるディレクトリを指定します。
arduino-cli compile --fqbn esp32:esp32:m5stack-atom M5AtomExample
アップロード
アップロード時にはポート情報が必要となるので、まずはboard listコマンドにてポート情報を確認します。
ただM5ATOMだとBoard NameがUnknownとなってしまうのでPCへのデバイス接続前後でboard listコマンドを実行し、差分となるポートを確認するとよいと思います。
$ arduino-cli board list

Port Protocol Type    Board Name FQBN Core
COM1 serial   Unknown
COM6 serial   Unknown
そして以下のコマンドのようにコンパイルと同様のオプションに加え、--portオプションにてポートを指定しアップロードします。
arduino-cli upload --port COM6 --fqbn esp32:esp32:m5stack-atom M5AtomExample
コンパイルとアップロードを同時に実行
コンパイルとアップロードを同時実行するにはcompileコマンドをベースに--uploadオプション、--portオプションを追加します。
arduino-cli compile --fqbn esp32:esp32:m5stack-atom --upload --port COM6 M5AtomExample
シリアルモニタ
2021/11/23にリリースされたv0.20.0にて実装されました。
--portオプションで対象のポートを指定し実行します。
arduino-cli monitor --port COM6
--describeオプションをつけるとポート設定が表示されます。
$ arduino-cli monitor --port COM6 --describe

ID        Setting   Default Values
baudrate  Baudrate  9600    300, 600, 750, 1200, 2400, 4800, 9600, 19200, 38400, 57600, 115200, 230400, 460800, 500000, 921600, 1000000, 2000000
bits      Data bits 8       5, 6, 7, 8, 9
parity    Parity    None    None, Even, Odd, Mark, Space
stop_bits Stop bits 1       1, 1.5, 2
baudrateがデフォルトだと9600となり変更したい場合は--configオプションでいけるはずのようですが、現在バグっててききません…😢
arduino-cli monitor --port COM6 --config baudrate=115200
Arduinoライブラリに未登録の野良ライブラリをインストール
Arduino IDEの場合、Arduinoライブラリに未登録の野良ライブラリだとGitHub等からZIPをダウンロードして手動でインポートする感じでした。
Arduino CLIなら設定ファイルを一部変更することでlib installコマンドから直接GitHubのURLを指定してインストールできます。(超便利!😊)
まずは以下のコマンドで設定ファイルにあるlibrary.enable_unsafe_installの値をtrueに変更します。
arduino-cli config set library.enable_unsafe_install true
そしてlib installコマンドの--git-urlオプションにてGitHubのURLを指定します。
arduino-cli lib install --git-url https://github.com/miso-develop/opniz-arduino-m5atom
(おまけ)M5ATOMの環境構築を一括実行
M5ATOM以外のM5Stackデバイスは最後のlib installを対応するライブラリに変更すればおっけーです。
curl -fsSL https://raw.githubusercontent.com/arduino/arduino-cli/master/install.sh | sh # Arduino CLIインストール
arduino-cli config init # 設定初期化
arduino-cli config add board_manager.additional_urls https://dl.espressif.com/dl/package_esp32_index.json # ESP32用ボードマネージャ追加
arduino-cli core update-index # ボードパッケージのローカルキャッシュ更新
arduino-cli core install esp32:esp32 # ESP32ボードパッケージインストール
arduino-cli lib update-index # ライブラリのローカルキャッシュ更新
arduino-cli lib install M5Atom@0.0.3 FastLED # ライブラリインストール
