はじめに
前回記事(Google Homeを使ってシーリングライトを音声操作する)にて赤外線モジュール(irMagician)を用いてGoogle Homeからシーリングライトを音声操作できるようになりました。
そして次はテレビを音声操作しようとしたところ、テレビのリモコンが赤外線式ではなくirMagicianからの操作不可というオチに。
「じゃあ赤外線リモコンの安いテレビを買ってをその出力を今あるテレビに繋げればいいんじゃね」とか頭悪い思考に陥ってましたが、よくよく考えればテレビの使い道のほとんどは録画してある娘の教育番組の再生ぐらい。
ならそのプレイヤーであるPS4を操作できればいいじゃんという結論に至り方法を調べてみた所、「ps4-waker」というNode.jsモジュールに行き着きました。
今回はこのps4-wakerを導入し、PS4をGoogle Homeから音声操作してみようと思います。
※2017/10/26追記 動画載せました。
処理の流れ
ps4-wakerで出来ること
README.mdのUsageは以下の通り。
Usage:
  ps4-waker [options]                                   Wake PS4 device(s)
  ps4-waker [options] osk-submit (text)                 Submit the OSK, optionally providing the text
  ps4-waker [options] remote <key-name> (...<key-name>) Send remote key-press event(s)
  ps4-waker [options] search                            Search for devices
  ps4-waker [options] standby                           Request the device enter standby/rest mode
  ps4-waker [options] start <titleId>                   Start a specified title id
  ps4-waker --help | -h | -?                  Shows this help message.
  ps4-waker --version | -v                    Show package version.
起動、スタンバイ、テキスト送信、キー送信、アプリ(ゲームやトルネ)の起動ができそうです。
キー送信があるならPS4ゲームのBotも作れちゃうんじゃね!?と思ったけど、送れるのは以下のキー情報のみです。
□とかR1とかは送れません。
up, down, left, right, enter, back, option, ps
ps4-wakerの導入
では早速導入してみましょう。
私の実行環境はラズパイを使用しています。
まずはインストールを行います。
$ sudo npm install -g ps4-waker
さくっとインストールが終わったのでとりあえずPS4起動コマンドを打ってみます。
以下のような結果が返ってきますが、キャンセルせずそのままにしておいて下さい。
$ sudo ps4-waker
No credentials; Use Playstation App and try to connect to PS4-Waker
クレデンシャルがない?Playstation Appって何?
ググってみたところ、Playstation Appというスマホアプリがあるようです。
ps4-wakerを使用するには認証が必要で、認証を通すにはPlaystation Appが必要とのことなのでとりあえずAndroid版をスマホにインストールします。
起動したら画面下部の「PS4に接続する」→「セカンドスクリーン」と進めると「PS4-Waker」が出て来るので選択します。
(アプリ画面はこんな感じ)

するとラズパイ側で何やら処理が進みます。
↓みたいな感じになればクレデンシャル情報は取得できてるようです。
$ sudo ps4-waker
No credentials; Use Playstation App and try to connect to PS4-Waker
Got credentials!  { 'client-type': 'a',
  'auth-type': 'C',
  'user-credential': 'xxxxxxxxxxxxxxxxxxxxxxxxxxxxxxxxxxxxxxxxxxxxxxxxxxxxxxxxxxxxxxxxxxxxxx' }
Unable to connect to PS4 at xxx.xxx.xxx.xxx { Error: connect EHOSTUNREACH xxx.xxx.xxx.xxx:997
    at Object._errnoException (util.js:1019:11)
    at _exceptionWithHostPort (util.js:1041:20)
    at TCPConnectWrap.afterConnect [as oncomplete] (net.js:1175:14)
  code: 'EHOSTUNREACH',
  errno: 'EHOSTUNREACH',
  syscall: 'connect',
  address: 'xxx.xxx.xxx.xxx',
  port: 997 }
続いてps4-wakerからPS4へのログインを行います。
今度はPS4を操作します。
「設定」→「PlayStation App接続設定」→「機器を登録する」と進めるとPINコードが表示されます。
そのPINコードを使い以下のコマンドを実行します。
$ sudo ps4-waker --pin <pin-code>
Logged into device! Future uses should succeed
ここまで出来ればps4-wakerの各種コマンドが実行できるようになります。
ps4-wakerコマンド
主に使うコマンドをさらっと説明します。
コンソールから色々試し打ちしてみて下さい。
PS4起動
スタンバイ状態からPS4を復帰させます。
$ sudo ps4-waker
PS4スタンバイ
起動中のPS4をスタンバイさせます。
$ sudo ps4-waker standby
キー情報送信
<key>にはup, down, left, right, enter, back, option, psが入ります。
スペース区切りで連続した入力もできます。
またup:1000のように記述すると:のあとに指定したミリ秒分長押しになります。
$ sudo ps4-waker remote <key>
アプリ(ゲームとかトルネとか)起動
PS4にインストールされてるアプリを起動します。
ダウンロードしてるゲームやトルネとかYoutubeとか。
$ sudo ps4-waker start <titleid>
<titleid>の部分にアプリのidを入力するのですがそのtitleidってどうやって調べるのかというと、PlayStation Storeの対象アプリページのURLから取得します。
例えばトルネのURLは以下のようになりますが、最後の方にあるCUSA00442っていうのがtitleidになります。
https://store.playstation.com/#!/ja-jp/%e3%82%a2%e3%83%97%e3%83%aa/torne(%e3%83%88%e3%83%ab%e3%83%8d)-playstation4/cid=JA0003-CUSA00442_00-TORNEPS400000000
FirebaseのDatabase定義
ps4-wakerでPS4をコマンド操作できるようになったら、次は音声操作できるようにしてみましょう。
ps4-wakerを導入したラズパイとGoogle Homeの音声コマンドをつなげるには一度グローバルネットワークを経由する必要があります。
グローバル→ローカルの通り道としてFirebaseを使用します。
以下の記事を参考にFirebaseプロジェクトを作成します。
Firebaseの設定
Databaseの構造については以下のように定義します。
プロジェクト名-xxxxx
 └ googlehome
   └ word: ""
IFTTT Appletの作成
続いてIFTTTで音声のトリガーを作成します。
アクションは先ほど作成したFirebaseのDatabase更新のURLをWebhooksで指定します。
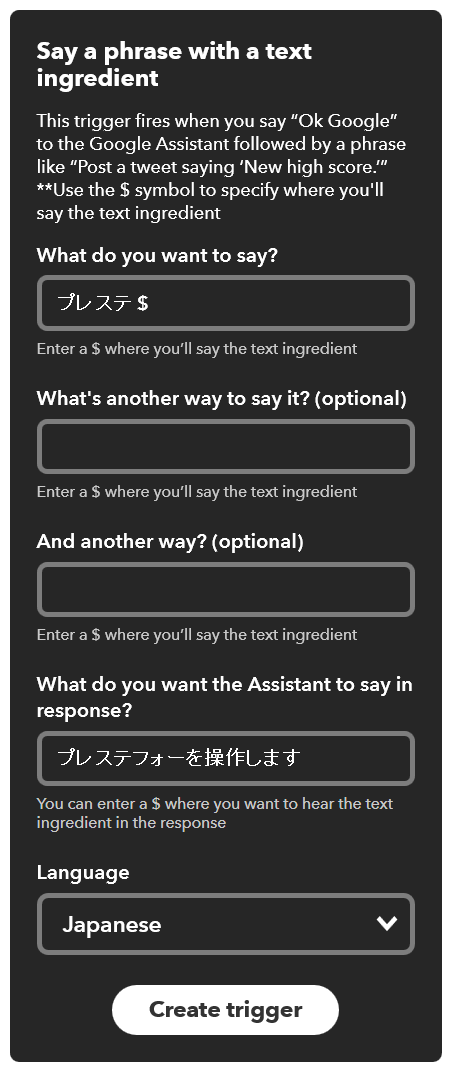
「this」のGoogle Assistantレシピ
トリガー部には音声コマンド内に変数が使用できる「Say a phrase with a text ingredient」を使用します。
「プレステ」の後に続く言葉(「起動」「スタンバイ」等)は変数($)に持ちます。
ちなみに応答部が「プレステフォー」とかっこ悪い書き方になってるのは、「プレステ4」とすると「ぷれすてよん」と読まれてしまうためです…

「that」のWebhooksレシピ
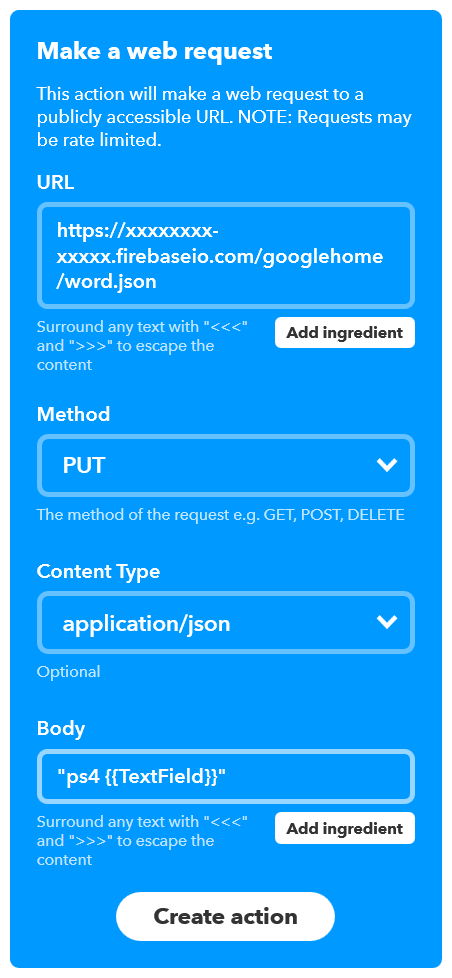
アクション部にはFirebaseのDatabase更新のためWebhooksでHTTPアクセスを行います。
URLは先程作成したDatabaseの構造に沿い、MethodはPUT、Content Typeはjson、そしてBodyに"ps4 {{TextField}}"と設定します。
「{{TextField}}」にthisの「$」部の変数(「起動」「スタンバイ」等)が入ってきます。
注意点はBodyを必ずダブルクォーテーションで括るのと、「ps4」と「{{TextField}}」の間にスペースを入れることです。

Node.jsの実装
最後にFirebaseのDatabaseを監視し、更新があればps4-wakerコマンドをキックするプログラムをNode.jsで実装します。
Node.jsモジュールのインストール
FirebaseとSuperAgentのNode.jsモジュールをインストールします。
適当なディレクトリを作り、以下のコマンドを実行して下さい。
$ npm init -y
$ npm install firebase --save
プログラム作成
前回記事で作成したindex.jsにps4-waker用の処理を追記しました。
confingはFirebaseコンソールの「ウェブアプリに Firebase を追加」より取得できる情報に置き換えて下さい。
var firebase = require("firebase");

//firebase config
var config = {
  apiKey: "xxxxxxxxxxxxxxxxxxxxxxx",
  authDomain: "xxxxxxxx-xxxxx.firebaseapp.com",
  databaseURL: "https://xxxxxxxx-xxxxx.firebaseio.com",
  projectId: "xxxxxxxx-xxxxx",
  storageBucket: "xxxxxxxx-xxxxx.appspot.com",
  messagingSenderId: "xxxxxxxxxxxxxxxx"
};
firebase.initializeApp(config);


//database更新時
const path = "/googlehome";
const key = "word";
const db = firebase.database();
db.ref(path).on("value", function(changedSnapshot) {
  //値取得
  const value = changedSnapshot.child(key).val();
  if (value) {
  	console.log(value);

    //コマンド生成
    const command = getJsonData(value.split(" ")[0], {

      //シーリングライト
      "light": () => {
        const command = "sh /home/pi/irmagician/light/ir.sh ";
        const option = getJsonData(value.split(" ")[1], {
          "つけ": "full",
          "オン": "full",
          "消し": "off",
          "けし": "off",
          "オフ": "off",
          "エコ": "eco",
          "楽": "easy",
          "ラクニエ": "easy",
          "節電": "save",
          "おやすみ": "sleep",
          "タイマー": "sleep",
          "保安": "security",
          "豆": "security",
          "a": "a",
          "1": "a",
          "b": "b",
          "2": "b",
          "に": "b",
          "c": "c",
          "3": "c",
          "さん": "c",
          "傘": "c",
          "館": "c",
          "d": "d",
          "4": "d",
          "音": "d",
          "屋": "d",
          "default": false
        });
        return option ? command + option : option;
      },

      //PS4
      "ps4": () => {
        const command = "sudo ps4-waker ";
        let word = value.split(" ")[1];
        if (word == "4") word = value.split(" ")[2];
        const option = getJsonData(word, {
          "起動": " ",
          "軌道": " ",
          "つけ": " ",
          "オン": " ",
          "スタンバイ": "standby",
          "消し": "standby",
          "けし": "standby",
          "止め": "standby",
          "とめ": "standby",
          "停止": "standby",
          "ホーム": "remote ps",
          "フォーム": "remote ps",
          "メニュー": "remote ps",
          "エンター": "remote enter",
          "センター": "remote enter",
          "選択": "remote enter",
          "バック": "remote back",
          "戻る": "remote back",
          "戻って": "remote back",
          "オプション": "remote options",
          "上": "remote up",
          "笛": "remote up",
          "うえ": "remote up",
          "下": "remote down",
          "した": "remote down",
          "左": "remote left",
          "右": "remote right",
          "トルネ": "sudo ps4-waker start CUSA00442",
          "とる": "sudo ps4-waker start CUSA00442",
          "メディア": "sudo ps4-waker start CUSA02012",
          "トリコ": "sudo ps4-waker start CUSA05152",
          "default": false
        });
        return option ? command + option : option;
      },

      //template
      "xxx": () => {
        return getJsonData(value.split(" ")[1], {
          "xxx": "xxx",
          "default": false
        });
      },

      //default
      "default": () => false,

    })();
    console.log(command);

    //コマンド実行
    if (command) {
      const exec = require('child_process').exec;
      exec(command);

      //firebase clear
      db.ref(path).set({[key]: ""});
    }

  }
});


//jsonからvalueに一致する値取得
function getJsonData(value, json) {
  for (let word in json)  if (value == word) return json[word]
  return json["default"]
}
Google Homeに「プレステ4○○」と話しかけたときの「○○」の部分のワードと対応するps4-wakerコマンドを上記のコードにて実装します。
誤認識時や言い回しを考慮して、同じコマンドに対し複数のワードを指定しています。
あとはこのindex.jsをnodeコマンドにて実行します。
$ node index.js
どうでしょう。
ちゃんと話しかけたとおり動作しましたか?
正常に動いているなら後はサービス化なりforeverなりしちゃいましょう。
実際の動作
Google Homeに話しかけてPS4を操作してみた pic.twitter.com/53wSdAabP8
— 田中みそ (@miso_develop) 2017年10月25日
おわりに
irMagicianでテレビのリモコンの信号学習できなかった時はどうしようかと思いましたが、案外なんとかなるもんですね。
ただ現状満たせていない要件としてテレビの電源オフがあります。
調べてみた所ソニーのブラビアを操作できるNode.jsモジュールがあり、試してみたのですがうちのは古い型のようでだめでした…
bravia
それと一応テレビ自体は赤外線受信が可能なようなので、リモコンの赤外線情報をなんとかゲットできれば…
ちなみにirMagician製造元の大宮技研のサイトに赤外線リモコンデータがいくつか置いてあります。
ここにあるデータも試してみましたがうちのテレビじゃダメでした。
あとはHDMI経由でテレビを操作できるのもあるので今度はそれも試してみよう。
※2017/10/30追記 やってみました↓
Google Homeに話しかけてテレビの電源を操作してみる
