この記事はぷりぷりあぷりけーしょんず Advent Calendar 2019の23日目の記事です。
はじめに
好きなバンドとかアーティストを共有したいときってありませんか?わたしはあります。
そういったときにSlack上でサクッと検索ができたら幸せだなあと思い、アーティスト名を入力すると、そのアーティストの人気曲Top10を返すSlack botを作りました。
Infrastructure as Code の学習も兼ねて、Lambda + API Gateway はCDKで定義しています。
使用技術
Slack Outgoing Webhook
Spotify API
AWS Lambda
Amazon API Gateway
AWS CDK 1.19.0
Node.js 12.8.1
※ CDK, Node の環境構築は完了していることを前提とします。
アーキテクチャ
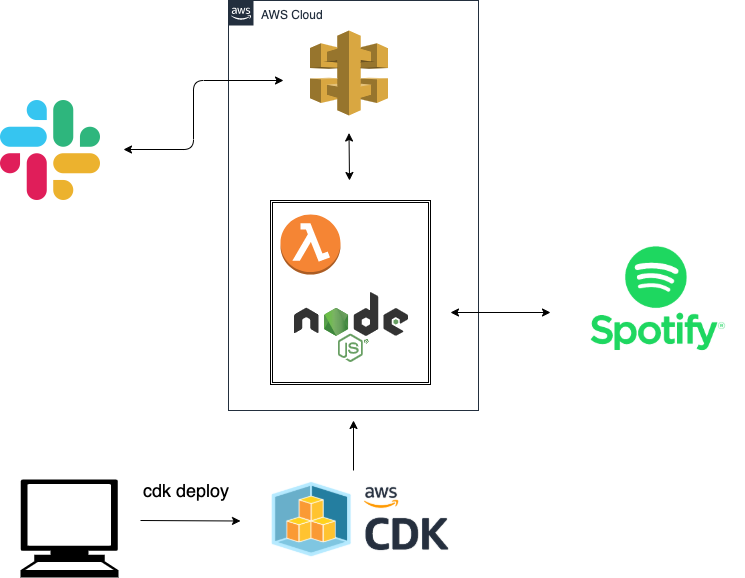
アーキテクチャはこのようなイメージです。
ざっくり説明すると、SlackのOutgoing WebhookからAPI GatewayにPOSTし、受け取った文字列をもとにSpotify APIに検索をかけて、その結果をSlackに返すようになっています。
ディレクトリ構成
CDKでプロジェクトを作成するので、ディレクトリ構成はこのようになります。
├── bin
│   └── 〇〇-cdk.ts
├── lambda
│   ├── node_modeules
│   ├── package.json
│   ├── package-lock.json
│   └── search.js
├── lib
│   └── 〇〇-stack.ts
├── node_modeules
├── README.md
├── package-lock.json
├── package.json
└── tsconfig.json
Spotify APIを使えるようにする
Spotify APIを使用するためには、クライアントアプリケーションを作成して認証を通す必要があります。
下記URLからダッシュボードにサインアップ / ログインすることができます。
https://developer.spotify.com/dashboard/
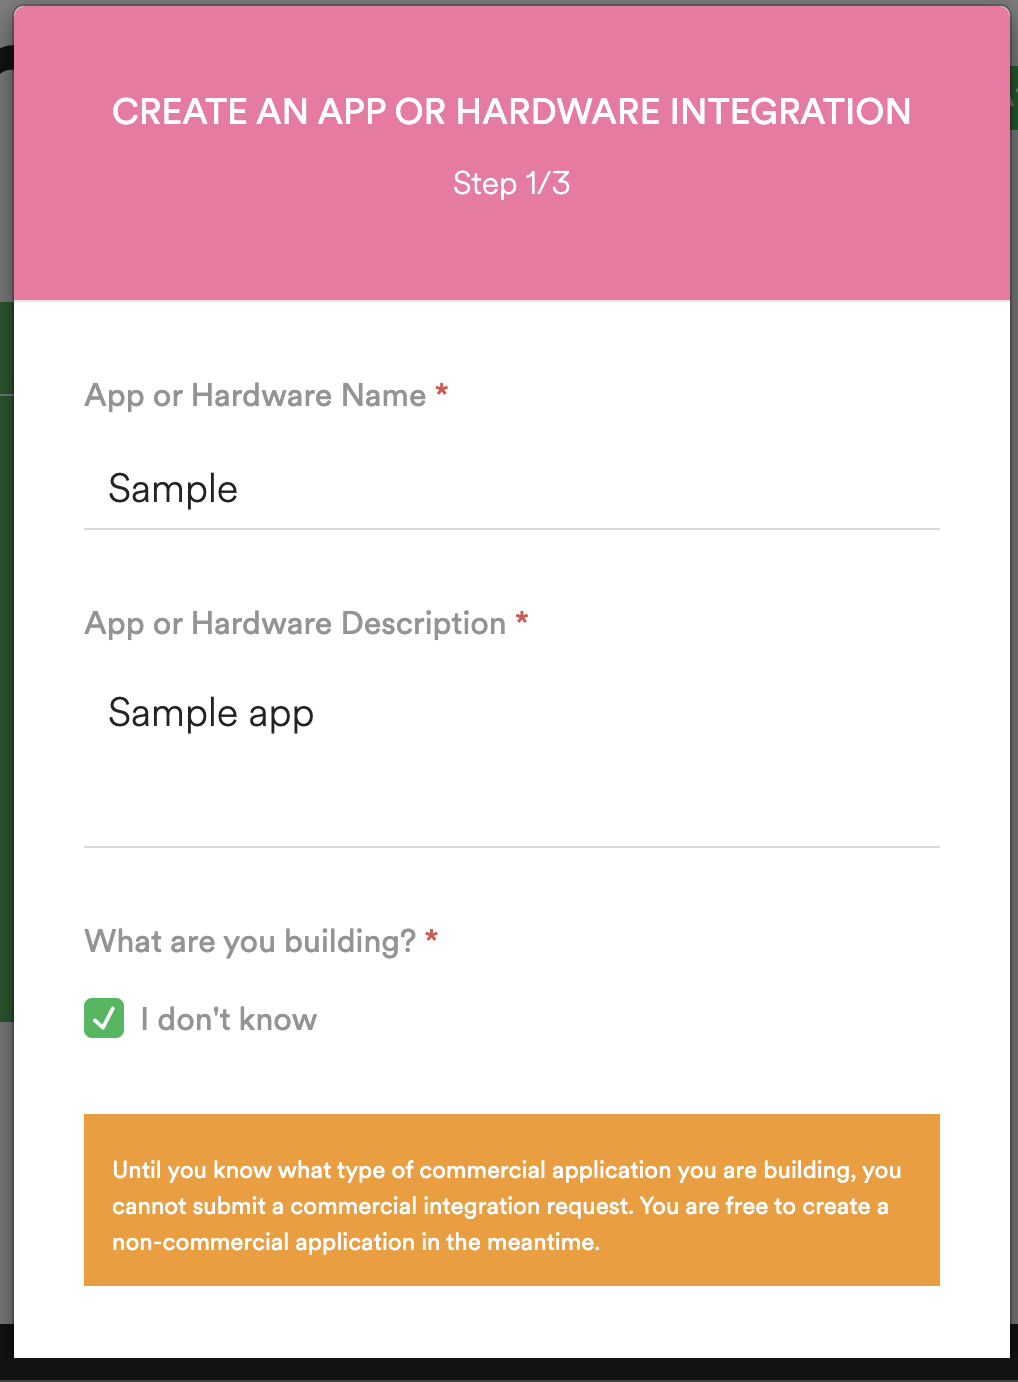
ダッシュボードにログインができたら、CREATE AN APPをクリックしてクライアントアプリを作成します。


アプリが作成されたら、Client IdとClient Secretをメモしておきます。
Spotify APIには3種類の認証方法がありますが、今回はクライアント側から直接APIを叩く構成ではないため、Client Credentials Flowという認証フローを採用しています。
各認証方法についての詳細はこちらをご参照ください。
https://developer.spotify.com/documentation/general/guides/authorization-guide/
CDKでAWSリソースを定義していく
AWSリソースと、Lambdaにデプロイするコードを書いていきます。
Nodeのプログラムを作る
/lambdaディレクトリを作成し、そのディレクトリでnpm initでpackage.jsonを作成したら、
npm install requestで request のパッケージをインストールしておきます。
exports.handler = (event, context, callback) => {
    const request = require('request');

    const authOptions = {
        url: 'https://accounts.spotify.com/api/token',
        headers: {
            'Authorization': 'Basic ' + process.env.ACCESS_TOKEN
        },
        form: {
            grant_type: 'client_credentials'
        },
        json: true
    };

    request.post(authOptions, function (error, response, body) {
        if (error) {
            console.log('POST Error: ' + error.message);
            return;
        }

        const token = body.access_token;
        const artist = event.text.slice(5);
        const encoded = encodeURIComponent(artist);

        const options = {
            url: 'https://api.spotify.com/v1/search?q=' + encoded + '&type=artist&market=JP&limit=1&offset=0',
            headers: {
                'Authorization': 'Bearer ' + token
            },
            json: true
        };

        request.get(options, function (error, response, body) {
            let res = {};

            if (error) {
                console.log('GET Error: ' + error.message);
                res.text = '検索に失敗しました。ごめんなさい!';
                callback(null, res);
            } else {
                res.text = body.artists.items[0].external_urls.spotify;
                callback(null, res);
            }
        });
    });
};
SlackからPOSTされた文字列はevent.textで取得することができます。Outgoing Webhookのトリガーとなる文字列を除くためslice(5)としています。
あとはその文字列(アーティスト名)をエンコードして、https://api.spotify.com/v1/searchのクエリパラメータに含めてリクエストをするだけです。
APIの細かい仕様はこちらをご参照ください。
レスポンスが複数の場合もありえますが、今回は1件目だけをSlackに返すようにしています。
Lambdaを定義する
npm install @aws-cdk/aws-lambda でLambdaのライブラリをインストールしたら、/lib配下のtsファイルにコードを書いていきます。
import cdk = require('@aws-cdk/core');
import lambda = require('@aws-cdk/aws-lambda');
import { Duration } from '@aws-cdk/core';

export class PurivisualSearchCdkStack extends cdk.Stack {
  constructor(scope: cdk.Construct, id: string, props?: cdk.StackProps) {
    super(scope, id, props);

    // lambda
    const search = new lambda.Function(this, 'SearchHandler', {
      runtime: lambda.Runtime.NODEJS_10_X,
      code: lambda.Code.fromAsset('lambda'),
      handler: 'search.handler',
      timeout: Duration.minutes(1),
      environment: {
        "ACCESS_TOKEN": "< your access token >"
      }
    });
  }
}
environmentの< your access token >には、Spotifyでアプリを作成したときに発行したClient IdとClient Secretをbase64でエンコードした文字列を入れてください。
ターミナルで下記コマンド叩くとエンコードした文字列を出力できます。
echo -n < Client Id >:< Client Secret > | base64
API Gatewayを定義する
npm install @aws-cdk/aws-apigateway でAPI Gatewayのライブラリをインストールします。
import cdk = require('@aws-cdk/core');
import lambda = require('@aws-cdk/aws-lambda');
import apigw = require('@aws-cdk/aws-apigateway');
import { Duration } from '@aws-cdk/core';

export class PurivisualSearchCdkStack extends cdk.Stack {
  constructor(scope: cdk.Construct, id: string, props?: cdk.StackProps) {
    super(scope, id, props);

    // lambda
    const search = new lambda.Function(this, 'SearchHandler', {
      runtime: lambda.Runtime.NODEJS_10_X,
      code: lambda.Code.fromAsset('lambda'),
      handler: 'search.handler',
      timeout: Duration.minutes(1),
      environment: {
        "ACCESS_TOKEN": "< your accsess token >"
      }
    });

    // api gateway
    const api = new apigw.LambdaRestApi(this, 'PurivisualSearchApi', {
      handler: search,
      proxy: false
    });

    // リソースの作成
    const postResouse = api.root.addResource("serach")

    const responseModel = api.addModel('ResponseModel', {
      contentType: 'application/json',
      modelName: 'ResponseModel',
      schema: {}
    });

    const template: string = '## convert HTML POST data or HTTP GET query string to JSON\n' +
        '\n' +
        '## get the raw post data from the AWS built-in variable and give it a nicer name\n' +
        '#if ($context.httpMethod == "POST")\n' +
        ' #set($rawAPIData = $input.path(\'$\'))\n' +
        '#elseif ($context.httpMethod == "GET")\n' +
        ' #set($rawAPIData = $input.params().querystring)\n' +
        ' #set($rawAPIData = $rawAPIData.toString())\n' +
        ' #set($rawAPIDataLength = $rawAPIData.length() - 1)\n' +
        ' #set($rawAPIData = $rawAPIData.substring(1, $rawAPIDataLength))\n' +
        ' #set($rawAPIData = $rawAPIData.replace(", ", "&"))\n' +
        '#else\n' +
        ' #set($rawAPIData = "")\n' +
        '#end\n' +
        '\n' +
        '## first we get the number of "&" in the string, this tells us if there is more than one key value pair\n' +
        '#set($countAmpersands = $rawAPIData.length() - $rawAPIData.replace("&", "").length())\n' +
        '\n' +
        '## if there are no "&" at all then we have only one key value pair.\n' +
        '## we append an ampersand to the string so that we can tokenise it the same way as multiple kv pairs.\n' +
        '## the "empty" kv pair to the right of the ampersand will be ignored anyway.\n' +
        '#if ($countAmpersands == 0)\n' +
        ' #set($rawPostData = $rawAPIData + "&")\n' +
        '#end\n' +
        '\n' +
        '## now we tokenise using the ampersand(s)\n' +
        '#set($tokenisedAmpersand = $rawAPIData.split("&"))\n' +
        '\n' +
        '## we set up a variable to hold the valid key value pairs\n' +
        '#set($tokenisedEquals = [])\n' +
        '\n' +
        '## now we set up a loop to find the valid key value pairs, which must contain only one "="\n' +
        '#foreach( $kvPair in $tokenisedAmpersand )\n' +
        ' #set($countEquals = $kvPair.length() - $kvPair.replace("=", "").length())\n' +
        ' #if ($countEquals == 1)\n' +
        '  #set($kvTokenised = $kvPair.split("="))\n' +
        '  #if ($kvTokenised[0].length() > 0)\n' +
        '   ## we found a valid key value pair. add it to the list.\n' +
        '   #set($devNull = $tokenisedEquals.add($kvPair))\n' +
        '  #end\n' +
        ' #end\n' +
        '#end\n' +
        '\n' +
        '## next we set up our loop inside the output structure "{" and "}"\n' +
        '{\n' +
        '#foreach( $kvPair in $tokenisedEquals )\n' +
        '  ## finally we output the JSON for this pair and append a comma if this isn\'t the last pair\n' +
        '  #set($kvTokenised = $kvPair.split("="))\n' +
        ' "$util.urlDecode($kvTokenised[0])" : #if($kvTokenised[1].length() > 0)"$util.urlDecode($kvTokenised[1])"#{else}""#end#if( $foreach.hasNext ),#end\n' +
        '#end\n' +
        '}'

    // POSTメソッドの作成
    postResouse.addMethod("POST", new apigw.LambdaIntegration(search, {
      // 統合リクエストの設定
      requestTemplates: {
        'application/x-www-form-urlencoded': template
      },
      // 統合レスポンスの設定
      integrationResponses: [
        {
          statusCode: '200',
          contentHandling: apigw.ContentHandling.CONVERT_TO_TEXT,
          responseTemplates: {
            'application/json': "$input.json('$')"
          }
        }
      ],
      passthroughBehavior: apigw.PassthroughBehavior.WHEN_NO_MATCH,
      proxy: false
    }),
        // メソッドレスポンスの設定
        {
          methodResponses: [
            {
              statusCode: '200',
              responseModels: {
                'application/json': responseModel
              }
            }
          ]
        })
  }
}
apigw.LambdaRestApi()のhandlerに先ほど定義したLambdaを指定してあげることで、LambdaをバックエンドとしたAPIを作成することができます。
SlackからPOSTされるデータはapplication/x-www-form-urlencoded形式のため、jsonに変換しています。AWSフォーラムで紹介されているマッピングテンプレートをまるっとコピーして使用しています。
https://forums.aws.amazon.com/thread.jspa?messageID=673012&tstart=0#673012
デプロイ
これでAWSリソースとLambdaにデプロイするプログラムが完成したので、デプロイします。
cdk diff
cdk deploy
SlackのOutgoing Webhookを設定する

「引き金となる言葉」には被ることがないような文言を設定しておくのが無難です。わたしは推しの名前にしました。
あとは、URLに作成したAPI Gatewayのエンドポイントを指定し、名前やアイコンなどを設定して保存すればbotの完成です。

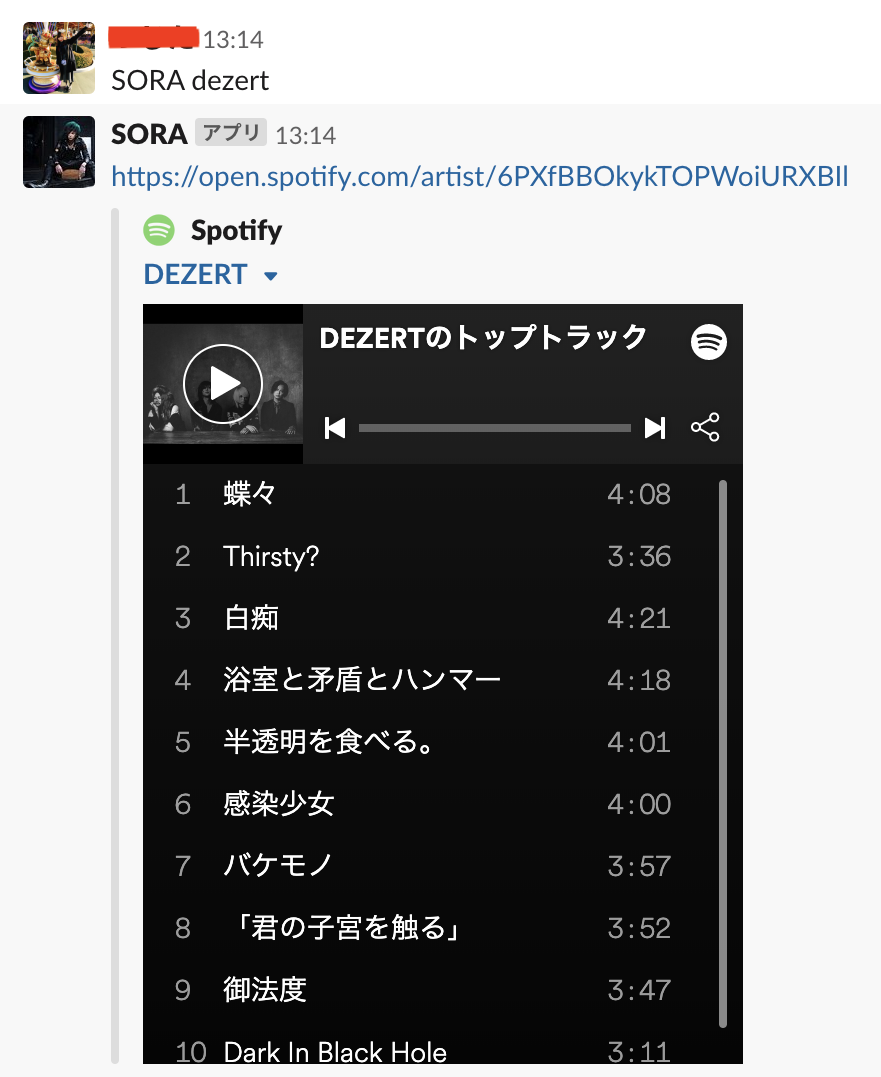
このように、「SORA」のあとにスペース+アーティスト名で、そのアーティストの人気曲Top10が表示されるようになりました!残念ながらSlack上で再生ができるは視聴版のみとなっており、全曲フル尺で再生したい場合はリンクからSpotifyを開く必要があります。
最後に
こういうbotがあれば「このアーティストオススメだから聴いてみて!」が簡単にできて楽しいかなと思って作ってみました。
あとbotのアイコンを推しにするとかなり愛着が湧きます!
Spotify APIは他にも色んなエンドポイントが用意されているので、気になる方は是非使ってみてください!
