新入社員が学んだことをまとめてみました!
objcに触れてまだ半年ほどで勉強の毎日です・・・。
そんな私が今回ご紹介する内容はタイトル通り…
AlertControllerのカスタマイズをしてみました!
今回はAlertViewの上にtableViewを乗せてAlertControllerのカスタマイズを行いました。
やりたいこと
1.AlertControllerの要素数を増やしたい。
-標準のAlertControllerでは要素数が多い時、画面サイズによってはタイトル部分が切れてしまう。
2.AlertControllerのサイズはそのままにしたい。
-要素数の部分はtableViewを乗せてカスタマイズしよう…!
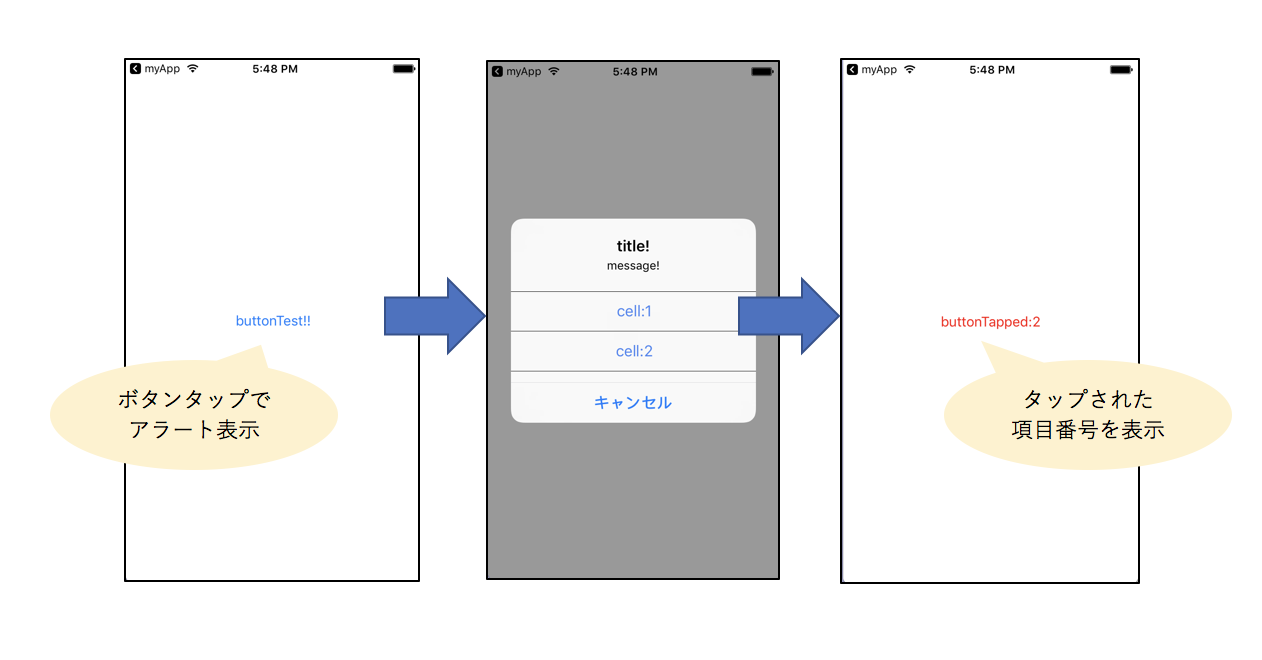
作成したのがこんな感じ(下図)のボタンをタップしたらアラートを表示するだけのシンプルなものです!

図:作成したAlertControllerのスクリーンショット
ソースコード
カスタムしたAlertControllerを呼び出すためのメソッドを作ります。
-(void)customAlertController:(NSString *)title
                     message:(NSString *)message
                   menuArray:(NSArray *)array
                         tag:(NSInteger)tag {
    UIViewController *controller = [[UIViewController alloc]init];

    //viewの表示サイズを格納する変数
    CGRect rect;

    if (array.count < 4) {
        rect = CGRectMake(0, 0, 272, 100);
        [controller setPreferredContentSize:rect.size];

    }
    else if (array.count < 6){
        rect = CGRectMake(0, 0, 272, 150);
        [controller setPreferredContentSize:rect.size];
    }
    else if (array.count < 8){
        rect = CGRectMake(0, 0, 272, 200);
        [controller setPreferredContentSize:rect.size];

    }
    else {
        rect = CGRectMake(0, 0, 272, 250);
        [controller setPreferredContentSize:rect.size];
    }

    //tableViewを生成-------------------------------------------------------------
    alertTableView  = [[UITableView alloc]initWithFrame:rect];
    //viewを作成(tableViewの上に乗せる):アラートとtableViewの境界線
    UIView *titleView = [[UIView alloc] initWithFrame:CGRectMake(0, 0, 272, 0.5)];
    titleView.backgroundColor = [UIColor blackColor];
    //テーブルビューのデリゲート
    alertTableView.delegate = self;
    alertTableView.dataSource = self;
    [alertTableView setTag:tag];

    //テーブルビューの背景色を透明に
    alertTableView.backgroundColor = [UIColor clearColor];
    //テーブルビュー:線の色を指定
    alertTableView.separatorColor = [UIColor blackColor];
    //テーブルビュー:境界線を引く
    [alertTableView setSeparatorStyle:UITableViewCellSeparatorStyleSingleLine];

    //テーブルビューをviewに追加
    [controller.view addSubview:alertTableView];
    [controller.view bringSubviewToFront:alertTableView];
    //titleViewをviewに追加
    [controller.view addSubview:titleView];
    [controller.view setUserInteractionEnabled:YES];
    [alertTableView setUserInteractionEnabled:YES];
    //セルの選択可否
    [alertTableView setAllowsSelection:YES];
    //テーブルビューの最初と最後の行をスクロールさせない処理
    [alertTableView setBounces:NO];
    //タイトル/メッセージを指定-----------------------------------------------------------------
    UIAlertController *alertController = [UIAlertController alertControllerWithTitle:title
                                                                             message:message
                                                                      preferredStyle:UIAlertControllerStyleAlert];

    [alertController setValue:controller forKey:@"contentViewController"];
    //キャンセルボタンの設定-------------------------------------------------------------------
    UIAlertAction *cancelAction = [UIAlertAction actionWithTitle:@"キャンセル"
                                                           style:UIAlertActionStyleCancel
                                                         handler:^(UIAlertAction *action) {
                                                             //何もしない
                                                         }];
    //キャンセルボタンを追加-------------------------------------------------------------------
    [alertController addAction:cancelAction];
    //カスタムしたアラートを表示----------------------------------------------------------------
    [self presentViewController:alertController animated:YES completion:nil];
}
あとはこのメソッドに引数を与えて呼ぶとカスタムアラートビューが表示されます。
menuArrayには項目に表示する内容を格納し、配列の要素数に応じてアラートの表示サイズが変化します。
    //カスタムアラートのメソッドを呼ぶ
    [self customAlertController:@"title!" message:@"message!" menuArray:nil tag:0];
}
まとめ
・他にもチェックボックスをAlertControllerに乗せたりできるようなので、
色々なカスタマイズができそう。
・標準のAlertControllerではないのできちんと項目タップされた後にAlertControllerを閉じる処理の記述が必要。
・「bringSubviewToFront:」はViewの位置関係を把握していないと、
意図しない場所にViewが埋もれてしまう可能性があるため使用するときには注意が必要。
・tableViewの標準
-セル境界線の左端部分が切れないよう左端まで引く処理を追加する。
-最初と最後の行のセルがスクロールできないよう設定する。
ご紹介したソースコードの全容
# import "ViewController.h"

# define MAXROW 20

//テーブルビューを使用するのでデリゲートを宣言
@interface ViewController ()<UITableViewDataSource,UITableViewDelegate>
@end

@implementation ViewController{
    //カスタムアラートビュー
    UITableView *alertTableView;
    UIButton *alertButton;
}

- (void)viewDidLoad {
    [super viewDidLoad];

    //ボタンの生成
    alertButton = [UIButton buttonWithType:UIButtonTypeSystem];
    //ボタンの表示領域設定
    alertButton.frame = CGRectMake(0,
                                   0,
                                   (self.view.frame.size.width),
                                   (self.view.frame.size.height)
                                   );
    //ボタンのタイトル設定
    [alertButton setTitle:@"buttonTest!!" forState:UIControlStateNormal];
    //ボタンタップ時に呼ぶメソッドを指定
    [alertButton addTarget:self action:@selector(alertButtonDidTapped:) forControlEvents:UIControlEventTouchDown];

    //viewにアラートボタンを追加
    [self.view addSubview:alertButton];

}

- (void)didReceiveMemoryWarning {
    [super didReceiveMemoryWarning];
}

-(void)alertButtonDidTapped:(UIButton*)button{
    //カスタムアラートのメソッドを呼ぶ
    [self customAlertController:@"title!" message:@"message!" menuArray:nil tag:0];
}

# pragma mark TableViewDataSource Method
//列数を返すメソッド
- (NSInteger)numberOfSectionsInTableView:(UITableView *)tableView {
    return 1;
}
//行数を返すメソッド
- (NSInteger)tableView:(UITableView *)tableView
 numberOfRowsInSection:(NSInteger)section {
    return MAXROW;
}

// 設定(セル)
- (UITableViewCell *)tableView:(UITableView *)tableView cellForRowAtIndexPath:(NSIndexPath *)indexPath {
    // セルオブジェクト取得
    UITableViewCell *cell = [tableView dequeueReusableCellWithIdentifier:@"cell"];
    if (!cell) {
        cell = [[UITableViewCell alloc] initWithStyle:UITableViewCellStyleDefault reuseIdentifier:@"cell"];
    }

    //セルの左端が途切れないように設定-------------------------------------------------
    if ([cell respondsToSelector:@selector(layoutMargins)]) {
        cell.layoutMargins = UIEdgeInsetsZero;
    }
    if([cell respondsToSelector:@selector(separatorInset)]){
        cell.separatorInset = UIEdgeInsetsZero;
    }
    if([cell respondsToSelector:@selector(preservesSuperviewLayoutMargins)]){
        cell.preservesSuperviewLayoutMargins = NO;
    }
    //---------------------------------------------------------------------------

    //テーブルビューの背景色を透明に設定
    cell.backgroundColor = [UIColor clearColor];
    //セルのテキスト表示位置を中央に設定
    cell.textLabel.textAlignment = NSTextAlignmentCenter;
    //テキストの表示色をキャンセルボタン(標準と同色にRGB指定)と同じ色に設定
    cell.textLabel.textColor = [UIColor colorWithRed:0.275 green:0.518 blue:0.953 alpha:1.0];

    //セルに文字列を表示
    cell.textLabel.text = [NSString stringWithFormat:@"cell:%ld",((long)indexPath.row + 1)];

    return cell;
}


# pragma mark UITableViewDelegate Method
// cellがタップされた際の処理
- (void)tableView:(UITableView *)tableView didSelectRowAtIndexPath:(NSIndexPath *)indexPath{

    NSLog(@"cell Tapped!");
    //セルのハイライトを無効化--------------------------------------------------------------
    [tableView deselectRowAtIndexPath:[tableView indexPathForSelectedRow] animated:YES];
    //重要!!!セルがタップされた時にカスタムアラートを閉じる------------------------------------
    //標準とは異なるため、きちんとカスタムで生成したビューを閉じる処理を書いてあげる。
    [self dismissViewControllerAnimated:YES completion:^{
            //何もしない。
            //カスタムビューを閉じたあとに何か処理をしたい時はここに書く
        [alertButton setTintColor:[UIColor redColor]];
            [alertButton setTitle:[NSString stringWithFormat:@"buttonTapped:%ld",((long)indexPath.row + 1)]
                         forState:UIControlStateNormal];

            }];
}

# pragma mark AlertCustomize Method
-(void)customAlertController:(NSString *)title
                     message:(NSString *)message
                   menuArray:(NSArray *)array
                         tag:(NSInteger)tag {
    UIViewController *controller = [[UIViewController alloc]init];

    //viewの表示サイズを格納する変数
    CGRect rect;

    if (array.count < 4) {
        rect = CGRectMake(0, 0, 272, 100);
        [controller setPreferredContentSize:rect.size];

    }
    else if (array.count < 6){
        rect = CGRectMake(0, 0, 272, 150);
        [controller setPreferredContentSize:rect.size];
    }
    else if (array.count < 8){
        rect = CGRectMake(0, 0, 272, 200);
        [controller setPreferredContentSize:rect.size];

    }
    else {
        rect = CGRectMake(0, 0, 272, 250);
        [controller setPreferredContentSize:rect.size];
    }

    //tableViewを生成-------------------------------------------------------------
    alertTableView  = [[UITableView alloc]initWithFrame:rect];
    //viewを作成(tableViewの上に乗せる):アラートとtableViewの境界線
    UIView *titleView = [[UIView alloc] initWithFrame:CGRectMake(0, 0, 272, 0.5)];
    titleView.backgroundColor = [UIColor blackColor];
    //テーブルビューのデリゲート
    alertTableView.delegate = self;
    alertTableView.dataSource = self;
    [alertTableView setTag:tag];

    //テーブルビューの背景色を透明に
    alertTableView.backgroundColor = [UIColor clearColor];
    //テーブルビュー:線の色を指定
    alertTableView.separatorColor = [UIColor blackColor];
    //テーブルビュー:境界線を引く
    [alertTableView setSeparatorStyle:UITableViewCellSeparatorStyleSingleLine];

    //テーブルビューをviewに追加
    [controller.view addSubview:alertTableView];
    [controller.view bringSubviewToFront:alertTableView];
    //titleViewをviewに追加
    [controller.view addSubview:titleView];
    [controller.view setUserInteractionEnabled:YES];
    [alertTableView setUserInteractionEnabled:YES];
    //セルの選択可否
    [alertTableView setAllowsSelection:YES];
    //テーブルビューの最初と最後の行をスクロールさせない処理
    [alertTableView setBounces:NO];
    //タイトル/メッセージを指定-----------------------------------------------------------------
    UIAlertController *alertController = [UIAlertController alertControllerWithTitle:title
                                                                             message:message
                                                                      preferredStyle:UIAlertControllerStyleAlert];

    [alertController setValue:controller forKey:@"contentViewController"];
    //キャンセルボタンの設定-------------------------------------------------------------------
    UIAlertAction *cancelAction = [UIAlertAction actionWithTitle:@"キャンセル"
                                                           style:UIAlertActionStyleCancel
                                                         handler:^(UIAlertAction *action) {
                                                             //何もしない
                                                         }];
    //キャンセルボタンを追加-------------------------------------------------------------------
    [alertController addAction:cancelAction];
    //カスタムしたアラートを表示----------------------------------------------------------------
    [self presentViewController:alertController animated:YES completion:nil];
}

@end