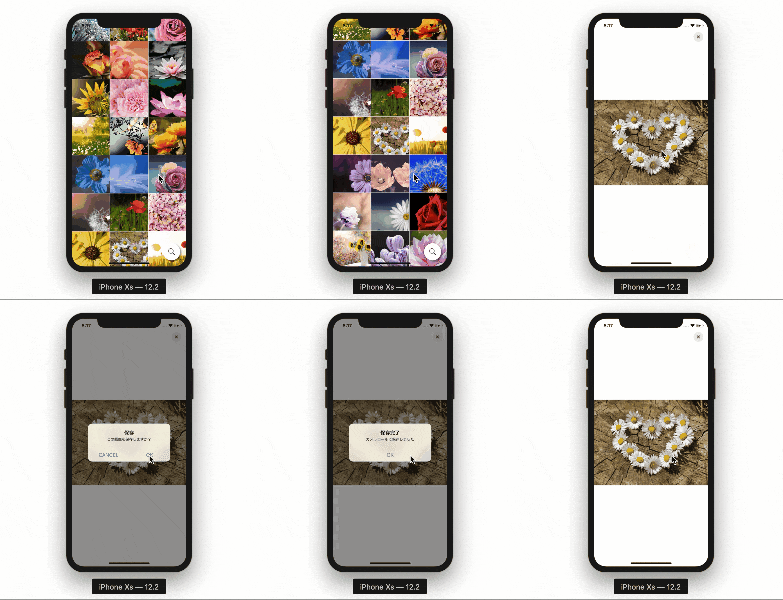
今回はUIImageViewに表示された画像をカメラロールに保存してみました!
完成形
以下のGIF画像ではCollectionViewで任意の画像を選択後、画面遷移して画像を保存していますが、今回は画面遷移後の画像保存の部分のみを紹介します。
1. UIImageにタップイベントを追加
UIImageViewをタップした時に、そこに含まれているUIImageを取得します。
import UIKit

class ViewController: UIViewController {

    override func viewDidLoad() {
        super.viewDidLoad()

        //UIImageViewのインスタンスを生成
        let imageView = UIImageView(image: UIImage(named: "sample.png"))
        let width = view.frame.width
        let height = view.frame.height
        imageView.frame.size = CGSize(width: width, height: height/3)
        imageView.contentMode = .scaleAspectFill
        imageView.clipsToBounds = true

        // UIImageView にタップイベントを追加
        imageView.userInteractionEnabled = true
        imageView.addGestureRecognizer(UITapGestureRecognizer(target: self, action: #selector(self.saveImage(_:))))

        // 画面の中心に UIImageView を配置
        imageView.center = self.view.center
        self.view.addSubview(imageView)
    }
// セーブを行う
    @objc func saveImage(_ sender: UITapGestureRecognizer) {

        //タップしたUIImageViewを取得
        let targetImageView = sender.view! as! UIImageView
        // その中の UIImage を取得
        let targetImage = targetImageView.image!
        //保存するか否かのアラート
        let alertController = UIAlertController(title: "保存", message: "この画像を保存しますか?", preferredStyle: .alert)
        //OK
        let okAction = UIAlertAction(title: "OK", style: .default) { (ok) in
            //ここでフォトライブラリに画像を保存
            UIImageWriteToSavedPhotosAlbum(targetImage, self, #selector(self.showResultOfSaveImage(_:didFinishSavingWithError:contextInfo:)), nil)
        }
        //CANCEL
        let cancelAction = UIAlertAction(title: "CANCEL", style: .default) { (cancel) in
            alertController.dismiss(animated: true, completion: nil)
        }
        //OKとCANCELを表示追加し、アラートを表示
        alertController.addAction(cancelAction)
        alertController.addAction(okAction)
        present(alertController, animated: true, completion: nil)
    }
 // 保存結果をアラートで表示
    func showResultOfSaveImage(_ image: UIImage, didFinishSavingWithError error: NSError!, contextInfo: UnsafeMutableRawPointer) {

        var title = "保存完了"
        var message = "カメラロールに保存しました"

        if error != nil {
            title = "エラー"
            message = "保存に失敗しました"
        }

        let alert = UIAlertController(title: title, message: message, preferredStyle: .alert)

        // OKボタンを追加
        alert.addAction(UIAlertAction(title: "OK", style: .default, handler: nil))

        // UIAlertController を表示
        self.present(alert, animated: true, completion: nil)
    }
2. プライバシー設定を変更
コードは以上で完成ですが、もう1つやらなければいけないことがあります。
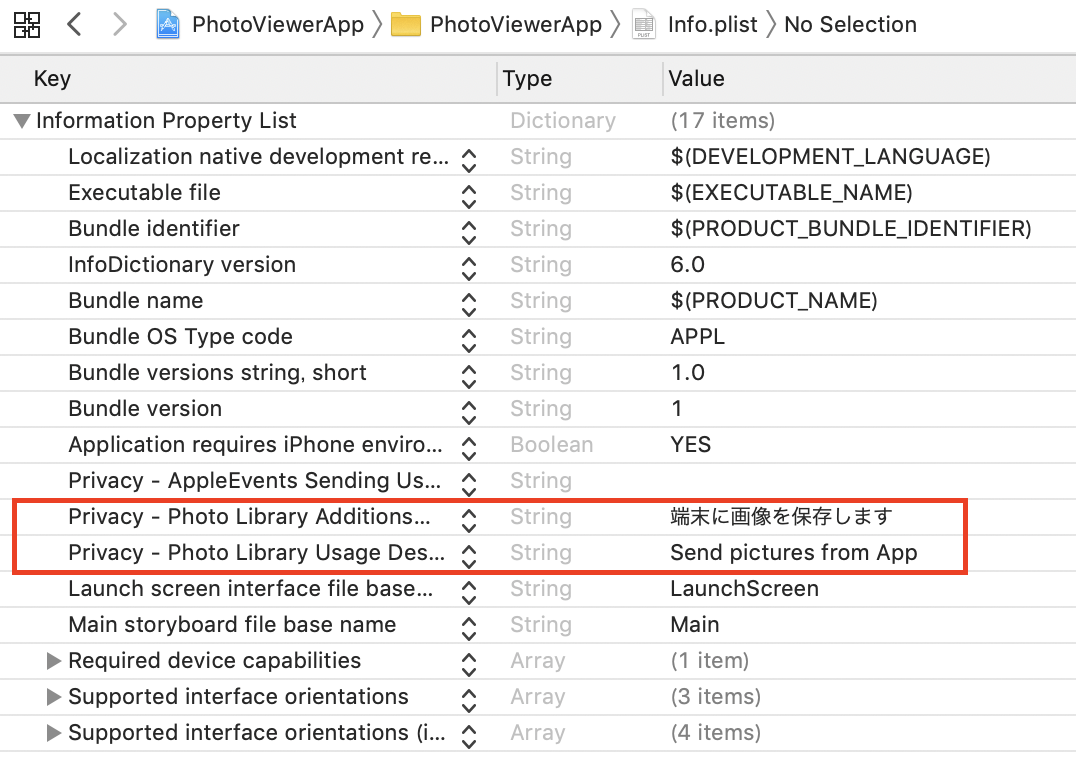
info.plistの中にあるPrivacyの設定です。追加しなければいけないのは以下の2つです。
-
Privacy - Photo Library Usage Description
-
Privacy - Photo Library Additions Usage Description
上記の2つを追加し、Valueを以下の画像のように変更することで、初回画像保存時にアラートが表示され、ユーザーにフォトライブラリーへのアクセスを許可を要求することができます。

