概要
Vuforia の External Camera の例として紹介されている File Driver のビルドにちょっと手間取ったのでビルドするために必要な作業のログです。
手順
環境は Windows 10, Visual Studio 2017 です. mac だとうまくいきませんでした.
-
https://developer.vuforia.com/downloads/samples の
Advanced Topics のDownload File Driverからコードをダウンロード - ↑と同じページの Core Features の
Download for UWPをダウンロード - ダウンロードした zip を適当に解凍
- cmake をダウンロード & インストール (3.9.6 を使ったけどおそらくほかのバージョンでも大丈夫だと思います)
- 解凍した 1 のディレクトリにコマンドプロンプトで入ります
ex) cd C:\Users\miro\Downloads\vuforia-driver-sample-filedriver-android_uwp-7-5-20
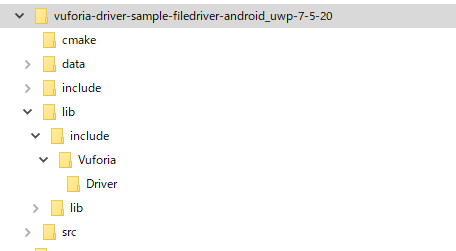
- この後の作業を少し楽にするためにこのディレクトリの中に
libというディレクトリを作って解凍した 2 の中にあるbuild/の中のincludeとlibをコピーします.- 下の画像のようなディレクトリ構造になっていれば大丈夫です.
- 次に
build.pyを編集します.build.pyでは cmake の generator にVisual Studio 14 2015を使っているので Visual Studio 2017 でビルドできません. そこで下のソースコードのようにVisual Studio 15 2017を使うようにコードを変更します(84行目付近です). - そしたら5のコマンドプロンプトで
python build.py -a x64 -vh lib\include uwpと実行すればビルドが開始されます.
ディレクトリ構造
build.py (一部)
        elif platform == PLATFORM_UWP:
            toolchain_file = os.path.join(android_toolchain_dir, "uwp.toolchain.{0}.cmake".format(arch))
            if arch == "x86":
                generator = "Visual Studio 15 2017"
            elif arch == "x64":
                generator = "Visual Studio 15 2017 Win64"
以上です.