2019年12月12日のFlutter Interactで、macOS向けがFlutterがTechnical previewからAlphaになったという発表がありました。これに伴い今までのDesktop shellsに加えてDesktop用(現在macOS専用)のページが追加されました。
今後のmacOSの進捗はflutter/projectsを確認することで分かります。
https://github.com/flutter/flutter/projects/53
https://github.com/flutter/flutter/projects/36
ちなみにですが、Flutterに近いクロスプラットフォームのフレームワークとの比較として、12月11日にGithub starの推移の調査したところFlutterのstarの数がelectronを越えたようです。
GithubのスターのFlutterのStartの伸び方エグい pic.twitter.com/Wb6Iu7ELop
— mirock0606 (@mirock0606) December 11, 2019
追記(2020/07/10)
2020/07/09にUbuntuディストリビューションなどの開発元であるCanonicalとGoogleが共同でWindows向けFlutterのAlpha版を発表しました。
Canonical enables Linux desktop app support with Flutter
概要
この記事では
- Desktop向けFlutterの現状
- Desktop向けFlutterを使う方法
- Desktopアプリに必要と思われる機能をFlutterのサンプルコードとともに紹介(※機能紹介部分はmacOS向けのみとなります)
を書きます。
Desktop向けFlutterの現状
Desktop向けFlutterはFlutterのSDKに含まれており、Windonws/macOS/Linux上で動作するアプリケーションの開発を行うことができます。
しかし、
- macOSとLinuxがAlpha版、WindowsがTechnical Previewなため開発としては初期段階にいること
- 上記のためそもそもDesktop対応のプラグインが少ない
という強大な障壁があるため製品向けの開発に扱うのは難しいのが現状です。
実際にflutter-desktop-embedding公式リポジトリを確認してみると(4ヶ月前の更新ですが)
As explained in the link above, desktop libraries are still in early stages. The code here is not stable, nor intended for production use.
(意訳)Desktop向けの機能はまだ開発初期段階だから、コードは安定してないし、本番環境での使用も意図してませんよ。
とあります。
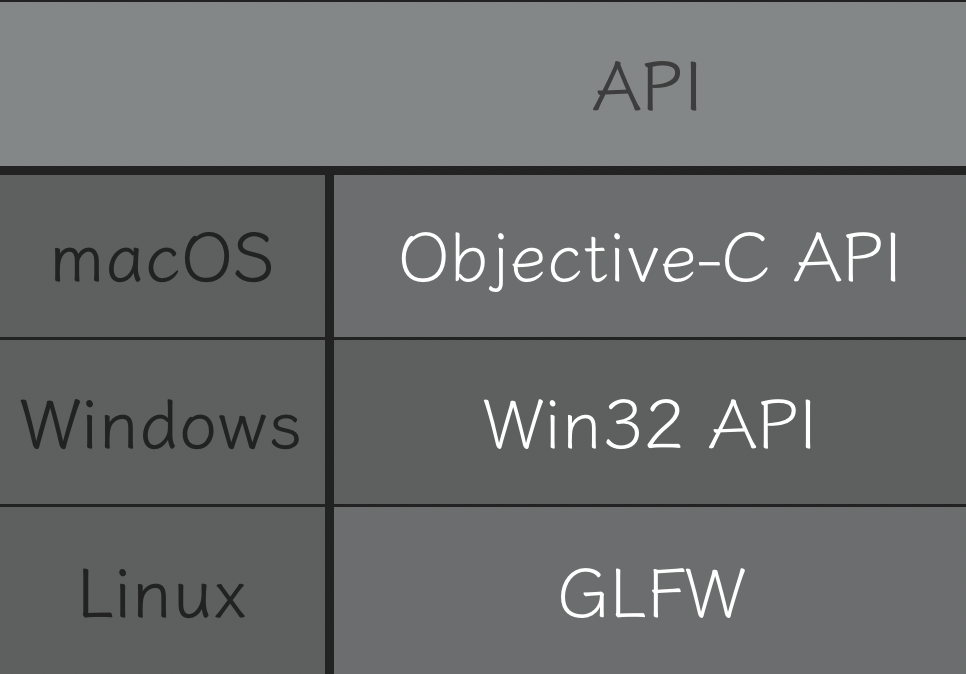
また、Destop shellでは、Windowsの項目で
The Windows shell is in early stages. It is Win32-based, but we plan to explore UWP support in the future.
(意訳)Win32 APIを使っているけどUWPに変更する予定だよ
Linuxの項目では(一部省略)
The current Linux shell is a GLFW placeholder, to allow early experimentation.(....)Our current plan is to support GTK+ out of the box, in a way where adding support for other toolkits is straightforward.Expect the APIs for the final shell to be radically different from the current implementation.
(意訳)現状はGLFW使っているけど、GTK+に変更する予定だよ。完成品は今と比べてあり得ないくらいの変更があると思うよ
一方、macOSの項目では
This is the most mature of the desktop platforms (for various reasons, including that it's quite close to iOS, which we already support). The Objective-C API layer is largely stable at this point, so breaking changes there should be rare.
(意訳)Objective-C APIは既にサポートしているiOSに近く、安定しているため破壊的な変更は稀だと思うよ
とあります。
別に貶しているわけではないのですが、macOS以外のDesktop版は初期段階というのが現状かと思います。
上記のページと、flutter/engineのソースを元に、今のDesktop版の簡単なAPI対応を図にしました。
Desktop向けFlutterを使う方法
Flutterのバージョンは以下で行いました。
Flutter 1.13.3-pre.23 • channel master • https://github.com/flutter/flutter.git
Framework • revision c06bf6503a (2 days ago) • 2019-12-13 17:42:35 -0500
Engine • revision e0e0ac0a68
Tools • Dart 2.8.0 (build 2.8.0-dev.0.0 45db297095)
Desktop向けFlutterの設定
Desktop版のアプリを開発するには、Flutterのmaster channelに変更した上でDesktopのサポートをenableにする必要があります。Flutterのchannelの説明はこのページにあります。ちなみにmasterは、master/dev/beta/stableとあるFlutterのチャンネルの中で最新のコミットが集っています。
 flutter channel master
 flutter upgrade
 flutter config --enable-macos-desktop
 flutter config --enable-windows-desktop
 flutter config --enable-linux-desktop
サポートがenableになっているかは以下のコマンドで確認できます。
flutter devices
-> macOS      • macOS      • darwin-x64     • Mac OS X ... (macOSの場合)
サンプルの実行
公式ではいつものカウントアプリを作っているので、同様にやってみます。
mkdir countapp
cd countapp
flutter create .
flutter run -d macOS
なお、WindowsとLinuxではターゲットプラットフォームのオーバーライドが必要です。
void _setTargetPlatformForDesktop() {
  if (Platform.isLinux || Platform.isWindows) {
    debugDefaultTargetPlatformOverride = TargetPlatform.fuchsia;
  }
}
void main() {
  _setTargetPlatformForDesktop();
  runApp.....
}
以下のようにDesktop上でカウントアプリを動作させることができました。flutter runコマンドでは何も設定していないのでdebug modeで動いておりますが、release modeやprofile mode(共にmacOSのみ)で動かすことも可能です。
Plugins
macOSであればAndroidやiOSと同様にpubspec.yamlにパッケージ名を追加するだけ大丈夫です。公式では以下のPlugin Packagesをサポートしています。
url_launcherとshared_preferencesについては、pub.devにある公式のパッケージでサポートされています。connectivityとpath_providerについては、以下のように_macosという文字列をパッケージ名の最後に付けたのもを追加する必要があります。
connectivity: ^0.4.6
connectivity_macos: ^0.0.1
Dart packages
各プラットフォームに依存していないDart packagesであればDesktop版で実行できる可能性があります。実際に次の項目でDart packagesを1つ動かしております。ですが、Desktop版自身がAlphaやTechnical previewなためエラーやクラッシュが起きる可能性は大いに考えられます。
今のDesktop向けFlutterで実現出来る機能
ここからはほぼmacOS向けの説明となります。Desktopアプリなら欲しい(と思う)機能とその実装を紹介します。各機能について深く紹介はしません。
- キーボード入力
- メニューバー
- ファイル選択パネル
- 画面サイズ取得と変更
- ネットワーク接続
- データ永続化
キーボード入力
文字列の入力させるWidgetなら
- TextField
生のキーボード入力を取得するWidgetなら - RawKeyboardListener
があります。
TextField
Center(
  child: Padding(
    padding: const EdgeInsets.all(24.0),
    child: TextField(),
  ),
),
実際にはこんな感じになります。日本語入力はできますが、方向キーの動きに癖があったりするので今後の開発に期待しております。
[macos] Full IME support #30660

RawKeyboardListener
  FocusNode _focusNode = new FocusNode();
  String keyLabel = "";
  _handleKey(RawKeyEventDataMacOs key) {
    setState(() {
      keyLabel = "${key.logicalKey.debugName}";
      log(key.toString());
    });
  }

  @override
  Widget build(BuildContext context) {
    return Center(
        child: RawKeyboardListener(
          focusNode: _focusNode,
          autofocus: true,
          onKey: (key) => _handleKey(key.data),
          child: Center(
            child: Text(keyLabel),
          ),
        ),
      ),
  }
実際にはこんな感じになります。

コールバックでは以下のようなデータが取得できます。
RawKeyEventDataMacOs(keyLabel: d, keyCode: 2, characters: d, unmodifiedCharacters: d, modifiers: 256, modifiers down: {})
keyCodeと実際のキーの対応に関してはの対応に関しては、ここpresentationに参考にできるものがあると思います。ちなみに上記のDart packageはFlutterでプレゼン資料を作れるパッケージです。
メニューバー
メニューバーを表示させるなら[flutter-desktop-embedding公式リポジトリ]で管理されているPluginであるmenubarの関数
- setApplicationMenu
が使えます。
pubspec.yamlへの追加
....
  menubar:
    git:
      url: https://github.com/google/flutter-desktop-embedding.git
      path: plugins/menubar
setApplicationMenu
このサンプルでは、メニューバーに動的にメニューを追加しています。
  String menuLabel = "";
  Future setMenu() async {
    // メニューアイテムの作成
    List<MenuItem> items = [];
    for (int i = 0; i < 3; i++) {
      MenuItem menuItem = MenuItem(
          label: "sample${i}",
          onClicked: () => setState(() => menuLabel = "sample${i}をクリックしました!"));
      items.add(menuItem);
    }
    // サブメニューに作成したメニューをセット
    Submenu itemAll = Submenu(label: "HelloWorld", children: items);
    // 作成したサブメニューを実際のメニューバーにセット
    setApplicationMenu([itemAll]);
  }

  @override
  Widget build(BuildContext context) {
    return Center(
        child: Column(
          mainAxisAlignment: MainAxisAlignment.center,
          children: <Widget>[
            Text(
              menuLabel,
            ),
            const SizedBox(
              height: 32,
            ),
            FlatButton(
              color: Colors.blueGrey,
              child: Text(
                "メニューをセット",
              ),
              onPressed: () => setMenu(),
            ),
          ],
        ),
      ),
  }
このように既存のメニューに項目を追加することができます。
実際にはこんな感じになります。
ファイル選択パネル
ファイル選択/保存パネルを表示させるなら[flutter-desktop-embedding公式リポジトリ]で管理されているPluginであるfile_chooserの関数
- showOpenPanel
- showSavePanel
が使えます。
pubspec.yamlへの追加
.....
  file_chooser:
    git:
      url: https://github.com/google/flutter-desktop-embedding.git
      path: plugins/file_chooser
DebugProfile.entitlements
macOSのセキュリティの関係上以下をDebugProfile.entitlementsに追加しないとファイルにアクセスできません。
詳細はmacOS Signing and Securityにあります。
    <key>com.apple.security.files.user-selected.read-write</key>
    <true/>
showOpenPanel/showSavePanel
このサンプルではファイル選択パネルを通して端末からファイルを選択しアプリ上に表示→ファイル保存パネルからファイルを端末に保存しています。
  var _imageWidget;
  String _completeText;
  var _imageFile;

  Future<void> _openPanel() async {
    var result = await showOpenPanel(
      initialDirectory: "/Users/mirock/Desktop", // パネルを開いた時に表示されるディレクトリ
      allowsMultipleSelection: true, // ファイルの複数選択を許可するか
      allowedFileTypes: ["png"], // 許可するファイル拡張子
      confirmButtonText: "オーケー!", // パネルのボタンテキスト変更
    ); //
    // ファイル選択に成功した時の処理
    if (!result.canceled) {
      _imageFile = File(result.paths[0]);
      setState(() => _imageWidget =
          SizedBox(height: 600, width: 600, child: Image.file(_imageFile)));
    }
  }

  Future<void> _savePanel() async {
    var result = await showSavePanel(
      suggestedFileName: "rev12_final_新しいファイル.png", // パネルを開いた時に表示される保存するファイル名
      initialDirectory: "/Users/mirock/Desktop", // パネルを開いた時に表示されるディレクトリ
      allowedFileTypes: ["png"], // 許可するファイル拡張子
      confirmButtonText: "保存!", // パネルのボタンテキスト変更
    );
    if (!result.canceled && _imageFile != null) {
      _imageFile.copy(result.paths[0]);
    } else {
      setState(() => _completeText = "なんかダメです");
    }
  }
    return Scaffold(
      body: Center(
        child: Padding(
          padding: const EdgeInsets.all(16.0),
          child: Column(
            mainAxisAlignment: MainAxisAlignment.start,
            children: <Widget>[
              Row(
                mainAxisAlignment: MainAxisAlignment.center,
                children: <Widget>[
                  FlatButton(
                    color: Colors.blueGrey,
                    child: Text(
                      "開く",
                    ),
                    onPressed: () async => _openPanel(),
                  ),
                  const SizedBox(
                    width: 32,
                  ),
                  FlatButton(
                    color: Colors.blueGrey,
                    child: Text(
                      "保存",
                    ),
                    onPressed: () async => _savePanel(),
                  ),
                ],
              ),
              SizedBox(
                height: 32,
              ),
              _imageWidget ??
                  Text(
                    "何にもないよ!",
                  ),
              SizedBox(
                height: 32,
              ),
              Text(
                _completeText ?? "",
              ),
            ],
          ),
        ),
      ),
    );
実際にはこんな感じになります。ちなみにUnsplashのサンプルではネットワークからダウンロードしてきたファイルを保存するコードがあります。
画面サイズ取得と変更
ファイル選択/保存パネルを表示させるなら[flutter-desktop-embedding公式リポジトリ]で管理されているPluginであるwindow_sizeの関数
- getWindowInfo
- setWindowFrame
が使えます。
pubspec.yamlへの追加
.....
  window_size:
    git:
      url: https://github.com/google/flutter-desktop-embedding.git
      path: plugins/window_size
getWindowInfo/setWindowFrame
このサンプルでは画面サイズを取得して、強制的に画面サイズを変更しています。
  PlatformWindow _windowInfo;
  Future<void> _window() async {
    getWindowInfo().then((windowInfo) {
      setState(() => _windowInfo = windowInfo);
      setWindowFrame(Rect.fromCenter(
        center: windowInfo.frame.center,
        width: 300,
        height: 800,
      ));
    });
  }

  @override
  Widget build(BuildContext context) {
    return Scaffold(
      body: Center(
        child: Padding(
          padding: const EdgeInsets.all(16.0),
          child: Column(
            mainAxisAlignment: MainAxisAlignment.start,
            children: <Widget>[
              FlatButton(
                color: Colors.blueGrey,
                child: Text(
                  "前の画面サイズ",
                ),
                onPressed: () async => _window(),
              ),
              const SizedBox(
                height: 32,
              ),
              Text(_windowInfo != null
                  ? "width: ${_windowInfo.frame.width}, height: ${_windowInfo.frame.height}"
                  : "")
            ],
          ),
        ),
      ),
    );
  }
実際にはこんな感じになります。ちなみに起動時に変更するには1つ処理を入れなければいけないようです。
ネットワーク接続
ネットワーク接続は様々な手法があります。今回はdioを使ってみました。
pubspec.yamlへの追加
.....
  dio:
DebugProfile.entitlements
ファイルアクセス同様にネットワークに接続するためにもDebugProfile.entitlementsに設定を追加する必要があります。
   <key>com.apple.security.network.client</key>
   <true/>
Getリクエスト
このサンプルではjson placeholderからjsonを取得し画像とタイトルを表示しています。
 var posts;
  Future<void> _fetch() async {
    try {
      Response response = await Dio().get(
          "https://jsonplaceholder.typicode.com/albums/1/photos?_limit=10");
      posts = SizedBox(
        height: 700,
        width: 700,
        child: GridView.builder(
            gridDelegate: SliverGridDelegateWithFixedCrossAxisCount(
              crossAxisCount: 2,
            ),
            itemBuilder: (BuildContext context, int index) {
              return _item(response.data[index]["title"],
                  response.data[index]["thumbnailUrl"]);
            },
            itemCount: response.data.length),
      );
      setState(() {});
    } catch (e) {
      log(e);
    }
  }

  @override
  Widget build(BuildContext context) {
    return Scaffold(
      body: Padding(
        padding: const EdgeInsets.all(16.0),
        child: Center(
          child: Column(
            mainAxisAlignment: MainAxisAlignment.start,
            children: <Widget>[
              FlatButton(
                color: Colors.blueGrey,
                child: Text(
                  "ダウンロード!",
                ),
                onPressed: () => _fetch(),
              ),
              const SizedBox(
                height: 32,
              ),
              posts ??
                  Text(
                    "何にもないよ!",
                  )
            ],
          ),
        ),
      ),
    );
  }

  Widget _item(String title, String url) {
    return SizedBox(
      height: 600,
      width: 400,
      child: Column(
        children: <Widget>[
          Text(
            title,
          ),
          Image.network(
            url,
            fit: BoxFit.contain,
          )
        ],
      ),
    );
  }
実際にはこんな感じになります。

データ永続化
公式のドキュメントによるとFlutterでデータを永続化方法には
- sqfliteを使う
- ファイルに書き出す
- shared preferenceを使う
があると書かれています。
shared_preferenceは現在macOSのみの対応ですが利用できます。使い方については、Store key-value data on diskやFlutterで値を保存したり取り出したりするを参考にできます。
今回、sqfliteはまだmacOSをサポートしていないので大規模データの保存には別の手段が必要と書こうとしたのですが、なんと2019/12/14にsqfliteがmacOSを実験的にサポートし始めたのでsqfliteも一応使えるようになりました。公式のサンプルをmacOSのアプリで試したのですが、Android/iOSと同様に扱うことができました。
sqfliteの使い方については公式やFlutterでローカルDBを扱う方法、SQLiteでのデータ永続化を参考にできます。
sqfliteのmacOS対応前はsembastを使ってデータの保存をしようとしていたのでそちらを紹介しようと思います。
sembast
sembastはドキュメントベースのNoSQLでDartVMでもFlutterでも動きます。100%Dartで書かれておりプラットフォームにも依存関係が無いためアプリ内に埋め込むことができます。Webで使われているIndexedDBやnedb等に似ており、それらにインスパイアされて作られたそうです。
こちらはsembastのドキュメントを元にデータベースの読み込み、データ書き込み、データ読み込みの例を紹介します。
//データベース読み込み
String dbPath = 'sample.db';
DatabaseFactory dbFactory = databaseFactoryIo;
_db = await dbFactory.openDatabase(dbPath);
_store = StoreRef<String, String>.main();

//キーを使ったデータ書き込み
await _store.record('text').put(_db, text);

//データの読み込み
_editedText = await _store.record('text').get(_db);
他にも、トランザクションの利用やデータベースの暗号化をすることができます。
まとめ
Flutter for Desktopは、macOS版がAlphaでWindows/LinuxがTechnical Previewと開発の途中です。ですが、macOSに関してはいろいろ試していても安定していました。プラグインも記事を書いている途中に追加されていたりするので今後のmacOS周りの発展に期待が持てそうです。
2019年末でもDesktop向けのフレームワークとしてはElectronがまだ強いですが、Desktop向けFlutterが同一がそれ以上の存在になる日を期待しています。
記事内で間違いなどあればご指摘いただけますと幸いです。
以下余談
本記事ではDesktop向けFlutterと呼んでますが公式ページやその他をみるとFlutter for DesktopやDesktop Embedding for Flutter、Desktop Support for Flutterのような複数の呼び名があります。今はどう呼んだら良いんでしょうね。。