目的
- laravel8のアプリのサービスでDBから値を取得する処理をリポジトリ層に分割する方法をまとめる
ご注意
- laravelではこのように絶対処理を分割して記載しないといけないと言うわけではありません。
- コントローラーから直接リポジトリを呼び出すような処理ももちろんあります。いい悪いではなくソースを書いている方の思想が違うためこのようなことがあります。
- プロジェクト毎のルールや、自分のプロダクトにあった記載方法でソースを書くことをおすすめします!
- また、今回記載する方法はレイヤードアーキテクチャーと呼ばるものらしいです。(先輩から教えていただいた)
実施環境
- ハードウェア環境
| 項目 | 情報 |
|---|---|
| OS | macOS Catalina(10.15.5) |
| ハードウェア | MacBook Pro (13-inch, 2020, Four Thunderbolt 3 ports) |
| プロセッサ | 2 GHz クアッドコアIntel Core i5 |
| メモリ | 32 GB 3733 MHz LPDDR4 |
| グラフィックス | Intel Iris Plus Graphics 1536 MB |
- ソフトウェア環境
| 項目 | 情報 | 備考 |
|---|---|---|
| PHP バージョン | 7.4.8 | Homebrewを用いてこちらの方法で導入→Mac HomebrewでPHPをインストールする |
| Laravel バージョン | 8.X | commposerを用いてこちらの方法で導入→Mac Laravelの環境構築を行う |
| MySQLバージョン | 8.0.19 for osx10.13 on x86_64 | Homwbrewを用いてこちらの方法で導入→Mac HomebrewでMySQLをインストールする |
前提条件
- 実施環境に近い環境が構築されていること。
- 下記記事の内容を実施済みであること。
前提情報
-
今回リポジトリに処理を分割するlaravel8のアプリではAuthを用いた認証機能が付与されており、ログインができること。(データ取得処理をリポジトリに分割する本来の目的では必要ない作業だが説明の都合上こちらを記載させていただいた。)
-
laravel8のアプリでの方法を紹介してるがルーティング情報の記載部分とusersテーブルのモデルファイルのデフォルト位置以外はlaravel7、laravel6でも方法は同じである。
-
筆者はMacのローカルに環境を構築し本記載の確認を行った。
-
Laravel8のアプリでユーザ情報をDBから取得する処理をサービスに分割する方法を記載する。
-
どんなことをするかを簡単に図に記載する。
-
ルーティング、コントローラ、サービス、ビューにはそれぞれ下記の記載がされており、ログイン後に
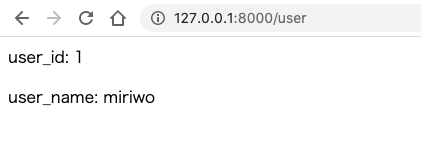
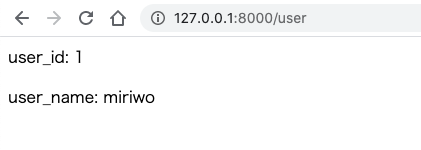
/userにアクセスするとログイン中のユーザIDとユーザ名が下記のように表示される。-
ルーティングファイル
アプリ名ディレクトリ/routes/web.php<?php use Illuminate\Support\Facades\Route; use App\Http\Controllers\ContentController; use App\Http\Controllers\UserController; /* |-------------------------------------------------------------------------- | Web Routes |-------------------------------------------------------------------------- | | Here is where you can register web routes for your application. These | routes are loaded by the RouteServiceProvider within a group which | contains the "web" middleware group. Now create something great! | */ Route::get('/', function () { return view('welcome'); }); Auth::routes(); Route::get('/user', [UserController::class, 'index'])->name('user.index'); -
コントローラファイル
アプリ名ディレクトリ/app/Http/Controllers/UserController.php<?php namespace App\Http\Controllers; use Illuminate\Http\Request; use App\Models\User; use Illuminate\Support\Facades\Auth; class UserController extends Controller { public function index() { $user_id = Auth::id(); $user_info = User::select('*')->find($user_id); return view('users.index', ['user_info' => $user_info]); } } -
サービスファイル
アプリ名ディレクトリ/app/Services/UserService.php<?php namespace App\Services; use App\Models\User; class UserService { /** * * @var User */ private $user; public function __construct(User $user) { $this->user = $user; } /** * ユーザIDからユーザ情報を取得する * * @param int $user_id * @return model */ public function getUserInfoByUserId($user_id) { return $user_info = User::select('*')->find($user_id); } } -
ビュー
アプリ名ディレクトリ/resources/views/users/index.blade.php<p>user_id: {{$user_info['id']}}</p> <p>user_name: {{$user_info['name']}}</p>
-
概要
- リポジトリファイルの作成と記載
- リポジトリインターフェイスファイルの作成と記載
- リポジトリの登録(バインド)
- サービスファイルの修正
- 確認
詳細
-
リポジトリファイルの作成と記載
-
アプリ名ディレクトリで下記コマンドを実行してリポジトリファイルとリポジトリインターフェイスファイルを格納するディレクトリを作成する。
$ mkdir app/Repositories -
アプリ名ディレクトリで下記コマンドを実行してリポジトリファイルを作成して開く。
$ vi app/Repositories/UserRepository.php -
UserRepository.phpファイルに下記の内容を記載する。
アプリ名ディレクトリ/app/Repositories/UserRepository.php<?php namespace App\Repositories; use App\Models\User; class UserRepository implements UserRepositoryInterface { /** * * @var User */ private $user; public function __construct(User $user) { $this->user = $user; } /** * ユーザIDからユーザ情報を取得する * * @param int $user_id * @return model */ public function getUserInfoByUserId($user_id) { return $user_info = User::select('*')->find($user_id); } }
-
-
リポジトリインターフェイスファイルの作成と記載
-
アプリ名ディレクトリで下記コマンドを実行してリポジトリインターフェイスファイルを作成して開く。
$ vi app/Repositories/UserRepositoryInterface.php -
UserRepositoryInterface.phpに下記の内容を記載する。
アプリ名ディレクトリ/app/Repositories/UserRepositoryInterface.php<?php namespace App\Repositories; interface UserRepositoryInterface { /** * ユーザIDからユーザ情報を取得する * * @param int $user_id * @return model */ public function getUserInfoByUserId($user_id); }
-
-
リポジトリの登録(バインド)
-
アプリ名ディレクトリで下記コマンドを実行してAppServiceProvider.phpファイルを開く。
$ vi app/Providers/AppServiceProvider.php -
下記のように修正してリポジトリを登録する。
app/Providers/AppServiceProvider.php<?php namespace App\Providers; use Illuminate\Support\ServiceProvider; class AppServiceProvider extends ServiceProvider { /** * Register any application services. * * @return void */ public function register() { // 下記を追記 $this->app->bind( \App\Repositories\UserRepositoryInterface::class, \App\Repositories\UserRepository::class ); // 上記までを追記 } /** * Bootstrap any application services. * * @return void */ public function boot() { // } }
-
-
サービスファイルの修正
-
アプリ名ディレクトリで下記コマンドを実行してサービスファイルを開く。
$ vi app/Services/UserService.php -
下記のように内容を修正する。
アプリ名ディレクトリ/app/Services/UserService.php<?php namespace App\Services; // 下記を修正 use App\Repositories\UserRepositoryInterface; class UserService { /** * * @var User */ // 下記を修正 private $userRepository; // 下記を修正 public function __construct(UserRepositoryInterface $userRepository) { // 下記を修正 $this->userRepository = $userRepository; } /** * ユーザIDからユーザ情報を取得する * * @param int $user_id * @return model */ public function getUserInfoByUserId($user_id) { // 下記を修正 return $this->userRepository->getUserInfoByUserId($user_id); } }
-
-
確認
-
ローカルサーバを起動しAuthで実装した認証機能にログイン後、下記にアクセスする。
-
下記のように表示されることを確認する。
-


