目次
- Macのローカルで作成したLaravelアプリで画像ファイルアップロードしたものを、zip化してダウンロードするボタンを設置する方法をまとめる
実施環境
- ハードウェア環境
| 項目 | 情報 |
|---|---|
| OS | macOS Catalina(10.15.5) |
| ハードウェア | MacBook Pro (13-inch, 2020, Four Thunderbolt 3 ports) |
| プロセッサ | 2 GHz クアッドコアIntel Core i5 |
| メモリ | 32 GB 3733 MHz LPDDR4 |
| グラフィックス | Intel Iris Plus Graphics 1536 MB |
- ソフトウェア環境
| 項目 | 情報 | 備考 |
|---|---|---|
| PHP バージョン | 7.4.8 | Homebrewを用いてこちらの方法で導入→Mac HomebrewでPHPをインストールする |
| Laravel バージョン | 6.X | commposerを用いてこちらの方法で導入→Mac Laravelの環境構築を行う |
| MySQLバージョン | 8.0.19 for osx10.13 on x86_64 | Homwbrewを用いてこちらの方法で導入→Mac HomebrewでMySQLをインストールする |
前提条件
- 下記記事の作業が実行できていること
前提情報
- 本記事はMacのローカルで作成されたLaravelアプリから
アプリ名ディレクトリ/storage/app/public/imagesにファイルをアップロードする機能を作る。 -
アプリ名ディレクトリ/storage/app/public/imagesにアップロードされたファイルを表示するページと画像の詳細ページと画像表示ページを作成する。下記に作成するページのURLを記載する。(画像表示ページとは画像をブラウザ内の全画面で表示するページのことを指す)- 一覧ページののURL
/output - 詳細ページのURL
/detail/imagesテーブルのid - 表示ページのURL
/display/imagesテーブルのid
- 一覧ページののURL
- 本記事の作業完了したソースは下記にアップしてある。
概要
- ルーティングファイルの記載
- コントローラファイルの記載
- ビューファイルの作成と記載
- 確認
詳細
- 下記の説明で実行するコマンドはすべてMacのローカルのターミナルで実行するものとし、実行場所はアプリ名ディレクトリであるlaravel6_imageディレクトリとする。
- ルーティングファイルの記載(本作業完了後のソースコードはこちら→https://github.com/miriwo0104/laravel6_image/tree/image_zip_download_local/01_route)
-
下記コマンドを実行してルーティングファイルを開く。
$ vi routes/web.php -
下記のルーティング情報を記載する。
laravel6_image/routes/web.php// zipダウンロード用 Route::post('/zip_download', 'ImageController@zipDownload')->name('zipDownload'); -
記載後のルーティングファイルの全内容を下記に記載する。
laravel6_image/routes/web.php<?php /* |-------------------------------------------------------------------------- | Web Routes |-------------------------------------------------------------------------- | | Here is where you can register web routes for your application. These | routes are loaded by the RouteServiceProvider within a group which | contains the "web" middleware group. Now create something great! | */ Route::get('/', function () { return view('welcome'); }); // 画像アップロードページ用 Route::get('/input', 'ImageController@input')->name('input'); // 画像アップロード処理用 Route::post('/upload', 'ImageController@upload')->name('upload'); // 画像一覧ページ用 Route::get('/output', 'ImageController@output')->name('output'); // 画像詳細ページ用 Route::get('/detail/{images_id}', 'ImageController@detail')->name('detail'); // 画像表示ページ用 Route::get('/display/{images_id}', 'ImageController@display')->name('display'); // ダウンロード用 Route::post('/download', 'ImageController@download')->name('download'); // 下記を追記 // zipダウンロード用 Route::post('/zip_download', 'ImageController@zipDownload')->name('zipDownload');
-
- コントローラファイルの記載(本作業完了後のソースコードはこちら→https://github.com/miriwo0104/laravel6_image/tree/image_zip_download_local/02_controller)
-
下記コマンドを実行してzipの一時ファイルが格納されるディレクトリを作成する。
$ mkdir storage/app/public/zip_tmp -
下記コマンドを実行して作成したコントローラファイルを開く。
$ vi app/Http/Controllers/ImageController.php -
下記のようにコントローラファイルの内容を追記修正する。追記修正後のコントローラファイルの全体の内容を下記に記載する。
laravel6_image/app/Http/Controllers/ImageController.php<?php namespace App\Http\Controllers; use Illuminate\Http\Request; use App\Models\Image; use Illuminate\Support\Facades\Storage; // 下記を追記 use ZipArchive; use Illuminate\Support\Str; // 上記までを追記 class ImageController extends Controller { public function input() { return view('images/input'); } public function upload(Request $request) { $this->validate($request, [ 'file' => [ // 空でないこと 'required', // アップロードされたファイルであること 'file', // 画像ファイルであること 'image', // MIMEタイプを指定 'mimes:jpeg,png', ] ]); if ($request->file('file')->isValid([])) { $file_name= $request->file('file')->getClientOriginalName(); // オリジナルファイルのファイル名の取得 $file_path= Storage::putFile('/images', $request->file('file'), 'public'); // ファイルのアップロードとアップロードパスの取得 $image_info = new Image(); $image_info->file_path = $file_path; $image_info->file_name = $file_name; $image_info->save(); return redirect('/'); }else{ return redirect(route('input')); } } public function output() { $image_infos = Image::select('*')->get(); return view('images.output', ['image_infos' => $image_infos]); } public function detail($image_id) { $image_info = Image::find($image_id); return view('images.detail', ['image_info' => $image_info]); } public function display($image_id) { $image_info = Image::find($image_id); return Storage::response($image_info['file_path'], $image_info['file_name']); } public function download(Request $request) { $image_info = Image::find($request['id']); return Storage::download($image_info['file_path'], $image_info['file_name']); } // 下記を追記 public function zipDownload(Request $request) { $image_info = Image::find($request['id']); $zip_tmp_file_path = Storage::disk('local')->path('zip_tmp/'); $zip_tmp_file_name = Str::random(40) . '.zip'; $zip_tmp_file_full_path = $zip_tmp_file_path . $zip_tmp_file_name; $zip = new ZipArchive(); $zip->open($zip_tmp_file_full_path, ZipArchive::CREATE); $zip->addFromString($image_info['file_name'], Storage::get($image_info['file_path'])); $zip->close(); ob_end_clean(); $headers = ['Content-Type' => 'application/zip']; return response()->download($zip_tmp_file_full_path, 'image.zip', $headers)->deleteFileAfterSend(true); } // 上記までを追記 }
-
- ビューファイルの作成と記載(本作業完了後のソースコードはこちら→https://github.com/miriwo0104/laravel6_image/tree/image_zip_download_local/03_view)
-
下記コマンドを実行してビューファイルを作成して開く。
$ vi resources/views/images/output.blade.php -
下記の内容をビューファイルに記載する。
laravel6_image/resources/views/images/input.blade.php<h1>アップロードされた画像一覧</h1> @foreach ($image_infos as $image_info) <hr> <img src="{{asset('storage/' . $image_info['file_path'])}}" alt="{{asset('storage/' . $image_info['file_path'])}}"> <br> <a href="{{route('detail', ['images_id' => $image_info['id']])}}"> <button type="submit">詳細</button> </a> <br> <a href="{{route('display', ['images_id' => $image_info['id']])}}"> <button type="submit">表示</button> </a> <br> <form action="{{route('download')}}" method="post"> @csrf <input type="hidden" name="id" value="{{$image_info['id']}}"> <button type="submit">ダウンロード</button> </form> {{-- 下記を追記 --}} <br> <form action="{{route('zipDownload')}}" method="post"> @csrf <input type="hidden" name="id" value="{{$image_info['id']}}"> <button type="submit">zipダウンロード</button> </form> {{-- 上記までを追記 --}} @endforeach -
下記コマンドを実行してビューファイルを作成して開く。
$ vi resources/views/images/detail.blade.php -
下記の内容をビューファイルに記載する。
laravel6_image/resources/views/images/detail.blade.php<h1>画像の詳細</h1> <img src="{{asset('storage/' . $image_info['file_path'])}}" alt="{{asset('storage/' . $image_info['file_path'])}}"> <br> <a href="{{route('display', ['images_id' => $image_info['id']])}}"> <button type="submit">表示</button> </a> <br> <form action="{{route('download')}}" method="post"> @csrf <input type="hidden" name="id" value="{{$image_info['id']}}"> <button type="submit">ダウンロード</button> </form> {{-- 下記を追記 --}} <br> <form action="{{route('zipDownload')}}" method="post"> @csrf <input type="hidden" name="id" value="{{$image_info['id']}}"> <button type="submit">zipダウンロード</button> </form> {{-- 上記までを追記 --}} <ul> <li>ID: {{$image_info['id']}}</li> <li>アップロード日: {{$image_info['created_at']}}</li> </ul>
-
- 確認
-
下記コマンドを実行してローカルサーバを起動する。
$ php artisan serve -
下記にアクセスする。
-
登録してある画像が表示されることを確認する。

-
「zipダウンロード」をクリックする。

-
image.zipがダウンロードされることを確認する。
-
画像下部の「詳細」をクリックする。

-
「zipダウンロード」をクリックする。
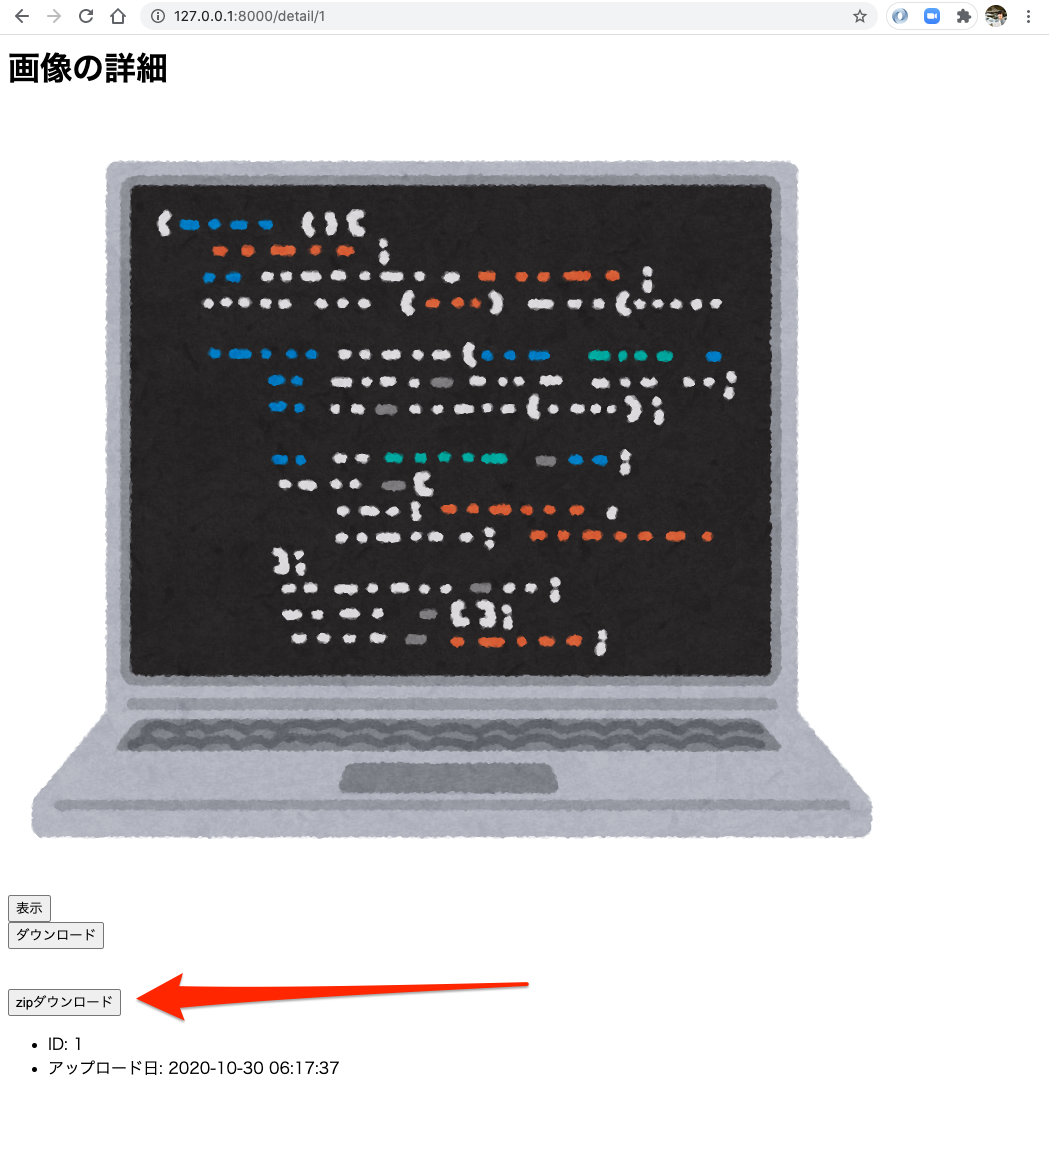
-
image.zipがダウンロードされることを確認する。
-
image.zipを回答し画像がzip化されていることを確認する。
-