目的
- Laravel6でチェックボックスの実装とtrue falseを受け取りそれに応じてデータベースのカラムに0か1を格納する
実施環境
- ハードウェア環境
| 項目 | 情報 |
|---|---|
| OS | macOS Catalina(10.15.5) |
| ハードウェア | MacBook Pro (13-inch, 2020, Four Thunderbolt 3 ports) |
| プロセッサ | 2 GHz クアッドコアIntel Core i5 |
| メモリ | 32 GB 3733 MHz LPDDR4 |
| グラフィックス | Intel Iris Plus Graphics 1536 MB |
- ソフトウェア環境
| 項目 | 情報 | 備考 |
|---|---|---|
| PHP バージョン | 7.4.8 | Homebrewを用いてこちらの方法で導入→Mac HomebrewでPHPをインストールする |
| Laravel バージョン | 6.X | commposerを用いてこちらの方法で導入→Mac Laravelの環境構築を行う |
| MySQLバージョン | 8.0.19 for osx10.13 on x86_64 | Homwbrewを用いてこちらの方法で導入→Mac HomebrewでMySQLをインストールする |
前提条件
- 実施環境に近い環境が構築されていること。(筆者は直接Macに環境を構築しているがLaravel6の動作環境なら基本本方法で確認可能である。)
前提情報
- Authを用いた認証機能があるLaravel6アプリがあること。
- usersテーブルに1つ以上のデータレコードが存在すること。
- Larvel6でチェックボックスを実装する。
- そのチェックボックスがチェックされているかいないかによってDBのusersテーブルのcheck_flagカラム」に格納する値を変更する。
- 「check_flagカラム」はチェックされていないと0、チェックボックスにチェックされていると1が入る。
- 「check_flagカラム」に1が入っていた時にチェックボックス入力ページのチェックボックスは最初からチェックがついた状態にする。
概要
- カラム作成
- ルーティング情報の記載
- コントローラファイルの作成と記載
- ビューファイルの作成と記載
- 確認
詳細
- カラム作成
-
アプリ名ディレクトリで下記コマンドを実行してマイグレーションファイルを作成する。
$ php artisan make:migrate add_check_flag_columns_to_users_table --table=users -
作成されたマイグレーションファイルを開き下記のように記載する。下記にはマイグレーションファイルの全内容を記載する。
アプリ名ディレクトリ/database/migrations/YYYY_MM_DD_HHMMSS_add_check_flag_columns_to_users_table.php<?php use Illuminate\Database\Migrations\Migration; use Illuminate\Database\Schema\Blueprint; use Illuminate\Support\Facades\Schema; class AddCheckFlagColumnsToUsersTable extends Migration { /** * Run the migrations. * * @return void */ public function up() { Schema::table('users', function (Blueprint $table) { // $table->tinyInteger('check_flag')->default(0)->after('password'); }); } /** * Reverse the migrations. * * @return void */ public function down() { Schema::table('users', function (Blueprint $table) { // $table->dropColumn('check_flag'); }); } }
-
- ルーティング情報の記載
-
ルーティングファイルを開き、下記の3行を追記する。
アプリ名ディレクトリ/routes/web.phpRoute::get('/input', 'TestController@input')->name('input'); Route::post('/check_register', 'TestController@register')->name('check.register'); Route::get('/output', 'TestController@output')->name('output');
-
- コントローラファイルの作成と記載
-
アプリ名ディレクトリで下記コマンドを実行してコントローラファイルを作成する。
$ php artisan make:controller TestController -
作成されたファイルに下記の内容を記載する。下記にはコントローラファイルの全内容を記載する。
アプリ名ディレクトリ/app/Http/Controllers/TestController.php<?php namespace App\Http\Controllers; use Illuminate\Http\Request; use App\User; class TestController extends Controller { public function input() { $user_infos = User::select('*')->get(); return view('tests.input', ['user_infos' => $user_infos]); } public function register(Request $request) { $input_data = $request->all(); foreach ($input_data['user_id'] as $key => $value) { $user_info = User::select('*')->find($key); $user_info->check_flag = $value; $user_info->save(); } Log::info($request); return redirect(route('output')); } public function output() { $user_infos = User::select('*')->get(); return view('tests.output', ['user_infos' => $user_infos]); } }
-
- ビューファイルの作成と記載
-
アプリ名ディレクトリで下記コマンドを実行してビューファイル格納用のディレクトリを作成する。
$ mkdir resources/views/tests -
input.blade.phpファイルとoutput.blade.phpファイルを
アプリ名ディレクトリ/resources/views/tests直下に作成する。 -
先に作成した2つのビューファイルに下記の内容を記載する。
-
input.blade.php
input <form action="{{ route('check.register') }}" method="post"> @csrf <table border="1"> <tr> <th>チェックボックス</th> <th>id</th> <th>name</th> <th>email</th> </tr> @foreach ($user_infos as $user_info) <tr> <input type="hidden" name="user_id[{{ $user_info['id'] }}]" value="0"> @if ($user_info['check_flag'] === 1) <td><input type="checkbox" checked="checked" name="user_id[{{ $user_info['id'] }}]" value="1"></td> @else <td><input type="checkbox" name="user_id[{{ $user_info['id'] }}]" value="1"></td> @endif <td>{{ $user_info['id'] }}</td> <td>{{ $user_info['name'] }}</td> <td>{{ $user_info['email'] }}</td> </tr> @endforeach </table> <button type="submit">保存</button> </form> -
output.blade.php
output
<table border="1">
    <tr>
        <th>チェックボックス</th>
        <th>id</th>
        <th>name</th>
        <th>email</th>
    </tr>
    @foreach ($user_infos as $user_info)
    <tr>
        @if ($user_info['check_flag'] === 1)
        <td><input type="checkbox" checked="checked" name="user_id[]" value="{{ $user_info['id'] }}"></td>
        @else
        <td><input type="checkbox" name="user_id[]" value="{{ $user_info['id'] }}"></td>
        @endif
        <td>{{ $user_info['id'] }}</td>
        <td>{{ $user_info['name'] }}</td>
        <td>{{ $user_info['email'] }}</td>
    </tr>
    @endforeach
</table>
-
-
- 確認
-
ローカルサーバを起動し下記にアクセスする。
-
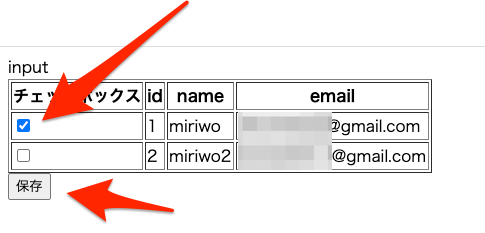
テーブル状にusersテーブルのデータが表示されるので任意のレコードのチェックボックスにチェックをいれて「保存」をクリックする。
-
outputの画面に移動する。
-
再度下記にアクセスする。
-
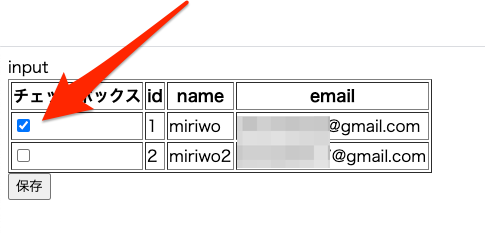
先程チェックを入れて保存したカラムのチェックボックスはデフォルトでチェックが入った状態になっている。
-

