何番煎じかわかりませんが……
上海Espressif社製のWiFiチップESP8266EXと32MbitのEEPROM、アンテナをモジュール化したESP-WROOM-02(以下Wifiモジュール)がいろいろなところで販売されています。
今回は秋月で買えるモジュールと周辺部品を使い、Arduino IDEの環境でプログラムできるようにセットアップしていきます。
必要なもの
- ESP-WROOM-02 DIP化キット
- 超小型USBシリアル変換モジュール
- カーボン抵抗(炭素皮膜抵抗) 1/4W 10kΩ (100本入)
- 3.3Vレギュレータ
- 電源アダプタ(5Vとか12V)
- ブレッドボード用DCジャックDIP化キット
- ブレッドボード(大きめのものが使いやすいです)
- タクトスイッチ
- あとはLチカ用にLEDとか?
ハードウェアのセットアップ
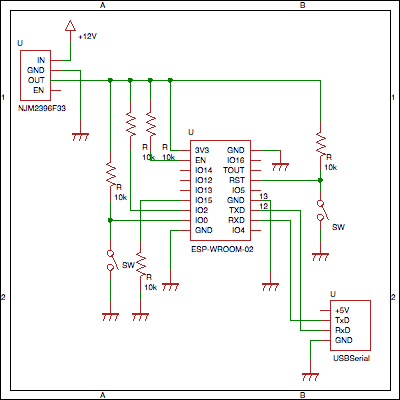
Wifiモジュールにピンヘッダをハンダ付けし、ブレッドボード上でこのように配線します。
RSTに繋がるSWはリセットスイッチ、IO0のSWはSerial Download ModeとFlash Boot Modeの切り替え用です。IO0のSWを押しながらリセットスイッチを押すとFlash Boot Modeで起動します。
電源はUSBから供給できる電流だと足りないらしいので今回は別電源を使っています。

ソフトウェアのセットアップ
ソフトウェア側では、Arduino IDEのボードライブラリの中にESP8266 Arduino Core Libraryを導入します。
まずArduinoの公式サイトからArduino IDEをダウンロード・インストールします。
Arduino - Software
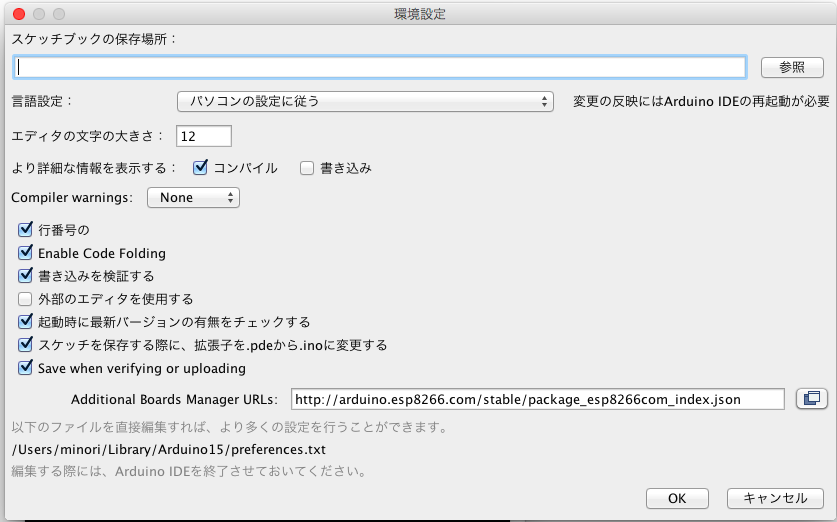
Arduino IDEを起動し、「環境設定(Preferences)」メニューから設定画面を開き、"Additional Board Manager URL:"に以下のURLをコピペし、OKで閉じます。
http://arduino.esp8266.com/stable/package_esp8266com_index.json

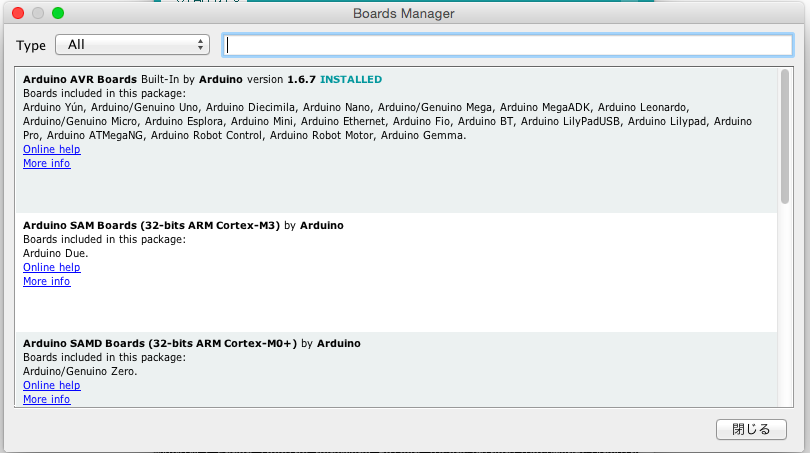
次に「ツール」メニューから「ボード」、「Boards Manager」を開きます。
ボード情報のダウンロードが終わると、"ESP8266 by ESP8266 Community"という項目が出るのでそこを選択して"Install"。

「ボード」メニューを開くと"ESP8266 Modules"の項目が増えているはずです。これでArduino Coreの導入は完了です。
ATコマンドで操作してみる / Lチカさせてみる
ここからは飽きた調べるとすぐに出てくるので割愛します。
注意すべきなのは、今回の配線ではIO0 SWを押しながらRST SWを押すとUART Downlaod Mode、RST SWだけ押すとFlash Boot Modeで起動することです。
ATコマンドで起動する場合はFlash Boot Mode, Arduino IDEからスケッチを書き込む場合はUART Download Modeで起動しないといけないので気をつけてください。