【注意】
「結局ダメでした」という内容ですので、期待せずに読んでください。
はじめに
MicrosoftのNNI(Neural Network Intelligence)を使って、Kerasのパラメータを調整してみます。
NNI(Neural Network Intelligence)とは
詳しくはこちらを見ていただくとして、ざっくり説明すると、ユーザーが自動的に機械学習(AutoML)を試行するためのツールキットになります。
通常、機械学習を行うとき、ハイパーパラメータを自分で少しづつ調整するのですが、それを自動的にやってしまおうというのがこいつです。
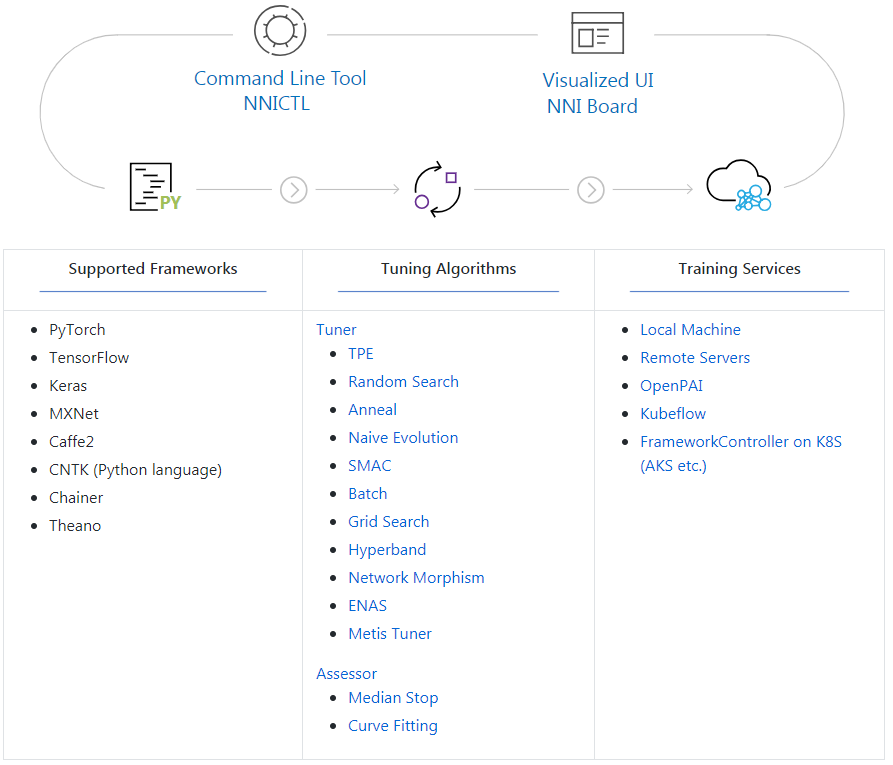
具体的には、調整したいコードを少しだけ修正し、調整するハイパーパラメータの種類や値の範囲をJSONで記述し、YAMLでどう実行するかを書いてGO!って感じです。
準備
NNIを使ってパラメータ調整を行うための準備をします。
OSがWindowsですので、Anaconda等で環境を用意しておきます。
(必要なモジュールのインストールは省略)
NNIのインストール
pipでNNIをインストールします。
$ pip install --upgrade nni
(途中省略)
Successfully built pyhdfs json-tricks networkx future
Installing collected packages: networkx, pymongo, future, tqdm, hyperopt, covera
ge, json-tricks, nni-sdk, urllib3, idna, chardet, requests, simplejson, pyhdfs,
contextlib2, schema, psutil, nni
Successfully installed chardet-3.0.4 contextlib2-0.5.5 coverage-4.5.3 future-0.1
7.1 hyperopt-0.1.2 idna-2.8 json-tricks-3.13.1 networkx-2.2 nni-0.3.4 nni-sdk-0.
5.1 psutil-5.6.1 pyhdfs-0.2.1 pymongo-3.7.2 requests-2.21.0 schema-0.7.0 simplej
son-3.16.0 tqdm-4.31.1 urllib3-1.24.1
結構な数のモジュールをインストールしてくれます。
必要であれば、GitHubからソースやサンプルを落としてください。
オリジナルコード
今回の対象となるMNISTを使った画像識別のプログラム(CNN版)をこちらから持ってきます。
フレームワークはKerasです。
'''Trains a simple convnet on the MNIST dataset.

Gets to 99.25% test accuracy after 12 epochs
(there is still a lot of margin for parameter tuning).
16 seconds per epoch on a GRID K520 GPU.
'''

from __future__ import print_function
import keras
from keras.datasets import mnist
from keras.models import Sequential
from keras.layers import Dense, Dropout, Flatten
from keras.layers import Conv2D, MaxPooling2D
from keras import backend as K

batch_size = 128
num_classes = 10
epochs = 12

# input image dimensions
img_rows, img_cols = 28, 28

# the data, split between train and test sets
(x_train, y_train), (x_test, y_test) = mnist.load_data()

if K.image_data_format() == 'channels_first':
    x_train = x_train.reshape(x_train.shape[0], 1, img_rows, img_cols)
    x_test = x_test.reshape(x_test.shape[0], 1, img_rows, img_cols)
    input_shape = (1, img_rows, img_cols)
else:
    x_train = x_train.reshape(x_train.shape[0], img_rows, img_cols, 1)
    x_test = x_test.reshape(x_test.shape[0], img_rows, img_cols, 1)
    input_shape = (img_rows, img_cols, 1)

x_train = x_train.astype('float32')
x_test = x_test.astype('float32')
x_train /= 255
x_test /= 255
print('x_train shape:', x_train.shape)
print(x_train.shape[0], 'train samples')
print(x_test.shape[0], 'test samples')

# convert class vectors to binary class matrices
y_train = keras.utils.to_categorical(y_train, num_classes)
y_test = keras.utils.to_categorical(y_test, num_classes)

model = Sequential()
model.add(Conv2D(32, kernel_size=(3, 3),
                 activation='relu',
                 input_shape=input_shape))
model.add(Conv2D(64, (3, 3), activation='relu'))
model.add(MaxPooling2D(pool_size=(2, 2)))
model.add(Dropout(0.25))
model.add(Flatten())
model.add(Dense(128, activation='relu'))
model.add(Dropout(0.5))
model.add(Dense(num_classes, activation='softmax'))

model.compile(loss=keras.losses.categorical_crossentropy,
              optimizer=keras.optimizers.Adadelta(),
              metrics=['accuracy'])

model.fit(x_train, y_train,
          batch_size=batch_size,
          epochs=epochs,
          verbose=1,
          validation_data=(x_test, y_test))
score = model.evaluate(x_test, y_test, verbose=0)
print('Test loss:', score[0])
print('Test accuracy:', score[1])
動かすとこんな感じになります。
$ python mnist_cnn.py
(途中省略)
59904/60000 [============================>.] - ETA: 0s - loss: 0.0266 - acc: 0.9
60000/60000 [==============================] - 117s 2ms/step - loss: 0.0266 - acc: 0.9916 - val_loss: 0.0272 - val_acc: 0.9919
Test loss: 0.027202984082238982
Test accuracy: 0.9919
試してみる
では早速NNIを使ってみましょう。
今回は、最適化アルゴリズムと学習率を調整します。
最適化アルゴリズムは「Adam」と「SDG」を切り替えます。
学習率は、「0.0001」「0.001」「0.002」「0.005」「0.01」を切り替えます。
コードの修正
まずは、以下のコードを追加します。
import logging
import nni

LOG = logging.getLogger('mnist_keras')
当然のごとく、NNIをインポートしないと始まりません。
また、ログの準備をしておきます。
# get parameters from tuner
RECEIVED_PARAMS = nni.get_next_parameter()
LOG.debug(RECEIVED_PARAMS)
PARAMS = {
        'optimizer': 'Adam',
        'learning_rate': 0.001
    }
PARAMS.update(RECEIVED_PARAMS)
次に、NNIからその時のハイパーパラメータの値を取得します。
「PARAMS」にデフォルト値を入れて宣言しておき、そこを毎回更新するイメージとなります。
さらに、元のソースでは
model.compile(loss=keras.losses.categorical_crossentropy,
              optimizer=keras.optimizers.Adadelta(),
              metrics=['accuracy'])
だったところを、外から変更できるように、以下のように書き換えます。
if PARAMS['optimizer'] == 'Adam':
    optimizer = keras.optimizers.Adam(lr=PARAMS['learning_rate'])
else:
    optimizer = keras.optimizers.SGD(lr=PARAMS['learning_rate'], momentum=0.9)
model.compile(loss=keras.losses.categorical_crossentropy,
              optimizer=optimizer,
              metrics=['accuracy'])
ここで、先程設定した「PARAMS」の値を使用します。
また、学習時に途中経過を収集する処理を追加します。
具体的には、model.fit()の前にcallbackで呼び出すクラスを用意し、epochごとに途中経過として「val_acc」の値を保存します。
class SendMetrics(keras.callbacks.Callback):
    '''
    Keras callback to send metrics to NNI framework
    '''
    def on_epoch_end(self, epoch, logs={}):
        '''
        Run on end of each epoch
        '''
        LOG.debug(logs)
        nni.report_intermediate_result(logs["val_acc"])
そして、model.fit()を修正して呼び出します。
model.fit(x_train, y_train,
          batch_size=batch_size,
          epochs=epochs,
          verbose=1,
          validation_data=(x_test, y_test),
          callbacks=[SendMetrics()])
一番最後に、model.evaluate()から正解率の値を取得して保存するように書き換えます。
_, acc = model.evaluate(x_test, y_test, verbose=0)
LOG.debug('Final result is: %d', acc)
nni.report_final_result(acc)
設定ファイル作成
次に、ハイパーパラメータにどういった値を指定して実行するかを設定します。
指定するファイルはJSON形式で記述します。
{
    "optimizer":{"_type":"choice","_value":["Adam", "SGD"]},
    "learning_rate":{"_type":"choice","_value":[0.0001, 0.001, 0.002, 0.005, 0.01]}
}
今回は、値を「選ぶ」ので「_type」が「choice」となります。
(別の指定方法は、また別の機会に)
さらに、これらpythonコードとハイパーパラメータファイルを結びつけ、実行するためのスクリプトをYAML形式のファイルに記述します。
authorName: default
experimentName: example_mnist-keras
trialConcurrency: 1
maxExecDuration: 1h
maxTrialNum: 10
# choice: local, remote, pai
trainingServicePlatform: local
searchSpacePath: search_space.json
# choice: true, false
useAnnotation: false
tuner:
  #choice: TPE, Random, Anneal, Evolution, BatchTuner, MetisTuner
  #SMAC (SMAC should be installed through nnictl)
  builtinTunerName: TPE
  classArgs:
    #choice: maximize, minimize
    optimize_mode: maximize
trial:
  command: python3 mnist-keras.py
  codeDir: .
  gpuNum: 0
とりあえず、何が書いてあるのかは気にしないでおきます。
なお、各ファイルには、このyamlファイルからの相対パスを記述します。
(「codeDir」を修正してもOK)
実行
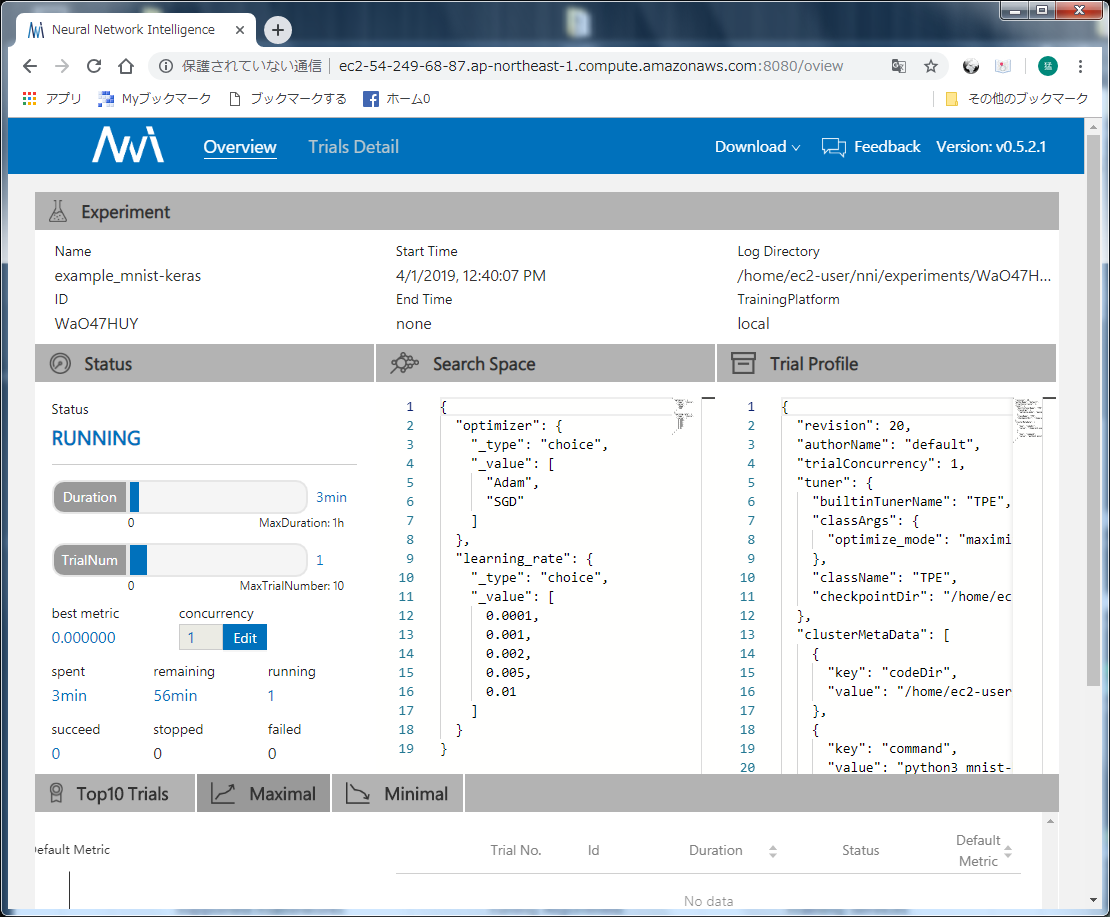
では動かしてみましょう。
$ nnictl create --config config.yml
(途中省略)
KeyError: 'HOME'
ポカーン...
そうです。実は私の環境はWindowsなのです。
$ set HOME=%USERPROFILE%
環境変数を設定して、再実行!
$ nnictl create --config config.yml
(途中省略)
AttributeError: module 'os' has no attribute 'geteuid'

ここでくじけました...(涙)
修正後のソースコード
linux環境に持っていけば、取りあえず動くと思います。
※AWS EC2(Deep Learning AMI (Amazon Linux) Version 22.0)で確認済み
(結構メモリを食います)
'''Trains a simple convnet on the MNIST dataset.

Gets to 99.25% test accuracy after 12 epochs
(there is still a lot of margin for parameter tuning).
16 seconds per epoch on a GRID K520 GPU.
'''

import keras
from keras.datasets import mnist
from keras.models import Sequential
from keras.layers import Dense, Dropout, Flatten
from keras.layers import Conv2D, MaxPooling2D
from keras import backend as K

import logging
import nni

LOG = logging.getLogger('mnist_keras')

# get parameters from tuner
RECEIVED_PARAMS = nni.get_next_parameter()
LOG.debug(RECEIVED_PARAMS)
PARAMS = {
        'optimizer': 'Adam',
        'learning_rate': 0.001
    }
PARAMS.update(RECEIVED_PARAMS)

batch_size = 128
num_classes = 10
epochs = 12

# input image dimensions
img_rows, img_cols = 28, 28

# the data, split between train and test sets
(x_train, y_train), (x_test, y_test) = mnist.load_data()

if K.image_data_format() == 'channels_first':
    x_train = x_train.reshape(x_train.shape[0], 1, img_rows, img_cols)
    x_test = x_test.reshape(x_test.shape[0], 1, img_rows, img_cols)
    input_shape = (1, img_rows, img_cols)
else:
    x_train = x_train.reshape(x_train.shape[0], img_rows, img_cols, 1)
    x_test = x_test.reshape(x_test.shape[0], img_rows, img_cols, 1)
    input_shape = (img_rows, img_cols, 1)

x_train = x_train.astype('float32')
x_test = x_test.astype('float32')
x_train /= 255
x_test /= 255

LOG.debug('x_train shape: %s', (x_train.shape,))
LOG.debug('x_test shape: %s', (x_test.shape,))

# convert class vectors to binary class matrices
y_train = keras.utils.to_categorical(y_train, num_classes)
y_test = keras.utils.to_categorical(y_test, num_classes)

model = Sequential()
model.add(Conv2D(32, kernel_size=(3, 3),
                 activation='relu',
                 input_shape=input_shape))
model.add(Conv2D(64, (3, 3), activation='relu'))
model.add(MaxPooling2D(pool_size=(2, 2)))
model.add(Dropout(0.25))
model.add(Flatten())
model.add(Dense(128, activation='relu'))
model.add(Dropout(0.5))
model.add(Dense(num_classes, activation='softmax'))

if PARAMS['optimizer'] == 'Adam':
    optimizer = keras.optimizers.Adam(lr=PARAMS['learning_rate'])
else:
    optimizer = keras.optimizers.SGD(lr=PARAMS['learning_rate'], momentum=0.9)
model.compile(loss=keras.losses.categorical_crossentropy,
              optimizer=optimizer,
              metrics=['accuracy'])

class SendMetrics(keras.callbacks.Callback):
    '''
    Keras callback to send metrics to NNI framework
    '''
    def on_epoch_end(self, epoch, logs={}):
        '''
        Run on end of each epoch
        '''
        LOG.debug(logs)
        nni.report_intermediate_result(logs["val_acc"])

model.fit(x_train, y_train,
          batch_size=batch_size,
          epochs=epochs,
          verbose=1,
          validation_data=(x_test, y_test),
          callbacks=[SendMetrics()])
_, acc = model.evaluate(x_test, y_test, verbose=0)
LOG.debug('Final result is: %d', acc)
nni.report_final_result(acc)
ちなみに、NNIのサンプルに、ちゃんとKerasでMNISTを行うコードがあるので、そちらのコードのほうがキレイです。
感想
linux環境でなくては動かないようですので、素直にlinuxでやりましょう。
(Microsoftのくせに...;_;)
【補足】
ちゃんとここに書いてあります。
・We support Linux and MacOS in current stage, Ubuntu 16.04 or higher, along with MacOS 10.14.1 are tested and supported. Simply run the following pip install in an environment that has python >= 3.5.
よく読みましょう >私
参考URL