せっかくこちらにあるように、Microsoft Azure Custom Visionで分類できるようになったので、Prediction APIを利用して識別を試してみます。
サンプルコード
こちらの公式サイトの一番下の方に、以下のようなサンプルコードがあります。
(Python 2.7と3.2のサンプルになります)
########### Python 2.7 #############
import httplib, urllib, base64

headers = {
    # Request headers
    'Prediction-Key': '',
    'Content-Type': 'multipart/form-data',
    'Prediction-key': '{subscription key}',
}

params = urllib.urlencode({
    # Request parameters
    'iterationId': '{string}',
    'application': '{string}',
})

try:
    conn = httplib.HTTPSConnection('southcentralus.api.cognitive.microsoft.com')
    conn.request("POST", "/customvision/v2.0/Prediction/{projectId}/image?%s" % params, "{body}", headers)
    response = conn.getresponse()
    data = response.read()
    print(data)
    conn.close()
except Exception as e:
    print("[Errno {0}] {1}".format(e.errno, e.strerror))

####################################

########### Python 3.2 #############
import http.client, urllib.request, urllib.parse, urllib.error, base64

headers = {
    # Request headers
    'Prediction-Key': '',
    'Content-Type': 'multipart/form-data',
    'Prediction-key': '{subscription key}',
}

params = urllib.parse.urlencode({
    # Request parameters
    'iterationId': '{string}',
    'application': '{string}',
})

try:
    conn = http.client.HTTPSConnection('southcentralus.api.cognitive.microsoft.com')
    conn.request("POST", "/customvision/v2.0/Prediction/{projectId}/image?%s" % params, "{body}", headers)
    response = conn.getresponse()
    data = response.read()
    print(data)
    conn.close()
except Exception as e:
    print("[Errno {0}] {1}".format(e.errno, e.strerror))

####################################
しかしこれはあまり参考にならないので使いません。
(もっと簡単に実装できます)
書き直し
まずimportは以下の2つだけ行います。
import requests
import json
次にリクエストを投げるところを作成します。
※以下、公開できないGUID部分は全て「xxxx」で隠しています
url="https://southcentralus.api.cognitive.microsoft.com/customvision/v2.0/Prediction/xxxxxxxx-xxxx-xxxx-xxxx-xxxxxxxxxxxx/image?iterationId=xxxxxxxx-xxxx-xxxx-xxxx-xxxxxxxxxxxx"
headers={'content-type':'application/octet-stream','Prediction-Key':'xxxxxxxxxxxxxxxxxxxxxxxxxxxxxxxx'}
response =requests.post(url,data=open("image01.jpg","rb"),headers=headers)
response.raise_for_status()
「url」と「Prediction-Key」には、Custom Visionの「Performance」の「Prediction URL」を選択すると表示されるURLとsubscription_keyを設定します。

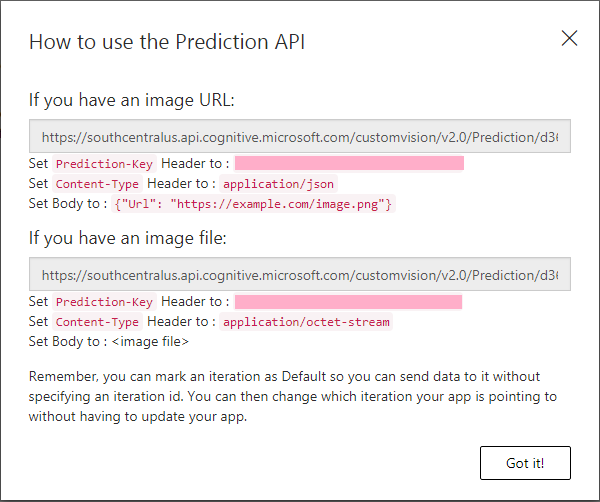
今回はローカルにある画像ファイルを送るため「If you have an image file:」の方を使用します。
また、今回はcontent-typeを「application/octet-stream」にしていますが、画像ファイルをURLで指定する場合は「application.json」にして、URLをBodyにJSON形式で指定します。
最後に、表示方法を記述します。
analysis = response.json()
name, pred = analysis["predictions"][0]["tagName"], analysis["predictions"][0]["probability"]
print(name, pred)
name, pred = analysis["predictions"][1]["tagName"], analysis["predictions"][1]["probability"]
print(name, pred)
取得したresponseは以下のような形式になっています。
{"id": "xxxxxxxx-xxxx-xxxx-xxxx-xxxxxxxxxxxx", "project": "xxxxxxxx-xxxx-xxxx-xxxx-xxxxxxxxxxxx", "iteration": "xxxxxxxx-xxxx-xxxx-xxxx-xxxxxxxxxxxx", "created": "2018-10-28T12:07:38.1175189Z", "predictions": [{"probability": 0.988633335, "tagId": "7fae72ba-fdcc-4b21-bb1f-d3c45114c512", "tagName": "TakeruSato"}, {"probability": 0.0113666914, "tagId": "3af85416-aefc-426b-aeae-3963ddf73977", "tagName": "KazuyaKamenashi"}]}
なので、それぞれのtagNameとprobabilityの値を表示するようにしています。
結果、以下のように表示されます。
TakeruSato 0.988633335
KazuyaKamenashi 0.0113666914
感想
非常に簡単にPrediction APIが使えて驚きました。
これならちょっとした確認でもお気軽に使えそうです。